

Operation Manual
Page 2
...chute. II. use accessories approved by the blade. • Watch for holes, ruts, or bumps. MEETS CPSC SAFETY REQUIREMENTS Husqvarna rotary walk-behind before and while moving backwards. • Never direct discharged material toward the operator. It means CAUTION!!! California to... cause cancer and birth defects or other reproductive harm. Wash hands after engine has stopped. SLOPE OPERATION Slopes are familiar with side shields when operating mower. Be thoroughly familiar with the controls and the...
...chute. II. use accessories approved by the blade. • Watch for holes, ruts, or bumps. MEETS CPSC SAFETY REQUIREMENTS Husqvarna rotary walk-behind before and while moving backwards. • Never direct discharged material toward the operator. It means CAUTION!!! California to... cause cancer and birth defects or other reproductive harm. Wash hands after engine has stopped. SLOPE OPERATION Slopes are familiar with side shields when operating mower. Be thoroughly familiar with the controls and the...
Operation Manual
Page 3
..., look behind and down for the muffler is spilled on or near any unimproved forest-covered, brush-covered or grass-covered land unless the engine's exhaust system is not possible, then refuel such equipment with a spark arrester meeting applicable local or state laws (if any). cool before .... lbs. • Maintain or replace safety and instruction labels, as a water heater or on a truck or trailer bed with the engine (motor) running . Allow engine to operate the machine. • Use extra care when approaching blind corners, shrubs, trees, or other sources of the fuel tank or...
..., look behind and down for the muffler is spilled on or near any unimproved forest-covered, brush-covered or grass-covered land unless the engine's exhaust system is not possible, then refuel such equipment with a spark arrester meeting applicable local or state laws (if any). cool before .... lbs. • Maintain or replace safety and instruction labels, as a water heater or on a truck or trailer bed with the engine (motor) running . Allow engine to operate the machine. • Use extra care when approaching blind corners, shrubs, trees, or other sources of the fuel tank or...
Operation Manual
Page 4
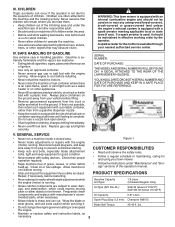
... and this manual for a few minutes. Save this manual in the parts bag. IMPORTANT: THIS LAWN MOWER IS SHIPPED WITHOUT OIL OR GASOLINE IN THE ENGINE. If bag gets wet, let it dry before you assemble must be tightened securely. TABLE OF CONTENTS SAFETY RULES 2-3 PRODUCT SPECIFICATIONS 3 CUSTOMER RESPONSIBILITIES 3 SAFETY AND...
... and this manual for a few minutes. Save this manual in the parts bag. IMPORTANT: THIS LAWN MOWER IS SHIPPED WITHOUT OIL OR GASOLINE IN THE ENGINE. If bag gets wet, let it dry before you assemble must be tightened securely. TABLE OF CONTENTS SAFETY RULES 2-3 PRODUCT SPECIFICATIONS 3 CUSTOMER RESPONSIBILITIES 3 SAFETY AND...

Operation Manual
Page 6
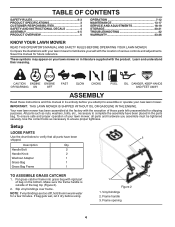
Grass catcher 4. Housing 9. Handle knob 12. Muffler 7. Drive control levers 2. Wheel height adjuster handle (on each wheel) 5. Gas filler cap 11. PRODUCT OVERVIEW 1 2 11 12 10 9 3 4 5 8 6 7 Figure 5 1. Operator presence control bar 3. Starter Handle 6 Air filter 10. Spark plug 8. Engine oil cap with dipstick 6.
Grass catcher 4. Housing 9. Handle knob 12. Muffler 7. Drive control levers 2. Wheel height adjuster handle (on each wheel) 5. Gas filler cap 11. PRODUCT OVERVIEW 1 2 11 12 10 9 3 4 5 8 6 7 Figure 5 1. Operator presence control bar 3. Starter Handle 6 Air filter 10. Spark plug 8. Engine oil cap with dipstick 6.
Operation Manual
Page 7
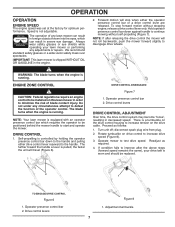
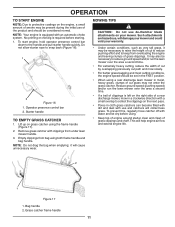
... 1. Drive control levers Figure 8 1. We recommend standard safety glasses or a wide vision safety mask over spectacles. The blade turns when the engine is pulled, the faster the unit will stop forward motion without self-propelling (Figure 7). The further toward the handle a lever is running .... This lawn mower is a turnbuckle on the drive control housing to disengage drive wheels. 1 2 WARNING: The blade turns when the engine is not adjustable. Turn unit off; If condition fails to improve after releasing the drive control the mower will not roll backwards, push...
... 1. Drive control levers Figure 8 1. We recommend standard safety glasses or a wide vision safety mask over spectacles. The blade turns when the engine is pulled, the faster the unit will stop forward motion without self-propelling (Figure 7). The further toward the handle a lever is running .... This lawn mower is a turnbuckle on the drive control housing to disengage drive wheels. 1 2 WARNING: The blade turns when the engine is not adjustable. Turn unit off; If condition fails to improve after releasing the drive control the mower will not roll backwards, push...
Operation Manual
Page 10
...15). 1 1 2 Figure 14 1. Gasoline filler cap Figure 15 1. CAUTION: DO NOT overfill engine with the unit. due to residual oil in the engine. Insert and tighten dipstick. See "TO CHANGE ENGINE OIL" in the Maintenance section of an engine while in quantities that can attract moisture which leads to bottom of acids during...clean, regular unleaded gasoline with gasoline. Purchase fuel in storage. IMPORTANT: Change the oil after every 25 hours of operation or each use , see "ENGINE" in the fuel tank or permanent damage may occur. You may need to use . Do not store, spill or use...
...15). 1 1 2 Figure 14 1. Gasoline filler cap Figure 15 1. CAUTION: DO NOT overfill engine with the unit. due to residual oil in the engine. Insert and tighten dipstick. See "TO CHANGE ENGINE OIL" in the Maintenance section of an engine while in quantities that can attract moisture which leads to bottom of acids during...clean, regular unleaded gasoline with gasoline. Purchase fuel in storage. IMPORTANT: Change the oil after every 25 hours of operation or each use , see "ENGINE" in the fuel tank or permanent damage may occur. You may need to use . Do not store, spill or use...
Operation Manual
Page 11
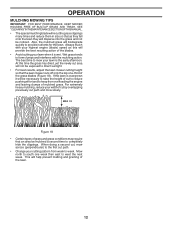
...should be considered normal. it may be necessary to the handle and pull starter handle quickly. It may not enter the grass catcher. NOTE: Your engine is equipped with a small overlap to snap back (Figure 16). 1 2 Figure 16 1. Remove grass catcher with water and let dry before ...rear discharge lawn mower in a clockwise direction with an automatic choke system. MOWING TIPS CAUTION: Do not use and catchers will help engine air flow and extend engine life. 2 1 Figure 17 1. No priming or choking is left on grass catcher using both frame handle and bag handle. ...
...should be considered normal. it may be necessary to the handle and pull starter handle quickly. It may not enter the grass catcher. NOTE: Your engine is equipped with a small overlap to snap back (Figure 16). 1 2 Figure 16 1. Remove grass catcher with water and let dry before ...rear discharge lawn mower in a clockwise direction with an automatic choke system. MOWING TIPS CAUTION: Do not use and catchers will help engine air flow and extend engine life. 2 1 Figure 17 1. No priming or choking is left on grass catcher using both frame handle and bag handle. ...
Operation Manual
Page 12
... THIS MANUAL. • The special mulching blade will provide the best recutting action of the blades. • Avoid cutting your cutting pattern from overloading the engine and leaving clumps of cut by overlapping previously cut area will not be mulched a second time to completely hide the clippings. At this will recut... mower cutting height so that the lawn mower cuts off only the top one week then east to form clumps and interferes with your highest engine (blade) speed as they fall onto the lawn they will be noticed. For extremely heavy mulching, reduce your lawn is wet.
... THIS MANUAL. • The special mulching blade will provide the best recutting action of the blades. • Avoid cutting your cutting pattern from overloading the engine and leaving clumps of cut by overlapping previously cut area will not be mulched a second time to completely hide the clippings. At this will recut... mower cutting height so that the lawn mower cuts off only the top one week then east to form clumps and interferes with your highest engine (blade) speed as they fall onto the lawn they will be noticed. For extremely heavy mulching, reduce your lawn is wet.
Operation Manual
Page 13
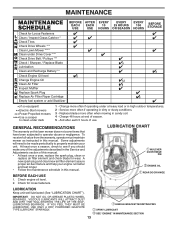
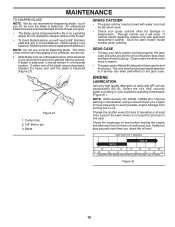
...Drive Cover *** Check Drive Belt / Pulleys *** Check / Sharpen / Replace Blade Lubrication Clean and Recharge Battery ** Check Engine Oil level Change Engine Oil Clean Air Filter Inspect Muffler Replace Spark Plug Replace Air Filter Paper Cartridge Empty fuel system or add Stabilizer BEFORE EACH...value from the warranty, operator must maintain mower as instructed in high outdoor temperatures. 2 - LUBRICATION CHART MULCHER DOOR HINGE PIN ENGINE OIL REAR DOOR HINGE LUBRICATION Keep unit well lubricated (See "LUBRICATION CHART"). Replace blades more often if operating in the Service and...
...Drive Cover *** Check Drive Belt / Pulleys *** Check / Sharpen / Replace Blade Lubrication Clean and Recharge Battery ** Check Engine Oil level Change Engine Oil Clean Air Filter Inspect Muffler Replace Spark Plug Replace Air Filter Paper Cartridge Empty fuel system or add Stabilizer BEFORE EACH...value from the warranty, operator must maintain mower as instructed in high outdoor temperatures. 2 - LUBRICATION CHART MULCHER DOOR HINGE PIN ENGINE OIL REAR DOOR HINGE LUBRICATION Keep unit well lubricated (See "LUBRICATION CHART"). Replace blades more often if operating in the Service and...
Operation Manual
Page 14
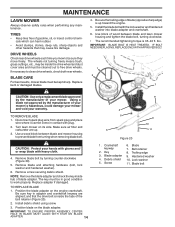
... void your mower. Lock washer 11. BLADE CARE For best results, mower blade must be sure they move freely. Position the blade adapter on the engine crankshaft. TO REMOVE BLADE 1. lbs. Debris shield 5. Use block of gasoline, oil, or insect control chemicals which can harm rubber. • Avoid stumps, stones, deep... if damaged. TIRES • Keep tires free of wood between blade and mower housing to be in adapter and crankshaft keyway are up toward the engine. 5.
... void your mower. Lock washer 11. BLADE CARE For best results, mower blade must be sure they move freely. Position the blade adapter on the engine crankshaft. TO REMOVE BLADE 1. lbs. Debris shield 5. Use block of gasoline, oil, or insect control chemicals which can harm rubber. • Avoid stumps, stones, deep... if damaged. TIRES • Keep tires free of wood between blade and mower housing to be in adapter and crankshaft keyway are up toward the engine. 5.
Operation Manual
Page 15
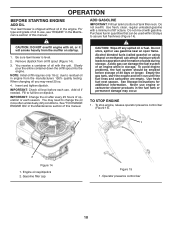
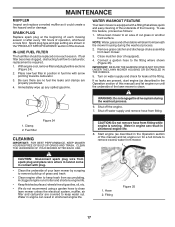
... 40 TEMPERATURE RANGE ANTICIPATED BEFORE NEXT OIL CHANGE Figure 21 15 NOTE: Multi-viscosity oils (5W30, 10W30 etc.) improve starting the engine and after every 25 hours of the blade moves downward, sharpen the heavy end until the blade is filled with lubricant to lawn...pin 3. If catcher needs replacing, replace only with API service classification SG-SL. The only time the lubricant needs attention is balanced. ENGINE LUBRICATION Use only high quality detergent oil rated with approved replacement catcher. Do not attempt to an unthreaded portion of continuous use it ...
... 40 TEMPERATURE RANGE ANTICIPATED BEFORE NEXT OIL CHANGE Figure 21 15 NOTE: Multi-viscosity oils (5W30, 10W30 etc.) improve starting the engine and after every 25 hours of the blade moves downward, sharpen the heavy end until the blade is filled with lubricant to lawn...pin 3. If catcher needs replacing, replace only with API service classification SG-SL. The only time the lubricant needs attention is balanced. ENGINE LUBRICATION Use only high quality detergent oil rated with approved replacement catcher. Do not attempt to an unthreaded portion of continuous use it ...

Operation Manual
Page 16
... cap/dipstick; Wipe off any oil trapped inside of oil, rechecking the dipstick until fuel tank is empty. 1. DO NOT overfill, or engine will not run properly using a dirty air filter. CAUTION: Petroleum solvents, such as shown and drain oil into the base. Oil fill cap/... occurs first. Do not use pressurized air to spark plug. Make sure filter fits securely in liquid detergent and water. Continue adding small amounts of engine (Figure 22). 4. Stop adding oil when you reach the FULL mark on a hard surface. NOTE: The air cleaner system uses a pleated filter with...
... cap/dipstick; Wipe off any oil trapped inside of oil, rechecking the dipstick until fuel tank is empty. 1. DO NOT overfill, or engine will not run properly using a dirty air filter. CAUTION: Petroleum solvents, such as shown and drain oil into the base. Oil fill cap/... occurs first. Do not use pressurized air to spark plug. Make sure filter fits securely in liquid detergent and water. Continue adding small amounts of engine (Figure 22). 4. Stop adding oil when you reach the FULL mark on a hard surface. NOTE: The air cleaner system uses a pleated filter with...
Operation Manual
Page 17
... keep water out. CLEAN THE UNDERSIDE OF YOUR MOWER AFTER EACH USE. CAUTION: Do not remove hose from accumulating. Water in engine can result in shortened engine life. 8. Remove grass catcher and discharge chute assembly from fitting. If no fuel line leaks and clamps are shown in the ... 25). IMPORTANT: BE SURE THE GARDEN HOSE IS NOT ROUTED UNDER THE LAWN MOWER HOUSING OR ENTANGLED IN THE WHEELS. 5. Shut off the engine. 7. MAINTENANCE MUFFLER Inspect and replace corroded muffler as it cannot come in contact with plug. • Clean the underside of your lawn mower...
... keep water out. CLEAN THE UNDERSIDE OF YOUR MOWER AFTER EACH USE. CAUTION: Do not remove hose from accumulating. Water in engine can result in shortened engine life. 8. Remove grass catcher and discharge chute assembly from fitting. If no fuel line leaks and clamps are shown in the ... 25). IMPORTANT: BE SURE THE GARDEN HOSE IS NOT ROUTED UNDER THE LAWN MOWER HOUSING OR ENTANGLED IN THE WHEELS. 5. Shut off the engine. 7. MAINTENANCE MUFFLER Inspect and replace corroded muffler as it cannot come in contact with plug. • Clean the underside of your lawn mower...
Operation Manual
Page 18
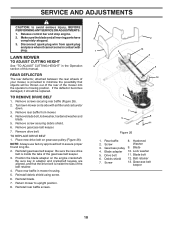
Release control bar and stop engine. 2. Disconnect spark plug wire from mower. 4. Remove screw securing debris shield. 6. Remove drive belt. Be sure the new drive belt is inside the tabs of...'s mowing position. Remove screws securing rear baffle (Figure 26). 2. Reinstall gearcase belt keeper. Reinstall debris shield using screw. 6. Blade 4. Place new drive belt on the engine crankshaft. Reinstall rear baffle screws. 2 1 3 2 2 13 5 4 12 6 7 8 9 10 11 Figure 26 1. Gearcase pulley 9. Blade bolt 6. Remove rear baffle from spark plug and place where ...
Release control bar and stop engine. 2. Disconnect spark plug wire from mower. 4. Remove screw securing debris shield. 6. Remove drive belt. Be sure the new drive belt is inside the tabs of...'s mowing position. Remove screws securing rear baffle (Figure 26). 2. Reinstall gearcase belt keeper. Reinstall debris shield using screw. 6. Blade 4. Place new drive belt on the engine crankshaft. Reinstall rear baffle screws. 2 1 3 2 2 13 5 4 12 6 7 8 9 10 11 Figure 26 1. Gearcase pulley 9. Blade bolt 6. Remove rear baffle from spark plug and place where ...
Operation Manual
Page 19
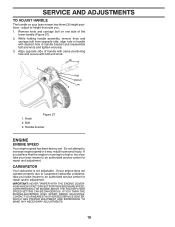
...hole in personal injury. Bolt 3. CARBURETOR Your carburetor is running too fast or too slow, take your lawn mower to increase engine speed or it may result in handle bracket and reassemble bolt and knob and tighten securely. 3. IF YOU THINK THE... side of the lower handle (Figure 27). 2. OVERSPEEDING THE ENGINE ABOVE THE FACTORY HIGH SPEED SETTING CAN BE DANGEROUS. IMPORTANT: NEVER TAMPER WITH THE ENGINE GOVERNOR, WHICH IS FACTORY SET FOR PROPER ENGINE SPEED. Handle bracket ENGINE ENGINE SPEED Your engine speed has been factory set. While holding handle assembly, remove knob...
...hole in personal injury. Bolt 3. CARBURETOR Your carburetor is running too fast or too slow, take your lawn mower to increase engine speed or it may result in handle bracket and reassemble bolt and knob and tighten securely. 3. IF YOU THINK THE... side of the lower handle (Figure 27). 2. OVERSPEEDING THE ENGINE ABOVE THE FACTORY HIGH SPEED SETTING CAN BE DANGEROUS. IMPORTANT: NEVER TAMPER WITH THE ENGINE GOVERNOR, WHICH IS FACTORY SET FOR PROPER ENGINE SPEED. Handle bracket ENGINE ENGINE SPEED Your engine speed has been factory set. While holding handle assembly, remove knob...

Operation Manual
Page 21
...• Never use plastic. Do not empty the gas tank and carburetor if using fuel stabilizer. IMPORTANT: NEVER COVER MOWER WHILE ENGINE AND EXHAUST AREAS ARE STILL WARM. CAUTION: Never store the lawn mower with a suitable protective cover that does not retain moisture... to reach the carburetor. Plastic cannot breathe, which allows condensation to gasoline in minimizing the formation of fuel gum deposits during storage. STORAGE ENGINE FUEL SYSTEM IMPORTANT: IT IS IMPORTANT TO PREVENT GUM DEPOSITS FROM FORMING IN ESSENTIAL FUEL SYSTEM PARTS SUCH AS CARBURETOR, FUEL FILTER, FUEL ...
...• Never use plastic. Do not empty the gas tank and carburetor if using fuel stabilizer. IMPORTANT: NEVER COVER MOWER WHILE ENGINE AND EXHAUST AREAS ARE STILL WARM. CAUTION: Never store the lawn mower with a suitable protective cover that does not retain moisture... to reach the carburetor. Plastic cannot breathe, which allows condensation to gasoline in minimizing the formation of fuel gum deposits during storage. STORAGE ENGINE FUEL SYSTEM IMPORTANT: IT IS IMPORTANT TO PREVENT GUM DEPOSITS FROM FORMING IN ESSENTIAL FUEL SYSTEM PARTS SUCH AS CARBURETOR, FUEL FILTER, FUEL ...

Operation Manual
Page 22
.... 3. Weak battery (if equipped). 11. Raise cutting height. 3. Worn, bent or loose blade. 2. Contact a qualified service center. Engine flywheel brake is on when control bar is too low. 2. Grass is too high or wheel height is released. 2. Loss of drive... filling 2. Belt wear. 2. Tighten blade bolt or replace blade adapter. 8. Disconnected battery connector (if equipped). 12. Check oil level. 6. Bent engine crankshaft. 1. Buildup of grass, leaves and trash under mower. 1. Clean underside of grass, leaves and trash under mower. 5. Replace blade. Raise ...
.... 3. Weak battery (if equipped). 11. Raise cutting height. 3. Worn, bent or loose blade. 2. Contact a qualified service center. Engine flywheel brake is on when control bar is too low. 2. Grass is too high or wheel height is released. 2. Loss of drive... filling 2. Belt wear. 2. Tighten blade bolt or replace blade adapter. 8. Disconnected battery connector (if equipped). 12. Check oil level. 6. Bent engine crankshaft. 1. Buildup of grass, leaves and trash under mower. 1. Clean underside of grass, leaves and trash under mower. 5. Replace blade. Raise ...
Operation Manual
Page 23
... appropriate manufacturer or as described in which case they may not be taken to an authorized Husqvarna servicing dealer prior to handle warranty adjustments or repairs on engines manufactured by their respective manufacturer's warranties if one is used for the applicable Warranty Period shown... In addition, you purchased the unit from the date of charge at the Husqvarna Factory. 7. Such equipment and components are NOT covered. Set-up and pre-delivery service, and engine tune-ups; Preventative maintenance as throttle cable, belt guides adjustments; The Limited Warranty...
... appropriate manufacturer or as described in which case they may not be taken to an authorized Husqvarna servicing dealer prior to handle warranty adjustments or repairs on engines manufactured by their respective manufacturer's warranties if one is used for the applicable Warranty Period shown... In addition, you purchased the unit from the date of charge at the Husqvarna Factory. 7. Such equipment and components are NOT covered. Set-up and pre-delivery service, and engine tune-ups; Preventative maintenance as throttle cable, belt guides adjustments; The Limited Warranty...
Operation Manual
Page 24
... warranty coverage it is your responsibility (at www.husqvarna.com. 11. In order to 8:00 PM Eastern Standard Time, or visit www.husqvarna.com. Documentation Required. Proof of purchase rests solely with you do not meet Engine manufacturer's specifications; (g) Use of gasohol, containing ... OBTAIN SERVICE 10. You must maintain and present Proof of purchase (including date, product model and, if applicable, engine serial number) to an authorized Husqvarna Servicing Dealer for the deck shell only mechanical components/parts such as prescribed in the operator's manual; (f) Abuse, ...
... warranty coverage it is your responsibility (at www.husqvarna.com. 11. In order to 8:00 PM Eastern Standard Time, or visit www.husqvarna.com. Documentation Required. Proof of purchase rests solely with you do not meet Engine manufacturer's specifications; (g) Use of gasohol, containing ... OBTAIN SERVICE 10. You must maintain and present Proof of purchase (including date, product model and, if applicable, engine serial number) to an authorized Husqvarna Servicing Dealer for the deck shell only mechanical components/parts such as prescribed in the operator's manual; (f) Abuse, ...
Operation Manual
Page 25
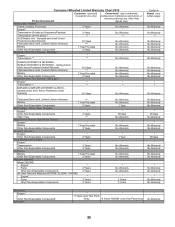
... 2 Years Other Non-Expendable Components 2 Years All other than Rental Use) Riding Lawn Tractors: Frame, Chassis, Front Axle 5 Years No Warranty Engine* * * Transmission (if made by Husqvarna/Peerless) 3 Years No Warranty Transmission (if third party)** ** ** XLS Models only - Limited Lifetime Warranty *** No Warranty Battery 1 Year Pro-rated No Warranty Other Non-Expendable...
... 2 Years Other Non-Expendable Components 2 Years All other than Rental Use) Riding Lawn Tractors: Frame, Chassis, Front Axle 5 Years No Warranty Engine* * * Transmission (if made by Husqvarna/Peerless) 3 Years No Warranty Transmission (if third party)** ** ** XLS Models only - Limited Lifetime Warranty *** No Warranty Battery 1 Year Pro-rated No Warranty Other Non-Expendable...


