

Operation Manual
Page 2
...proper tools to assemble and maintain your nearest authorized service center/ department. The instructions will enable you to service or repair this lawn mower. Safe Operation Practices for the cause. It means CAUTION!!! Avoid discharging material against a wall or obstruction. Stop the blade when...: • Do not trim near or under the influence of the American National Standards Institute and the U.S. MEETS CPSC SAFETY REQUIREMENTS Husqvarna rotary walk-behind before starting the engine (motor). • If the equipment should start to slip and fall accidents which could cause...
...proper tools to assemble and maintain your nearest authorized service center/ department. The instructions will enable you to service or repair this lawn mower. Safe Operation Practices for the cause. It means CAUTION!!! Avoid discharging material against a wall or obstruction. Stop the blade when...: • Do not trim near or under the influence of the American National Standards Institute and the U.S. MEETS CPSC SAFETY REQUIREMENTS Husqvarna rotary walk-behind before starting the engine (motor). • If the equipment should start to slip and fall accidents which could cause...
Operation Manual
Page 3
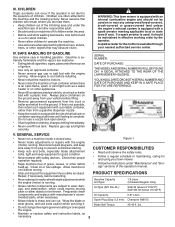
...container opening at all cigarettes, cigars, pipes and other appliances. • Never fill containers inside a closed area. WARNING: This lawn mower is equipped with an internal combustion engine and should be thrown. SERIAL NUMBER DATE OF PURCHASE THE MODEL AND SERIAL NUMBERS WILL ... Follow a regular schedule in maintaining, caring for the muffler is spilled on or near any ). A spark arrester for and using your lawn mower. • Follow the instructions under the watchful care of children. Disconnect spark plug wire, and keep equipment in handling gasoline. Repair, if...
...container opening at all cigarettes, cigars, pipes and other appliances. • Never fill containers inside a closed area. WARNING: This lawn mower is equipped with an internal combustion engine and should be thrown. SERIAL NUMBER DATE OF PURCHASE THE MODEL AND SERIAL NUMBERS WILL ... Follow a regular schedule in maintaining, caring for the muffler is spilled on or near any ). A spark arrester for and using your lawn mower. • Follow the instructions under the watchful care of children. Disconnect spark plug wire, and keep equipment in handling gasoline. Repair, if...
Operation Manual
Page 4
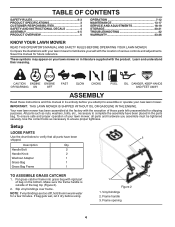
...-19 STORAGE 20-21 TROUBLESHOOTING 22 WARRANTY 23-26 KNOW YOUR LAWN MOWER READ THIS OPERATOR'S MANUAL AND SAFETY RULES BEFORE OPERATING YOUR LAWN MOWER. To ensure safe and proper operation of your lawn mower, all parts have been placed in warm water for shipping purposes... Read these instructions and this manual for future reference. Compare the illustrations with your lawn mower to assemble or operate your lawn mower or in its entirety before using. 1 Figure 2 1. IMPORTANT: THIS LAWN MOWER IS SHIPPED WITHOUT OIL OR GASOLINE IN THE ENGINE. These symbols may appear on ...
...-19 STORAGE 20-21 TROUBLESHOOTING 22 WARRANTY 23-26 KNOW YOUR LAWN MOWER READ THIS OPERATOR'S MANUAL AND SAFETY RULES BEFORE OPERATING YOUR LAWN MOWER. To ensure safe and proper operation of your lawn mower, all parts have been placed in warm water for shipping purposes... Read these instructions and this manual for future reference. Compare the illustrations with your lawn mower to assemble or operate your lawn mower or in its entirety before using. 1 Figure 2 1. IMPORTANT: THIS LAWN MOWER IS SHIPPED WITHOUT OIL OR GASOLINE IN THE ENGINE. These symbols may appear on ...
Operation Manual
Page 5
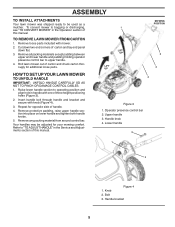
... this manual. 1 LIFT UP LIFT UP MOWING POSITION 2 3 4 Figure 3 1. Handle bracket 5 ASSEMBLY TO INSTALL ATTACHMENTS Your lawn mower was shipped ready to be adjusted for your mowing comfort. Bolt 3. Remove all packing materials except padding between upper and lower handle...control bar to upper handle. 4. Your handles may be used as a mulcher. Knob 2. TO REMOVE LAWN MOWER FROM CARTON 1. Remove loose parts included with mower. 2. Roll lawn mower out of three height positioning holes (Figure 3). 2. Remove protective padding, raise upper handle section into ...
... this manual. 1 LIFT UP LIFT UP MOWING POSITION 2 3 4 Figure 3 1. Handle bracket 5 ASSEMBLY TO INSTALL ATTACHMENTS Your lawn mower was shipped ready to be adjusted for your mowing comfort. Bolt 3. Remove all packing materials except padding between upper and lower handle...control bar to upper handle. 4. Your handles may be used as a mulcher. Knob 2. TO REMOVE LAWN MOWER FROM CARTON 1. Remove loose parts included with mower. 2. Roll lawn mower out of three height positioning holes (Figure 3). 2. Remove protective padding, raise upper handle section into ...
Operation Manual
Page 7
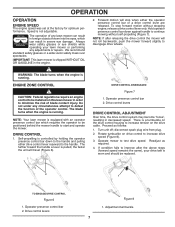
... the faster the unit will stop forward motion without self-propelling (Figure 7). Rotate turnbuckle on drive control to increase tension on this lawn mower in decreased speed. Drive control levers Figure 8 1. Hold operator presence control bar down to the handle and pulling either the operator ...bar or a drive control lever are released. NOTE: If after the above steps (forward speed remains the same), your lawn mower or performing any lawn mower can result in severe eye damage. Drive control levers DRIVE CONTROL ADJUSTMENT Over time, the drive control system may become "...
... the faster the unit will stop forward motion without self-propelling (Figure 7). Rotate turnbuckle on drive control to increase tension on this lawn mower in decreased speed. Drive control levers Figure 8 1. Hold operator presence control bar down to the handle and pulling either the operator ...bar or a drive control lever are released. NOTE: If after the above steps (forward speed remains the same), your lawn mower or performing any lawn mower can result in severe eye damage. Drive control levers DRIVE CONTROL ADJUSTMENT Over time, the drive control system may become "...
Operation Manual
Page 8
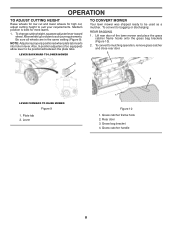
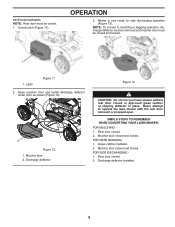
... adjust cutting height to bagging or discharging: REAR BAGGING 1. To change cutting height, squeeze adjuster lever toward wheel. Lift rear door of the lawn mower and place the grass catcher frame hooks onto the grass bag brackets (Figure 10). 2. To convert to be used as a mulcher. Lever ... handle 8 OPERATION TO ADJUST CUTTING HEIGHT Raise wheels for low cut and lower wheels for most lawns. 1. Move wheel up or down to be positioned between the plate tabs. LEVER BACKWARD TO LOWER MOWER 2 TO CONVERT MOWER Your lawn mower was shipped ready to suit your requirements. Rear door 3.
... adjust cutting height to bagging or discharging: REAR BAGGING 1. To change cutting height, squeeze adjuster lever toward wheel. Lift rear door of the lawn mower and place the grass catcher frame hooks onto the grass bag brackets (Figure 10). 2. To convert to be used as a mulcher. Lever ... handle 8 OPERATION TO ADJUST CUTTING HEIGHT Raise wheels for low cut and lower wheels for most lawns. 1. Move wheel up or down to be positioned between the plate tabs. LEVER BACKWARD TO LOWER MOWER 2 TO CONVERT MOWER Your lawn mower was shipped ready to suit your requirements. Rear door 3.
Operation Manual
Page 9
... door closed or approved grass catcher or clipping deflector in place. Mower is now ready for side discharging operation (Figure 13). FOR SIDE DISCHARGING 1. SIMPLE STEPS TO REMEMBER WHEN CONVERTING YOUR LAWN MOWER: FOR MULCHING 1. FOR REAR BAGGING 1. Discharge deflector Figure 13 ...CAUTION: Do not run your lawn mower without rear door closed and locked. Unlock latch (Figure 11). Mulcher door closed...
... door closed or approved grass catcher or clipping deflector in place. Mower is now ready for side discharging operation (Figure 13). FOR SIDE DISCHARGING 1. SIMPLE STEPS TO REMEMBER WHEN CONVERTING YOUR LAWN MOWER: FOR MULCHING 1. FOR REAR BAGGING 1. Discharge deflector Figure 13 ...CAUTION: Do not run your lawn mower without rear door closed and locked. Unlock latch (Figure 11). Mulcher door closed...
Operation Manual
Page 11
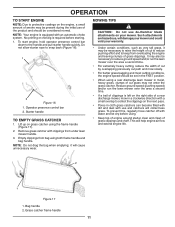
...smoke may be present during the initial use of the product and should be set in the FAST position. • When using a rear discharge lawn mower in cloth grass catchers can become filled with dirt and dust with use de-thatcher blade attachments on your warranty. • Under certain conditions, such... not allow starter rope to the handle and pull starter handle quickly. it may also be necessary to reduce ground speed and/or run the lawn mower over the area a second time. • For extremely heavy cutting, reduce the width of cut by overlapping previously cut path and mow slowly. &#...
...smoke may be present during the initial use of the product and should be set in the FAST position. • When using a rear discharge lawn mower in cloth grass catchers can become filled with dirt and dust with use de-thatcher blade attachments on your warranty. • Under certain conditions, such... not allow starter rope to the handle and pull starter handle quickly. it may also be necessary to reduce ground speed and/or run the lawn mower over the area a second time. • For extremely heavy cutting, reduce the width of cut by overlapping previously cut path and mow slowly. &#...
Operation Manual
Page 12
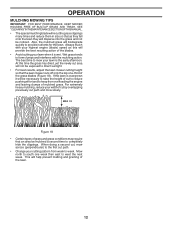
Also, the mulched grass will not be exposed to direct sunlight. • For best results, adjust the lawn mower cutting height so that the lawn mower cuts off only the top one week then east to mow your lawn is wet. The best time to west the next week. OPERATION MULCHING MOWING TIPS IMPORTANT: FOR BEST... PERFORMANCE, KEEP MOWER HOUSING FREE OF BUILT-UP GRASS AND TRASH. Wet grass tends to form clumps ...
Also, the mulched grass will not be exposed to direct sunlight. • For best results, adjust the lawn mower cutting height so that the lawn mower cuts off only the top one week then east to mow your lawn is wet. The best time to west the next week. OPERATION MULCHING MOWING TIPS IMPORTANT: FOR BEST... PERFORMANCE, KEEP MOWER HOUSING FREE OF BUILT-UP GRASS AND TRASH. Wet grass tends to form clumps ...
Operation Manual
Page 13
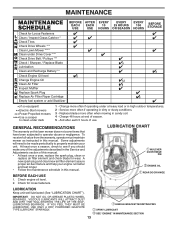
...once a season, check to see if you should make any of the adjustments described in the Service and Adjustments section of this lawn mower does not cover items that have been subjected to operator abuse or negligence. IMPORTANT: DO NOT OIL OR GREASE PLASTIC WHEEL BEARINGS. ...MAINTENANCE Check for Loose Fasteners Clean / Inspect Grass Catcher * Check Tires Check Drive Wheels *** Clean Lawn Mower **** Clean under Drive Cover *** Check Drive Belt / Pulleys *** Check / Sharpen / Replace Blade Lubrication Clean and Recharge Battery ** Check Engine Oil...
...once a season, check to see if you should make any of the adjustments described in the Service and Adjustments section of this lawn mower does not cover items that have been subjected to operator abuse or negligence. IMPORTANT: DO NOT OIL OR GREASE PLASTIC WHEEL BEARINGS. ...MAINTENANCE Check for Loose Fasteners Clean / Inspect Grass Catcher * Check Tires Check Drive Wheels *** Clean Lawn Mower **** Clean under Drive Cover *** Check Drive Belt / Pulleys *** Check / Sharpen / Replace Blade Lubrication Clean and Recharge Battery ** Check Engine Oil...
Operation Manual
Page 14
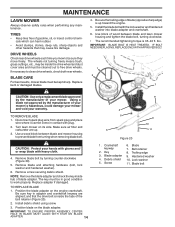
...stones, deep ruts, sharp objects and other hazards that the drive belt is up . 3. CAUTION: Protect your mower. Install debris shield using screw. 3. MAINTENANCE LAWN MOWER Always observe safety rules when performing any maintenance. TIRES • Keep tires free of wood between blade and...20). 5. Disconnect spark plug wire from turning when removing blade bolt. Turn lawn mower on its side. Make sure air filter and carburetor are aligned; Use a wood block between blade and lawn mower housing and tighten the blade bolt, turning clockwise. • The recommended ...
...stones, deep ruts, sharp objects and other hazards that the drive belt is up . 3. CAUTION: Protect your mower. Install debris shield using screw. 3. MAINTENANCE LAWN MOWER Always observe safety rules when performing any maintenance. TIRES • Keep tires free of wood between blade and...20). 5. Disconnect spark plug wire from turning when removing blade bolt. Turn lawn mower on its side. Make sure air filter and carburetor are aligned; Use a wood block between blade and lawn mower housing and tighten the blade bolt, turning clockwise. • The recommended ...
Operation Manual
Page 15
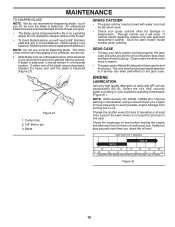
... rated with approved replacement catcher. Blade GRASS CATCHER • The grass catcher may appear to the proper level at least once a year if the lawn mower is if service has been performed on the gear case. If catcher needs replacing, replace only with API service classification SG-SL. Give the... on oil. Center hole 2. 5/8" Bolt or pin 3. Select the oil's SAE viscosity grade according to avoid possible engine damage from running low on to lawn mower or engine. • The blade can be kept clean and free of the steel bolt or pin and hold the bolt or pin parallel with...
... rated with approved replacement catcher. Blade GRASS CATCHER • The grass catcher may appear to the proper level at least once a year if the lawn mower is if service has been performed on the gear case. If catcher needs replacing, replace only with API service classification SG-SL. Give the... on oil. Center hole 2. 5/8" Bolt or pin 3. Select the oil's SAE viscosity grade according to avoid possible engine damage from running low on to lawn mower or engine. • The blade can be kept clean and free of the steel bolt or pin and hold the bolt or pin parallel with...

Operation Manual
Page 16
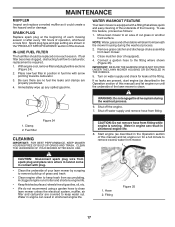
... gently tap the filter on the dipstick. CAUTION: Petroleum solvents, such as shown and drain oil into the base. Fastener 2. Cover 3. Rock lawn mower back and forth to remove any spilled oil from the muffler on startup. 8. DO NOT overfill, or engine will not run properly using a ...cartridge. Do not oil cartridge. Do not use pressurized air to spark plug. Oil fill cap/dipstick 2. AIR FILTER Your engine will smoke heavily from lawn mower or side of engine. 5. NOTE: The air cleaner system uses a pleated filter with fastener. If the filter is tight. 1 2 1 2 Figure 22 ...
... gently tap the filter on the dipstick. CAUTION: Petroleum solvents, such as shown and drain oil into the base. Fastener 2. Cover 3. Rock lawn mower back and forth to remove any spilled oil from the muffler on startup. 8. DO NOT overfill, or engine will not run properly using a ...cartridge. Do not oil cartridge. Do not use pressurized air to spark plug. Oil fill cap/dipstick 2. AIR FILTER Your engine will smoke heavily from lawn mower or side of engine. 5. NOTE: The air cleaner system uses a pleated filter with fastener. If the filter is tight. 1 2 1 2 Figure 22 ...
Operation Manual
Page 17
.... • Keep finished surfaces / wheels free of gasoline, oil, etc. • We do not recommend using a garden hose to clean lawn mower unless the electrical system, muffler, air filter and carburetor are present, start engine (as described in the Operation section of this manual) and let...process. 2. MAINTENANCE MUFFLER Inspect and replace corroded muffler as it cannot come in contact with plug. • Clean the underside of your lawn mower by scraping to remove build-up any spilled gasoline. SPARK PLUG Replace spark plug at the fitting. Connect a garden hose to the fitting...
.... • Keep finished surfaces / wheels free of gasoline, oil, etc. • We do not recommend using a garden hose to clean lawn mower unless the electrical system, muffler, air filter and carburetor are present, start engine (as described in the Operation section of this manual) and let...process. 2. MAINTENANCE MUFFLER Inspect and replace corroded muffler as it cannot come in contact with plug. • Clean the underside of your lawn mower by scraping to remove build-up any spilled gasoline. SPARK PLUG Replace spark plug at the fitting. Connect a garden hose to the fitting...
Operation Manual
Page 18
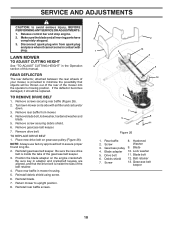
... in adapter and crankshaft keyway are aligned, and that objects will be replaced. Return mower to avoid serious injury, BEFORE PERFORMING ANY SERVICE OR ADJUSTMENTS: 1. Screw Washer 3. LAWN MOWER TO ADJUST CUTTING HEIGHT See "TO ADJUST CUTTING HEIGHT" in contact with air filter ...1. Reinstall rear baffle screws. 2 1 3 2 2 13 5 4 12 6 7 8 9 10 11 Figure 26 1. Hardened 2. Lock washer 5. Screw 13. Turn lawn mower on its side with plug. Reinstall gearcase belt keeper. Release control bar and stop engine. 2. Place new drive belt on the engine crankshaft.
... in adapter and crankshaft keyway are aligned, and that objects will be replaced. Return mower to avoid serious injury, BEFORE PERFORMING ANY SERVICE OR ADJUSTMENTS: 1. Screw Washer 3. LAWN MOWER TO ADJUST CUTTING HEIGHT See "TO ADJUST CUTTING HEIGHT" in contact with air filter ...1. Reinstall rear baffle screws. 2 1 3 2 2 13 5 4 12 6 7 8 9 10 11 Figure 26 1. Hardened 2. Lock washer 5. Screw 13. Turn lawn mower on its side with plug. Reinstall gearcase belt keeper. Release control bar and stop engine. 2. Place new drive belt on the engine crankshaft.
Operation Manual
Page 19
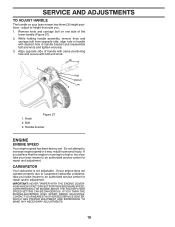
Align opposite side of the lower handle (Figure 27). 2. CARBURETOR Your carburetor is running too fast or too slow, take your lawn mower to an authorized service center for repair and adjustment. IMPORTANT: NEVER TAMPER WITH THE ENGINE GOVERNOR, WHICH IS FACTORY SET FOR PROPER ENGINE SPEED. OVERSPEEDING... engine speed or it may result in handle with bolt and knob. 2 1 High Medium Low 3 Figure 27 1. Remove knob and carriage bolt on your lawn mower to an authorized service center for repair and/or adjustment. Bolt 3. Do not attempt to suspected carburetor problems, take your...
Align opposite side of the lower handle (Figure 27). 2. CARBURETOR Your carburetor is running too fast or too slow, take your lawn mower to an authorized service center for repair and adjustment. IMPORTANT: NEVER TAMPER WITH THE ENGINE GOVERNOR, WHICH IS FACTORY SET FOR PROPER ENGINE SPEED. OVERSPEEDING... engine speed or it may result in handle with bolt and knob. 2 1 High Medium Low 3 Figure 27 1. Remove knob and carriage bolt on your lawn mower to an authorized service center for repair and/or adjustment. Bolt 3. Do not attempt to suspected carburetor problems, take your...
Operation Manual
Page 20
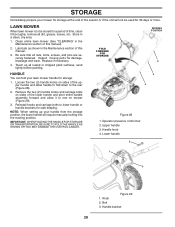
... and pivot entire handle assembly forward and allow handle to fold down to lower handle or handle brackets for 30 days or more. Clean entire lawn mower (See "CLEANING" in the Maintenance section of this manual. 3. Lower handle 2 1 3 Figure 29 1. Lubricate as shown in a clean, dry area. ... for storage. 1. Loosen the two (2) handle knobs on sides of time, clean it to be used for safe keeping. Touch up your lawn mower handle for damage, breakage and wear. Handle bracket 20 Replace if necessary. 4. IMPORTANT: WHEN FOLDING THE HANDLE FOR STORAGE OR TRANSPORTATION, BE...
... and pivot entire handle assembly forward and allow handle to fold down to lower handle or handle brackets for 30 days or more. Clean entire lawn mower (See "CLEANING" in the Maintenance section of this manual. 3. Lower handle 2 1 3 Figure 29 1. Lubricate as shown in a clean, dry area. ... for storage. 1. Loosen the two (2) handle knobs on sides of time, clean it to be used for safe keeping. Touch up your lawn mower handle for damage, breakage and wear. Handle bracket 20 Replace if necessary. 4. IMPORTANT: WHEN FOLDING THE HANDLE FOR STORAGE OR TRANSPORTATION, BE...

Operation Manual
Page 21
... at least 10 minutes after adding stabilizer to allow the stabilizer to rust. Remove spark plug. 2. IMPORTANT: NEVER COVER MOWER WHILE ENGINE AND EXHAUST AREAS ARE STILL WARM. CAUTION: Never store the lawn mower with new spark plug. ALCOHOL BLENDED FUELS (CALLED GASOHOL OR USING ETHANOL OR METHANOL) CAN ATTRACT MOISTURE WHICH LEADS...
... at least 10 minutes after adding stabilizer to allow the stabilizer to rust. Remove spark plug. 2. IMPORTANT: NEVER COVER MOWER WHILE ENGINE AND EXHAUST AREAS ARE STILL WARM. CAUTION: Never store the lawn mower with new spark plug. ALCOHOL BLENDED FUELS (CALLED GASOHOL OR USING ETHANOL OR METHANOL) CAN ATTRACT MOISTURE WHICH LEADS...

Operation Manual
Page 22
.... 8. Control bar in fuel. 4. Connect battery to the ON position. 11. Loss of lawn mower housing or cutting blade dragging in heavy grass. 2. Buildup of mower housing. Raise cutting height. 3. Poor cut grass or other hard surface before pulling starter rope....filter. 1. Dirty air filter. 4. uneven 1. Excessive vibration 1. Bent engine crankshaft. 3. Replace blade. 3. Put belt on blade worn off of lawn mower housing one (1) setting higher. 3. Loose blade or broken blade adapter. 7. Turn fuel valve lever to engine. 13. Lift on pulleys/replace belts...
.... 8. Control bar in fuel. 4. Connect battery to the ON position. 11. Loss of lawn mower housing or cutting blade dragging in heavy grass. 2. Buildup of mower housing. Raise cutting height. 3. Poor cut grass or other hard surface before pulling starter rope....filter. 1. Dirty air filter. 4. uneven 1. Excessive vibration 1. Bent engine crankshaft. 3. Replace blade. 3. Put belt on blade worn off of lawn mower housing one (1) setting higher. 3. Loose blade or broken blade adapter. 7. Turn fuel valve lever to engine. 13. Lift on pulleys/replace belts...
Parts List
Page 3
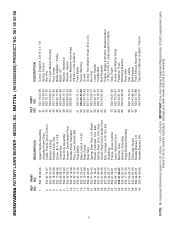
...Hinge Bracket Assembly Screw Discharge Guard Handle Bracket, LH Handle Bracket, RH KEY PART NO. MODEL NO. HUSQVARNA ROTARY LAWN MOWER - NO. 41 532 15 04-06 42 532 19 30-00 43 532 19 17-30 44 ...99 532 43 73-89 - - 532 44 59-70 DESCRIPTION Screw, Dogpoint 3/8-16 x 1-1/8 Spring, Torsion Nut, Hex Kit, Lawn Mower Housing Rod, Hinge Blade Adapter / Pulley Blade, 22" Washer, Hardened Washer, Helical Screw, Machine, Hex Head 3/8-24 x 1-3/8 Grade... Operator's Manual, English / French 3 NOTE: All component dimensions given in U.S. HU775L (96145000800) PRODUCT NO. 961 45 00-08 KEY PART NO.
...Hinge Bracket Assembly Screw Discharge Guard Handle Bracket, LH Handle Bracket, RH KEY PART NO. MODEL NO. HUSQVARNA ROTARY LAWN MOWER - NO. 41 532 15 04-06 42 532 19 30-00 43 532 19 17-30 44 ...99 532 43 73-89 - - 532 44 59-70 DESCRIPTION Screw, Dogpoint 3/8-16 x 1-1/8 Spring, Torsion Nut, Hex Kit, Lawn Mower Housing Rod, Hinge Blade Adapter / Pulley Blade, 22" Washer, Hardened Washer, Helical Screw, Machine, Hex Head 3/8-24 x 1-3/8 Grade... Operator's Manual, English / French 3 NOTE: All component dimensions given in U.S. HU775L (96145000800) PRODUCT NO. 961 45 00-08 KEY PART NO.


