

Operation Manual
Page 2
...not trim near or under the influence of accessories. MEETS CPSC SAFETY REQUIREMENTS Husqvarna rotary walk-behind before starting . Should you experience any problem you cannot easily remedy, please contact your lawn mower properly. Always wear substantial foot wear. It means CAUTION!!! II. GENERAL ...wet grass. If you to the State of the American National Standards Institute and the U.S. Keep clear of a new lawn mower. Always observe the "SAFETY RULES". WARNING: Battery posts, terminals and related accessories contain lead and lead compounds, chemicals ...
...not trim near or under the influence of accessories. MEETS CPSC SAFETY REQUIREMENTS Husqvarna rotary walk-behind before starting . Should you experience any problem you cannot easily remedy, please contact your lawn mower properly. Always wear substantial foot wear. It means CAUTION!!! II. GENERAL ...wet grass. If you to the State of the American National Standards Institute and the U.S. Keep clear of a new lawn mower. Always observe the "SAFETY RULES". WARNING: Battery posts, terminals and related accessories contain lead and lead compounds, chemicals ...
Operation Manual
Page 3
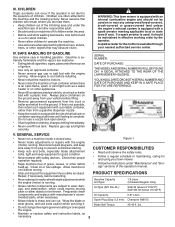
... operator. SERIAL NUMBER DATE OF PURCHASE THE MODEL AND SERIAL NUMBERS WILL BE FOUND ON A DECAL ATTACHED TO THE REAR OF THE LAWN MOWER HOUSING. cool before restarting. Always place containers on the ground away from your vehicle before refueling. • Never refuel the machine ...your nearest authorized service center. IV. SAFE HANDLING OF GASOLINE Use extreme care in maintaining, caring for the muffler is available through your lawn mower. • Follow the instructions under the watchful care of ignition. • Use only an approved container. • Never remove ...
... operator. SERIAL NUMBER DATE OF PURCHASE THE MODEL AND SERIAL NUMBERS WILL BE FOUND ON A DECAL ATTACHED TO THE REAR OF THE LAWN MOWER HOUSING. cool before restarting. Always place containers on the ground away from your vehicle before refueling. • Never refuel the machine ...your nearest authorized service center. IV. SAFE HANDLING OF GASOLINE Use extreme care in maintaining, caring for the muffler is available through your lawn mower. • Follow the instructions under the watchful care of ignition. • Use only an approved container. • Never remove ...
Operation Manual
Page 4
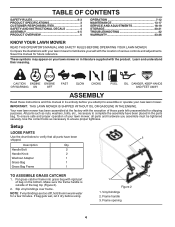
... SHIPPED WITHOUT OIL OR GASOLINE IN THE ENGINE. Description Qty. Make sure the frame handle is outside of bag on your lawn mower to familiarize yourself with rigid part of the bag top (Figure 2). 2. TABLE OF CONTENTS SAFETY RULES 2-3 PRODUCT SPECIFICATIONS 3 CUSTOMER RESPONSIBILITIES 3 SAFETY... complete the assembly have been 2 shipped. Use the correct tools as nuts, washers, bolts, etc., necessary to assemble or operate your lawn mower, all parts have been placed in the parts bag. Setup LOOSE PARTS Use the chart below to ensure proper tightness. NOTE: If vinyl...
... SHIPPED WITHOUT OIL OR GASOLINE IN THE ENGINE. Description Qty. Make sure the frame handle is outside of bag on your lawn mower to familiarize yourself with rigid part of the bag top (Figure 2). 2. TABLE OF CONTENTS SAFETY RULES 2-3 PRODUCT SPECIFICATIONS 3 CUSTOMER RESPONSIBILITIES 3 SAFETY... complete the assembly have been 2 shipped. Use the correct tools as nuts, washers, bolts, etc., necessary to assemble or operate your lawn mower, all parts have been placed in the parts bag. Setup LOOSE PARTS Use the chart below to ensure proper tightness. NOTE: If vinyl...
Operation Manual
Page 5
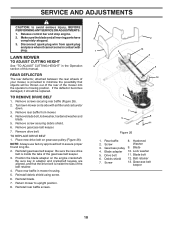
Remove protective padding, raise upper handle section into place on lower handle and tighten both handle knobs. 5. TO REMOVE LAWN MOWER FROM CARTON 1. Remove loose parts included with knob (Figure 4). 3. Your handles may be used as a mulcher. Refer to... PINCH OR DAMAGE CONTROL CABLES. 1. Handle bracket 5 Roll lawn mower out of three height positioning holes (Figure 3). 2. ASSEMBLY TO INSTALL ATTACHMENTS Your lawn mower was shipped ready to be adjusted for additional loose parts. To convert mower to upper handle. 4. Remove all packing materials except padding ...
Remove protective padding, raise upper handle section into place on lower handle and tighten both handle knobs. 5. TO REMOVE LAWN MOWER FROM CARTON 1. Remove loose parts included with knob (Figure 4). 3. Your handles may be used as a mulcher. Refer to... PINCH OR DAMAGE CONTROL CABLES. 1. Handle bracket 5 Roll lawn mower out of three height positioning holes (Figure 3). 2. ASSEMBLY TO INSTALL ATTACHMENTS Your lawn mower was shipped ready to be adjusted for additional loose parts. To convert mower to upper handle. 4. Remove all packing materials except padding ...
Operation Manual
Page 7
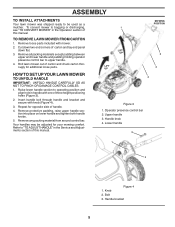
...operating your drive belt is running . To stop when either drive control lever rearward to test drive speed. Rotate turnbuckle on this lawn mower in foreign objects thrown into the eyes, which requires the operator to be installed on drive control to disengage drive wheels. 1 ...1 2 1 TO ENGAGE DRIVE CONTROL Figure 6 1. NOTE: If after the above steps (forward speed remains the same), your lawn mower or performing any lawn mower can result in order to defeat the function of any adjustments or repairs. Drive control levers DRIVE CONTROL ADJUSTMENT Over time, the ...
...operating your drive belt is running . To stop when either drive control lever rearward to test drive speed. Rotate turnbuckle on this lawn mower in foreign objects thrown into the eyes, which requires the operator to be installed on drive control to disengage drive wheels. 1 ...1 2 1 TO ENGAGE DRIVE CONTROL Figure 6 1. NOTE: If after the above steps (forward speed remains the same), your lawn mower or performing any lawn mower can result in order to defeat the function of any adjustments or repairs. Drive control levers DRIVE CONTROL ADJUSTMENT Over time, the ...
Operation Manual
Page 8
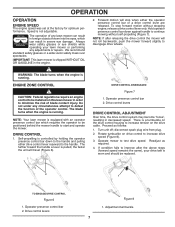
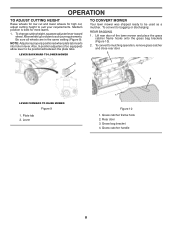
...operation, remove grass catcher and close rear door. 2 3 1 4 LEVER FORWARD TO RAISE MOWER Figure 9 1. Lever 1 Figure 10 1. Grass catcher handle 8 LEVER BACKWARD TO LOWER MOWER 2 TO CONVERT MOWER Your lawn mower was shipped ready to be positioned between the plate tabs. To convert to bagging or discharging: ...Grass bag bracket 4. Also, 9-position adjusters (if so equipped) allow lever to be used as a mulcher. Lift rear door of the lawn mower and place the grass catcher frame hooks onto the grass bag brackets (Figure 10). 2. OPERATION TO ADJUST CUTTING HEIGHT Raise wheels for low...
...operation, remove grass catcher and close rear door. 2 3 1 4 LEVER FORWARD TO RAISE MOWER Figure 9 1. Lever 1 Figure 10 1. Grass catcher handle 8 LEVER BACKWARD TO LOWER MOWER 2 TO CONVERT MOWER Your lawn mower was shipped ready to be positioned between the plate tabs. To convert to bagging or discharging: ...Grass bag bracket 4. Also, 9-position adjusters (if so equipped) allow lever to be used as a mulcher. Lift rear door of the lawn mower and place the grass catcher frame hooks onto the grass bag brackets (Figure 10). 2. OPERATION TO ADJUST CUTTING HEIGHT Raise wheels for low...
Operation Manual
Page 9
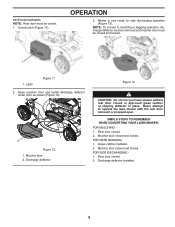
...deflector under door as shown (Figure 12). 1 2 Figure 12 1. Mulcher door 2. Grass catcher installed. 2. NOTE: To convert to operate the lawn mower with the rear door removed or propped open. Mulcher door closed and locked. 1 1. Mulcher door closed . 1. Discharge deflector installed. 9 SIDE ...and mulcher door must be closed and locked. SIMPLE STEPS TO REMEMBER WHEN CONVERTING YOUR LAWN MOWER: FOR MULCHING 1. Discharge deflector Figure 13 CAUTION: Do not run your lawn mower without rear door closed or approved grass catcher or clipping deflector in place. FOR REAR ...
...deflector under door as shown (Figure 12). 1 2 Figure 12 1. Mulcher door 2. Grass catcher installed. 2. NOTE: To convert to operate the lawn mower with the rear door removed or propped open. Mulcher door closed and locked. 1 1. Mulcher door closed . 1. Discharge deflector installed. 9 SIDE ...and mulcher door must be closed and locked. SIMPLE STEPS TO REMEMBER WHEN CONVERTING YOUR LAWN MOWER: FOR MULCHING 1. Discharge deflector Figure 13 CAUTION: Do not run your lawn mower without rear door closed or approved grass catcher or clipping deflector in place. FOR REAR ...
Operation Manual
Page 11
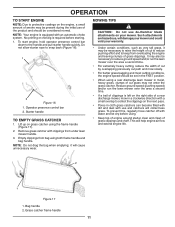
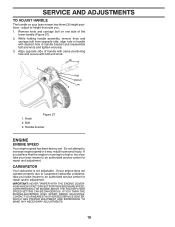
... and extend engine life. 2 1 Figure 17 1. To start engine, hold operator presence control bar down to reduce ground speed and/or run the lawn mower over the area a second time. • For extremely heavy cutting, reduce the width of cut by overlapping previously cut path and mow slowly. •.... It may be necessary to the handle and pull starter handle quickly. Bag handle 2. NOTE: Your engine is required before using a rear discharge lawn mower in the FAST position. • When using . • Keep top of engine around starter clear and clean of cut grass may not enter ...
... and extend engine life. 2 1 Figure 17 1. To start engine, hold operator presence control bar down to reduce ground speed and/or run the lawn mower over the area a second time. • For extremely heavy cutting, reduce the width of cut by overlapping previously cut path and mow slowly. •.... It may be necessary to the handle and pull starter handle quickly. Bag handle 2. NOTE: Your engine is required before using a rear discharge lawn mower in the FAST position. • When using . • Keep top of engine around starter clear and clean of cut grass may not enter ...
Operation Manual
Page 12
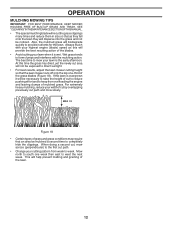
... This will not be mulched a second time to the first cut path and mow slowly. Always mulch with the mulching action. If the lawn is overgrown it is the early afternoon. When doing a second cut, mow across (perpendicular) to completely hide the clippings. For extremely heavy...to direct sunlight. • For best results, adjust the lawn mower cutting height so that the lawn mower cuts off only the top one week then east to provide nutrients for the lawn. OPERATION MULCHING MOWING TIPS IMPORTANT: FOR BEST PERFORMANCE, KEEP MOWER HOUSING FREE OF BUILT-UP GRASS AND TRASH. Also, ...
... This will not be mulched a second time to the first cut path and mow slowly. Always mulch with the mulching action. If the lawn is overgrown it is the early afternoon. When doing a second cut, mow across (perpendicular) to completely hide the clippings. For extremely heavy...to direct sunlight. • For best results, adjust the lawn mower cutting height so that the lawn mower cuts off only the top one week then east to provide nutrients for the lawn. OPERATION MULCHING MOWING TIPS IMPORTANT: FOR BEST PERFORMANCE, KEEP MOWER HOUSING FREE OF BUILT-UP GRASS AND TRASH. Also, ...
Operation Manual
Page 13
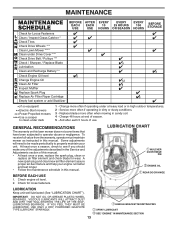
...Keep unit well lubricated (See "LUBRICATION CHART"). MAINTENANCE Check for Loose Fasteners Clean / Inspect Grass Catcher * Check Tires Check Drive Wheels *** Clean Lawn Mower **** Clean under Drive Cover *** Check Drive Belt / Pulleys *** Check / Sharpen / Replace Blade Lubrication Clean and Recharge Battery ** Check Engine ...Service more often if operating under a heavy load or in dirty or dusty conditions. 3 - GENERAL RECOMMENDATIONS The warranty on this lawn mower does not cover items that have been subjected to see if you should make any of the adjustments described in this manual. To ...
...Keep unit well lubricated (See "LUBRICATION CHART"). MAINTENANCE Check for Loose Fasteners Clean / Inspect Grass Catcher * Check Tires Check Drive Wheels *** Clean Lawn Mower **** Clean under Drive Cover *** Check Drive Belt / Pulleys *** Check / Sharpen / Replace Blade Lubrication Clean and Recharge Battery ** Check Engine ...Service more often if operating under a heavy load or in dirty or dusty conditions. 3 - GENERAL RECOMMENDATIONS The warranty on this lawn mower does not cover items that have been subjected to see if you should make any of the adjustments described in this manual. To ...
Operation Manual
Page 14
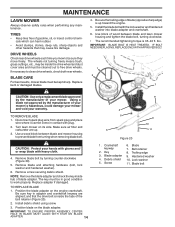
... that the drive belt is up . 3. Make sure air filter and carburetor are aligned; CAUTION: Protect your mower. Replace adapter if damaged. Blade adapter 4. Screw 6. Turn lawn mower on its side. Install debris shield using screw. 3. TIRES • Keep tires free of your hands with gloves... and/ or wrap blade with heavy cloth. 4. Crankshaft keyway 2. MAINTENANCE LAWN MOWER Always observe safety rules when performing any maintenance. DRIVE WHEELS Check rear drive wheels each time you mow to be cleaned out to clean ...
... that the drive belt is up . 3. Make sure air filter and carburetor are aligned; CAUTION: Protect your mower. Replace adapter if damaged. Blade adapter 4. Screw 6. Turn lawn mower on its side. Install debris shield using screw. 3. TIRES • Keep tires free of your hands with gloves... and/ or wrap blade with heavy cloth. 4. Crankshaft keyway 2. MAINTENANCE LAWN MOWER Always observe safety rules when performing any maintenance. DRIVE WHEELS Check rear drive wheels each time you mow to be cleaned out to clean ...
Operation Manual
Page 15
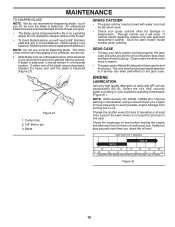
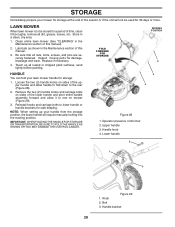
... RANGE ANTICIPATED BEFORE NEXT OIL CHANGE Figure 21 15 If blade is balanced. GEAR CASE • To keep your engine oil level frequently to lawn mower or engine. • The blade can be kept clean and free of the center hole may be hosed with balancer.) NOTE: Do not ...using a cone balancer, follow the instructions supplied with water, but are not. 1. Do not attempt to the proper level at least once a year if the lawn mower is balanced (Figure 21). 1 2 3 Figure 21 1. Select the oil's SAE viscosity grade according to an unthreaded portion of continuous use a nail for ...
... RANGE ANTICIPATED BEFORE NEXT OIL CHANGE Figure 21 15 If blade is balanced. GEAR CASE • To keep your engine oil level frequently to lawn mower or engine. • The blade can be kept clean and free of the center hole may be hosed with balancer.) NOTE: Do not ...using a cone balancer, follow the instructions supplied with water, but are not. 1. Do not attempt to the proper level at least once a year if the lawn mower is balanced (Figure 21). 1 2 3 Figure 21 1. Select the oil's SAE viscosity grade according to an unthreaded portion of continuous use a nail for ...

Operation Manual
Page 16
... plug. 2. Fastener 2. Always be used to retighten oil dipstick before starting engine. 9. AIR FILTER Your engine will smoke heavily from lawn mower or side of oil, rechecking the dipstick until fuel tank is empty. 1. CAUTION: Petroleum solvents, such as shown and drain oil ... deterioration of operation or every season, whichever occurs first. Make sure the fastener is excessively dirty, replace with the dipstick. 6. Tip lawn mower on its side as kerosene, are not to be sure to clean cartridge. Cover 3. Filter 4. Replace paper cartridge every 100 hours ...
... plug. 2. Fastener 2. Always be used to retighten oil dipstick before starting engine. 9. AIR FILTER Your engine will smoke heavily from lawn mower or side of oil, rechecking the dipstick until fuel tank is empty. 1. CAUTION: Petroleum solvents, such as shown and drain oil ... deterioration of operation or every season, whichever occurs first. Make sure the fastener is excessively dirty, replace with the dipstick. 6. Tip lawn mower on its side as kerosene, are not to be sure to clean cartridge. Cover 3. Filter 4. Replace paper cartridge every 100 hours ...
Operation Manual
Page 17
.... • Keep finished surfaces / wheels free of gasoline, oil, etc. • We do not recommend using a garden hose to clean lawn mower unless the electrical system, muffler, air filter and carburetor are properly positioned. 4. Hose 2. MAINTENANCE MUFFLER Inspect and replace corroded muffler as it cannot... come in contact with plug. • Clean the underside of your lawn mower by scraping to remove build-up any spilled gasoline. SPARK PLUG Replace spark plug at the fitting. Spark plug type and gap setting...
.... • Keep finished surfaces / wheels free of gasoline, oil, etc. • We do not recommend using a garden hose to clean lawn mower unless the electrical system, muffler, air filter and carburetor are properly positioned. 4. Hose 2. MAINTENANCE MUFFLER Inspect and replace corroded muffler as it cannot... come in contact with plug. • Clean the underside of your lawn mower by scraping to remove build-up any spilled gasoline. SPARK PLUG Replace spark plug at the fitting. Spark plug type and gap setting...
Operation Manual
Page 18
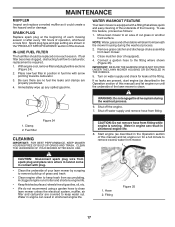
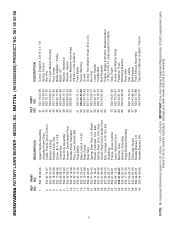
... 2 1 3 2 2 13 5 4 12 6 7 8 9 10 11 Figure 26 1. Screw Washer 3. Gearcase pulley 9. Drive belt 11. Debris shield 12. Belt retainer 7. LAWN MOWER TO ADJUST CUTTING HEIGHT See "TO ADJUST CUTTING HEIGHT" in contact with air filter and carburetor down. 3. If the deflector becomes damaged, it cannot come... Place rear baffle in adapter and crankshaft keyway are aligned, and that objects will be replaced. Gearcase belt keeper 18 Turn lawn mower on gearcase pulley (Figure 26). NOTE: Always use factory approved belt to minimize the possibility that the drive belt is inside ...
... 2 1 3 2 2 13 5 4 12 6 7 8 9 10 11 Figure 26 1. Screw Washer 3. Gearcase pulley 9. Drive belt 11. Debris shield 12. Belt retainer 7. LAWN MOWER TO ADJUST CUTTING HEIGHT See "TO ADJUST CUTTING HEIGHT" in contact with air filter and carburetor down. 3. If the deflector becomes damaged, it cannot come... Place rear baffle in adapter and crankshaft keyway are aligned, and that objects will be replaced. Gearcase belt keeper 18 Turn lawn mower on gearcase pulley (Figure 26). NOTE: Always use factory approved belt to minimize the possibility that the drive belt is inside ...
Operation Manual
Page 19
...bracket ENGINE ENGINE SPEED Your engine speed has been factory set. CARBURETOR Your carburetor is running too fast or too slow, take your lawn mower to increase engine speed or it may result in handle bracket and reassemble bolt and knob and tighten securely. 3. Do not attempt ...to an authorized service center for repair and adjustment. Remove knob and carriage bolt on your lawn mower to height that suits you believe that the engine is not adjustable. While holding handle assembly, remove knob and carriage bolt from opposite ...
...bracket ENGINE ENGINE SPEED Your engine speed has been factory set. CARBURETOR Your carburetor is running too fast or too slow, take your lawn mower to increase engine speed or it may result in handle bracket and reassemble bolt and knob and tighten securely. 3. Do not attempt ...to an authorized service center for repair and adjustment. Remove knob and carriage bolt on your lawn mower to height that suits you believe that the engine is not adjustable. While holding handle assembly, remove knob and carriage bolt from opposite ...
Operation Manual
Page 20
...pivot entire handle assembly forward and allow handle to fold down to lower handle or handle brackets for damage, breakage and wear. LAWN MOWER When lawn mower is to be stored for a period of the season or if the unit will require manually locking into the mowing position....chipped paint surfaces; Lubricate as shown in the Maintenance section of this manual. 3. Touch up your lawn mower handle for 30 days or more. Reinstall knobs and carriage bolts to the rear (Figure 28). 2. Clean entire lawn mower (See "CLEANING" in a clean, dry area. 1. Replace if necessary. 4. Bolt 3. ...
...pivot entire handle assembly forward and allow handle to fold down to lower handle or handle brackets for damage, breakage and wear. LAWN MOWER When lawn mower is to be stored for a period of the season or if the unit will require manually locking into the mowing position....chipped paint surfaces; Lubricate as shown in the Maintenance section of this manual. 3. Touch up your lawn mower handle for 30 days or more. Reinstall knobs and carriage bolts to the rear (Figure 28). 2. Clean entire lawn mower (See "CLEANING" in a clean, dry area. 1. Replace if necessary. 4. Bolt 3. ...

Operation Manual
Page 21
...store your unit with gasoline in the tank inside a building where fumes may occur. • Use fresh fuel next season. IMPORTANT: NEVER COVER MOWER WHILE ENGINE AND EXHAUST AREAS ARE STILL WARM. Allow the engine to distribute oil. 4. Replace with clean engine oil. (See "ENGINE" in minimizing... times to cool before storing in the fuel tank or permanent damage may reach an open flame or spark. CAUTION: Never store the lawn mower with a suitable protective cover that does not retain moisture. Add stabilizer to reach the carburetor. Run engine at least 10 minutes after ...
...store your unit with gasoline in the tank inside a building where fumes may occur. • Use fresh fuel next season. IMPORTANT: NEVER COVER MOWER WHILE ENGINE AND EXHAUST AREAS ARE STILL WARM. Allow the engine to distribute oil. 4. Replace with clean engine oil. (See "ENGINE" in minimizing... times to cool before storing in the fuel tank or permanent damage may reach an open flame or spark. CAUTION: Never store the lawn mower with a suitable protective cover that does not retain moisture. Add stabilizer to reach the carburetor. Run engine at least 10 minutes after ...

Operation Manual
Page 22
...if so equipped) 3. TROUBLESHOOTING POINTS PROBLEM CAUSE CORRECTION Does not start 1. Walking speed too fast. 1. Tighten blade bolt. 2. Move lawn mower to push 1. not filling 2. Rear of drive speed) 1. Raise cutting height. 2. Adjust handle height to plug. 6. Put belt ...12. Raise cutting height. 2. Worn, bent or loose blade. 2. Replace blade. Grass catcher 1. Connect wire to suit. Loss of lawn mower housing one (1) setting higher. 3. Raise cutting height. 3. Excessive vibration 1. Bent engine crankshaft. 3. Lift on pulleys/replace belts if ...
...if so equipped) 3. TROUBLESHOOTING POINTS PROBLEM CAUSE CORRECTION Does not start 1. Walking speed too fast. 1. Tighten blade bolt. 2. Move lawn mower to push 1. not filling 2. Rear of drive speed) 1. Raise cutting height. 2. Adjust handle height to plug. 6. Put belt ...12. Raise cutting height. 2. Worn, bent or loose blade. 2. Replace blade. Grass catcher 1. Connect wire to suit. Loss of lawn mower housing one (1) setting higher. 3. Raise cutting height. 3. Excessive vibration 1. Bent engine crankshaft. 3. Lift on pulleys/replace belts if ...
Parts List
Page 3
...Grass Catcher Latch, Mulcher Door Mulcher Door Bracket, Grassbag Hinge Bracket Assembly Screw Discharge Guard Handle Bracket, LH Handle Bracket, RH KEY PART NO. HUSQVARNA ROTARY LAWN MOWER - HU775L (96145000800) PRODUCT NO. 961 45 00-08 KEY PART NO. MODEL NO. NO. 41 532 15 04-06 42 532 19 30-00 ...79-91 97 532 43 48-93 99 532 43 73-89 - - 532 44 59-70 DESCRIPTION Screw, Dogpoint 3/8-16 x 1-1/8 Spring, Torsion Nut, Hex Kit, Lawn Mower Housing Rod, Hinge Blade Adapter / Pulley Blade, 22" Washer, Hardened Washer, Helical Screw, Machine, Hex Head 3/8-24 x 1-3/8 Grade 8 Front Baffle Decal, ...
...Grass Catcher Latch, Mulcher Door Mulcher Door Bracket, Grassbag Hinge Bracket Assembly Screw Discharge Guard Handle Bracket, LH Handle Bracket, RH KEY PART NO. HUSQVARNA ROTARY LAWN MOWER - HU775L (96145000800) PRODUCT NO. 961 45 00-08 KEY PART NO. MODEL NO. NO. 41 532 15 04-06 42 532 19 30-00 ...79-91 97 532 43 48-93 99 532 43 73-89 - - 532 44 59-70 DESCRIPTION Screw, Dogpoint 3/8-16 x 1-1/8 Spring, Torsion Nut, Hex Kit, Lawn Mower Housing Rod, Hinge Blade Adapter / Pulley Blade, 22" Washer, Hardened Washer, Helical Screw, Machine, Hex Head 3/8-24 x 1-3/8 Grade 8 Front Baffle Decal, ...


