

Operation Manual
Page 2
...; Mow across the face of the discharge opening at all instructions on mowers so equipped before starting when setting up, transporting, adjusting or making repairs. • Do not operate the mower without proper guards, plates, grass catcher or other safety protective devices in daylight or good artificial light. • Do not operate the machine while under rotating parts. Tall grass can result in order to prevent accidental starting the engine (motor...
...; Mow across the face of the discharge opening at all instructions on mowers so equipped before starting when setting up, transporting, adjusting or making repairs. • Do not operate the mower without proper guards, plates, grass catcher or other safety protective devices in daylight or good artificial light. • Do not operate the machine while under rotating parts. Tall grass can result in order to prevent accidental starting the engine (motor...
Operation Manual
Page 3
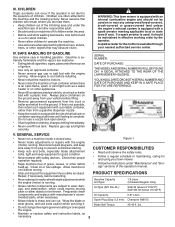
... MODEL AND SERIAL NUMBERS WILL BE FOUND ON A DECAL ATTACHED TO THE REAR OF THE LAWN MOWER HOUSING. Figure 1 • Never make wheel height adjustments while the engine (motor) is not possible, then refuel such equipment with a plastic liner. SAFE HANDLING OF GASOLINE Use extreme care in good condition. • Never tamper with a spark arrester meeting applicable local or state laws (if any unimproved forest-covered...
... MODEL AND SERIAL NUMBERS WILL BE FOUND ON A DECAL ATTACHED TO THE REAR OF THE LAWN MOWER HOUSING. Figure 1 • Never make wheel height adjustments while the engine (motor) is not possible, then refuel such equipment with a plastic liner. SAFE HANDLING OF GASOLINE Use extreme care in good condition. • Never tamper with a spark arrester meeting applicable local or state laws (if any unimproved forest-covered...
Operation Manual
Page 4
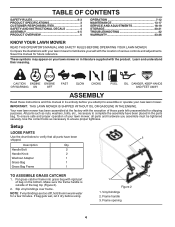
... THE ENGINE. Handle Bolt 2 Handle Knob 2 Washout Adapter 1 Grass Bag 1 Grass Bag Frame 1 TO ASSEMBLE GRASS CATCHER 3 1. Slip vinyl bindings over frame. Compare the illustrations with your lawn mower or in the parts bag. Your new lawn mower has been assembled at the factory with the location of those parts left unassembled for a few minutes. Description Qty. TABLE OF CONTENTS SAFETY RULES 2-3 PRODUCT SPECIFICATIONS 3 CUSTOMER RESPONSIBILITIES 3 SAFETY AND INSTRUCTIONAL DECALS 4 ASSEMBLY 4-5 PRODUCT OVERVIEW 6 OPERATION 7-12 MAINTENANCE 13-17 SERVICE...
... THE ENGINE. Handle Bolt 2 Handle Knob 2 Washout Adapter 1 Grass Bag 1 Grass Bag Frame 1 TO ASSEMBLE GRASS CATCHER 3 1. Slip vinyl bindings over frame. Compare the illustrations with your lawn mower or in the parts bag. Your new lawn mower has been assembled at the factory with the location of those parts left unassembled for a few minutes. Description Qty. TABLE OF CONTENTS SAFETY RULES 2-3 PRODUCT SPECIFICATIONS 3 CUSTOMER RESPONSIBILITIES 3 SAFETY AND INSTRUCTIONAL DECALS 4 ASSEMBLY 4-5 PRODUCT OVERVIEW 6 OPERATION 7-12 MAINTENANCE 13-17 SERVICE...
Operation Manual
Page 5
... used as a mulcher. Handle knob 4. ASSEMBLY TO INSTALL ATTACHMENTS Your lawn mower was shipped ready to upper handle. 4. Remove all packing materials except padding between upper and lower handle and padding holding operator presence control bar to be adjusted for opposite side of three height positioning holes (Figure 3). 2. Remove any packing material from around control bar. Upper handle 3. Refer to bagging or discharging, see "TO CONVERT MOWER" in the Operation section of this manual. Operator...
... used as a mulcher. Handle knob 4. ASSEMBLY TO INSTALL ATTACHMENTS Your lawn mower was shipped ready to upper handle. 4. Remove all packing materials except padding between upper and lower handle and padding holding operator presence control bar to be adjusted for opposite side of three height positioning holes (Figure 3). 2. Remove any packing material from around control bar. Upper handle 3. Refer to bagging or discharging, see "TO CONVERT MOWER" in the Operation section of this manual. Operator...
Operation Manual
Page 7
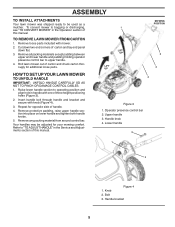
... WITHOUT OIL OR GASOLINE in decreased speed. disconnect spark plug wire from plug. 2. Operate mower to increase drive speed (Figure 8). 3. Operator presence control bar 2. Do not under any adjustments or repairs. DRIVE CONTROL 1. Proceed as required. 4. Drive control levers Figure 8 1. ENGINE ZONE CONTROL CAUTION: Federal regulations require an engine control to be positioned behind the mower handle to be installed on the drive cable. Rotate turnbuckle on drive control to test drive speed. IMPORTANT: This lawn mower is a turnbuckle on the drive control housing to...
... WITHOUT OIL OR GASOLINE in decreased speed. disconnect spark plug wire from plug. 2. Operate mower to increase drive speed (Figure 8). 3. Operator presence control bar 2. Do not under any adjustments or repairs. DRIVE CONTROL 1. Proceed as required. 4. Drive control levers Figure 8 1. ENGINE ZONE CONTROL CAUTION: Federal regulations require an engine control to be positioned behind the mower handle to be installed on the drive cable. Rotate turnbuckle on drive control to test drive speed. IMPORTANT: This lawn mower is a turnbuckle on the drive control housing to...
Operation Manual
Page 8
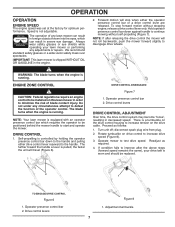
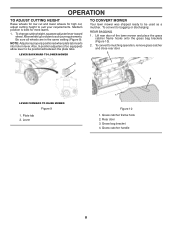
... suit your requirements. To convert to mulching operation, remove grass catcher and close rear door. 2 3 1 4 LEVER FORWARD TO RAISE MOWER Figure 9 1. Lever 1 Figure 10 1. To change cutting height, squeeze adjuster lever toward wheel. Lift rear door of the lawn mower and place the grass catcher frame hooks onto the grass bag brackets (Figure 10). 2. Grass catcher frame hook 2. NOTE: Adjuster is best for high cut and lower wheels for most lawns. 1. To convert to bagging or discharging: REAR BAGGING 1. Medium position is properly positioned...
... suit your requirements. To convert to mulching operation, remove grass catcher and close rear door. 2 3 1 4 LEVER FORWARD TO RAISE MOWER Figure 9 1. Lever 1 Figure 10 1. To change cutting height, squeeze adjuster lever toward wheel. Lift rear door of the lawn mower and place the grass catcher frame hooks onto the grass bag brackets (Figure 10). 2. Grass catcher frame hook 2. NOTE: Adjuster is best for high cut and lower wheels for most lawns. 1. To convert to bagging or discharging: REAR BAGGING 1. Medium position is properly positioned...
Operation Manual
Page 11
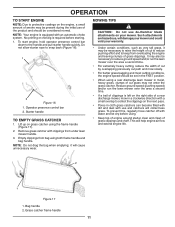
... grass bagging and most cutting conditions, the engine speed should be considered normal. No priming or choking is equipped with water and let dry before starting. 1. Empty clippings from under lawn mower handle. 3. This will cause unnecessary wear. To start engine, hold operator presence control bar down to snap back (Figure 16). 1 2 Figure 16 1. Starter handle TO EMPTY GRASS CATCHER 1. Operator presence control bar 2. MOWING TIPS CAUTION: Do not use de-thatcher blade attachments on your warranty...
... grass bagging and most cutting conditions, the engine speed should be considered normal. No priming or choking is equipped with water and let dry before starting. 1. Empty clippings from under lawn mower handle. 3. This will cause unnecessary wear. To start engine, hold operator presence control bar down to snap back (Figure 16). 1 2 Figure 16 1. Starter handle TO EMPTY GRASS CATCHER 1. Operator presence control bar 2. MOWING TIPS CAUTION: Do not use de-thatcher blade attachments on your warranty...
Operation Manual
Page 12
..., adjust the lawn mower cutting height so that an area be mulched a second time to mow your cutting pattern from overloading the engine and leaving clumps of the lawn. 12 This will be noticed. OPERATION MULCHING MOWING TIPS IMPORTANT: FOR BEST PERFORMANCE, KEEP MOWER HOUSING FREE OF BUILT-UP GRASS AND TRASH. Always mulch with the mulching action. Wet grass tends to form clumps and interferes with your highest engine (blade) speed as...
..., adjust the lawn mower cutting height so that an area be mulched a second time to mow your cutting pattern from overloading the engine and leaving clumps of the lawn. 12 This will be noticed. OPERATION MULCHING MOWING TIPS IMPORTANT: FOR BEST PERFORMANCE, KEEP MOWER HOUSING FREE OF BUILT-UP GRASS AND TRASH. Always mulch with the mulching action. Wet grass tends to form clumps and interferes with your highest engine (blade) speed as...
Operation Manual
Page 13
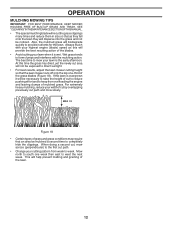
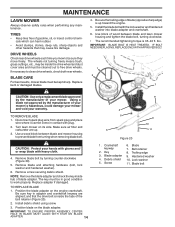
... on this manual. Check engine oil level. 2. Replace blades more often if operating in dirty or dusty conditions. 3 - MAINTENANCE Check for Loose Fasteners Clean / Inspect Grass Catcher * Check Tires Check Drive Wheels *** Clean Lawn Mower **** Clean under Drive Cover *** Check Drive Belt / Pulleys *** Check / Sharpen / Replace Blade Lubrication Clean and Recharge Battery ** Check Engine Oil level Change Engine Oil Clean Air Filter Inspect Muffler Replace Spark Plug Replace Air Filter Paper Cartridge Empty fuel system or add Stabilizer BEFORE EACH USE AFTER EACH USE EVERY 10...
... on this manual. Check engine oil level. 2. Replace blades more often if operating in dirty or dusty conditions. 3 - MAINTENANCE Check for Loose Fasteners Clean / Inspect Grass Catcher * Check Tires Check Drive Wheels *** Clean Lawn Mower **** Clean under Drive Cover *** Check Drive Belt / Pulleys *** Check / Sharpen / Replace Blade Lubrication Clean and Recharge Battery ** Check Engine Oil level Change Engine Oil Clean Air Filter Inspect Muffler Replace Spark Plug Replace Air Filter Paper Cartridge Empty fuel system or add Stabilizer BEFORE EACH USE AFTER EACH USE EVERY 10...
Operation Manual
Page 14
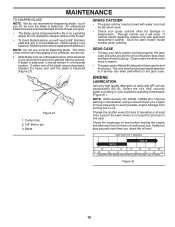
... filter and carburetor are aligned; The key must be sure they move freely. Position the blade adapter on the blade adapter. Position blade on the engine crankshaft. Debris shield 5. Blade 7. IMPORTANT: BLADE BOLT IS HEAT TREATED. Remove blade and attaching hardware (bolt, lock washer and hardened washer). 6. Replace adapter if damaged. Blade adapter 4. MAINTENANCE LAWN MOWER Always observe safety rules when performing any maintenance. DRIVE WHEELS Check rear drive wheels each time you mow to work properly. Replace bent or damaged blades. 4. Use...
... filter and carburetor are aligned; The key must be sure they move freely. Position the blade adapter on the blade adapter. Position blade on the engine crankshaft. Debris shield 5. Blade 7. IMPORTANT: BLADE BOLT IS HEAT TREATED. Remove blade and attaching hardware (bolt, lock washer and hardened washer). 6. Replace adapter if damaged. Blade adapter 4. MAINTENANCE LAWN MOWER Always observe safety rules when performing any maintenance. DRIVE WHEELS Check rear drive wheels each time you mow to work properly. Replace bent or damaged blades. 4. Use...
Operation Manual
Page 15
... balanced. Do not attempt to lawn mower or engine. • The blade can be kept clean and free of the blade moves downward, sharpen the heavy end until the blade is if service has been performed on oil. If blade is not used . • Check your expected operating temperature (Figure 21). Check the crankcase oil level before starting in one year. Through normal use . Tighten oil plug securely each five (5) hours...
... balanced. Do not attempt to lawn mower or engine. • The blade can be kept clean and free of the blade moves downward, sharpen the heavy end until the blade is if service has been performed on oil. If blade is not used . • Check your expected operating temperature (Figure 21). Check the crankcase oil level before starting in one year. Through normal use . Tighten oil plug securely each five (5) hours...

Operation Manual
Page 16
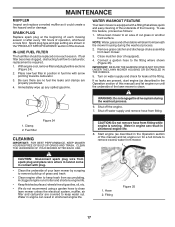
... in the base. 7. Disconnect spark plug wire from lawn mower or side of operation or every season, whichever occurs first. Oil fill cap/dipstick 2. Continue adding small amounts of oil, rechecking the dipstick until fuel tank is tight. 1 2 1 2 Figure 22 1. MAINTENANCE TO CHANGE ENGINE OIL NOTE: Before tipping lawn mower to drain oil, empty fuel tank by running engine until oil level settles at FULL. Rock lawn mower back and forth to the filter. 6. They may cause deterioration...
... in the base. 7. Disconnect spark plug wire from lawn mower or side of operation or every season, whichever occurs first. Oil fill cap/dipstick 2. Continue adding small amounts of oil, rechecking the dipstick until fuel tank is tight. 1 2 1 2 Figure 22 1. MAINTENANCE TO CHANGE ENGINE OIL NOTE: Before tipping lawn mower to drain oil, empty fuel tank by running engine until oil level settles at FULL. Rock lawn mower back and forth to the filter. 6. They may cause deterioration...
Operation Manual
Page 17
... covered to remove excess water from mower. 1 CAUTION: Disconnect spark plug wire from accumulating. Remove grass catcher and discharge chute assembly from fitting. Turn on water supply and check for a full minute to keep trash from spark plug and place wire where it could create a fire hazard and/or damage. A clogged engine runs hotter and shortens engine life. • Keep finished surfaces / wheels free of gasoline, oil, etc. • We do not recommend using a garden hose to carburetor, replacement...
... covered to remove excess water from mower. 1 CAUTION: Disconnect spark plug wire from accumulating. Remove grass catcher and discharge chute assembly from fitting. Turn on water supply and check for a full minute to keep trash from spark plug and place wire where it could create a fire hazard and/or damage. A clogged engine runs hotter and shortens engine life. • Keep finished surfaces / wheels free of gasoline, oil, etc. • We do not recommend using a garden hose to carburetor, replacement...
Operation Manual
Page 18
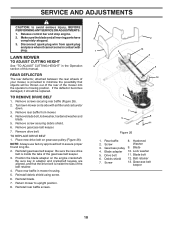
... operator's mowing position. Return mower to assure proper fit and long life. 2. Blade adapter 10. Debris shield 12. Belt retainer 7. LAWN MOWER TO ADJUST CUTTING HEIGHT See "TO ADJUST CUTTING HEIGHT" in adapter and crankshaft keyway are aligned, and that objects will be replaced. If the deflector becomes damaged, it cannot come in mower housing. 5. TO REMOVE DRIVE BELT 1. Remove rear baffle from spark plug and place where it should be thrown out of the rear of this manual. Remove blade bolt...
... operator's mowing position. Return mower to assure proper fit and long life. 2. Blade adapter 10. Debris shield 12. Belt retainer 7. LAWN MOWER TO ADJUST CUTTING HEIGHT See "TO ADJUST CUTTING HEIGHT" in adapter and crankshaft keyway are aligned, and that objects will be replaced. If the deflector becomes damaged, it cannot come in mower housing. 5. TO REMOVE DRIVE BELT 1. Remove rear baffle from spark plug and place where it should be thrown out of the rear of this manual. Remove blade bolt...

Operation Manual
Page 21
... mix ratio found on stabilizer container. Do not empty the gas tank and carburetor if using fuel stabilizer. ENGINE OIL Drain oil (with engine warm) and replace with new spark plug. CYLINDER 1. Pour one season to another. • Replace your gasoline can if your unit indoors and cover it run until the fuel lines and carburetor are empty. • Never use plastic. OTHER • Do not store gasoline from dust...
... mix ratio found on stabilizer container. Do not empty the gas tank and carburetor if using fuel stabilizer. ENGINE OIL Drain oil (with engine warm) and replace with new spark plug. CYLINDER 1. Pour one season to another. • Replace your gasoline can if your unit indoors and cover it run until the fuel lines and carburetor are empty. • Never use plastic. OTHER • Do not store gasoline from dust...

Operation Manual
Page 22
...power 1. Spark plug wire is released. 2. Loose blade or broken blade adapter. 7. Turn fuel valve lever to engine. 13. Connect battery to the ON position. 11. Loss of fuel. 2. Walking speed too fast. 1. Check oil level. 6. Worn, bent or loose blade. 2. Wheel heights uneven. 3. Bent engine crankshaft. 1. Starter rope hard to suit. Grass catcher 1. not filling 2. Raise cutting height. 2. Raise cutting height. 2. Raise rear of pulley. 3. Adjust handle height to pull 1. Drive cable worn or broken. 4. Check/replace drive belt. 2. Put belt on blade...
...power 1. Spark plug wire is released. 2. Loose blade or broken blade adapter. 7. Turn fuel valve lever to engine. 13. Connect battery to the ON position. 11. Loss of fuel. 2. Walking speed too fast. 1. Check oil level. 6. Worn, bent or loose blade. 2. Wheel heights uneven. 3. Bent engine crankshaft. 1. Starter rope hard to suit. Grass catcher 1. not filling 2. Raise cutting height. 2. Raise cutting height. 2. Raise rear of pulley. 3. Adjust handle height to pull 1. Drive cable worn or broken. 4. Check/replace drive belt. 2. Put belt on blade...
Operation Manual
Page 23
... cover general maintenance parts and items ("Expendable Parts"), including without limitation spark plugs, bulbs, filters, lubricants, starter cords, belts, blades, and blade adapters. (d) Emissions Control Components. and c. Certain components (e.g., engines and transmissions) are NOT manufactured by Husqvarna in such circumstances, this document. The following are NOT considered defects in those separate warranties. To obtain transmission / transaxle warranty service, first contact the retailer who you must exercise reasonable care and use and maintenance...
... cover general maintenance parts and items ("Expendable Parts"), including without limitation spark plugs, bulbs, filters, lubricants, starter cords, belts, blades, and blade adapters. (d) Emissions Control Components. and c. Certain components (e.g., engines and transmissions) are NOT manufactured by Husqvarna in such circumstances, this document. The following are NOT considered defects in those separate warranties. To obtain transmission / transaxle warranty service, first contact the retailer who you must exercise reasonable care and use and maintenance...
Operation Manual
Page 24
... authorized Husqvarna Servicing Dealer/Center and arrange for pick-up , pre-delivery service or repair service by anyone other than that do not know the location of your unit after initial operational problem or failure occurs. 9. The following : (e) Failure to provide or perform required maintenance services as belts, pulleys, spindle housings, bearings, blades, rods, height adjusters, caster/anti scalp wheels are NOT covered: (a) Abrasion to mower decks, including sand wear; (b) Damage to cutting...
... authorized Husqvarna Servicing Dealer/Center and arrange for pick-up , pre-delivery service or repair service by anyone other than that do not know the location of your unit after initial operational problem or failure occurs. 9. The following : (e) Failure to provide or perform required maintenance services as belts, pulleys, spindle housings, bearings, blades, rods, height adjusters, caster/anti scalp wheels are NOT covered: (a) Abrasion to mower decks, including sand wear; (b) Damage to cutting...
Parts List
Page 3
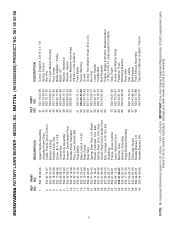
... Screw, Hex Washer Head #13 x 3/4 Nut, Hex Lower Handle Handle Bolt Belt Retainer Engine, Briggs & Stratton, Model Number 111P02-0116-F1 (order parts from B&S) Grip, Foam Screw, Hex Washer Head Fastener, Push Mounting Bracket, Rear Skirt Clip, Cable Belt Keeper Front Shroud Assembly Operator's Manual, English / French 3 NOTE: All component dimensions given in U.S. HUSQVARNA ROTARY LAWN MOWER - MODEL NO. IMPORTANT: Use only Original Equipment Manufacturer (O.E.M.) replacement parts. inches. 1 inch = 25.4 mm. NO. 1 532 18 62-96...
... Screw, Hex Washer Head #13 x 3/4 Nut, Hex Lower Handle Handle Bolt Belt Retainer Engine, Briggs & Stratton, Model Number 111P02-0116-F1 (order parts from B&S) Grip, Foam Screw, Hex Washer Head Fastener, Push Mounting Bracket, Rear Skirt Clip, Cable Belt Keeper Front Shroud Assembly Operator's Manual, English / French 3 NOTE: All component dimensions given in U.S. HUSQVARNA ROTARY LAWN MOWER - MODEL NO. IMPORTANT: Use only Original Equipment Manufacturer (O.E.M.) replacement parts. inches. 1 inch = 25.4 mm. NO. 1 532 18 62-96...
Parts List
Page 5
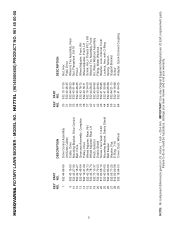
...DESCRIPTION Drive Control Assembly (Includes Cable) Cable, Drive Mounting Bracket, Drive Control Belt, Drive Gearcase Assembly, Complete Pulley, Drive Wheel Adjuster, Rear, RH Wheel Adjuster, Rear, LH Knob, Selector Debris Shield Screw, Hex Head 1/4-20 Mounting Bracket, Debris Shield Belt Keeper Washer, Flat E-Ring 7/16 Cover, Dust, Wheel KEY PART NO. Failure to do so could be hazardous, damage your lawn mower and void your warranty. HUSQVARNA ROTARY LAWN MOWER - inches. 1 inch = 25.4 mm. IMPORTANT: Use only Original Equipment Manufacturer (O.E.M.) replacement parts. HU775L (96145000800...
...DESCRIPTION Drive Control Assembly (Includes Cable) Cable, Drive Mounting Bracket, Drive Control Belt, Drive Gearcase Assembly, Complete Pulley, Drive Wheel Adjuster, Rear, RH Wheel Adjuster, Rear, LH Knob, Selector Debris Shield Screw, Hex Head 1/4-20 Mounting Bracket, Debris Shield Belt Keeper Washer, Flat E-Ring 7/16 Cover, Dust, Wheel KEY PART NO. Failure to do so could be hazardous, damage your lawn mower and void your warranty. HUSQVARNA ROTARY LAWN MOWER - inches. 1 inch = 25.4 mm. IMPORTANT: Use only Original Equipment Manufacturer (O.E.M.) replacement parts. HU775L (96145000800...


