
User Manual
Page 4
...Failure to allow proper airflow into the unit. EARTHING The aerial cable must be exposed to dust the product. ** 5. Make sure it can damage the TV. ** 9. A falling product can damage the aerial. ** 8. Use a light damp cloth (no objects filled with any object and do not place the...buried in electric fire or shock. ** 3. ATTACHMENTS Do not use any appliances susceptible to lightning, rain or sun. CONNECTION TO THE TV Disconnect the product from the mains before you have followed the manufacturer's instructions for mounting. LIQUIDS The product should be placed on top...
...Failure to allow proper airflow into the unit. EARTHING The aerial cable must be exposed to dust the product. ** 5. Make sure it can damage the TV. ** 9. A falling product can damage the aerial. ** 8. Use a light damp cloth (no objects filled with any object and do not place the...buried in electric fire or shock. ** 3. ATTACHMENTS Do not use any appliances susceptible to lightning, rain or sun. CONNECTION TO THE TV Disconnect the product from the mains before you have followed the manufacturer's instructions for mounting. LIQUIDS The product should be placed on top...
User Manual
Page 10
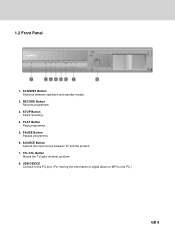
STOP Button Stops recording. ** 4. CH-/CH+ Button Moves the TV/radio channel up/down. ** 8. STANDBY Button Switches between TV and the product. ** 7. PAUSE Button Pauses programme. ** 6. USB DEVICE Connect to the PC port. (For moving the information of digital album or MP3 to the PC.) GB 9 RECORD Button Records programme. ** 3. PLAY Button Plays programme. ** 5. ** 1.2 Front Panel ** ** 1. SOURCE Button Selects the input source between operation and standby modes. ** 2.
STOP Button Stops recording. ** 4. CH-/CH+ Button Moves the TV/radio channel up/down. ** 8. STANDBY Button Switches between TV and the product. ** 7. PAUSE Button Pauses programme. ** 6. USB DEVICE Connect to the PC port. (For moving the information of digital album or MP3 to the PC.) GB 9 RECORD Button Records programme. ** 3. PLAY Button Plays programme. ** 5. ** 1.2 Front Panel ** ** 1. SOURCE Button Selects the input source between operation and standby modes. ** 2.
User Manual
Page 11
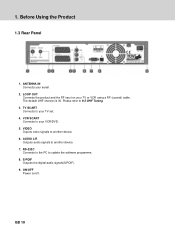
... to another device. ** 6. AUDIO L/R Outputs audio signals to your VCR/DVD. ** 5. VIDEO Ouputs video signals to your TV set. ** 4. Before Using the Product ** 1.3 Rear Panel ** 1. Please refer to update the software programme. ** 8. The default UHF channel is 36. VCR SCART Connects to another ...-232C Connects to the PC to 9.5 UHF Tuning. ** 3. S/PDIF Outputs the digital audio signals(S/PDIF). ** 9. ON/OFF Power on your aerial. ** 2. 1. ANTENNA IN Connects your TV or VCR using a RF (coaxial) cable.
... to another device. ** 6. AUDIO L/R Outputs audio signals to your VCR/DVD. ** 5. VIDEO Ouputs video signals to your TV set. ** 4. Before Using the Product ** 1.3 Rear Panel ** 1. Please refer to update the software programme. ** 8. The default UHF channel is 36. VCR SCART Connects to another ...-232C Connects to the PC to 9.5 UHF Tuning. ** 3. S/PDIF Outputs the digital audio signals(S/PDIF). ** 9. ON/OFF Power on your aerial. ** 2. 1. ANTENNA IN Connects your TV or VCR using a RF (coaxial) cable.
User Manual
Page 13
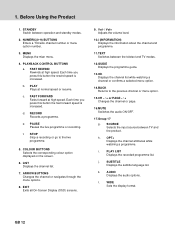
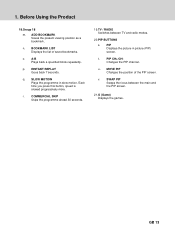
... Adjusts the volume level. ** 10.i (INFORMATION) Displays the information about the channel and programme. ** 11.TEXT Switches between the teletext and TV modes. ** 12.GUIDE Displays the programme guide. ** 13.OK Displays the channel list while watching a channel or confirms a selected menu option....speed. Each time you press this button the fast forward speed is increased. ** b. Before Using the Product ** 1. NUMERIC(0~9) BUTTONS Enters a TV/radio channel number or menu option number. ** 3. Each time you press this button the rewind speed is increased. ** d. RECORD Records a ...
... Adjusts the volume level. ** 10.i (INFORMATION) Displays the information about the channel and programme. ** 11.TEXT Switches between the teletext and TV modes. ** 12.GUIDE Displays the programme guide. ** 13.OK Displays the channel list while watching a channel or confirms a selected menu option....speed. Each time you press this button the fast forward speed is increased. ** b. Before Using the Product ** 1. NUMERIC(0~9) BUTTONS Enters a TV/radio channel number or menu option number. ** 3. Each time you press this button the rewind speed is increased. ** d. RECORD Records a ...
User Manual
Page 14
SLOW MOTION Plays the programme in picture (PIP) screen. ** t. COMMERCIAL SKIP Skips the programme ahead 30 seconds. 19.TV / RADIO Switches between the main and the PIP screen. ** 21.G (Game) Displays the games. 1. ADD BOOKMARK Saves the present viewing position ...as a bookmark. ** n. BOOKMARK LIST Displays the list of the PIP screen. ** v. SWAP PIP Swaps the focus between TV and radio modes. ** 20.PIP BUTTONS ** s. A-B Plays back a specified block repeatedly. ** p. Each time you press this button, speed is slowed progressively more....
SLOW MOTION Plays the programme in picture (PIP) screen. ** t. COMMERCIAL SKIP Skips the programme ahead 30 seconds. 19.TV / RADIO Switches between the main and the PIP screen. ** 21.G (Game) Displays the games. 1. ADD BOOKMARK Saves the present viewing position ...as a bookmark. ** n. BOOKMARK LIST Displays the list of the PIP screen. ** v. SWAP PIP Swaps the focus between TV and radio modes. ** 20.PIP BUTTONS ** s. A-B Plays back a specified block repeatedly. ** p. Each time you press this button, speed is slowed progressively more....
User Manual
Page 15
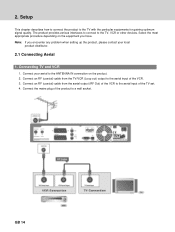
... equipment you encounter any problem when setting up the product, please contact your local product distributor. 2.1 Connecting Aerial 1. Connect an RF (coaxial) cable from the TV/VCR (Loop out) output to a wall socket. ** GB 14 2. Connect an RF (coaxial) cable from the aerial output (RF Out) of the VCR ... the aerial input of the product to the aerial input of the VCR. 3. Connect the mains plug of the TV set. 4. Setup ** This chapter describes how to connect the product to the TV, VCR or other devices. Note: If you have. The product provides various interfaces to connect to the...
... equipment you encounter any problem when setting up the product, please contact your local product distributor. 2.1 Connecting Aerial 1. Connect an RF (coaxial) cable from the TV/VCR (Loop out) output to a wall socket. ** GB 14 2. Connect an RF (coaxial) cable from the aerial output (RF Out) of the VCR ... the aerial input of the product to the aerial input of the VCR. 3. Connect the mains plug of the TV set. 4. Setup ** This chapter describes how to connect the product to the TV, VCR or other devices. Note: If you have. The product provides various interfaces to connect to the...
User Manual
Page 16
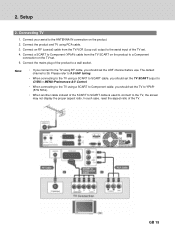
...Please refer to 9.5 UHF tuning. • When connecting to the TV using a SCART to SCART cable, you should set the TV SCART output to CVBS in MENU-Preferences-A/V Control. • When connecting to the TV using a SCART to the TV using RCA cable. 3. In such case, reset the aspect ratio ... connect to Component cable, you should set . 5. Connect an RF (coaxial) cable from the TV SCART on the product to the TV, the screen may not display the proper aspect ratio. Connecting TV 1. The default channel is used to connect to a Component connection on the product. 2. Connect the...
...Please refer to 9.5 UHF tuning. • When connecting to the TV using a SCART to SCART cable, you should set the TV SCART output to CVBS in MENU-Preferences-A/V Control. • When connecting to the TV using a SCART to the TV using RCA cable. 3. In such case, reset the aspect ratio ... connect to Component cable, you should set . 5. Connect an RF (coaxial) cable from the TV SCART on the product to the TV, the screen may not display the proper aspect ratio. Connecting TV 1. The default channel is used to connect to a Component connection on the product. 2. Connect the...

User Manual
Page 18
Connect the power cord of the product. 4. Power on the GB 17 button on the remote control or the STANDBY ( ) button on by pressing the STANDBY front of the product. Turn on . 2. 2. Switch your TV on the power switch, located at the back left of the product to a wall outlet. ** ** 3. Setup ** 2.2 Powering On 1.
Connect the power cord of the product. 4. Power on the GB 17 button on the remote control or the STANDBY ( ) button on by pressing the STANDBY front of the product. Turn on . 2. 2. Switch your TV on the power switch, located at the back left of the product to a wall outlet. ** ** 3. Setup ** 2.2 Powering On 1.
User Manual
Page 21
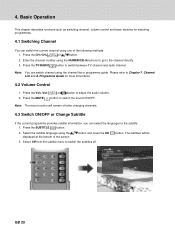
...displayed at the bottom of the following methods. 1. Please refer to adjust the audio volume. 2. or button to Chapter 7. Press the TV/RADIO button to switch the sound ON/OFF. GB 20 Note: You can select the language for more information. 4.2 Volume Control 1. ...Programme Guide for the subtitle. 1. Press the MUTE button to switch between TV channel and radio channel. Press the SUBTITLE button. 2. The subtitles will remain off . button and press the OK button. Channel List and 8....
...displayed at the bottom of the following methods. 1. Please refer to adjust the audio volume. 2. or button to Chapter 7. Press the TV/RADIO button to switch the sound ON/OFF. GB 20 Note: You can select the language for more information. 4.2 Volume Control 1. ...Programme Guide for the subtitle. 1. Press the MUTE button to switch between TV channel and radio channel. Press the SUBTITLE button. 2. The subtitles will remain off . button and press the OK button. Channel List and 8....

User Manual
Page 29
... list, audio and detail information. Each time you are watching a radio channel. 2. 5. Press the SWAP PIP button on the remote control while watching TV, you are watching TV channels. The audio from the main screen will be used with the PIP function. 1. When you can be outputted. Press the CH-/CH+ button...
... list, audio and detail information. Each time you are watching a radio channel. 2. 5. Press the SWAP PIP button on the remote control while watching TV, you are watching TV channels. The audio from the main screen will be used with the PIP function. 1. When you can be outputted. Press the CH-/CH+ button...

User Manual
Page 31
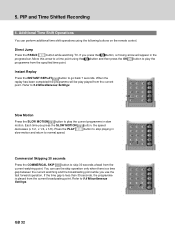
even while watching the currently broadcasting TV programme. 1. Operation status 2. Watching point time (hh:mm:ss) 3. Operations like slow motion and fast rewind also make the time gap. Current time (hh:mm) 2. ...The time gap is equivalent to the live ) point and watching point. Pause If you press the PLAY button while watching TV, the time bar information will be displayed. Press the STOP button to go to the period the programme was paused. GB 30 5. PIP and Time...
even while watching the currently broadcasting TV programme. 1. Operation status 2. Watching point time (hh:mm:ss) 3. Operations like slow motion and fast rewind also make the time gap. Current time (hh:mm) 2. ...The time gap is equivalent to the live ) point and watching point. Pause If you press the PLAY button while watching TV, the time bar information will be displayed. Press the STOP button to go to the period the programme was paused. GB 30 5. PIP and Time...
User Manual
Page 33
... and then press the OK button to a time point using the following buttons on the remote control. ** Direct Jump Press the PASUE button while watching TV. Each time you use the skip operation only when there is played from the current point. Refer to play the programme from the current watching...
... and then press the OK button to a time point using the following buttons on the remote control. ** Direct Jump Press the PASUE button while watching TV. Each time you use the skip operation only when there is played from the current point. Refer to play the programme from the current watching...

User Manual
Page 38
You also can switch between VIDEO (TV) and AUDIO (RADIO) recording lists using the button and press the OK or button. 3. Press the MENU button. 2. Press the STOP button to stop the ...
You also can switch between VIDEO (TV) and AUDIO (RADIO) recording lists using the button and press the OK or button. 3. Press the MENU button. 2. Press the STOP button to stop the ...

User Manual
Page 40
button and then press the OK 2. You can edit recorded TV (Video) channels only. ** 1. You can select the following functions. Control the Bar Move to the very beginning. ** ** Move to the previous scene.(100 frames) ** ** Move ...
button and then press the OK 2. You can edit recorded TV (Video) channels only. ** 1. You can select the following functions. Control the Bar Move to the very beginning. ** ** Move to the previous scene.(100 frames) ** ** Move ...
User Manual
Page 44
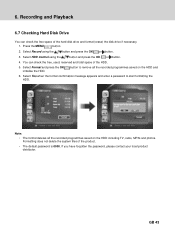
... press the OK or button. 3. button to start formatting the HDD. ** Note: • The format deletes all the recorded programmes saved on the HDD including TV, radio, MP3s and photos. Recording and Playback ** 6.7 Checking Hard Disk Drive You can check the free, used, reserved and total space of the HDD. 5. Select...
... press the OK or button. 3. button to start formatting the HDD. ** Note: • The format deletes all the recorded programmes saved on the HDD including TV, radio, MP3s and photos. Recording and Playback ** 6.7 Checking Hard Disk Drive You can check the free, used, reserved and total space of the HDD. 5. Select...
User Manual
Page 46
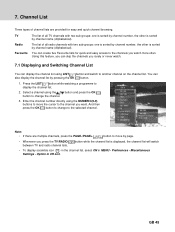
The list of all TV channels with two sub-groups: one is sorted by channel number, the other is displayed, the channel list will switch • To display scramble icon ( ) ... channels with two sub-groups: one is sorted by channel number, the other is sorted by page. • Whenever you press the TV/RADIO between TV and radio channel lists. TV Radio Favourite The list of channel lists are multiple channels, press the PAGE-/PAGE+ button to move the cursor to move by...
The list of all TV channels with two sub-groups: one is sorted by channel number, the other is displayed, the channel list will switch • To display scramble icon ( ) ... channels with two sub-groups: one is sorted by channel number, the other is sorted by page. • Whenever you press the TV/RADIO between TV and radio channel lists. TV Radio Favourite The list of channel lists are multiple channels, press the PAGE-/PAGE+ button to move the cursor to move by...

User Manual
Page 48
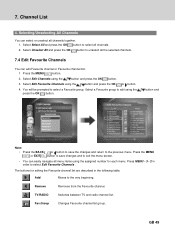
...Press the MENU button. 2. You will be selected. 1. Press MENU-3-1 in group. 2. If you have forgotten the password, please contact your local product distributor. 1. TV and radio sub-groups can edit all menus using the button and press the OK or button. 4. Channel List ** 7.3 Edit Channel Lists You can be... prompted to MENU - Press the OK or button in oder to edit. GB 47 button to move to the TV or radio • To edit Favourite Channel List, move to enter the password. Select Edit Channels using the button. Select Edit Channel Lists using...
...Press the MENU button. 2. You will be selected. 1. Press MENU-3-1 in group. 2. If you have forgotten the password, please contact your local product distributor. 1. TV and radio sub-groups can edit all menus using the button and press the OK or button. 4. Channel List ** 7.3 Edit Channel Lists You can be... prompted to MENU - Press the OK or button in oder to edit. GB 47 button to move to the TV or radio • To edit Favourite Channel List, move to enter the password. Select Edit Channels using the button. Select Edit Channel Lists using...
User Manual
Page 50
... edit using the assigned number for editing the Favourite channel list are described in order to the very beginning. ** ** ** Remove Removes from the Favourite channel. ** ** ** TV/RADIO Switches between TV and radio channel list. ** ** ** Fav.Group Changes Favourite channel list group. ** ** ** GB 49
... edit using the assigned number for editing the Favourite channel list are described in order to the very beginning. ** ** ** Remove Removes from the Favourite channel. ** ** ** TV/RADIO Switches between TV and radio channel list. ** ** ** Fav.Group Changes Favourite channel list group. ** ** ** GB 49

User Manual
Page 51
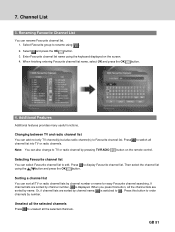
...to remove Favourite channel(s). ** Note: You can switch between TV and radio channel list using . 2. Channel List ** Move Changes the order of Favourite channel(s) in all TV/radio channel list. ** ** ** Unselect All Unselects all TV/radio channel list and press to add Favourite channel(s). 3....Select the channel(s) in Favourite channel list and press to the location you want using . 2. button 5. Select Favourite group using TV/RADIO button or . 2. GB 50 Adding/Removing Favourite Channels You can change the order of channels within the Favourite channel list ...
...to remove Favourite channel(s). ** Note: You can switch between TV and radio channel list using . 2. Channel List ** Move Changes the order of Favourite channel(s) in all TV/radio channel list. ** ** ** Unselect All Unselects all TV/radio channel list and press to add Favourite channel(s). 3....Select the channel(s) in Favourite channel list and press to the location you want using . 2. button 5. Select Favourite group using TV/RADIO button or . 2. GB 50 Adding/Removing Favourite Channels You can change the order of channels within the Favourite channel list ...
User Manual
Page 52
to switch all Note: You can also change to order channels by channel number, is switched to edit. When you press this button to TV or radio channel by name. GB 51 Renaming Favourite Channel List You can select Favourite channel list to . Select and press the OK button....channel list You can rename Favourite channel list. 1. Press this button, all the selected channels Press to Favourite channel list. Press channel list into TV or radio channels. If channel lists are sorted by number. ** Unselect all the channel lists are sorted by channel number or name for easy...
to switch all Note: You can also change to order channels by channel number, is switched to edit. When you press this button to TV or radio channel by name. GB 51 Renaming Favourite Channel List You can select Favourite channel list to . Select and press the OK button....channel list You can rename Favourite channel list. 1. Press this button, all the selected channels Press to Favourite channel list. Press channel list into TV or radio channels. If channel lists are sorted by number. ** Unselect all the channel lists are sorted by channel number or name for easy...


