
User Manual
Page 3
... to help understand, use and maintain the installation. ** To reduce the risk of the following marks that presents a risk of electric shock or personal injury. ** This symbol indicates important instructions accompanying the product. Warnings, Cautions and Notes Throughout the whole manual, pay special attention to make sure you understand the instructions provided. No user serviceable parts inside the product...
... to help understand, use and maintain the installation. ** To reduce the risk of the following marks that presents a risk of electric shock or personal injury. ** This symbol indicates important instructions accompanying the product. Warnings, Cautions and Notes Throughout the whole manual, pay special attention to make sure you understand the instructions provided. No user serviceable parts inside the product...
User Manual
Page 6
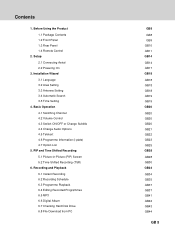
... 6.6 Digital Album 6.7 Checking Hard Disk Drive 6.8 File Download from PC GB8 ** GB8 GB9 GB10 GB11 GB14 ** GB14 GB17 GB18 ** GB18 GB18 GB18 GB19 GB19 GB20 ** GB20 GB20 GB20 GB21 GB22 GB23 GB25 GB28 ** GB28 GB30 GB34 ** GB34 GB35 GB37 GB37 GB41 GB42 GB43 GB44 GB 5 Basic Operation 4.1 Switching Channel 4.2 Volume Control 4.3 Switch ON/OFF or Change Subtitle 4.4 Change Audio Options 4.5 Teletext 4.6 Programme Information (i-plate) 4.7 Option List 5. Before Using...
... 6.6 Digital Album 6.7 Checking Hard Disk Drive 6.8 File Download from PC GB8 ** GB8 GB9 GB10 GB11 GB14 ** GB14 GB17 GB18 ** GB18 GB18 GB18 GB19 GB19 GB20 ** GB20 GB20 GB20 GB21 GB22 GB23 GB25 GB28 ** GB28 GB30 GB34 ** GB34 GB35 GB37 GB37 GB41 GB42 GB43 GB44 GB 5 Basic Operation 4.1 Switching Channel 4.2 Volume Control 4.3 Switch ON/OFF or Change Subtitle 4.4 Change Audio Options 4.5 Teletext 4.6 Programme Information (i-plate) 4.7 Option List 5. Before Using...
User Manual
Page 7
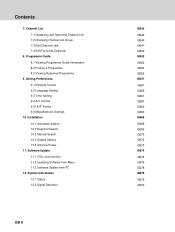
....3 Manual Search 10.4 Default Setting 10.5 Antenna Power 11. System Information 12.1 Status 12.2 Signal Detection GB 6 GB45 ** GB45 GB46 GB47 GB49 GB52 ** GB52 GB54 GB55 GB57 ** GB57 GB59 GB61 GB63 GB65 GB66 GB68 ** GB68 GB69 GB70 GB72 GB73 GB74 ** GB74 GB75 GB78 GB79 ** GB79 GB79 Channel List 7.1 Displaying and Switching Channel List 7.2 Changing Channel List Group 7.3 Edit Channel Lists 7.4 Edit Favourite Channels 8. Software Update 11.1 OTA (Over the Air) 11.2 Updating Software from Menu 11.3 Software Update...
....3 Manual Search 10.4 Default Setting 10.5 Antenna Power 11. System Information 12.1 Status 12.2 Signal Detection GB 6 GB45 ** GB45 GB46 GB47 GB49 GB52 ** GB52 GB54 GB55 GB57 ** GB57 GB59 GB61 GB63 GB65 GB66 GB68 ** GB68 GB69 GB70 GB72 GB73 GB74 ** GB74 GB75 GB78 GB79 ** GB79 GB79 Channel List 7.1 Displaying and Switching Channel List 7.2 Changing Channel List Group 7.3 Edit Channel Lists 7.4 Edit Favourite Channels 8. Software Update 11.1 OTA (Over the Air) 11.2 Updating Software from Menu 11.3 Software Update...
User Manual
Page 10
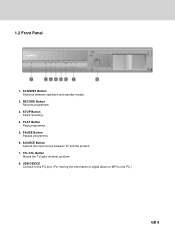
RECORD Button Records programme. ** 3. ** 1.2 Front Panel ** ** 1. PLAY Button Plays programme. ** 5. STANDBY Button Switches between TV and the product. ** 7. STOP Button Stops recording. ** 4. CH-/CH+ Button Moves the TV/radio channel up/down. ** 8. PAUSE Button Pauses programme. ** 6. USB DEVICE Connect to the PC port. (For moving the information of digital album or MP3 to the PC.) GB 9 SOURCE Button Selects the input source between operation and standby modes. ** 2.
RECORD Button Records programme. ** 3. ** 1.2 Front Panel ** ** 1. PLAY Button Plays programme. ** 5. STANDBY Button Switches between TV and the product. ** 7. STOP Button Stops recording. ** 4. CH-/CH+ Button Moves the TV/radio channel up/down. ** 8. PAUSE Button Pauses programme. ** 6. USB DEVICE Connect to the PC port. (For moving the information of digital album or MP3 to the PC.) GB 9 SOURCE Button Selects the input source between operation and standby modes. ** 2.
User Manual
Page 11
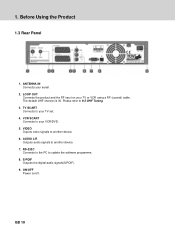
1. ANTENNA IN Connects your TV set. ** 4. RS-232C Connects to the PC to another device. ** 7. The default UHF channel is 36. TV SCART Connects to your TV or VCR using a RF (coaxial) cable. VIDEO Ouputs video signals to update the software programme. ** 8. AUDIO L/R Outputs audio signals to 9.5 UHF Tuning. ** 3. LOOP OUT Connects the product and the RF input on /off. GB 10 Before Using the Product ** 1.3 Rear Panel ** 1. Please refer to another device. ** 6. S/PDIF Outputs the digital audio signals(S/PDIF...
1. ANTENNA IN Connects your TV set. ** 4. RS-232C Connects to the PC to another device. ** 7. The default UHF channel is 36. TV SCART Connects to your TV or VCR using a RF (coaxial) cable. VIDEO Ouputs video signals to update the software programme. ** 8. AUDIO L/R Outputs audio signals to 9.5 UHF Tuning. ** 3. LOOP OUT Connects the product and the RF input on /off. GB 10 Before Using the Product ** 1.3 Rear Panel ** 1. Please refer to another device. ** 6. S/PDIF Outputs the digital audio signals(S/PDIF...
User Manual
Page 13
... input source between operation and standby modes. ** 2. STANDBY Switch between TV and the product. ** h. FAST FORWARD Fasts forward at high speed. PAUSE Pauses the live programme. ** 5. NUMERIC(0~9) BUTTONS Enters a TV/radio channel number or menu option number. ** 3. PLAYBACK CONTROL BUTTONS ** a. LIST Displays the channel list. ** 7. ARROW BUTTONS Changes the channel or navigates through the menu options. ** 8. EXIT Exits all On-Screen Display (OSD) screens. ** 9. OPT+ Displays the channel attributes while watching a programme. ** i. AUDIO Displays the audio options...
... input source between operation and standby modes. ** 2. STANDBY Switch between TV and the product. ** h. FAST FORWARD Fasts forward at high speed. PAUSE Pauses the live programme. ** 5. NUMERIC(0~9) BUTTONS Enters a TV/radio channel number or menu option number. ** 3. PLAYBACK CONTROL BUTTONS ** a. LIST Displays the channel list. ** 7. ARROW BUTTONS Changes the channel or navigates through the menu options. ** 8. EXIT Exits all On-Screen Display (OSD) screens. ** 9. OPT+ Displays the channel attributes while watching a programme. ** i. AUDIO Displays the audio options...
User Manual
Page 16
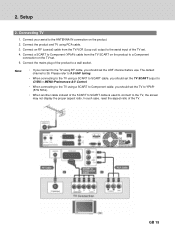
... screen may not display the proper aspect ratio. Connect a SCART to Component (YPbPr) cable from the TV/VCR (Loop out) output to YPbPr (576i 50hz). • When another cable instead of the TV. ** GB 15 Please refer to 9.5 UHF tuning. • When connecting to the TV using a SCART to SCART cable, you should set the TV SCART output to CVBS in MENU-Preferences-A/V Control. • When connecting...
... screen may not display the proper aspect ratio. Connect a SCART to Component (YPbPr) cable from the TV/VCR (Loop out) output to YPbPr (576i 50hz). • When another cable instead of the TV. ** GB 15 Please refer to 9.5 UHF tuning. • When connecting to the TV using a SCART to SCART cable, you should set the TV SCART output to CVBS in MENU-Preferences-A/V Control. • When connecting...
User Manual
Page 34
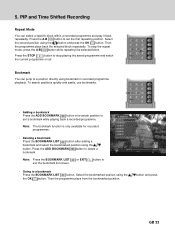
... LIST exit the bookmark list screen. Press the A-B button to a position directly using the the OK button. Press the ADD BOOKMARK button to a bookmark Press the BOOKMARK LIST button. Select the second position using the button. or EXIT button to ** • Going to delete a bookmark. button and press GB 33 PIP and Time Shifted Recording ** Repeat Mode You can jump to set a bookmark while playing back a recorded programme. Then the programme plays back the selected block...
... LIST exit the bookmark list screen. Press the A-B button to a position directly using the the OK button. Press the ADD BOOKMARK button to a bookmark Press the BOOKMARK LIST button. Select the second position using the button. or EXIT button to ** • Going to delete a bookmark. button and press GB 33 PIP and Time Shifted Recording ** Repeat Mode You can jump to set a bookmark while playing back a recorded programme. Then the programme plays back the selected block...
User Manual
Page 35
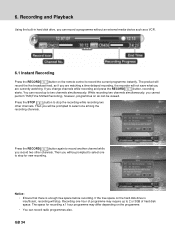
... you change channels while recording and press the RECORD button, recording starts. Recording and Playback ** Using the built-in hard disk drive, you record two other channels. Press the STOP button to record another channel while you can be prompted to select one hour of programme may differ depending on air can record a programme without an external media device such as a VCR. 6.1 Instant Recording Press the RECORD button on the hard disk drive is enough free...
... you change channels while recording and press the RECORD button, recording starts. Recording and Playback ** Using the built-in hard disk drive, you record two other channels. Press the STOP button to record another channel while you can be prompted to select one hour of programme may differ depending on air can record a programme without an external media device such as a VCR. 6.1 Instant Recording Press the RECORD button on the hard disk drive is enough free...

User Manual
Page 36
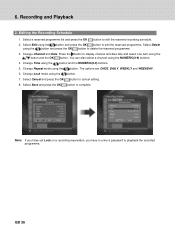
... or button to record automatically in Menu - Press the MENU button. 2. Select Recording Schedule using the button and the OK button. 6. Select Channel and Date. button and the NUMERIC(0-9) 4. Press the button to enter a password for reservation. Recording and Playback ** 6.2 Recording Schedule You can reserve two programmes to record simultaneously. • If the channel is locked or restricted by parental control, you have to display channel and date lists and select one Repeat mode option among...
... or button to record automatically in Menu - Press the MENU button. 2. Select Recording Schedule using the button and the OK button. 6. Select Channel and Date. button and the NUMERIC(0-9) 4. Press the button to enter a password for reservation. Recording and Playback ** 6.2 Recording Schedule You can reserve two programmes to record simultaneously. • If the channel is locked or restricted by parental control, you have to display channel and date lists and select one Repeat mode option among...
User Manual
Page 37
... a channel using the button and press the OK button to display channel and date lists and select one item using the button. Recording and Playback ** 2. Press the button to delete the reserved programme. 3. Change Repeat mode using the button and the OK button. 6. The options are ONCE, DAILY, WEEKLY and WEEKDAY. 6. Select Save and press the OK button to complete. ** Note: If you have set Lock on a recording reservation, you have to enter a password...
... a channel using the button and press the OK button to display channel and date lists and select one item using the button. Recording and Playback ** 2. Press the button to delete the reserved programme. 3. Change Repeat mode using the button and the OK button. 6. The options are ONCE, DAILY, WEEKLY and WEEKDAY. 6. Select Save and press the OK button to complete. ** Note: If you have set Lock on a recording reservation, you have to enter a password...

User Manual
Page 38
... functions while you are playing back a recorded programme from the play list. • Certain parts of the programme may blink when playing back a recorded programme in Menu - Select a programme and then press the OK the information screen. Recording and Playback ** 6.3 Programme Playback You can switch between VIDEO (TV) and AUDIO (RADIO) recording lists using the button and press the OK or button. 3. You can view the recorded programmes in case the recording mode is switched...
... functions while you are playing back a recorded programme from the play list. • Certain parts of the programme may blink when playing back a recorded programme in Menu - Select a programme and then press the OK the information screen. Recording and Playback ** 6.3 Programme Playback You can switch between VIDEO (TV) and AUDIO (RADIO) recording lists using the button and press the OK or button. 3. You can view the recorded programmes in case the recording mode is switched...

User Manual
Page 40
... press the OK 2. You can select the following functions. Recording and Playback ** Locking a Recorded programme 1. Select Lock in the edit screen using the buttons. or button to change Note: If the lock option of a programme is configured to Enable, you have to enter a password to change the status from Enable to playback the programme. 3. Control the Bar Move to the very beginning. ** ** Move to the previous scene...
... press the OK 2. You can select the following functions. Recording and Playback ** Locking a Recorded programme 1. Select Lock in the edit screen using the buttons. or button to change Note: If the lock option of a programme is configured to Enable, you have to enter a password to change the status from Enable to playback the programme. 3. Control the Bar Move to the very beginning. ** ** Move to the previous scene...
User Manual
Page 45
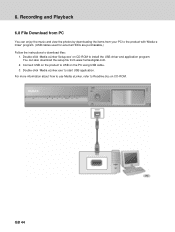
... to start USB application. Double-click 'Media eLinker.exe' to Readme.doc on CD-ROM. ** GB 44 Recording and Playback ** 6.8 File Download from PC You can also download the setup file from your PC to the product with 'Media-e linker' program. (USB cables used for external HDDs are purchasable.) ** Follow the instructions to install the USB driver and application program. You can enjoy the music and view...
... to start USB application. Double-click 'Media eLinker.exe' to Readme.doc on CD-ROM. ** GB 44 Recording and Playback ** 6.8 File Download from PC You can also download the setup file from your PC to the product with 'Media-e linker' program. (USB cables used for external HDDs are purchasable.) ** Follow the instructions to install the USB driver and application program. You can enjoy the music and view...

User Manual
Page 51
... and radio channel list using the and press the OK button. Select the channel(s) to add Favourite channel(s). 3. button 5. Select the channel(s) in the Favourite channel list. 1. The selected channel(s) is moved to the location you selected. 7. Select Favourite group using . 2. Channel List ** Move Changes the order of channels within the Favourite channel list and press the OK button. 3. Moving Favourite Channels You can change the order of Favourite channel list. ** ** ** Sort Sorts channels by number or...
... and radio channel list using the and press the OK button. Select the channel(s) to add Favourite channel(s). 3. button 5. Select the channel(s) in the Favourite channel list. 1. The selected channel(s) is moved to the location you selected. 7. Select Favourite group using . 2. Channel List ** Move Changes the order of channels within the Favourite channel list and press the OK button. 3. Moving Favourite Channels You can change the order of Favourite channel list. ** ** ** Sort Sorts channels by number or...

User Manual
Page 53
... button to the channel directly. 4. Programme Guide ** The programme guide displays programme information about each channel, based on the remote control to move to previous /next programme within the same channel using the button. 4. Also, you can enter the channel number using the information given. Press the i button in the selected programme to exit the guide screen. 8.1 Viewing Programme Guide Information You can also schedule your recording using the NUMERIC(0-9) buttons on the date and time. Select a channel list group using the button...
... button to the channel directly. 4. Programme Guide ** The programme guide displays programme information about each channel, based on the remote control to move to previous /next programme within the same channel using the button. 4. Also, you can enter the channel number using the information given. Press the i button in the selected programme to exit the guide screen. 8.1 Viewing Programme Guide Information You can also schedule your recording using the NUMERIC(0-9) buttons on the date and time. Select a channel list group using the button...

User Manual
Page 54
... schedule recording in the scheduled programme and pressing the OK 1. Moves forwards to complete the reservation. ** Note: The default password is locked or restricted by parental control, you will be prompted to 2 hours before . Scheduling Recoding You can also use the FAST REWIND , FAST FORWARD , COMMERCIAL SKIP and INSTANT REPLAY buttons on the remote control. 5. If the channel is 0000. Enter the password...
... schedule recording in the scheduled programme and pressing the OK 1. Moves forwards to complete the reservation. ** Note: The default password is locked or restricted by parental control, you will be prompted to 2 hours before . Scheduling Recoding You can also use the FAST REWIND , FAST FORWARD , COMMERCIAL SKIP and INSTANT REPLAY buttons on the remote control. 5. If the channel is 0000. Enter the password...
User Manual
Page 75
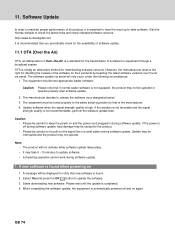
... software update via aerial will not activate while software update takes place. • It may take 5 ~10 minutes to update software. • Scheduling operation cannot work during software update. If new software is found when powering on and the power cord plugged in during software update. 1. A message will be displayed to release the software via aerial. Select Yes and press the OK button to check the latest news and newly released software...
... software update via aerial will not activate while software update takes place. • It may take 5 ~10 minutes to update software. • Scheduling operation cannot work during software update. If new software is found when powering on and the power cord plugged in during software update. 1. A message will be displayed to release the software via aerial. Select Yes and press the OK button to check the latest news and newly released software...
User Manual
Page 83
...; Check audio type or soundtrack option in the remote control for further instructions. ** 1. No picture on TV set ** • Make sure that your AV cable is connected correctly. • Check the volume levels of the product. (where applicable) • Connect the power cable to DTV mode, if you use the universal remote control. No or poor sound ** • Check that the product is in menu to On, if you use the active antenna to ensure...
...; Check audio type or soundtrack option in the remote control for further instructions. ** 1. No picture on TV set ** • Make sure that your AV cable is connected correctly. • Check the volume levels of the product. (where applicable) • Connect the power cable to DTV mode, if you use the universal remote control. No or poor sound ** • Check that the product is in menu to On, if you use the active antenna to ensure...
User Manual
Page 88
... Air) A standard for the transmission of a signal measured in the network. ** 8. Aerial A device that can record and play back programmes directly using the embedded hard disk drive(s). ** 12.RF (Radio Frequency) Television signals are modulated onto RF signals and are several MUXes. Frequency The property of software for their products. ** 10.PIP (Picture In Picture) A function that allows you to display 2 different TV channels (or TV inputs) on one screen. ** 11.PVR (Personal Video Recorder) Video recorder...
... Air) A standard for the transmission of a signal measured in the network. ** 8. Aerial A device that can record and play back programmes directly using the embedded hard disk drive(s). ** 12.RF (Radio Frequency) Television signals are modulated onto RF signals and are several MUXes. Frequency The property of software for their products. ** 10.PIP (Picture In Picture) A function that allows you to display 2 different TV channels (or TV inputs) on one screen. ** 11.PVR (Personal Video Recorder) Video recorder...


