
User Manual
Page 2
Please read this user's manual carefully to be copied, used or translated in part or whole without HUMAX's prior consent in writing except approval of ownership of copyright and copyright law. ** Warranty This warranty does not cover parts which may become defective due ... maintain the product at maximum performance. ** Thank you for future reference. Keep this user's manual is subject to change without notice. ** Copyright (Copyright © 2009 HUMAX Corporation) Not to be able to your product for purchasing...
Please read this user's manual carefully to be copied, used or translated in part or whole without HUMAX's prior consent in writing except approval of ownership of copyright and copyright law. ** Warranty This warranty does not cover parts which may become defective due ... maintain the product at maximum performance. ** Thank you for future reference. Keep this user's manual is subject to change without notice. ** Copyright (Copyright © 2009 HUMAX Corporation) Not to be able to your product for purchasing...
User Manual
Page 3
This symbol indicates important instructions accompanying the product. ** Instruction about the 'WEEE' Symbol This product should not be disposed with other apparatus. • Note Indicates additional information to make the user aware of possible problems and information of any importance to help understand, use, and maintain the installation. ** Meaning of Symbols To reduce the risk of where and how they can take this product or their local government office for details of electric shock, do not remove cover(or back). Please separate this from uncontrolled waste disposal. ** ...
This symbol indicates important instructions accompanying the product. ** Instruction about the 'WEEE' Symbol This product should not be disposed with other apparatus. • Note Indicates additional information to make the user aware of possible problems and information of any importance to help understand, use, and maintain the installation. ** Meaning of Symbols To reduce the risk of where and how they can take this product or their local government office for details of electric shock, do not remove cover(or back). Please separate this from uncontrolled waste disposal. ** ...
User Manual
Page 4
OVERLOADING • Do not overload a wall outlet, extension cord or adapter as these may result in electric fire or shock. 3. LIQUID • The product should be placed on the apparatus. 4. Failure to do so can damage the LNB. 8. Please read the following safety precautions carefully. ** Safety Instructions and Precautions ** 1. CLEANING • Disconnect the product from the wall outlet before you are not sure of the type of power supplied to your home, consult your local power company. • Disconnect the product from the TV. VENTILATION • The slots on top ...
OVERLOADING • Do not overload a wall outlet, extension cord or adapter as these may result in electric fire or shock. 3. LIQUID • The product should be placed on the apparatus. 4. Failure to do so can damage the LNB. 8. Please read the following safety precautions carefully. ** Safety Instructions and Precautions ** 1. CLEANING • Disconnect the product from the wall outlet before you are not sure of the type of power supplied to your home, consult your local power company. • Disconnect the product from the TV. VENTILATION • The slots on top ...

User Manual
Page 5
This will prevent damage to the unit due to lightning and power-surges. 12.EXTRANEOUS OBJECTS • Do not insert anything through the openings in additional damage to the unit. 10.LOCATION • Place the product indoors to avoid exposing it to lightning, rain or sun. • Do not place it near a radiator or heat register. • Make sure it has more than 10 cm clearance from any appliances susceptible to electromagnetic influences, such as a TV or a VCR. • Do not block the openings with any object, and do not place the product on a bed, sofa, rug, or other similar surface. ...
This will prevent damage to the unit due to lightning and power-surges. 12.EXTRANEOUS OBJECTS • Do not insert anything through the openings in additional damage to the unit. 10.LOCATION • Place the product indoors to avoid exposing it to lightning, rain or sun. • Do not place it near a radiator or heat register. • Make sure it has more than 10 cm clearance from any appliances susceptible to electromagnetic influences, such as a TV or a VCR. • Do not block the openings with any object, and do not place the product on a bed, sofa, rug, or other similar surface. ...
User Manual
Page 6
** Warning ** The mains plug, as possible from melting. • The main plug shall remain readily operable. 2. To avoid damage of order. • Do not insert metal or alien substance into the slots for the modules or Smartcards. To avoid electrical shock; • Do not open the main body. • Do not insert metal or inflammable objects inside the product. • Do not touch the power plug with wet hands. • Disconnect the power cord in order to it is out of the power cord or plug; • Do not modify or process the power cord or plug arbitrarily. • Do not ...
** Warning ** The mains plug, as possible from melting. • The main plug shall remain readily operable. 2. To avoid damage of order. • Do not insert metal or alien substance into the slots for the modules or Smartcards. To avoid electrical shock; • Do not open the main body. • Do not insert metal or inflammable objects inside the product. • Do not touch the power plug with wet hands. • Disconnect the power cord in order to it is out of the power cord or plug; • Do not modify or process the power cord or plug arbitrarily. • Do not ...
User Manual
Page 7
... Air GB27 8.2 Software Update from PC GB28 9. Channel List GB18 4.1 Simple/Advanced Channel List GB19 4.2 Option in Channel List GB19 5. 1. Installation Wizard GB16 3.1 Language GB16 3.2 Humax Auto Search GB16 3.3 Time Setting GB17 3.4 Result GB17 4. TV Guide GB20 5.1 Viewing TV Guide GB20 5.2 Using TV Guide GB21 6. Installation GB23 7.1 System Setting GB23 7.2 Organising...
... Air GB27 8.2 Software Update from PC GB28 9. Channel List GB18 4.1 Simple/Advanced Channel List GB19 4.2 Option in Channel List GB19 5. 1. Installation Wizard GB16 3.1 Language GB16 3.2 Humax Auto Search GB16 3.3 Time Setting GB17 3.4 Result GB17 4. TV Guide GB20 5.1 Viewing TV Guide GB20 5.2 Using TV Guide GB21 6. Installation GB23 7.1 System Setting GB23 7.2 Organising...
User Manual
Page 8
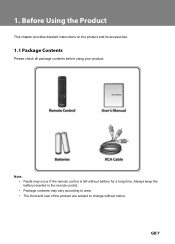
Always keep the battery inserted in the remote control. • Package contents may occur if the remote control is left without notice. Please check all package contents before using your product. ** ** Note: • Faults may vary according to area. • The front and rear of the product are subject to change without battery for a long time. This chapter provides detailed instructions on the product and its accessories.
Always keep the battery inserted in the remote control. • Package contents may occur if the remote control is left without notice. Please check all package contents before using your product. ** ** Note: • Faults may vary according to area. • The front and rear of the product are subject to change without battery for a long time. This chapter provides detailed instructions on the product and its accessories.
User Manual
Page 9
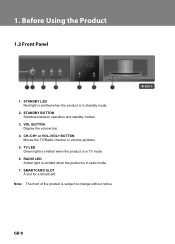
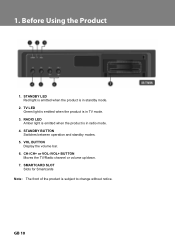
** ** 1. STANDBY LED Red light is emitted when the product is in standby mode. ** 2. CH-/CH+ or VOL-/VOL+ BUTTON Moves the TV/Radio channel or volume up/down. ** 5. RADIO LED Amber light is emitted when the product is in radio mode. ** 7. STANDBY BUTTON Switches between operation and standby modes. ** 3. VOL BUTTON Display the volume bar. ** 4. TV LED Green light is emitted when the product is subject to change without notice. SMARTCARD SLOT A slot for a Smartcard ** Note: The front of the product is in TV mode. ** 6.
** ** 1. STANDBY LED Red light is emitted when the product is in standby mode. ** 2. CH-/CH+ or VOL-/VOL+ BUTTON Moves the TV/Radio channel or volume up/down. ** 5. RADIO LED Amber light is emitted when the product is in radio mode. ** 7. STANDBY BUTTON Switches between operation and standby modes. ** 3. VOL BUTTON Display the volume bar. ** 4. TV LED Green light is emitted when the product is subject to change without notice. SMARTCARD SLOT A slot for a Smartcard ** Note: The front of the product is in TV mode. ** 6.
User Manual
Page 10
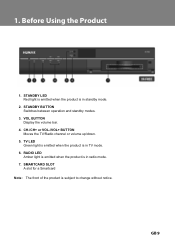
** ** 1. TV LED Green light is emitted when the product is in TV mode. ** 6. STANDBY BUTTON Switches between operation and standby modes. ** 3. STANDBY LED Red light is emitted when the product is in standby mode. ** 2. CH-/CH+ or VOL-/VOL+ BUTTON Moves the TV/Radio channel or volume up/down. ** 5. VOL BUTTON Display the volume bar. ** 4. RADIO LED Amber light is emitted when the product is subject to change without notice. SMARTCARD SLOT A slot for a Smartcard ** Note: The front of the product is in radio mode. ** 7.
** ** 1. TV LED Green light is emitted when the product is in TV mode. ** 6. STANDBY BUTTON Switches between operation and standby modes. ** 3. STANDBY LED Red light is emitted when the product is in standby mode. ** 2. CH-/CH+ or VOL-/VOL+ BUTTON Moves the TV/Radio channel or volume up/down. ** 5. VOL BUTTON Display the volume bar. ** 4. RADIO LED Amber light is emitted when the product is subject to change without notice. SMARTCARD SLOT A slot for a Smartcard ** Note: The front of the product is in radio mode. ** 7.
User Manual
Page 11
TV LED Green light is emitted when the product is in TV mode. ** 3. CH-/CH+ or VOL-/VOL+ BUTTON Moves the TV/Radio channel or volume up/down. ** 7. RADIO LED Amber light is emitted when the product is in radio mode. ** 4. ** ** 1. VOL BUTTON Display the volume bar. ** 6. STANDBY BUTTON Switches between operation and standby modes. ** 5. SMARTCARD SLOT Slots for Smartcards ** Note: The front of the product is in standby mode. ** 2. STANDBY LED Red light is emitted when the product is subject to change without notice.
TV LED Green light is emitted when the product is in TV mode. ** 3. CH-/CH+ or VOL-/VOL+ BUTTON Moves the TV/Radio channel or volume up/down. ** 7. RADIO LED Amber light is emitted when the product is in radio mode. ** 4. ** ** 1. VOL BUTTON Display the volume bar. ** 6. STANDBY BUTTON Switches between operation and standby modes. ** 5. SMARTCARD SLOT Slots for Smartcards ** Note: The front of the product is in standby mode. ** 2. STANDBY LED Red light is emitted when the product is subject to change without notice.

User Manual
Page 12
STANDBY BUTTON Switches between operation and standby modes. ** 3. RADIO LED Amber light is emitted when the product is in TV mode. ** 6. ** ** 1. TV LED Green light is emitted when the product is in standby mode. ** 2. VOL BUTTON Display the volume bar. ** 4. SMARTCARD SLOT A slot for a Smartcard ** Note: The front of the product is in radio mode. ** 7. CH-/CH+ or VOL-/VOL+ BUTTON Moves the TV/Radio channel or volume up/down. ** 5. STANDBY LED Red light is emitted when the product is subject to change without notice.
STANDBY BUTTON Switches between operation and standby modes. ** 3. RADIO LED Amber light is emitted when the product is in TV mode. ** 6. ** ** 1. TV LED Green light is emitted when the product is in standby mode. ** 2. VOL BUTTON Display the volume bar. ** 4. SMARTCARD SLOT A slot for a Smartcard ** Note: The front of the product is in radio mode. ** 7. CH-/CH+ or VOL-/VOL+ BUTTON Moves the TV/Radio channel or volume up/down. ** 5. STANDBY LED Red light is emitted when the product is subject to change without notice.
User Manual
Page 13
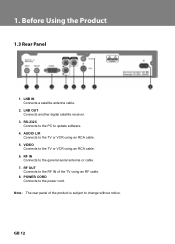
POWER CORD Connects to change without notice. LNB OUT Connects another digital satellite receiver. ** 3. RF OUT Connects to the RF IN of the product is subject to the power cord. ** Note: The rear panel of the TV using an RF cable. 8. LNB IN Connects a satellite antenna cable. ** 2. VIDEO Connects to the TV or VCR using an RCA cable. ** 6. AUDIO L/R Connects to the TV or VCR using an RCA cable. ** 5. RF IN Connects to update software. ** 4. ** 1. RS-232C Connects to the PC to the general aerial antenna or cable. ** 7.
POWER CORD Connects to change without notice. LNB OUT Connects another digital satellite receiver. ** 3. RF OUT Connects to the RF IN of the product is subject to the power cord. ** Note: The rear panel of the TV using an RF cable. 8. LNB IN Connects a satellite antenna cable. ** 2. VIDEO Connects to the TV or VCR using an RCA cable. ** 6. AUDIO L/R Connects to the TV or VCR using an RCA cable. ** 5. RF IN Connects to update software. ** 4. ** 1. RS-232C Connects to the PC to the general aerial antenna or cable. ** 7.
User Manual
Page 14
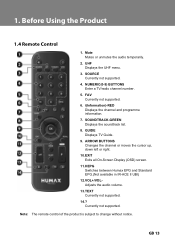
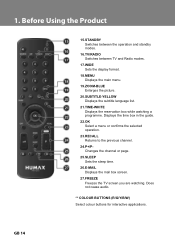
... or moves the cursor up, down left or right. ** 10.EXIT ** Exits all On-Screen Display (OSD) screen. ** 11.HEPG ** Switches between Humax EPG and Standard EPG.(Not available in IR-ACE II UBI) ** 12.VOL+/VOL- ** Adjusts the audio volume. ** 13.TEXT ** Currently not supported. ** 14.? ** Currently not supported. ** Note: The...
... or moves the cursor up, down left or right. ** 10.EXIT ** Exits all On-Screen Display (OSD) screen. ** 11.HEPG ** Switches between Humax EPG and Standard EPG.(Not available in IR-ACE II UBI) ** 12.VOL+/VOL- ** Adjusts the audio volume. ** 13.TEXT ** Currently not supported. ** 14.? ** Currently not supported. ** Note: The...
User Manual
Page 15
Displays the time box in the guide. ** 22.OK ** Select a menu or confirms the selected operation. ** 23.RECALL ** Returns to the previous channel. ** 24.P+/P- ** Changes the channel or page. ** 25.SLEEP ** Sets the sleep time. ** 26.E-MAIL ** Displays the mail box screen. ** 27.FREEZE ** Freezes the TV screen you are watching. Does not cease audio. ** ** COLOUR BUTTONS (R/G/Y/B/W) ** Select colour buttons for interactive applications. ** 15.STANDBY ** Switches between the operation and standby modes. ** 16.TV/RADIO ** Switches between TV and Radio modes. ** 17.WIDE ** Sets the display ...
Displays the time box in the guide. ** 22.OK ** Select a menu or confirms the selected operation. ** 23.RECALL ** Returns to the previous channel. ** 24.P+/P- ** Changes the channel or page. ** 25.SLEEP ** Sets the sleep time. ** 26.E-MAIL ** Displays the mail box screen. ** 27.FREEZE ** Freezes the TV screen you are watching. Does not cease audio. ** ** COLOUR BUTTONS (R/G/Y/B/W) ** Select colour buttons for interactive applications. ** 15.STANDBY ** Switches between the operation and standby modes. ** 16.TV/RADIO ** Switches between TV and Radio modes. ** 17.WIDE ** Sets the display ...
User Manual
Page 16
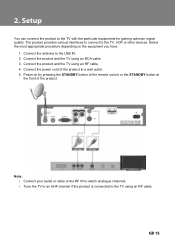
** You can connect the product to the LNB IN. 2. Connect the antenna to the TV with the particular equipments for gaining optimum signal quality. Connect the power cord of the product. ** ** Note: • Connect your aerial or cable to the RF IN to watch analogue channels. • Tune the TV to an UHF channel if the product is connected to the TV using an RF cable. Select the most appropriate procedure depending on by pressing the STANDBY button of the remote control or the STANDBY button at the front of the product to the TV, VCR or other devices. Connect the product and the...
** You can connect the product to the LNB IN. 2. Connect the antenna to the TV with the particular equipments for gaining optimum signal quality. Connect the power cord of the product. ** ** Note: • Connect your aerial or cable to the RF IN to watch analogue channels. • Tune the TV to an UHF channel if the product is connected to the TV using an RF cable. Select the most appropriate procedure depending on by pressing the STANDBY button of the remote control or the STANDBY button at the front of the product to the TV, VCR or other devices. Connect the product and the...
User Manual
Page 17
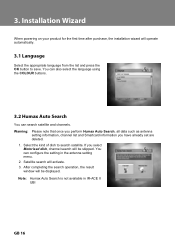
... antenna setting information, channel list and Smartcard information you select Motorised dish, channel search will be skipped. You can configure the setting in IR-ACE II UBI Note: Humax Auto Search is not available in the antenna setting menu. 2. After completing the search operation, the result window will be displayed. You can...
... antenna setting information, channel list and Smartcard information you select Motorised dish, channel search will be skipped. You can configure the setting in IR-ACE II UBI Note: Humax Auto Search is not available in the antenna setting menu. 2. After completing the search operation, the result window will be displayed. You can...
User Manual
Page 18
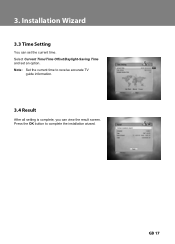
Press the OK button to receive accurate TV guide information. After all setting is complete, you can set an option. You can view the result screen. Note: Set the current time to complete the installation wizard. Select Current Time/Time Offset/Daylight-Saving Time and set the current time.
Press the OK button to receive accurate TV guide information. After all setting is complete, you can set an option. You can view the result screen. Note: Set the current time to complete the installation wizard. Select Current Time/Time Offset/Daylight-Saving Time and set the current time.
User Manual
Page 19
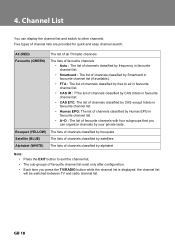
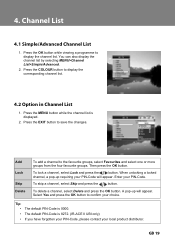
... only after configuration. • Each time you can display the channel list and switch to air in favourite channel list. • CAS IR : TThe list of channels classified by CAS Irdeto in favourite channel list. • CAS ETC: The list of channels classified by CAS ...except Irdeto in favourite channel list. • Humax EPG: The list of channels classified by Humax EPG in favourite channel list. • A~D : The list of channels classified by free to other channels. Bouquet (YELLOW) The lists of channels classified by bouquets Satellite (BLUE...
... only after configuration. • Each time you can display the channel list and switch to air in favourite channel list. • CAS IR : TThe list of channels classified by CAS Irdeto in favourite channel list. • CAS ETC: The list of channels classified by CAS ...except Irdeto in favourite channel list. • Humax EPG: The list of channels classified by Humax EPG in favourite channel list. • A~D : The list of channels classified by free to other channels. Bouquet (YELLOW) The lists of channels classified by bouquets Satellite (BLUE...
User Manual
Page 20
... displayed. 2. You can also display the channel list by selecting MENU>Channel List>Simple/Advanced. 2. Press the MENU button while the channel list is 8272. (IR-ACE II UBI only) • If you have forgotten your PIN-Code, please contact your PIN-Code will appear. Select Yes and press the OK...
... displayed. 2. You can also display the channel list by selecting MENU>Channel List>Simple/Advanced. 2. Press the MENU button while the channel list is 8272. (IR-ACE II UBI only) • If you have forgotten your PIN-Code, please contact your PIN-Code will appear. Select Yes and press the OK...
User Manual
Page 21
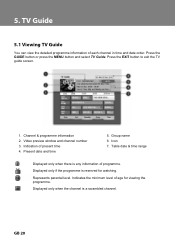
Icon 7. Table date & time range Displayed only when there is reserved for viewing the programme. Indicates the minimum level of present time 4. Channel & programme information 2. Indication of age for watching. Present date and time ** 5. Group name 6. Displayed only if the programme is any information of each channel in time and date order. Video preview window and channel number 3. Represents parental level. Displayed only when the channel is a scrambled channel. Press the GUIDE button or press the MENU button and select TV Guide. Press the EXIT button to ...
Icon 7. Table date & time range Displayed only when there is reserved for viewing the programme. Indicates the minimum level of present time 4. Channel & programme information 2. Indication of age for watching. Present date and time ** 5. Group name 6. Displayed only if the programme is any information of each channel in time and date order. Video preview window and channel number 3. Represents parental level. Displayed only when the channel is a scrambled channel. Press the GUIDE button or press the MENU button and select TV Guide. Press the EXIT button to ...