
User Manual
Page 3
...Instruction about the 'WEEE' Symbol This product should not be disposed with other household wastes at the end of any importance to qualified service personnel. This will prevent possible harm to the environment or human health from other apparatus. • Note Indicates additional information to make the user aware of possible problems and information of its working... users: Please contact either the retailer where you purchased this product or their local government office for details of material resources. Refer servicing to help understand, use, and maintain the installation....
...Instruction about the 'WEEE' Symbol This product should not be disposed with other household wastes at the end of any importance to qualified service personnel. This will prevent possible harm to the environment or human health from other apparatus. • Note Indicates additional information to make the user aware of possible problems and information of its working... users: Please contact either the retailer where you purchased this product or their local government office for details of material resources. Refer servicing to help understand, use, and maintain the installation....
User Manual
Page 4
... earth for the satellite dish. CONNECTION TO THE SATELLITE DISH LNB • Disconnect the product from the mains before connecting or disconnecting the cable from the satellite dish. In addition, ...type of power supplied to your home, consult your local power company. • Disconnect the product from the wall outlet before you start any maintenance or installation procedures. 2. CLEANING • Disconnect the product from the mains before cleaning. • Use a light damp cloth (no objects filled with international safety standards. Failure to do so can damage the LNB...
... earth for the satellite dish. CONNECTION TO THE SATELLITE DISH LNB • Disconnect the product from the mains before connecting or disconnecting the cable from the satellite dish. In addition, ...type of power supplied to your home, consult your local power company. • Disconnect the product from the wall outlet before you start any maintenance or installation procedures. 2. CLEANING • Disconnect the product from the mains before cleaning. • Use a light damp cloth (no objects filled with international safety standards. Failure to do so can damage the LNB...
User Manual
Page 7
... TV Guide GB21 6. Parental Control GB22 7. Channel List GB18 4.1 Simple/Advanced Channel List GB19 4.2 Option in Channel List GB19 5. Appendix GB29 9.1 Trouble Shooting GB29 9.2 Error Message GB31 9.3 Specification GB32 9.4 Service and Support GB34 Installation Wizard GB16 3.1 Language GB16 3.2 Humax Auto Search GB16 3.3 Time Setting GB17 3.4 Result GB17 4. Setup GB15 3. Before Using the Product GB7 1.1 Package Contents GB7 1.2 Front Panel GB8 1.3 Rear Panel GB12 1.4 Remote Control GB13 2. Software Update GB27 8.1 OTA (Over the Air GB27 8.2 Software Update...
... TV Guide GB21 6. Parental Control GB22 7. Channel List GB18 4.1 Simple/Advanced Channel List GB19 4.2 Option in Channel List GB19 5. Appendix GB29 9.1 Trouble Shooting GB29 9.2 Error Message GB31 9.3 Specification GB32 9.4 Service and Support GB34 Installation Wizard GB16 3.1 Language GB16 3.2 Humax Auto Search GB16 3.3 Time Setting GB17 3.4 Result GB17 4. Setup GB15 3. Before Using the Product GB7 1.1 Package Contents GB7 1.2 Front Panel GB8 1.3 Rear Panel GB12 1.4 Remote Control GB13 2. Software Update GB27 8.1 OTA (Over the Air GB27 8.2 Software Update...
User Manual
Page 13
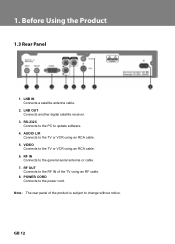
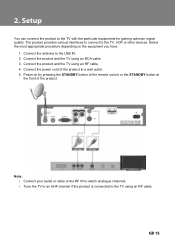
RS-232C Connects to the PC to the TV or VCR using an RCA cable. ** 6. VIDEO Connects to update software. ** 4. RF OUT Connects to the RF IN of the product is subject to the power cord. ** Note: The rear panel of the TV using an RCA cable. ** 5. RF IN Connects to the TV or VCR using an RF cable. 8. POWER CORD Connects to change without notice. ** 1. LNB IN Connects a satellite antenna cable. ** 2. LNB OUT Connects another digital satellite receiver. ** 3. AUDIO L/R Connects to the general aerial antenna or cable. ** 7.
RS-232C Connects to the PC to the TV or VCR using an RCA cable. ** 6. VIDEO Connects to update software. ** 4. RF OUT Connects to the RF IN of the product is subject to the power cord. ** Note: The rear panel of the TV using an RCA cable. ** 5. RF IN Connects to the TV or VCR using an RF cable. 8. POWER CORD Connects to change without notice. ** 1. LNB IN Connects a satellite antenna cable. ** 2. LNB OUT Connects another digital satellite receiver. ** 3. AUDIO L/R Connects to the general aerial antenna or cable. ** 7.
User Manual
Page 14
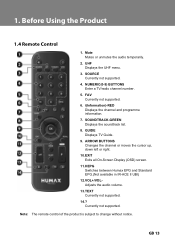
.../radio channel number. ** 5. FAV ** Currently not supported. ** 6. GUIDE ** Displays TV Guide. ** 9. Mute ** Mutes or unmutes the audio temporarily. ** 2. SOURCE ** Currently not supported. ** 4. SOUNDTRACK-GREEN ** Displays the soundtrack list. ** 8. i(Information)-RED ** Displays the channel and programme information. ** 7. UHF ** Displays the UHF menu. ** 3. ARROW BUTTONS ** Changes the channel or moves the cursor up, down left or right. ** 10.EXIT ** Exits all On-Screen Display (OSD) screen. ** 11.HEPG ** Switches between Humax EPG and Standard EPG.(Not available in IR-ACE...
.../radio channel number. ** 5. FAV ** Currently not supported. ** 6. GUIDE ** Displays TV Guide. ** 9. Mute ** Mutes or unmutes the audio temporarily. ** 2. SOURCE ** Currently not supported. ** 4. SOUNDTRACK-GREEN ** Displays the soundtrack list. ** 8. i(Information)-RED ** Displays the channel and programme information. ** 7. UHF ** Displays the UHF menu. ** 3. ARROW BUTTONS ** Changes the channel or moves the cursor up, down left or right. ** 10.EXIT ** Exits all On-Screen Display (OSD) screen. ** 11.HEPG ** Switches between Humax EPG and Standard EPG.(Not available in IR-ACE...
User Manual
Page 15
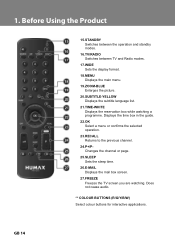
... ** Switches between the operation and standby modes. ** 16.TV/RADIO ** Switches between TV and Radio modes. ** 17.WIDE ** Sets the display format. ** 18.MENU ** Displays the main menu. ** 19.ZOOM-BLUE ** Enlarges the picture. ** 20.SUBTITLE-YELLOW ** Displays the subtitle language list. ** 21.TIME-WHITE ** Displays the reservation box while watching a programme. Displays the time box in the guide. ** 22.OK ** Select a menu or confirms the selected operation. ** 23.RECALL ** Returns to the previous channel. ** 24.P+/P- ** Changes the channel or...
... ** Switches between the operation and standby modes. ** 16.TV/RADIO ** Switches between TV and Radio modes. ** 17.WIDE ** Sets the display format. ** 18.MENU ** Displays the main menu. ** 19.ZOOM-BLUE ** Enlarges the picture. ** 20.SUBTITLE-YELLOW ** Displays the subtitle language list. ** 21.TIME-WHITE ** Displays the reservation box while watching a programme. Displays the time box in the guide. ** 22.OK ** Select a menu or confirms the selected operation. ** 23.RECALL ** Returns to the previous channel. ** 24.P+/P- ** Changes the channel or...
User Manual
Page 16
... to watch analogue channels. • Tune the TV to an UHF channel if the product is connected to a wall outlet. 5. Connect the product and the TV using an RF cable. 4. ** You can connect the product to the TV with the particular equipments for gaining optimum signal quality. Select the most appropriate procedure depending on by pressing the STANDBY button of the remote control...
... to watch analogue channels. • Tune the TV to an UHF channel if the product is connected to a wall outlet. 5. Connect the product and the TV using an RF cable. 4. ** You can connect the product to the TV with the particular equipments for gaining optimum signal quality. Select the most appropriate procedure depending on by pressing the STANDBY button of the remote control...
User Manual
Page 17
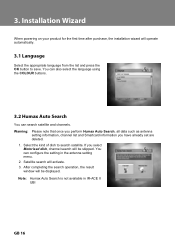
... be displayed. Note: Humax Auto Search is not available in the antenna setting menu. 2. ** When powering on your product for the first time after purchase, the installation wizard will activate. 3. You can also select the language using the COLOUR buttons. Warning: Please note that once you perform Humax Auto Search, all data such as antenna setting information, channel list and Smartcard information you select Motorised dish, channel search will be skipped. You can configure the setting in IR-ACE II...
... be displayed. Note: Humax Auto Search is not available in the antenna setting menu. 2. ** When powering on your product for the first time after purchase, the installation wizard will activate. 3. You can also select the language using the COLOUR buttons. Warning: Please note that once you perform Humax Auto Search, all data such as antenna setting information, channel list and Smartcard information you select Motorised dish, channel search will be skipped. You can configure the setting in IR-ACE II...
User Manual
Page 19
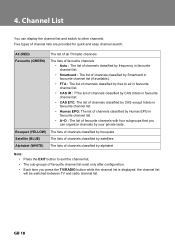
...) The lists of channels classified by bouquets Satellite (BLUE) The lists of channels classified by satellites Alphabet (WHITE) The lists of channels classified by alphabet ** Note: • Press the EXIT button to exit the channel list. • The sub-groups of favourite channel list exist only after configuration. • Each time you can display the channel list and switch to air in favourite channel list. • CAS IR : TThe list of channels classified by CAS Irdeto in favourite channel list...
...) The lists of channels classified by bouquets Satellite (BLUE) The lists of channels classified by satellites Alphabet (WHITE) The lists of channels classified by alphabet ** Note: • Press the EXIT button to exit the channel list. • The sub-groups of favourite channel list exist only after configuration. • Each time you can display the channel list and switch to air in favourite channel list. • CAS IR : TThe list of channels classified by CAS Irdeto in favourite channel list...
User Manual
Page 20
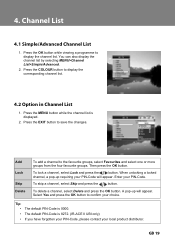
... also display the channel list by selecting MENU>Channel List>Simple/Advanced. 2. Skip To skip a channel, select Skip and press the button. Tip: • The default PIN-Code is 0000. • The default PIN-Code is displayed. 2. Then press the OK button. When unlocking a locked channel, a pop-up will appear. A pop-up requiring your PIN-Code. Press the OK button while viewing a programme to display the corresponding channel list. 1. Press the COLOUR button to display the channel list. Delete ** To delete a channel, select Delete and...
... also display the channel list by selecting MENU>Channel List>Simple/Advanced. 2. Skip To skip a channel, select Skip and press the button. Tip: • The default PIN-Code is 0000. • The default PIN-Code is displayed. 2. Then press the OK button. When unlocking a locked channel, a pop-up will appear. A pop-up requiring your PIN-Code. Press the OK button while viewing a programme to display the corresponding channel list. 1. Press the COLOUR button to display the channel list. Delete ** To delete a channel, select Delete and...
User Manual
Page 22
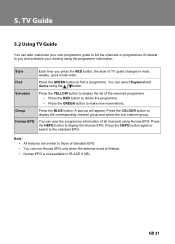
Humax EPG ** Note: You can view the programme information of all channels using the programme information. ** Style Each time you press the RED button, the style of TV guide changes in IR-ACE II UBI. You can select Keyword and Genre using the button Schedule Press the YELLOW button to display the list of the reserved programme. • Press the RED button to delete the programme. • Press the GREEN button to...
Humax EPG ** Note: You can view the programme information of all channels using the programme information. ** Style Each time you press the RED button, the style of TV guide changes in IR-ACE II UBI. You can select Keyword and Genre using the button Schedule Press the YELLOW button to display the list of the reserved programme. • Press the RED button to delete the programme. • Press the GREEN button to...
User Manual
Page 24
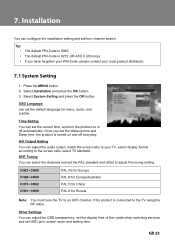
... menu, audio, and subtitle. ** Time Setting You can adjust the OSD transparency, set the display time of the i-plate when switching services and set the Wakeup time and Sleep time, the product is 8272. (IR-ACE II UBI only) • If you set OSD skin, screen saver and waiting time. A/V Output Setting You can configure the installation setting and perform channel search. Tip: • The default PIN-Code is 0000. • The default PIN-Code is turned on or off everyday. Select Installation...
... menu, audio, and subtitle. ** Time Setting You can adjust the OSD transparency, set the display time of the i-plate when switching services and set the Wakeup time and Sleep time, the product is 8272. (IR-ACE II UBI only) • If you set OSD skin, screen saver and waiting time. A/V Output Setting You can configure the installation setting and perform channel search. Tip: • The default PIN-Code is 0000. • The default PIN-Code is turned on or off everyday. Select Installation...

User Manual
Page 26
... other information. ** Manual Search You can search services of the selected satellite by transponders using the transponder information. ** SMATV Search You can automatically search satellites and channels without entering any other information. Humax Auto Search You can search SMATV automatically or manually. ** Note: Humax Auto Search is not available in antenna setting to Enable before performing channel search. Refer to the 3.2 Humax Auto Search. ** Antenna Setting You can set antenna and LNB information to search services Motor Antenna ** Set Motorised System in IR-ACE II...
... other information. ** Manual Search You can search services of the selected satellite by transponders using the transponder information. ** SMATV Search You can automatically search satellites and channels without entering any other information. Humax Auto Search You can search SMATV automatically or manually. ** Note: Humax Auto Search is not available in antenna setting to Enable before performing channel search. Refer to the 3.2 Humax Auto Search. ** Antenna Setting You can set antenna and LNB information to search services Motor Antenna ** Set Motorised System in IR-ACE II...
User Manual
Page 27
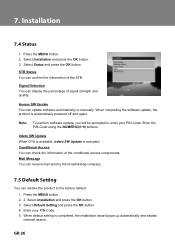
... the STB. ** Signal Detection You can display the percentage of signal strength and quality. ** Humax SW Update You can check the information of the conditional access components. Conditional Access You can update software automatically or manually. Select Installation and press the OK button. 3. When default setting is activated. When completing the software update, the product is automatically powered off and again. ** Note: ** To perform software update, you will be prompted to the factory default. ** 1. Mail Message...
... the STB. ** Signal Detection You can display the percentage of signal strength and quality. ** Humax SW Update You can check the information of the conditional access components. Conditional Access You can update software automatically or manually. Select Installation and press the OK button. 3. When default setting is activated. When completing the software update, the product is automatically powered off and again. ** Note: ** To perform software update, you will be prompted to the factory default. ** 1. Mail Message...
User Manual
Page 28
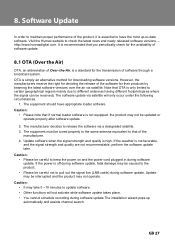
... activate while software update takes place. • You cannot schedule recording during software update. In order to maintain proper performance of software through a broadcast system. OTA, an abbreviation of Over-the-Air, is essential to have appropriate loader software. The software update via a designated satellite. 3. Caution: • Please be updated or operate properly after software update. ** 2. Update may not be careful to pull out the signal line (LNB cable) during software update.The installation...
... activate while software update takes place. • You cannot schedule recording during software update. In order to maintain proper performance of software through a broadcast system. OTA, an abbreviation of Over-the-Air, is essential to have appropriate loader software. The software update via a designated satellite. 3. Caution: • Please be updated or operate properly after software update. ** 2. Update may not be careful to pull out the signal line (LNB cable) during software update.The installation...

User Manual
Page 29
Download the new software file equivalent for this product model from PC to this product with an RS-232C serial cable. 4. Connect your software by transferring the new software from the PC. Power On/Off to start operating. ** Download and install the download tool. 3. Follow these steps to download new software from the Humax website (http://www.humaxdigital.com). 2. Execute the installed download tool and follow the instructions provided. 5. You can connect your product to the PC directly and update your PC to this product. ** 1.
Download the new software file equivalent for this product model from PC to this product with an RS-232C serial cable. 4. Connect your software by transferring the new software from the PC. Power On/Off to start operating. ** Download and install the download tool. 3. Follow these steps to download new software from the Humax website (http://www.humaxdigital.com). 2. Execute the installed download tool and follow the instructions provided. 5. You can connect your product to the PC directly and update your PC to this product. ** 1.
User Manual
Page 30
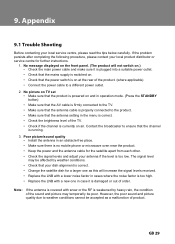
... picture/sound quality • Install the antenna in an obstacle-free place. • Make sure there is no mobile phone or microwave oven near the product. • Keep the power and the antenna cable for the satellite apart from each other. • Check the signal levels and adjust your dish alignment is correct. • Change the satellite dish for further instructions. 1. Contact the broadcaster to ensure that the channel...
... picture/sound quality • Install the antenna in an obstacle-free place. • Make sure there is no mobile phone or microwave oven near the product. • Keep the power and the antenna cable for the satellite apart from each other. • Check the signal levels and adjust your dish alignment is correct. • Change the satellite dish for further instructions. 1. Contact the broadcaster to ensure that the channel...
User Manual
Page 31
... of the reservation. 7. Channel search does not work. • Make sure that your AV cable is correct. 9. No PIN-Code information is given. • The default PIN-Code is always 0000. • The default PIN-Code is 1234 for Parental Control. (IR-ACE II UBI only) • The default PIN-Code is on at the time of your TV set . 6. No or poor sound • Check that the antenna setting in the remote control for a new set and the product...
... of the reservation. 7. Channel search does not work. • Make sure that your AV cable is correct. 9. No PIN-Code information is given. • The default PIN-Code is always 0000. • The default PIN-Code is 1234 for Parental Control. (IR-ACE II UBI only) • The default PIN-Code is on at the time of your TV set . 6. No or poor sound • Check that the antenna setting in the remote control for a new set and the product...
User Manual
Page 32
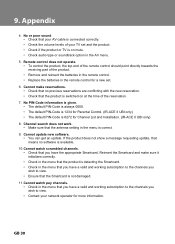
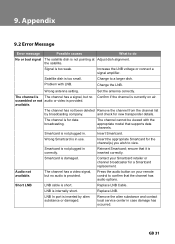
... for new transponder details. Press the audio button on air. Replace LNB. Remove the alien substance and contact local service center in use. Increase the LNB voltage or connect a signal amplifier. Wrong antenna setting. Confirm if the channel is inserted correctly. The channel has not been deleted Remove the channel from the channel list by alien substance or damaged. and check for a Smartcard replacement. Reinsert Smartcard; Short LNB LNB cable is not pointing at Adjust dish alignment. Replace LNB Cable. Error message...
... for new transponder details. Press the audio button on air. Replace LNB. Remove the alien substance and contact local service center in use. Increase the LNB voltage or connect a signal amplifier. Wrong antenna setting. Confirm if the channel is inserted correctly. The channel has not been deleted Remove the channel from the channel list by alien substance or damaged. and check for a Smartcard replacement. Reinsert Smartcard; Short LNB LNB cable is not pointing at Adjust dish alignment. Replace LNB Cable. Error message...

User Manual
Page 33
... Transport Stream Profile Level Video Input Rate Aspect Ratio Video Resolution Audio Decoding Audio Mode MPEG-2 ISO/IEC 13818 MPEG2 MP@ML 15 Mbit/s Max 4:3, 16:9 720 x 576, 720 x 480 MPEG-2 Audio/MusiCam Layer I & II Single/Dual/Joint stereo/Stereo Memory Flash Memory Graphic (MPEG)/System DRAM 2 Mbytes 16 Mbytes RF Modulator RF Input/Loopthrough output Frequency Output Channel TV Standard 75 , IEC 169-2 47...
... Transport Stream Profile Level Video Input Rate Aspect Ratio Video Resolution Audio Decoding Audio Mode MPEG-2 ISO/IEC 13818 MPEG2 MP@ML 15 Mbit/s Max 4:3, 16:9 720 x 576, 720 x 480 MPEG-2 Audio/MusiCam Layer I & II Single/Dual/Joint stereo/Stereo Memory Flash Memory Graphic (MPEG)/System DRAM 2 Mbytes 16 Mbytes RF Modulator RF Input/Loopthrough output Frequency Output Channel TV Standard 75 , IEC 169-2 47...


