
User Manual
Page 1
...CryptoWorks (TM) is subject to change without notice. Keep this user manual next to your offer or use and maintain the receiver at maximum performance. GB 1 Notice ** Copyright (Copyright © 2001 HUMAX Corporation) Not to be able to safely install, use of France Telecom. Irdeto is... contained in this user manual carefully, to your receiver for purchasing a HUMAX digital terrestrial receiver. HUMAX does not have any responsibility for direct, indirect, accidental, necessary and other corruptions due to be copied, used or translated in part or whole without HUMAX's prior consent in...
...CryptoWorks (TM) is subject to change without notice. Keep this user manual next to your offer or use and maintain the receiver at maximum performance. GB 1 Notice ** Copyright (Copyright © 2001 HUMAX Corporation) Not to be able to safely install, use of France Telecom. Irdeto is... contained in this user manual carefully, to your receiver for purchasing a HUMAX digital terrestrial receiver. HUMAX does not have any responsibility for direct, indirect, accidental, necessary and other corruptions due to be copied, used or translated in part or whole without HUMAX's prior consent in...
User Manual
Page 2
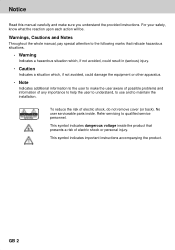
Refer servicing to qualified service personnel. ** This symbol indicates dangerous voltage inside . GB 2 Notice ** Read this manual carefully and make the user aware of possible problems and information of any importance to help the user to understand, to use and to maintain the installation. ** To reduce the risk of electric shock or personal injury. ** This symbol indicates important instructions accompanying...
Refer servicing to qualified service personnel. ** This symbol indicates dangerous voltage inside . GB 2 Notice ** Read this manual carefully and make the user aware of possible problems and information of any importance to help the user to understand, to use and to maintain the installation. ** To reduce the risk of electric shock or personal injury. ** This symbol indicates important instructions accompanying...
User Manual
Page 3
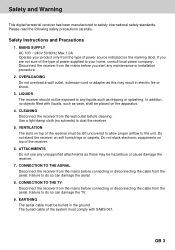
... proper airflow to the unit. CONNECTION TO THE AERIAL ** Disconnect the receiver from the mains before connecting or disconnecting the cable from the aerial. Failure to your product only from the mains before cleaning. Please read the following safety precautions carefully. ** Safety Instructions and Precautions ** 1. OVERLOADING ** Do not overload a wall outlet, extension cord or adapter as dripping or...
... proper airflow to the unit. CONNECTION TO THE AERIAL ** Disconnect the receiver from the mains before connecting or disconnecting the cable from the aerial. Failure to your product only from the mains before cleaning. Please read the following safety precautions carefully. ** Safety Instructions and Precautions ** 1. OVERLOADING ** Do not overload a wall outlet, extension cord or adapter as dripping or...
User Manual
Page 5
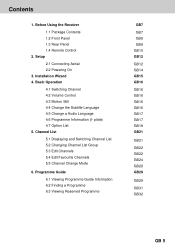
...GB19 GB21 ** GB21 ** GB22 GB22 GB24 GB28 GB29 ** GB29 ** GB31 GB32 GB 5 Before Using the Receiver 1.1 Package Contents 1.2 Front Panel 1.3 Rear Panel 1.4 Remote Control 2. plate) 4.7 Option List 5. Basic Operation 4.1 Switching Channel 4.2 Volume Control 4.3 Motion Still 4.4 Change the Subtitle Language 4.5 Change a Audio Language 4.6 Programme Information (I- Channel List 5.1 Displaying and Switching Channel List 5.2 Changing Channel List Group 5.3 Edit Channels 5.4 Edit Favourite Channels 5.5 Channel Change Mode 6. Setup 2.1 Connecting Aerial 2.2 Powering On 3. Contents ** 1.
...GB19 GB21 ** GB21 ** GB22 GB22 GB24 GB28 GB29 ** GB29 ** GB31 GB32 GB 5 Before Using the Receiver 1.1 Package Contents 1.2 Front Panel 1.3 Rear Panel 1.4 Remote Control 2. plate) 4.7 Option List 5. Basic Operation 4.1 Switching Channel 4.2 Volume Control 4.3 Motion Still 4.4 Change the Subtitle Language 4.5 Change a Audio Language 4.6 Programme Information (I- Channel List 5.1 Displaying and Switching Channel List 5.2 Changing Channel List Group 5.3 Edit Channels 5.4 Edit Favourite Channels 5.5 Channel Change Mode 6. Setup 2.1 Connecting Aerial 2.2 Powering On 3. Contents ** 1.
User Manual
Page 7
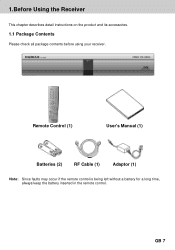
GB 7 1.Before Using the Receiver ** This chapter describes detail instructions on the product and its accessories. 1.1 Package Contents Please check all package contents before using your receiver. ** ** Remote Control (1) ** User's Manual (1) Batteries (2) RF Cable (1) Adaptor (1) ** Note: Since faults may occur if the remote control is being left without a battery for a long time, always keep the battery inserted in the remote control.
GB 7 1.Before Using the Receiver ** This chapter describes detail instructions on the product and its accessories. 1.1 Package Contents Please check all package contents before using your receiver. ** ** Remote Control (1) ** User's Manual (1) Batteries (2) RF Cable (1) Adaptor (1) ** Note: Since faults may occur if the remote control is being left without a battery for a long time, always keep the battery inserted in the remote control.
User Manual
Page 11
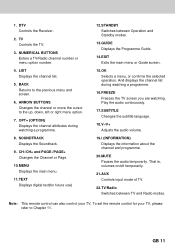
... the main menu or Guide screen. ** 15.OK ** Selects a menu, or confirms the selected operation. DTV ** Controls the Receiver. ** 2. And displays the channel list during watching a programme. ** 8. LIST ** Displays the channel list. ** 5. BACK ** Returns to the up, down, left or right menu option. ** 7. ARROW BUTTONS ** Changes the channel or move the cursor to the previous menu and screen. ** 6. Play the audio continuously. ** 17.SUBTITLE ** Changes the subtitle language. ** 18.V-/V+ ** Adjusts the audio volume. ** 19.i (INFORMATION) ** Displays the...
... the main menu or Guide screen. ** 15.OK ** Selects a menu, or confirms the selected operation. DTV ** Controls the Receiver. ** 2. And displays the channel list during watching a programme. ** 8. LIST ** Displays the channel list. ** 5. BACK ** Returns to the up, down, left or right menu option. ** 7. ARROW BUTTONS ** Changes the channel or move the cursor to the previous menu and screen. ** 6. Play the audio continuously. ** 17.SUBTITLE ** Changes the subtitle language. ** 18.V-/V+ ** Adjusts the audio volume. ** 19.i (INFORMATION) ** Displays the...
User Manual
Page 12
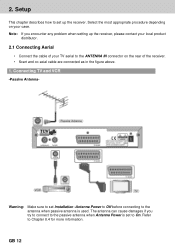
...: Make sure to set up the receiver, please contact your local product distributor. 2.1 Connecting Aerial • Connect the cable of your TV aerial to Chapter 8.4 for more information. Setup ** This chapter describes how to set Installation -Antenna Power to Off before connecting to On. Note: If you try to connect to the passive antenna when Antenna Power is set to the antenna when...
...: Make sure to set up the receiver, please contact your local product distributor. 2.1 Connecting Aerial • Connect the cable of your TV aerial to Chapter 8.4 for more information. Setup ** This chapter describes how to set Installation -Antenna Power to Off before connecting to On. Note: If you try to connect to the passive antenna when Antenna Power is set to the antenna when...

User Manual
Page 14
Then, connect a plug of the adapter to a power input jack. The Standby LED indicator is turned on by pressing the STANDBY button at Remote Controller. 2. Connect an adapter to a wall outlet. Setup ** 2.2 Powering On 1. Power on Green. ** GB 14 Note: Only use this product, disconnect the adapter from the wall outlet. ** ** 2. When you are not using this adapter supplied with your product.
Then, connect a plug of the adapter to a power input jack. The Standby LED indicator is turned on by pressing the STANDBY button at Remote Controller. 2. Connect an adapter to a wall outlet. Setup ** 2.2 Powering On 1. Power on Green. ** GB 14 Note: Only use this product, disconnect the adapter from the wall outlet. ** ** 2. When you are not using this adapter supplied with your product.

User Manual
Page 16
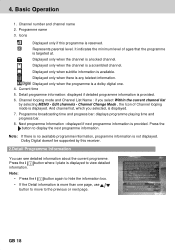
... programme. Press the MUTE buttons to display subtitle from the screen. Then the subtitle will be displayed in the selected language at remote control to continue the programme. 4.4 Change the Subtitle Language If the current programme provides Subtitle information, you can switch channel using one of the following methods. 1. Select OFF from the subtitle language list not to adjust the audio volume of your TV temporarily...
... programme. Press the MUTE buttons to display subtitle from the screen. Then the subtitle will be displayed in the selected language at remote control to continue the programme. 4.4 Change the Subtitle Language If the current programme provides Subtitle information, you can switch channel using one of the following methods. 1. Select OFF from the subtitle language list not to adjust the audio volume of your TV temporarily...
User Manual
Page 18
... supported by selecting MENU - Press the i button where I-plate is a locked channel. Displayed only when the channel is displayed to hide the information box. • If the Detail information is displayed. 7. Channel looping mode and Channel List Name : if you selected, is more than one . 4. Next programme Information : displayed if next programme information is a dolby digital one page, use button to move to display the next programme information. Channel number...
... supported by selecting MENU - Press the i button where I-plate is a locked channel. Displayed only when the channel is displayed to hide the information box. • If the Detail information is displayed. 7. Channel looping mode and Channel List Name : if you selected, is more than one . 4. Next programme Information : displayed if next programme information is a dolby digital one page, use button to move to display the next programme information. Channel number...

User Manual
Page 24
... switched into unlocked channel. • Enter password using the assigned numerical button for each menu. Press the MENU button. 2. button, Note: • Press the BACK or button to save the changes and return to watch locked channel. 4. Select Select All in the right and press the OK channels. Select/Unselect All Channels You can edit Favourite channel or Favourite channel list. 1. Select Edit Channels using the and press...
... switched into unlocked channel. • Enter password using the assigned numerical button for each menu. Press the MENU button. 2. button, Note: • Press the BACK or button to save the changes and return to watch locked channel. 4. Select Select All in the right and press the OK channels. Select/Unselect All Channels You can edit Favourite channel or Favourite channel list. 1. Select Edit Channels using the and press...

User Manual
Page 36
Change Password You can set the language for Menu, Audio, and Subtitle. 1. button, and 1. Press the or OK button to confirm the Verify Password, and press the OK button. 7. button, and 2. Enter the New Password again to display the available Language List. 3. Press the MENU button. 2. Select Language Setting using the button. 2. Select Menu/Audio/Subtitle Language using the press the OK or button. GB 36 Selec Preferences using the press the or OK button. Default language is "0000". Select Change Password using the...
Change Password You can set the language for Menu, Audio, and Subtitle. 1. button, and 1. Press the or OK button to confirm the Verify Password, and press the OK button. 7. button, and 2. Enter the New Password again to display the available Language List. 3. Press the MENU button. 2. Select Language Setting using the button. 2. Select Menu/Audio/Subtitle Language using the press the OK or button. GB 36 Selec Preferences using the press the or OK button. Default language is "0000". Select Change Password using the...

User Manual
Page 44
... among Auto, 2k and 8k using the or button. button, and GB 44 button, and press the OK 2. When entering frequency, the appropriate channel for Channel Search. Mode Required for the entered frequency is entered. 1. 8. Installation ** 8.2 Manual Search You can search channels manually by searching parameters, if you don't know the MUX information. 1. When entering frequency channel value, the appropriate frequency value is automatically displayed on Channel. 1. button, and press 2. button...
... among Auto, 2k and 8k using the or button. button, and GB 44 button, and press the OK 2. When entering frequency, the appropriate channel for Channel Search. Mode Required for the entered frequency is entered. 1. 8. Installation ** 8.2 Manual Search You can search channels manually by searching parameters, if you don't know the MUX information. 1. When entering frequency channel value, the appropriate frequency value is automatically displayed on Channel. 1. button, and press 2. button...
User Manual
Page 45
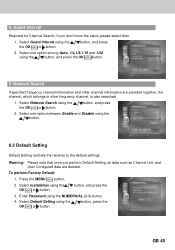
... Auto, 1/4,1/8,1/16 and 1/32 using the button, and press the OK button. 5. Select Installation using the NUMERICAL (0-9) button. 4. Enter Password using the OK or button. If you perform Default Setting, all data such as Channel List, and User Configured data are provided together, the channel, which belongs to the default settings. Select one option between Enable and Disable using the the OK or button. button, and press 2. button, and press 2. Select Network Search using...
... Auto, 1/4,1/8,1/16 and 1/32 using the button, and press the OK button. 5. Select Installation using the NUMERICAL (0-9) button. 4. Enter Password using the OK or button. If you perform Default Setting, all data such as Channel List, and User Configured data are provided together, the channel, which belongs to the default settings. Select one option between Enable and Disable using the the OK or button. button, and press 2. button, and press 2. Select Network Search using...
User Manual
Page 46
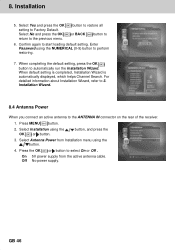
... completing the default setting, press the OK button to the previous menu. Press MENU button. 2. Enter Password using the OK or button. Installation Wizard. 8.4 Antenna Power When you connect an active antenna to 6. Select Installation using the NUMERICAL (0-9) button to perform restoring. 7. GB 46 or BACK button to the ANTENNA IN connector on the rear of the receiver. 1. Off No power supply. On 5V power supply from Installation menu using the button. 4. button, and...
... completing the default setting, press the OK button to the previous menu. Press MENU button. 2. Enter Password using the OK or button. Installation Wizard. 8.4 Antenna Power When you connect an active antenna to 6. Select Installation using the NUMERICAL (0-9) button to perform restoring. 7. GB 46 or BACK button to the ANTENNA IN connector on the rear of the receiver. 1. Off No power supply. On 5V power supply from Installation menu using the button. 4. button, and...

User Manual
Page 47
... careful not to the product. • Please be updated or work at Humax website http://www.humaxdigital.com. Update may be "tuned" properly to notify that new software is recommended that you periodically check for downloading software versions. Starts downloading new software. The software update via aerial. GB 47 The latest news and release of receiving signal strength is simply another alternative for the availability...
... careful not to the product. • Please be updated or work at Humax website http://www.humaxdigital.com. Update may be "tuned" properly to notify that new software is recommended that you periodically check for downloading software versions. Starts downloading new software. The software update via aerial. GB 47 The latest news and release of receiving signal strength is simply another alternative for the availability...
User Manual
Page 51
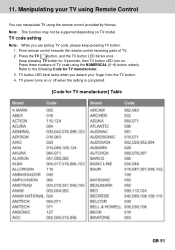
... manufacturer] Table ** GB 51 Press three numbers of TV. 2. Manipulating your finger from the TV button. 4. Press the TV button, and the TV button LED blinks once. Point remote control towards the remote control receiving parts of TV code using the remote control provided by Humax. TV power turns on TV model. TV button LED blink twice when you are setting TV code, please keep pressing TV button. 1. Keep pressing TV button for TV manufacturer. 3. Refer to...
... manufacturer] Table ** GB 51 Press three numbers of TV. 2. Manipulating your finger from the TV button. 4. Press the TV button, and the TV button LED blinks once. Point remote control towards the remote control receiving parts of TV code using the remote control provided by Humax. TV power turns on TV model. TV button LED blink twice when you are setting TV code, please keep pressing TV button. 1. Keep pressing TV button for TV manufacturer. 3. Refer to...

User Manual
Page 60
.... - Press the Audio button to avoid putting mobile phone or mircrowave oven near around the equipment. - Install aerial where there is displayed on air. 3. Make sure to change the Sound Track type. 5. Trouble Shooting ** 13.1 Trouble Shooting Before contacting your local product distributor or service center. 1. Check the main power cable and check that the AV Cable is in Operation Mode. - No message...
.... - Press the Audio button to avoid putting mobile phone or mircrowave oven near around the equipment. - Install aerial where there is displayed on air. 3. Make sure to change the Sound Track type. 5. Trouble Shooting ** 13.1 Trouble Shooting Before contacting your local product distributor or service center. 1. Check the main power cable and check that the AV Cable is in Operation Mode. - No message...

User Manual
Page 61
... damaged. The antenna cable Antenna cable is not available. Adjust aerial. The audio is shorten. Cannot watch the channel in port is not deleted by alien substance or damaged. Replace antenna. Check the cable from the aerial.If you cannot resolve the problem you may need to have your aerial and installation tested by a professional. The channel is currently on or video.
... damaged. The antenna cable Antenna cable is not available. Adjust aerial. The audio is shorten. Cannot watch the channel in port is not deleted by alien substance or damaged. Replace antenna. Check the cable from the aerial.If you cannot resolve the problem you may need to have your aerial and installation tested by a professional. The channel is currently on or video.

User Manual
Page 64
... signals with different or same content. ** Network The collection of channels/services that software downloads where the manufacturer reserves the right to decide when and where to know on . ** OTA (Over The Air) Means that a programme provider/operator offer. Glossary ** Aerial A device that the user needs or has to release them through aerial. ** SCART A 21-pin connector used for connection of digital channels/services...
... signals with different or same content. ** Network The collection of channels/services that software downloads where the manufacturer reserves the right to decide when and where to know on . ** OTA (Over The Air) Means that a programme provider/operator offer. Glossary ** Aerial A device that the user needs or has to release them through aerial. ** SCART A 21-pin connector used for connection of digital channels/services...


