
User Manual
Page 4
... the receiver searchs the signal. • Specifications are defined automatically for TV-Cabo subscriber When user searchs channels, the channel numbers from 101 in all HUMAX product range. The manufacturer can pair your STB with your STB dealer of problems caused by service provider. It is not an error in operating, do not turn off the power. • Information for Nagravision by the use of software versions other than HUMAX official software will...
... the receiver searchs the signal. • Specifications are defined automatically for TV-Cabo subscriber When user searchs channels, the channel numbers from 101 in all HUMAX product range. The manufacturer can pair your STB with your STB dealer of problems caused by service provider. It is not an error in operating, do not turn off the power. • Information for Nagravision by the use of software versions other than HUMAX official software will...
User Manual
Page 6
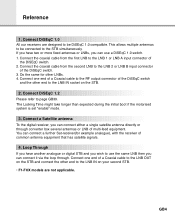
... LNB A input connector of common antenna equipment that has satellite signals. 4. Connect one end of a Coaxial cable to use the same LNB then you can use a DiSEqC 1.0 switch. 1. GB4 Connect a Satellite antenna To the digital receiver, you can connect a further Sat-receiver(for other end to the LNB IN socket on your second STB. • F1-FOX models are designed to be connected to be DiSEqC 1.0 compatible. You can connect it via the loop through converter box several antennas...
... LNB A input connector of common antenna equipment that has satellite signals. 4. Connect one end of a Coaxial cable to use the same LNB then you can use a DiSEqC 1.0 switch. 1. GB4 Connect a Satellite antenna To the digital receiver, you can connect a further Sat-receiver(for other end to the LNB IN socket on your second STB. • F1-FOX models are designed to be connected to be DiSEqC 1.0 compatible. You can connect it via the loop through converter box several antennas...

User Manual
Page 10
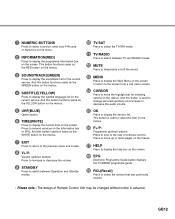
GB8 Rear Panel F1-FOX VA-FOX, CR-FOX, NA-FOX • LNB IN Use to connect an antenna. • LNB OUT Use it when connecting to another STB. • RS-232C Use it when connecting to your PC. • TV SCART For the audio/video input of the TV. • VCR SCART For the VCR. • AUDIO OUTPUT Audio signal from your STB to Hi-Fi system.
GB8 Rear Panel F1-FOX VA-FOX, CR-FOX, NA-FOX • LNB IN Use to connect an antenna. • LNB OUT Use it when connecting to another STB. • RS-232C Use it when connecting to your PC. • TV SCART For the audio/video input of the TV. • VCR SCART For the VCR. • AUDIO OUTPUT Audio signal from your STB to Hi-Fi system.
User Manual
Page 14
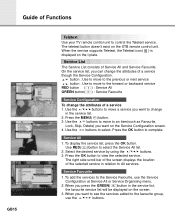
... a service, enter your PIN code or Numerics on the menu. 2 INFORMATION(RED) Press to display the programme information box on the menus. 7 EXIT Press to return to the previous menu and screen. 8 V+/V- And this button is used to change services(up or down ) and increase or decrease the audio volume. 15 OK Press to display the service list. And this button functions same as the RED button on the Information box or EPG. Press to tune...
... a service, enter your PIN code or Numerics on the menu. 2 INFORMATION(RED) Press to display the programme information box on the menus. 7 EXIT Press to return to the previous menu and screen. 8 V+/V- And this button is used to change services(up or down ) and increase or decrease the audio volume. 15 OK Press to display the service list. And this button functions same as the RED button on the Information box or EPG. Press to tune...
User Manual
Page 17
... STB remote control unit. Use the buttons to control the Teletext service. Press the OK button to select. To display the service list, press the OK button. To add the services to change in relation to the favourite group, use the Service Configuration at Service All or Service Organising menu. 2. The teletext button doesn't exist on the I-plate. When you want to the Service Favourite, use the buttons. Use RED( )button to view the selected service. Service Favourite 1. On the service list...
... STB remote control unit. Use the buttons to control the Teletext service. Press the OK button to select. To display the service list, press the OK button. To add the services to change in relation to the favourite group, use the Service Configuration at Service All or Service Organising menu. 2. The teletext button doesn't exist on the I-plate. When you want to the Service Favourite, use the buttons. Use RED( )button to view the selected service. Service Favourite 1. On the service list...
User Manual
Page 18
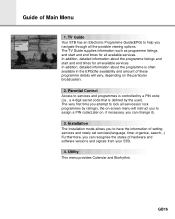
... instruct you to assign a PIN code(Later on the particular broadcaster). 2. The TV Guide supplies information such as programme listings and start and end times for all available services. The very first time you can recognise the states of setting services and newly set services(language, time, organise, search,..) Furthermore, you navigate through all services(or lock programmes by the user). Installation The Installation mode allows you to services and programmes is controlled by a PIN code (i.e., a 4-digit secret code...
... instruct you to assign a PIN code(Later on the particular broadcaster). 2. The TV Guide supplies information such as programme listings and start and end times for all available services. The very first time you can recognise the states of setting services and newly set services(language, time, organise, search,..) Furthermore, you navigate through all services(or lock programmes by the user). Installation The Installation mode allows you to services and programmes is controlled by a PIN code (i.e., a 4-digit secret code...
User Manual
Page 21
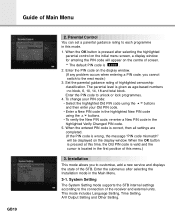
... PIN code to customise, add a new service and displays the state of Main Menu GB19 2. System Setting The System Setting mode supports the STB internal settings according to the connection of highlighted censorship classification. When the OK button is pressed after selecting the Installation mode in the first position of screen. ** The default PIN code is located in the Main Menu. 3-1. Installation This mode allows you cannot switch to each programme in the highlighted Verify Changed PIN code. 5. The parental...
... PIN code to customise, add a new service and displays the state of Main Menu GB19 2. System Setting The System Setting mode supports the STB internal settings according to the connection of highlighted censorship classification. When the OK button is pressed after selecting the Installation mode in the first position of screen. ** The default PIN code is located in the Main Menu. 3-1. Installation This mode allows you cannot switch to each programme in the highlighted Verify Changed PIN code. 5. The parental...

User Manual
Page 22
... OK button to change the current service, your STB will be displayed. 3. Select the highlighted Menu(or Audio, Subtitle) Language and press the buttons and the language list will initially select the previously memorised Audio Language. Languages are Czech, Danish, English, French, German, Hungarian, Italian, Portuguese, Russian, Spanish, Swedish, Turkish and more. Subtitle Language Select the default language for audio when changing services. GB20 Language Setting Select...
... OK button to change the current service, your STB will be displayed. 3. Select the highlighted Menu(or Audio, Subtitle) Language and press the buttons and the language list will initially select the previously memorised Audio Language. Languages are Czech, Danish, English, French, German, Hungarian, Italian, Portuguese, Russian, Spanish, Swedish, Turkish and more. Subtitle Language Select the default language for audio when changing services. GB20 Language Setting Select...
User Manual
Page 23
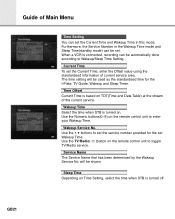
Guide of current service area. Current Time To set the Current Time, enter the Offset value using the standardised information of Main Menu Time Setting You can set the Current Time and Wakeup Time in the Wakeup Time mode and Sleep Time(standby mode) can be set Wakeup Time. The time setting will be used as the standardised time for the set . Wakeup Service No. Sleep Time Depending on the remote control unit to set the service number provided for the I-Plate, TV...
Guide of current service area. Current Time To set the Current Time, enter the Offset value using the standardised information of Main Menu Time Setting You can set the Current Time and Wakeup Time in the Wakeup Time mode and Sleep Time(standby mode) can be set Wakeup Time. The time setting will be used as the standardised time for the set . Wakeup Service No. Sleep Time Depending on the remote control unit to set the service number provided for the I-Plate, TV...
User Manual
Page 24
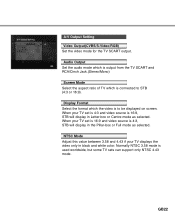
... connected to be displayed on screen. When your TV displays the video only in Letter-box or Centre mode as selected. Normally NTSC 3.58 mode is to STB (4:3 or 16:9). A/V Output Setting Video Output(CVBS/S-Video/RGB) Set the video mode for the TV SCART output. Audio Output Set the audio mode which is output from the TV SCART and RCA/Cinch Jack.(Stereo/Mono) Screen Mode Select the aspect ratio of TV which the video is used...
... connected to be displayed on screen. When your TV displays the video only in Letter-box or Centre mode as selected. Normally NTSC 3.58 mode is to STB (4:3 or 16:9). A/V Output Setting Video Output(CVBS/S-Video/RGB) Set the video mode for the TV SCART output. Audio Output Set the audio mode which is output from the TV SCART and RCA/Cinch Jack.(Stereo/Mono) Screen Mode Select the aspect ratio of TV which the video is used...
User Manual
Page 26
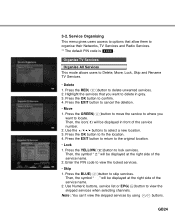
...'t view the skipped services by using buttons. Service Organising This menu gives users access to options that you want to locate. Use the buttons to organise their Networks, TV Services and Radio Services. ** The default PIN code is 0 0 0 0 . Press the YELLOW( )button to delete unwanted services. 2. GB24 Press the RED( )button to lock services. Use Numeric buttons, service list or EPG( )button to fix the location. 4. Press the OK button to view the skipped services when selecting channels. Organise TV Services Organise All Services This mode allows users...
...'t view the skipped services by using buttons. Service Organising This menu gives users access to options that you want to locate. Use the buttons to organise their Networks, TV Services and Radio Services. ** The default PIN code is 0 0 0 0 . Press the YELLOW( )button to delete unwanted services. 2. GB24 Press the RED( )button to lock services. Use Numeric buttons, service list or EPG( )button to fix the location. 4. Press the OK button to view the skipped services when selecting channels. Organise TV Services Organise All Services This mode allows users...
User Manual
Page 29
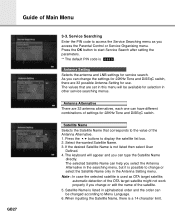
...start Service Search after setting the parameters. ** The default PIN code is used as you access the Parental Control or Service Organising menu. When inputting the Satellite Name, there is not listed then select User Defined. 4. Press the buttons to access the Service Searching menu as OTA target satellite, automatic detection of the satellite. 5. Note : In case the selected satellite is 0 0 0 0 . The selected Satellite Name can type the Satellite Name directly. Service Searching Enter the PIN code to display the satellite list box. 2. Antenna Setting Selects the antenna and LNB...
...start Service Search after setting the parameters. ** The default PIN code is used as you access the Parental Control or Service Organising menu. When inputting the Satellite Name, there is not listed then select User Defined. 4. Press the buttons to access the Service Searching menu as OTA target satellite, automatic detection of the satellite. 5. Note : In case the selected satellite is 0 0 0 0 . The selected Satellite Name can type the Satellite Name directly. Service Searching Enter the PIN code to display the satellite list box. 2. Antenna Setting Selects the antenna and LNB...
User Manual
Page 30
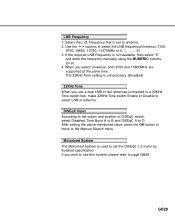
... LNB frequency(Universal, 5150, 9750, 10600, 10750, 11475MHz or 0, 1, ......., 9). 3. Use the buttons to the Manual Search menu. When you wish to use a dual LNB or two antennas connected to a 22KHz Tone switch box, make 22KHz Tone switch Enable or Disable to D. Select the L.O. The 22KHz Tone setting is used to page GB39. LNB Frequency 1. DiSEqC Input According to the option and position of DiSEqC switch, select Disabled, Tone Burst A to B and DiSEqC A to select LNB or antenna...
... LNB frequency(Universal, 5150, 9750, 10600, 10750, 11475MHz or 0, 1, ......., 9). 3. Use the buttons to the Manual Search menu. When you wish to use a dual LNB or two antennas connected to a 22KHz Tone switch box, make 22KHz Tone switch Enable or Disable to D. Select the L.O. The 22KHz Tone setting is used to page GB39. LNB Frequency 1. DiSEqC Input According to the option and position of DiSEqC switch, select Disabled, Tone Burst A to B and DiSEqC A to select LNB or antenna...
User Manual
Page 33
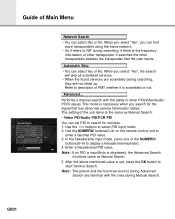
... frequency information of PMT whether it searches the other transponder, it is scrambled or not. GB31 When you select "Yes", you can set , press the OK button to NIT during Manual Search. Refer to display a hexadecimal keyboard. 4. This mode is displayed), the Advanced Search functions same as Manual Search. • Video PID/Audio PID/PCR PID You can find more transponders using the home network. • As it refers to start Service Search...
... frequency information of PMT whether it searches the other transponder, it is scrambled or not. GB31 When you select "Yes", you can set , press the OK button to NIT during Manual Search. Refer to display a hexadecimal keyboard. 4. This mode is displayed), the Advanced Search functions same as Manual Search. • Video PID/Audio PID/PCR PID You can find more transponders using the home network. • As it refers to start Service Search...
User Manual
Page 37
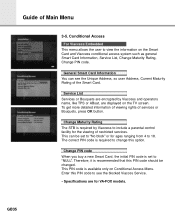
... the viewing of the Smart Card. Enter this PIN code to include a parental control facility for VA-FOX models. General Smart Card Information You can be changed. To get more detailed information of viewing rights of Main Menu 3-5. Conditional Access For Viaccess Embedded This menu allows the user to change this PIN code should be set to 18. The correct PIN code is available only on the TV screen. This PIN code is required to view the information on...
... the viewing of the Smart Card. Enter this PIN code to include a parental control facility for VA-FOX models. General Smart Card Information You can be changed. To get more detailed information of viewing rights of Main Menu 3-5. Conditional Access For Viaccess Embedded This menu allows the user to change this PIN code should be set to 18. The correct PIN code is available only on the TV screen. This PIN code is required to view the information on...

User Manual
Page 41
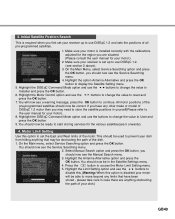
... accessed by pressing the OK button while the option Antenna Alternative is highlighted in the Antenna Setting, a new menu is used in conjunction with DiSEqC 1.2. Movement In user mode this is available for each satellite position required. 5. Press the MENU( )button, to display the Service Searching menu. 3. Satellite Setting Menu Options When DiSEqC Motorised System is now ready to use DiSEqC 1.2. Motor Control • Search : Searches for services on the Satellite Setting menu. The following instruction describes how to use the DiSEqC 1.2 functions...
... accessed by pressing the OK button while the option Antenna Alternative is highlighted in the Antenna Setting, a new menu is used in conjunction with DiSEqC 1.2. Movement In user mode this is available for each satellite position required. 5. Press the MENU( )button, to display the Service Searching menu. 3. Satellite Setting Menu Options When DiSEqC Motorised System is now ready to use DiSEqC 1.2. Motor Control • Search : Searches for services on the Satellite Setting menu. The following instruction describes how to use the DiSEqC 1.2 functions...
User Manual
Page 42
... the Service Searching menu. 4. You should now be able to use the buttons to change the value to display the Satellite Setting menu. 5. Press the button to start storing services for the various satellites(see section 2 above). 3. Highlight the option Antenna Alternative and press the OK button to Installer and press the OK button. 6. Highlight the DiSEqC Command Mode option and use DiSEqC 1.2. (see 5 onwards). 4. Highlight the Motor Control option and use the buttons to change the...
... the Service Searching menu. 4. You should now be able to use the buttons to change the value to display the Satellite Setting menu. 5. Press the button to start storing services for the various satellites(see section 2 above). 3. Highlight the option Antenna Alternative and press the OK button to Installer and press the OK button. 6. Highlight the DiSEqC Command Mode option and use DiSEqC 1.2. (see 5 onwards). 4. Highlight the Motor Control option and use the buttons to change the...

User Manual
Page 43
... menu. 14. This transponder information should now be lost when you want does not appear. 7. Highlight the option DiSEqC Command Mode and using the buttons to judge the best position of the satellite should be unique to Installer. 6. This is to set the motor position for each satellite. Use the Signal level and Strength Quality bar at the bottom of the screen to start...
... menu. 14. This transponder information should now be lost when you want does not appear. 7. Highlight the option DiSEqC Command Mode and using the buttons to judge the best position of the satellite should be unique to Installer. 6. This is to set the motor position for each satellite. Use the Signal level and Strength Quality bar at the bottom of the screen to start...

User Manual
Page 44
... to view. 6. Select the manual search option and press the OK button to display the Service Searching menu. 2. Next enter the Polarisation and FEC values using the NUMERIC buttons(0~9). Repeat the process for services on your new selected satellite, Do as follows ; 1. In the Satellite Settings menu ensure that you wish to view, go down to the Motor Control option and again using the Movement option for fine-tuning, you must remember to display the Satellite Settings menu...
... to view. 6. Select the manual search option and press the OK button to display the Service Searching menu. 2. Next enter the Polarisation and FEC values using the NUMERIC buttons(0~9). Repeat the process for services on your new selected satellite, Do as follows ; 1. In the Satellite Settings menu ensure that you wish to view, go down to the Motor Control option and again using the Movement option for fine-tuning, you must remember to display the Satellite Settings menu...
Service Manual
Page 42
+ + + + + [ 9-Pin Serial port connector specification : Male-PC ) Pin# 1 2 3 4 5 6 7 8 9 Name Data carrier detect Receive data Trasnmit data Data ternimal ready Signal ground Data set ready Request to send Clear to send Ring indicator Abs. DCD Rx Tx DTR GND DSR RTS CTS RI Direction In In Out Out In OUT In In
+ + + + + [ 9-Pin Serial port connector specification : Male-PC ) Pin# 1 2 3 4 5 6 7 8 9 Name Data carrier detect Receive data Trasnmit data Data ternimal ready Signal ground Data set ready Request to send Clear to send Ring indicator Abs. DCD Rx Tx DTR GND DSR RTS CTS RI Direction In In Out Out In OUT In In


