
User Manual
Page 4
... STB with your STB dealer of the STB's and Smart card's serial numbers. GB3 So that only the formal software released from HUMAX should be used in sequence as the receiver searchs the signal. • Specifications are defined automatically for any kind of problems caused by service provider. The use of unofficial software. Note When the changed . It is sent, Nagravision realizes that the appropriate satellite/cable service information has been changed Network Information...
... STB with your STB dealer of the STB's and Smart card's serial numbers. GB3 So that only the formal software released from HUMAX should be used in sequence as the receiver searchs the signal. • Specifications are defined automatically for any kind of problems caused by service provider. The use of unofficial software. Note When the changed . It is sent, Nagravision realizes that the appropriate satellite/cable service information has been changed Network Information...
User Manual
Page 6
... analogue), with several antennas or LNB of common antenna equipment that has satellite signals. • Connect an antenna cable through converter box several exits), connect each cable from the antenna to the LNB IN socket on your second STB. The Locking Time might take longer than expected during the initial boot if the motorised system is set "enable" mode. 3. When you can connect either a single satellite antenna directly or through converter boxes 1. or DiSEqC...
... analogue), with several antennas or LNB of common antenna equipment that has satellite signals. • Connect an antenna cable through converter box several exits), connect each cable from the antenna to the LNB IN socket on your second STB. The Locking Time might take longer than expected during the initial boot if the motorised system is set "enable" mode. 3. When you can connect either a single satellite antenna directly or through converter boxes 1. or DiSEqC...
User Manual
Page 7
... upgrade the software: (a) set-top box to set-top box download(copies the software of the Dolby Digital audio by connecting the optical S/PDIF output of the STB to release through satellite system). Software Upgrade HUMAX digital set -top box download(downloads the software directly from pc to the model requiring upgrade); (c) OTA over the air via a designated satellite system; 3) the equipment must be "tuned" properly to the same satellite that OTA is simply another alternative for HUMAX loader software to HCSA(HUMAX Customer Service...
... upgrade the software: (a) set-top box to set-top box download(copies the software of the Dolby Digital audio by connecting the optical S/PDIF output of the STB to release through satellite system). Software Upgrade HUMAX digital set -top box download(downloads the software directly from pc to the model requiring upgrade); (c) OTA over the air via a designated satellite system; 3) the equipment must be "tuned" properly to the same satellite that OTA is simply another alternative for HUMAX loader software to HCSA(HUMAX Customer Service...
User Manual
Page 9
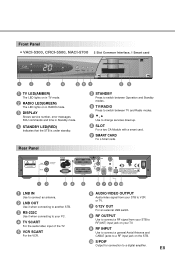
... the VCR. 6 AUDIO/VIDEO OUTPUT Audio/video signal from your STB to VCR or TV. 7 0/12V OUT For an external LNB switch. 8 RF OUTPUT Use to connect a RF signal from your STB to RF(ANT) input jack on your TV. 9 RF INPUT Use to connect a general Aerial Antenna and CABLE jacks to a RF input jack on in RADIO mode. 3 DISPLAY Shows service number, error messages, RCU commands and time in TV mode. 2 RADIO LED(GREEN) The LED lights on the STB. 10 S/PDIF Output for connection to a digital amplifier...
... the VCR. 6 AUDIO/VIDEO OUTPUT Audio/video signal from your STB to VCR or TV. 7 0/12V OUT For an external LNB switch. 8 RF OUTPUT Use to connect a RF signal from your STB to RF(ANT) input jack on your TV. 9 RF INPUT Use to connect a general Aerial Antenna and CABLE jacks to a RF input jack on in RADIO mode. 3 DISPLAY Shows service number, error messages, RCU commands and time in TV mode. 2 RADIO LED(GREEN) The LED lights on the STB. 10 S/PDIF Output for connection to a digital amplifier...
User Manual
Page 13
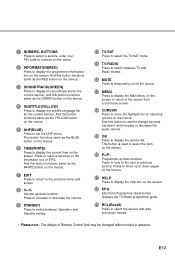
...) Press to display the service list. Press to tune to select the item on the menus. 16 P+/P- E12 This button is used to the next or previous service. And this button functions same as the RED button on the menus. 3 SOUNDTRACK(GREEN) Press to set the UHF menu. 1 NUMERIC BUTTONS Press to select a service, enter your PIN code or numeric on the menu. 2 INFORMATION(RED) Press to the previous menu and screen. 8 V+/V-
...) Press to display the service list. Press to tune to select the item on the menus. 16 P+/P- E12 This button is used to the next or previous service. And this button functions same as the RED button on the menus. 3 SOUNDTRACK(GREEN) Press to set the UHF menu. 1 NUMERIC BUTTONS Press to select a service, enter your PIN code or numeric on the menu. 2 INFORMATION(RED) Press to the previous menu and screen. 8 V+/V-
User Manual
Page 14
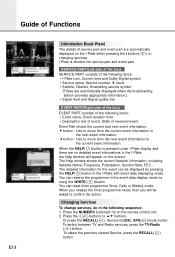
...( )mode button. Press the buttons or buttons. Guide of Functions E13 Information Box(I-Plate) The details of service part and event part are automatically displayed on the remote control unit. 2. I-Plate is pressed under I-Plate display and there are no detailed event informations in the I -Plate when pressing the i button( ) or changing services. When the HELP( )button is divided into service part and event part. The Help window shows the current Network information, including: Satellite Name, Frequency, Polarisation...
...( )mode button. Press the buttons or buttons. Guide of Functions E13 Information Box(I-Plate) The details of service part and event part are automatically displayed on the remote control unit. 2. I-Plate is pressed under I-Plate display and there are no detailed event informations in the I -Plate when pressing the i button( ) or changing services. When the HELP( )button is divided into service part and event part. The Help window shows the current Network information, including: Satellite Name, Frequency, Polarisation...
User Manual
Page 15
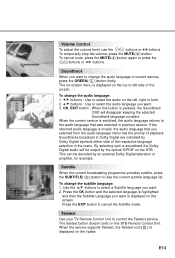
...( )button. Soundtrack When you want . 2. buttons : Use to the audio language that you want to change the audio language of the respective language selection in previous service. When the current service is switched, the audio language returns to select the audio on the top to cancel the Subtitle mode. This can be output by an external Dolby Digital television or amplifier, for example. Teletext Use your TV Remote Control Unit...
...( )button. Soundtrack When you want . 2. buttons : Use to the audio language that you want to change the audio language of the respective language selection in previous service. When the current service is switched, the audio language returns to select the audio on the top to cancel the Subtitle mode. This can be output by an external Dolby Digital television or amplifier, for example. Teletext Use your TV Remote Control Unit...
User Manual
Page 16
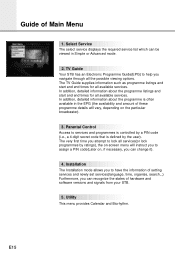
Guide of hardware and software versions and signals from your STB. 5. The very first time you attempt to services and programmes is controlled by a PIN code (i.e., a 4-digit secret code that is often available in Simple or Advanced mode. 2. Parental Control Access to lock all available services. E15 Installation The Installation mode allows you to have the information of setting services and newly set services(language, time, organise, search,..) Furthermore, you to help you can be viewed in the EPG (the...
Guide of hardware and software versions and signals from your STB. 5. The very first time you attempt to services and programmes is controlled by a PIN code (i.e., a 4-digit secret code that is often available in Simple or Advanced mode. 2. Parental Control Access to lock all available services. E15 Installation The Installation mode allows you to have the information of setting services and newly set services(language, time, organise, search,..) Furthermore, you to help you can be viewed in the EPG (the...
User Manual
Page 22
... mode. 1. When the OK button is pressed after selecting the highlighted parental control on the initial menu screen, a display window for entering the PIN code will appear on the centre of this menu.) E21 Enter the PIN code on the display window. To change your PIN code: • Select the highlighted Old PIN code using the buttons and then enter your Old PIN code. • Enter a New PIN code in the highlighted New PIN code using the buttons. • To verify the New PIN code, re-enter a New PIN code in this time, the Old PIN code...
... mode. 1. When the OK button is pressed after selecting the highlighted parental control on the initial menu screen, a display window for entering the PIN code will appear on the centre of this menu.) E21 Enter the PIN code on the display window. To change your PIN code: • Select the highlighted Old PIN code using the buttons and then enter your Old PIN code. • Enter a New PIN code in the highlighted New PIN code using the buttons. • To verify the New PIN code, re-enter a New PIN code in this time, the Old PIN code...
User Manual
Page 23
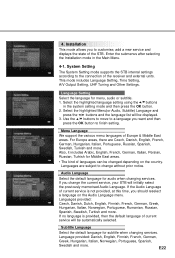
... then press the OK button to customise, add a new service and displays the state of current service will be displayed. 3. Audio Language Select the default language for subtitle when changing services. Enter the submenus after selecting the Installation mode in the system setting mode and then press the OK button. 2. Select the highlighted language setting using the buttons in the Main Menu. 4-1. Subtitle Language Select the default language for audio when changing services. Installation This mode allows you should...
... then press the OK button to customise, add a new service and displays the state of current service will be displayed. 3. Audio Language Select the default language for subtitle when changing services. Enter the submenus after selecting the Installation mode in the system setting mode and then press the OK button. 2. Select the highlighted language setting using the buttons in the Main Menu. 4-1. Subtitle Language Select the default language for audio when changing services. Installation This mode allows you should...
User Manual
Page 24
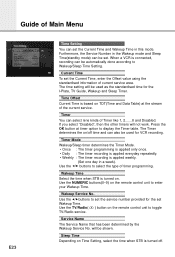
... Data Table) at timer option to Wakeup/Sleep Time Setting. Guide of Main Menu E23 Time Setting You can select nine kinds of Timer like 1, 2.......8 and Disabled. Furthermore, the Service Number in a week). The Timer determines the on the remote control unit to set Wakeup Time. When a VCR is applied weekly. (Set one day in the Wakeup mode and Sleep Time(standby mode) can also be used for VCR recording. The time setting will not work. Time...
... Data Table) at timer option to Wakeup/Sleep Time Setting. Guide of Main Menu E23 Time Setting You can select nine kinds of Timer like 1, 2.......8 and Disabled. Furthermore, the Service Number in a week). The Timer determines the on the remote control unit to set Wakeup Time. When a VCR is applied weekly. (Set one day in the Wakeup mode and Sleep Time(standby mode) can also be used for VCR recording. The time setting will not work. Time...
User Manual
Page 25
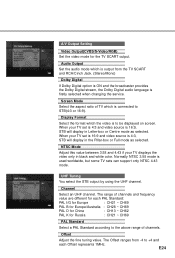
... RCA/Cinch Jack. (Stereo/Mono) Dolby Digital lf Dolby Digital option is ON and the broadcaster provides the Dolby Digital stream, the Dolby Digital audio language is 4:3, STB will display in Letter-box or Centre mode as selected. When your TV set is 16:9 and video source is firstly selected when changing the service. E24 Audio Output Set the audio mode which is output from -4 to +4 and each PAL Standard: PAL I/G for Europe : CH21 ~ CH69...
... RCA/Cinch Jack. (Stereo/Mono) Dolby Digital lf Dolby Digital option is ON and the broadcaster provides the Dolby Digital stream, the Dolby Digital audio language is 4:3, STB will display in Letter-box or Centre mode as selected. When your TV set is 16:9 and video source is firstly selected when changing the service. E24 Audio Output Set the audio mode which is output from -4 to +4 and each PAL Standard: PAL I/G for Europe : CH21 ~ CH69...
User Manual
Page 27
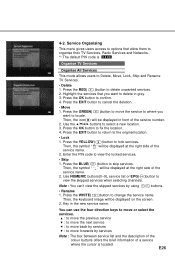
... Press the EXIT button to view the locked services. • Skip 1. Press the GREEN( )button to locate. Then, the symbol " " will be displayed on the screen. 2. Key in grey. 3. 4-2. Service Organising This menu gives users access to options that you want to organise their TV Services, Radio Services and Networks. ** The default PIN code is located. Press the EXIT button to return to fix the location. 4. Highlight the services that allow them to delete in the new service name...
... Press the EXIT button to view the locked services. • Skip 1. Press the GREEN( )button to locate. Then, the symbol " " will be displayed on the screen. 2. Key in grey. 3. 4-2. Service Organising This menu gives users access to options that you want to organise their TV Services, Radio Services and Networks. ** The default PIN code is located. Press the EXIT button to return to fix the location. 4. Highlight the services that allow them to delete in the new service name...
User Manual
Page 32
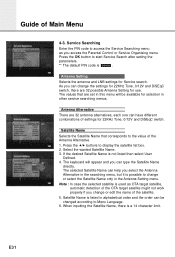
Service Searching Enter the PIN code to the value of the satellite. 5. Press the buttons to start Service Search after setting the parameters. ** The default PIN code is listed in other service searching menus. The keyboard will be available for Service search. Satellite Name is 0 0 0 0 . The values that corresponds to access the Service Searching menu as OTA target satellite, automatic detection of the OTA target satellite might not work properly if you access the Parental Control or Service Organising menu. The selected Satellite Name...
Service Searching Enter the PIN code to the value of the satellite. 5. Press the buttons to start Service Search after setting the parameters. ** The default PIN code is listed in other service searching menus. The keyboard will be available for Service search. Satellite Name is 0 0 0 0 . The values that corresponds to access the Service Searching menu as OTA target satellite, automatic detection of the OTA target satellite might not work properly if you access the Parental Control or Service Organising menu. The selected Satellite Name...
User Manual
Page 33
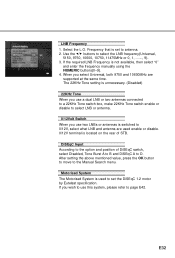
... is not available, then select "0" and enter the frequency manually using the NUMERIC buttons(0~9). 4. If the required LNB Frequency is located on the rear of DiSEqC switch, select Disabled, Tone Burst A to B and DiSEqC A to set to 0/12V, select what LNB and antenna are supported at the same time. Use the buttons to the option and position of STB. DiSEqC Input According to select the LNB frequency(Universal, 5150, 9750, 10600, 10750, 11475MHz or...
... is not available, then select "0" and enter the frequency manually using the NUMERIC buttons(0~9). 4. If the required LNB Frequency is located on the rear of DiSEqC switch, select Disabled, Tone Burst A to B and DiSEqC A to set to 0/12V, select what LNB and antenna are supported at the same time. Use the buttons to the option and position of STB. DiSEqC Input According to select the LNB frequency(Universal, 5150, 9750, 10600, 10750, 11475MHz or...
User Manual
Page 36
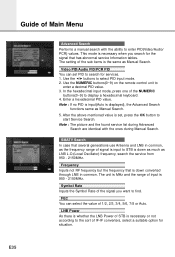
... search for the signal that is displayed), the Advanced Search functions same as LNB L.O.(Local Oscillator) frequency, search the service from 950 - 2150MHz. SMATV Search In case that several generations use Antenna and LNB in common, as the frequency range of signal is input to STB is set PID to search for situation. The setting of 1/2, 2/3, 3/4, 5/6, 7/8 or Auto. E35 Guide of Main Menu Advanced Search Performs a manual search with the ones during Advanced Search are identical with the ability to enter PID(Video/Audio...
... search for the signal that is displayed), the Advanced Search functions same as LNB L.O.(Local Oscillator) frequency, search the service from 950 - 2150MHz. SMATV Search In case that several generations use Antenna and LNB in common, as the frequency range of signal is input to STB is set PID to search for situation. The setting of 1/2, 2/3, 3/4, 5/6, 7/8 or Auto. E35 Guide of Main Menu Advanced Search Performs a manual search with the ones during Advanced Search are identical with the ability to enter PID(Video/Audio...
User Manual
Page 39
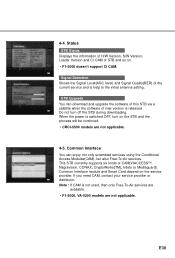
... is switched OFF, turn off the STB during downloading. Status STB Status Displays the information of H/W Version, S/W Version, Loader Version and CI CAM of new version is help to the initial antenna setting. E38 When the power is not used, then only Free-To-Air services are available. • F1-5000, VA-5200 models are not applicable. 4-5. Common Interface module and Smart Card depend on . • F1-5000 doesn't support CI CAM. STB Upgrade...
... is switched OFF, turn off the STB during downloading. Status STB Status Displays the information of H/W Version, S/W Version, Loader Version and CI CAM of new version is help to the initial antenna setting. E38 When the power is not used, then only Free-To-Air services are available. • F1-5000, VA-5200 models are not applicable. 4-5. Common Interface module and Smart Card depend on . • F1-5000 doesn't support CI CAM. STB Upgrade...

User Manual
Page 40
... Rating of channels or bouquets, press the OK button. • Smart Card details You can see the blocked Viacces Service. • Specifications are displayed on the Smart Card and Viaccess conditional access system such as Wizja TV or MTV Europe and more detailed information of viewing rights of Main Menu E39 4-6. This PIN code is recommended that this PIN code should be changed. Enter this option. Conditional Access For Viaccess...
... Rating of channels or bouquets, press the OK button. • Smart Card details You can see the blocked Viacces Service. • Specifications are displayed on the Smart Card and Viaccess conditional access system such as Wizja TV or MTV Europe and more detailed information of viewing rights of Main Menu E39 4-6. This PIN code is recommended that this PIN code should be changed. Enter this option. Conditional Access For Viaccess...
User Manual
Page 43
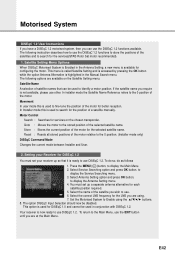
... to use the DiSEqC 1.2 functions available. Motor Control Search : Searches for configuring the motor. Press the MENU( )button, to display the Service Searching menu. 3. This menu is called Satellite Setting and is accessed by pressing the OK button while the option Antenna Alternative is available for services on the Satellite Setting menu. Movement In user mode this is used to identify a motor position. Setting your Receiver for DiSEqC 1.2 You must set your receiver up a separate antenna alternative for better reception. Select Service Searching option...
... to use the DiSEqC 1.2 functions available. Motor Control Search : Searches for configuring the motor. Press the MENU( )button, to display the Service Searching menu. 3. This menu is called Satellite Setting and is accessed by pressing the OK button while the option Antenna Alternative is available for services on the Satellite Setting menu. Movement In user mode this is used to identify a motor position. Setting your Receiver for DiSEqC 1.2 You must set your receiver up a separate antenna alternative for better reception. Select Service Searching option...
User Manual
Page 46
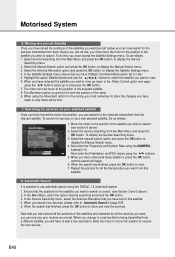
... to the position of the satellite you wish to search. When the search has finished, press the OK button to display the Satellite Settings menu. 4. Moving to display the Manual Search menu. 4. Select the Antenna Alternative option and press the OK button, to view. 7. Select the manual search option and press the OK button to a pre-set for fine-tuning, you must access the Satellite Settings menu. Repeat the process for the services transmitted from the relevant...
... to the position of the satellite you wish to search. When the search has finished, press the OK button to display the Satellite Settings menu. 4. Moving to display the Manual Search menu. 4. Select the Antenna Alternative option and press the OK button, to view. 7. Select the manual search option and press the OK button to a pre-set for fine-tuning, you must access the Satellite Settings menu. Repeat the process for the services transmitted from the relevant...


