
Owner's Manual
Page 1
...Install the Batteries ...9 Step 6. Mount the Thermostat ...11 Step 8. Registered Trademark © 2004 Honeywell International Inc. Customize Your Thermostat ...11 Step 9. Set the Fan and System Switches...18 If You Have a Problem ...19 Smart Response™ Technology ...21 Wiring Diagrams ...22 ® U.S. All Rights Reserved 69-1199-4 Honeywell CT3500.../CT3595 PROGRAMMABLE THERMOSTAT Weekday, Saturday and Sunday Programmable Heat and/or Cool Low Voltage (20 to 30 Vac) Thermostat and Wallplate Model CT3500/CT3595 OWNER'S GUIDE Para...
...Install the Batteries ...9 Step 6. Mount the Thermostat ...11 Step 8. Registered Trademark © 2004 Honeywell International Inc. Customize Your Thermostat ...11 Step 9. Set the Fan and System Switches...18 If You Have a Problem ...19 Smart Response™ Technology ...21 Wiring Diagrams ...22 ® U.S. All Rights Reserved 69-1199-4 Honeywell CT3500.../CT3595 PROGRAMMABLE THERMOSTAT Weekday, Saturday and Sunday Programmable Heat and/or Cool Low Voltage (20 to 30 Vac) Thermostat and Wallplate Model CT3500/CT3595 OWNER'S GUIDE Para...
Owner's Manual
Page 5
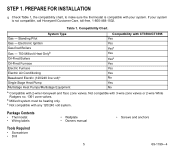
STEP 1. Not compatible with CT3500/CT3595 Gas - Package Contents • Thermostat • Wiring labels • Wallplate • Owners ...Rodgers no. 1361 zone valves. b Millivolt system must be heating only. Table 1. c Not compatible with 2-wire Honeywell and Taco zone valves. Electronic Ignition Yes Gas-fired Boilers Yesa Gas - 750 Millivolt Heat Onlyb Yes Oil-Fired Boilers.../Multistage Equipment No a Compatible with any 120/240 volt system. PREPARE FOR INSTALLATION q Check Table 1, the compatibility chart, to make sure the thermostat is compatible with your system is not ...
STEP 1. Not compatible with CT3500/CT3595 Gas - Package Contents • Thermostat • Wiring labels • Wallplate • Owners ...Rodgers no. 1361 zone valves. b Millivolt system must be heating only. Table 1. c Not compatible with 2-wire Honeywell and Taco zone valves. Electronic Ignition Yes Gas-fired Boilers Yesa Gas - 750 Millivolt Heat Onlyb Yes Oil-Fired Boilers.../Multistage Equipment No a Compatible with any 120/240 volt system. PREPARE FOR INSTALLATION q Check Table 1, the compatibility chart, to make sure the thermostat is compatible with your system is not ...
Owner's Manual
Page 6
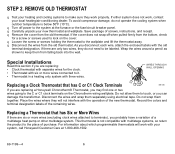
...going to the system at 1-800-468-1502. 69-1199-4 6 q Remove the cover from the old thermostat. If there are replacing a Honeywell Chronotherm® Thermostat, you can damage the transformer. Place the wires where they do not operate the cooling system when outdoor temperature is not ... M5136 If you are only two wires, they will work properly. q Turn off when pulled firmly from falling back into the wall. Special Installations Read this section if you are six or more wires connected to it. • Thermostat in a heating only system with separate wires for ...
...going to the system at 1-800-468-1502. 69-1199-4 6 q Remove the cover from the old thermostat. If there are replacing a Honeywell Chronotherm® Thermostat, you can damage the transformer. Place the wires where they do not operate the cooling system when outdoor temperature is not ... M5136 If you are only two wires, they will work properly. q Turn off when pulled firmly from falling back into the wall. Special Installations Read this section if you are six or more wires connected to it. • Thermostat in a heating only system with separate wires for ...
Owner's Manual
Page 7
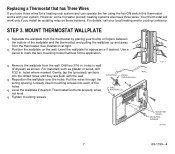
... if you have three wires. q Reposition the wallplate over the holes. Use a pencil to mark the two mounting holes that has Three Wires If you install an isolating relay on the wall. However, some hot water (zoned) heating systems also have three wires for appearance if desired. Thermostat functions properly when...
... if you have three wires. q Reposition the wallplate over the holes. Use a pencil to mark the two mounting holes that has Three Wires If you install an isolating relay on the wall. However, some hot water (zoned) heating systems also have three wires for appearance if desired. Thermostat functions properly when...
Owner's Manual
Page 8
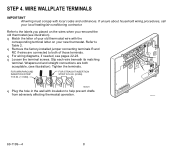
... IN. (8 MM). FOR WRAPAROUND INSERTION STRIP 7/16 IN. (11 MM). M4826 q Plug the hole in the wall with local codes and ordinances. q Remove the factory-installed jumper connecting terminals R and RC if wires are both of your old thermostat wire with the corresponding terminal letter on the wires when you placed...
... IN. (8 MM). FOR WRAPAROUND INSERTION STRIP 7/16 IN. (11 MM). M4826 q Plug the hole in the wall with local codes and ordinances. q Remove the factory-installed jumper connecting terminals R and RC if wires are both of your old thermostat wire with the corresponding terminal letter on the wires when you placed...
Owner's Manual
Page 9
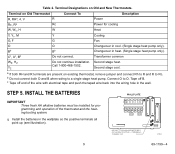
...Designations on existing thermostat, remove jumper and connect Rh to R and R to O. Second stage cool. Connect O to Rc. q Install the batteries in cool. (Single stage heat pump only). Terminal on Old Thermostat Connect To Description R, RHa, 4, V R Power ... pump only). Bb Bb Changeover in the wall. STEP 5. Tape off end of the thermostat and the heating/cooling system. INSTALL THE BATTERIES IMPORTANT Three fresh AA alkaline batteries must be installed for cooling W, W1, H W Heat Y, Y1, M Y Cooling G, F G Fan O O Changeover in the wallplate so ...
...Designations on existing thermostat, remove jumper and connect Rh to R and R to O. Second stage cool. Connect O to Rc. q Install the batteries in cool. (Single stage heat pump only). Terminal on Old Thermostat Connect To Description R, RHa, 4, V R Power ... pump only). Bb Bb Changeover in the wall. STEP 5. Tape off end of the thermostat and the heating/cooling system. INSTALL THE BATTERIES IMPORTANT Three fresh AA alkaline batteries must be installed for cooling W, W1, H W Heat Y, Y1, M Y Cooling G, F G Fan O O Changeover in the wallplate so ...
Owner's Manual
Page 10
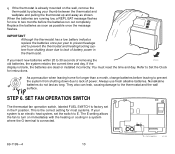
... most systems. If your thumb between the thermostat and wallplate and pulling the thermostat up and away as shown. When the batteries are dead or installed incorrectly. Replace the batteries as soon as long. STEP 6. Refer to two months before leaving to prevent 60 70 80 90 the system from shutting...
... most systems. If your thumb between the thermostat and wallplate and pulling the thermostat up and away as shown. When the batteries are dead or installed incorrectly. Replace the batteries as soon as long. STEP 6. Refer to two months before leaving to prevent 60 70 80 90 the system from shutting...
Owner's Manual
Page 19
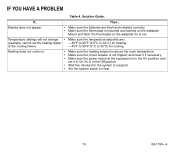
... appear. • • Temperature settings will not change • (example; Heating does not come on the wallplate. Make sure the temperature setpoints are fresh and installed correctly. Wait five minutes for cooling. Set the system switch to respond. Mount and latch the thermostat on the wallplate if it is not tripped...
... appear. • • Temperature settings will not change • (example; Heating does not come on the wallplate. Make sure the temperature setpoints are fresh and installed correctly. Wait five minutes for cooling. Set the system switch to respond. Mount and latch the thermostat on the wallplate if it is not tripped...
Owner's Manual
Page 21
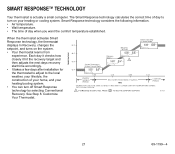
... it checks how closely it hit the recovery target and then adjusts the next days recovery start time accordingly. • It takes a few days after installation for the thermostat to adjust to turn off Smart Response technology by selecting Conventional Recovery. M18591 21 69-1199-4 TEMPERATURE System Operating in Comfort Mode...
... it checks how closely it hit the recovery target and then adjusts the next days recovery start time accordingly. • It takes a few days after installation for the thermostat to adjust to turn off Smart Response technology by selecting Conventional Recovery. M18591 21 69-1199-4 TEMPERATURE System Operating in Comfort Mode...


