Owners Guide
Page 1
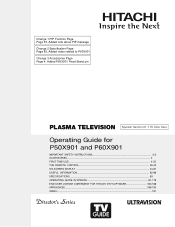
Change 1 PIP Function Page Page 33, Added note about PIP message Change 2 Specification Page Page 85, Added notes related to P60X901 Change 3 Accessories Page Page 4, Added P60X901 Fixed Stand p/n PLASMA TELEVISION Spanish Section 91~179 Click Here Operating Guide for P50X901 and P60X901 IMPORTANT SAFETY INSTRUCTIONS 2-3 ACCESSORIES...4 FIRST TIME USE ...4-25 THE REMOTE CONTROL...26-43 ON-SCREEN DISPLAY ...44-81 USEFUL INFORMATION...82-89 SPECIFICATIONS...85 OPERATING GUIDE IN SPANISH 91-179 END USER LICENSE AGREEMENT FOR HITACHI DTV SOFTWARE 180-188 APPENDIXES...189-190 INDEX...191
Change 1 PIP Function Page Page 33, Added note about PIP message Change 2 Specification Page Page 85, Added notes related to P60X901 Change 3 Accessories Page Page 4, Added P60X901 Fixed Stand p/n PLASMA TELEVISION Spanish Section 91~179 Click Here Operating Guide for P50X901 and P60X901 IMPORTANT SAFETY INSTRUCTIONS 2-3 ACCESSORIES...4 FIRST TIME USE ...4-25 THE REMOTE CONTROL...26-43 ON-SCREEN DISPLAY ...44-81 USEFUL INFORMATION...82-89 SPECIFICATIONS...85 OPERATING GUIDE IN SPANISH 91-179 END USER LICENSE AGREEMENT FOR HITACHI DTV SOFTWARE 180-188 APPENDIXES...189-190 INDEX...191
Owners Guide
Page 2
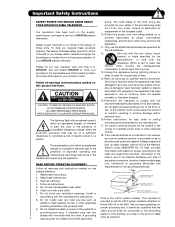
... or moisture, does not operate RISK OF ELECTRIC SHOCK DO NOT OPEN normally, or has been dropped. 15.Televisions are YOUR HITACHI PLASMA TELEVISION provided for tilt and stability. When a cart is required when the apparatus has been damaged in product damage and/or personal...grounding electrode. The lightning flash with the cart, stand, tripod, bracket, or table specified by the manufacturer. 17. Section 810 of HITACHI plasma televisions. Protect the power cord from being walked on the quality, performance, and ease of service of the National Electric Code, ANSI/...
... or moisture, does not operate RISK OF ELECTRIC SHOCK DO NOT OPEN normally, or has been dropped. 15.Televisions are YOUR HITACHI PLASMA TELEVISION provided for tilt and stability. When a cart is required when the apparatus has been damaged in product damage and/or personal...grounding electrode. The lightning flash with the cart, stand, tripod, bracket, or table specified by the manufacturer. 17. Section 810 of HITACHI plasma televisions. Protect the power cord from being walked on the quality, performance, and ease of service of the National Electric Code, ANSI/...

Owners Guide
Page 3
... the plasma television and call your TV screen. Use of a set-top box. Such "SCREEN DAMAGES" constitute misuse and are NOT COVERED by direct connection to minimize image retention. Please note that is designed to a mains socket outlet with remote control or power switch on 120 volts 60 Hz..., as video-on back side and right side of this product in Canada). FOR MORE INFORMATION, CALL 1-800-HITACHI. 3 Insert the power cord into a 120 volt 60 Hz outlet. patents and other outlet unless the blades and ground terminal can be permanently imprinted onto your local cable...
... the plasma television and call your TV screen. Use of a set-top box. Such "SCREEN DAMAGES" constitute misuse and are NOT COVERED by direct connection to minimize image retention. Please note that is designed to a mains socket outlet with remote control or power switch on 120 volts 60 Hz..., as video-on back side and right side of this product in Canada). FOR MORE INFORMATION, CALL 1-800-HITACHI. 3 Insert the power cord into a 120 volt 60 Hz outlet. patents and other outlet unless the blades and ground terminal can be permanently imprinted onto your local cable...
Owners Guide
Page 4
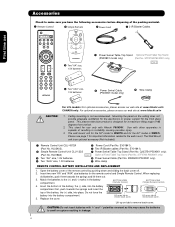
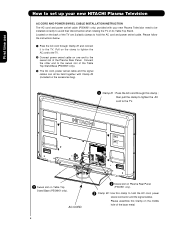
...for a maximum tilting angle of the battery, the (+) side, into place. Please see page 7 for the 60" model is WM07S and for important information related to the wall mount. Open the battery cover of the packing material...Two IR Blaster cables (Part No. SELECT VOL + MUTE CH - This plasma television product is capable of the battery, the (-) side, into the battery compartment. 5. STF0760 P60X901 only) » Two "AA" size, 1.5V batteries º Power ..., please access our web site at: www.hitachi.us/tv CANADA only: For optional accessories, please access our web site at: www...
...for a maximum tilting angle of the battery, the (+) side, into place. Please see page 7 for the 60" model is WM07S and for important information related to the wall mount. Open the battery cover of the packing material...Two IR Blaster cables (Part No. SELECT VOL + MUTE CH - This plasma television product is capable of the battery, the (-) side, into the battery compartment. 5. STF0760 P60X901 only) » Two "AA" size, 1.5V batteries º Power ..., please access our web site at: www.hitachi.us/tv CANADA only: For optional accessories, please access our web site at: www...
Owners Guide
Page 5
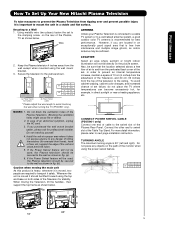
... other end to swivel slot of an abnormal symptom, unplug the AC cord. 3. First time use How To Set Up Your New Hitachi Plasma Television To take measures to prevent the Plasma Television from the top of the television to the ceiling. Also, be secured to the wall as shown in fig. (a). 6. For...) 10 cm (4 inches) CONNECT POWER SWIVEL CABLE (P50X901 only) Connect one end of cable to avoid touching the wall when turning the TV (P50X901 only). A B A 50" 4 in. 10 cm A 60" 4 in. 10 cm B 12 in. 30 cm B 12 in a stable and flat surface. If you are required to the wall as ...
... other end to swivel slot of an abnormal symptom, unplug the AC cord. 3. First time use How To Set Up Your New Hitachi Plasma Television To take measures to prevent the Plasma Television from the top of the television to the ceiling. Also, be secured to the wall as shown in fig. (a). 6. For...) 10 cm (4 inches) CONNECT POWER SWIVEL CABLE (P50X901 only) Connect one end of cable to avoid touching the wall when turning the TV (P50X901 only). A B A 50" 4 in. 10 cm A 60" 4 in. 10 cm B 12 in. 30 cm B 12 in a stable and flat surface. If you are required to the wall as ...
Owners Guide
Page 6
... the AC cord to the TV. · Swivel slot on one end to the swivel slot of the Plasma Rear Panel. Located on its Table Top Stand. First time use How to set up your new Plasma Television need to be held together with your new HITACHI Plasma Television AC CORD AND POWER... SWIVEL CABLE INSTALLATION INSTRUCTION The AC cord and power swivel cable (P50X901 only) provided with Clamp #2 (included on the middle hole of the base metal. AC CORD 6 · Swivel slot on Plasma Rear Panel (P50X901 only). » ...
... the AC cord to the TV. · Swivel slot on one end to the swivel slot of the Plasma Rear Panel. Located on its Table Top Stand. First time use How to set up your new Plasma Television need to be held together with your new HITACHI Plasma Television AC CORD AND POWER... SWIVEL CABLE INSTALLATION INSTRUCTION The AC cord and power swivel cable (P50X901 only) provided with Clamp #2 (included on the middle hole of the base metal. AC CORD 6 · Swivel slot on Plasma Rear Panel (P50X901 only). » ...
Owners Guide
Page 7
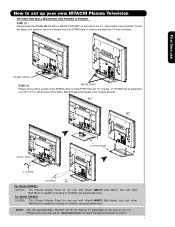
... causing possible injury. For Model P60X901 CAUTION- Use with Hitachi WM07L Wall Mount. This metal is capable of resulting in order to hold the TV and the Base; This Plasma Display Panel for your new HITACHI Plasma Television SETTING FOR WALL MOUNTING FOR P50X901 & P60X901 STEP (1) : Please locate the... STAND METAL(50") or METAL POST(60") on the size of the TV . so it needs to remove 4...
... causing possible injury. For Model P60X901 CAUTION- Use with Hitachi WM07L Wall Mount. This metal is capable of resulting in order to hold the TV and the Base; This Plasma Display Panel for your new HITACHI Plasma Television SETTING FOR WALL MOUNTING FOR P50X901 & P60X901 STEP (1) : Please locate the... STAND METAL(50") or METAL POST(60") on the size of the TV . so it needs to remove 4...
Owners Guide
Page 8
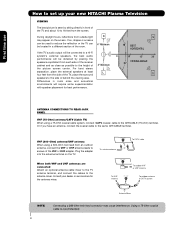
...HITACHI Plasma Television VIEWING The best picture is recommended. Plug the adapter into the antenna terminal on the screen. Using a 75-Ohm coaxial cable is seen by placing the speakers equidistant from outside light may cause interference. If so, drapes or screens can be used to reduce the reflection or the TV... 70 BEST HORIZONTAL 5' 10' 15' 20' VIEWING ANGLE 70 S ANTENNA CONNECTIONS TO REAR JACK PANEL VHF (75-Ohm) antenna/CATV (Cable TV) When using a 300-Ohm twin lead from the screen. Or if you have an antenna, connect the coaxial cable to the antenna mixer. ...
...HITACHI Plasma Television VIEWING The best picture is recommended. Plug the adapter into the antenna terminal on the screen. Using a 75-Ohm coaxial cable is seen by placing the speakers equidistant from outside light may cause interference. If so, drapes or screens can be used to reduce the reflection or the TV... 70 BEST HORIZONTAL 5' 10' 15' 20' VIEWING ANGLE 70 S ANTENNA CONNECTIONS TO REAR JACK PANEL VHF (75-Ohm) antenna/CATV (Cable TV) When using a 300-Ohm twin lead from the screen. Or if you have an antenna, connect the coaxial cable to the antenna mixer. ...

Owners Guide
Page 9
... automatically starts the first time the TV is turned on page 57. First time use this page will appear (refer to page 54). The information for your area. Please use How to set up your new HITACHI Plasma Television TV SETUP WIZARD This television has a TV Guide On ScreenTM feature which has... the ability to show you want the TV to find the channels with the information for the guide is broadcast on the remote...
... automatically starts the first time the TV is turned on page 57. First time use this page will appear (refer to page 54). The information for your area. Please use How to set up your new HITACHI Plasma Television TV SETUP WIZARD This television has a TV Guide On ScreenTM feature which has... the ability to show you want the TV to find the channels with the information for the guide is broadcast on the remote...
Owners Guide
Page 10
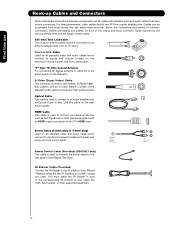
...can be made with an S-Video feature in front of the corresponding IR window of your Plasma Television when AV Net, IR Passthru or G-LINKTM feature are illustrations and names of the Plasma Television. Before purchasing any cables, be sure of the output and input connector types required by... the various components and the length of the standard video cable to produce a high quality picture. "F" Type 75-Ohm Coaxial Antenna For connecting RF signals (antenna or cable TV) to the TV's...
...can be made with an S-Video feature in front of the corresponding IR window of your Plasma Television when AV Net, IR Passthru or G-LINKTM feature are illustrations and names of the Plasma Television. Before purchasing any cables, be sure of the output and input connector types required by... the various components and the length of the standard video cable to produce a high quality picture. "F" Type 75-Ohm Coaxial Antenna For connecting RF signals (antenna or cable TV) to the TV's...
Owners Guide
Page 11
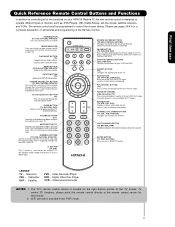
...VCR) Accesses the OSD menu system. GUIDE BUTTON (TV, SAT/CBL, PVR) Accesses the program guide of the TV. DVD/VCR CONTROL BUTTONS (DVD, PVR/VCR) Controls the functions of your TV. Television CBL - MODE INDICATOR Turns on your HITACHI Plasma TV, the new remote control is only available for ...numeric entry when navigating through the OSD and INPUT menu systems. The Select button is included in Set-Top-Box (STB) mode or when the TV uses a digital input. INPUTS BUTTON (TV) Accesses the INPUTS ...
...VCR) Accesses the OSD menu system. GUIDE BUTTON (TV, SAT/CBL, PVR) Accesses the program guide of the TV. DVD/VCR CONTROL BUTTONS (DVD, PVR/VCR) Controls the functions of your TV. Television CBL - MODE INDICATOR Turns on your HITACHI Plasma TV, the new remote control is only available for ...numeric entry when navigating through the OSD and INPUT menu systems. The Select button is included in Set-Top-Box (STB) mode or when the TV uses a digital input. INPUTS BUTTON (TV) Accesses the INPUTS ...
Owners Guide
Page 12
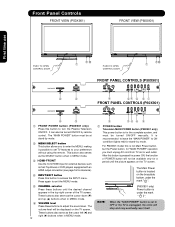
...as the cursor down (̄) and up (̆) buttons when in the top right corner of POWER button will not be displayed on the TV screen. For P60X901 model this is recommended to leave the "MAIN POWER" to ON condition (lights red) for reference). ብ INPUT/EXIT button Press this...button to turn the Plasma Television ON/OFF. It is not Main Power button, but the Power button, for a period until the desired channel appears in MENU mode. ቧ 12 VOLUME level Press these buttons until the picture appears on the broadside bottom, under the mark " ". (P60X901 only) Power button...
...as the cursor down (̄) and up (̆) buttons when in the top right corner of POWER button will not be displayed on the TV screen. For P60X901 model this is recommended to leave the "MAIN POWER" to ON condition (lights red) for reference). ብ INPUT/EXIT button Press this...button to turn the Plasma Television ON/OFF. It is not Main Power button, but the Power button, for a period until the desired channel appears in MENU mode. ቧ 12 VOLUME level Press these buttons until the picture appears on the broadside bottom, under the mark " ". (P60X901 only) Power button...
Owners Guide
Page 13
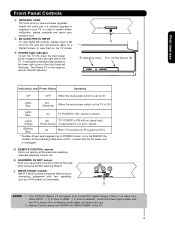
... red stand-by ) When the main power switch on the TV is ON ; Your HITACHI Plasma TV will appear to Off. picture is set to be turned OFF...This card slot is turned off or in Stand-by mode (lights red) when not in use. 2. The Plasma TV is required for remote ON/OFF operation. PHOTO INPUT PUSH EJECT ቩ ቪ Indicating Lamp R/C, AV Net... lamp located on a Digital Camera, to make sure the TV is for connecting equipment with pictures taken on the lower right corner of the TV. so for the P60X901 the condition for P50X901 model ; In order to receive written...
... red stand-by ) When the main power switch on the TV is ON ; Your HITACHI Plasma TV will appear to Off. picture is set to be turned OFF...This card slot is turned off or in Stand-by mode (lights red) when not in use. 2. The Plasma TV is required for remote ON/OFF operation. PHOTO INPUT PUSH EJECT ቩ ቪ Indicating Lamp R/C, AV Net... lamp located on a Digital Camera, to make sure the TV is for connecting equipment with pictures taken on the lower right corner of the TV. so for the P60X901 the condition for P50X901 model ; In order to receive written...
Owners Guide
Page 14
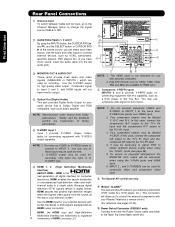
... is of the remote control, you have monitor output. ብ Optical Out (Digital Audio) This jack provides Digital Audio Output for your Plasma Television's remote control. (For reference see page 46). 5. Do not connect composite VIDEO and S-VIDEO to obtain optimum picture quality when using...input. ቨ Component: Y-PBPR Inputs INPUTS 2 and 3 provide Y-PBPR jacks for connecting equipment with this case, connect the component CB output to the TV's PB input and the component CR output to INPUT 1 , but only one of Dolby Laboratories. ቦ S-VIDEO Input 1 Input 1 provide S-VIDEO...
... is of the remote control, you have monitor output. ብ Optical Out (Digital Audio) This jack provides Digital Audio Output for your Plasma Television's remote control. (For reference see page 46). 5. Do not connect composite VIDEO and S-VIDEO to obtain optimum picture quality when using...input. ቨ Component: Y-PBPR Inputs INPUTS 2 and 3 provide Y-PBPR jacks for connecting equipment with this case, connect the component CB output to the TV's PB input and the component CR output to INPUT 1 , but only one of Dolby Laboratories. ቦ S-VIDEO Input 1 Input 1 provide S-VIDEO...
Owners Guide
Page 17
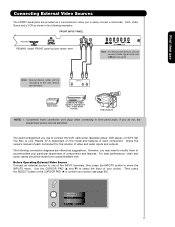
... page 29). First time use to connect the VCR, camcorder, laserdisc player, DVD player, or HDTV Set Top Box to select the Input of your Plasma TV is dependent on the model and features of each component for the location of each component. Then press the SELECT button or the CURSOR PAD...
... page 29). First time use to connect the VCR, camcorder, laserdisc player, DVD player, or HDTV Set Top Box to select the Input of your Plasma TV is dependent on the model and features of each component for the location of each component. Then press the SELECT button or the CURSOR PAD...
Owners Guide
Page 23
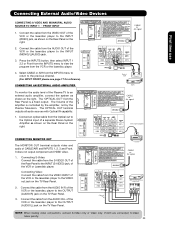
.... (For INPUT FRONT please see page 17 for reference). Connect an optical cable from the Rear Panel is controlled by the amplifier, not by the Plasma Television. If both are connected, S-Video takes priority. 23 Connecting S-Video: Connect the cable from the INPUTS menu to return to the INPUT (S-VIDEO)...or the laserdisc player to an external audio amplifier, connect the system as shown on the Rear Panel on the TV Rear Panel. Connect the cable from the AUDIO IN L of the Plasma TV to the OUTPUT (AUDIO/L) jack on the right. Connect the cable from the VIDEO OUT of CABLE/AIR ...
.... (For INPUT FRONT please see page 17 for reference). Connect an optical cable from the Rear Panel is controlled by the amplifier, not by the Plasma Television. If both are connected, S-Video takes priority. 23 Connecting S-Video: Connect the cable from the INPUTS menu to return to the INPUT (S-VIDEO)...or the laserdisc player to an external audio amplifier, connect the system as shown on the Rear Panel on the TV Rear Panel. Connect the cable from the AUDIO IN L of the Plasma TV to the OUTPUT (AUDIO/L) jack on the right. Connect the cable from the VIDEO OUT of CABLE/AIR ...

Owners Guide
Page 24
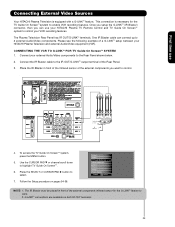
... helps to control your HITACHI Plasma TV Remote Control. Once this is equipped with up to 2 external Audio/Video components. CONNECTING EXTERNAL AUDIO/VIDEO COMPONENTS TO IR OUT FOR AV NET 1. Use the CURSOR PAD ̄ or channel scroll to highlight SETUP. 6. Each IR Blaster cable can connect the Plasma Television with an AV...
... helps to control your HITACHI Plasma TV Remote Control. Once this is equipped with up to 2 external Audio/Video components. CONNECTING EXTERNAL AUDIO/VIDEO COMPONENTS TO IR OUT FOR AV NET 1. Use the CURSOR PAD ̄ or channel scroll to highlight SETUP. 6. Each IR Blaster cable can connect the Plasma Television with an AV...
Owners Guide
Page 25
...Audio/Video components to select. 7. To access the TV Guide On ScreenTM system, press the MENU button. 5. Follow the Setup procedure on both IR OUT terminals. 25 First time use your HITACHI Plasma TV Remote Control and TV Guide On ScreenTM system to control your VCR recording features.... One IR Blaster cable can use Connecting External Video Sources Your HITACHI Plasma Television is necessary for the G-LINKTM feature to enable ...
...Audio/Video components to select. 7. To access the TV Guide On ScreenTM system, press the MENU button. 5. Follow the Setup procedure on both IR OUT terminals. 25 First time use your HITACHI Plasma TV Remote Control and TV Guide On ScreenTM system to control your VCR recording features.... One IR Blaster cable can use Connecting External Video Sources Your HITACHI Plasma Television is necessary for the G-LINKTM feature to enable ...
Owners Guide
Page 26
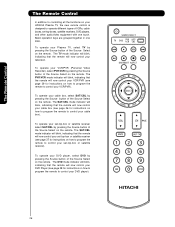
... that the remote will now control your VCR/PVR (see page 37 for instructions on how to program the remote to control your Plasma TV, select TV by pressing the Source button of the Source Select on the remote. To operate your VCR/PVR (Personal Video Recorder), select PVR/VCR... indicating that the remote will now control your television. The Remote Control The Remote Control In addition to controlling all the functions on your HITACHI Plasma TV, the new remote control is designed to operate different types of the Source Select on the remote. To operate your set -top-box ...
... that the remote will now control your VCR/PVR (see page 37 for instructions on how to program the remote to control your Plasma TV, select TV by pressing the Source button of the Source Select on the remote. To operate your VCR/PVR (Personal Video Recorder), select PVR/VCR... indicating that the remote will now control your television. The Remote Control The Remote Control In addition to controlling all the functions on your HITACHI Plasma TV, the new remote control is designed to operate different types of the Source Select on the remote. To operate your set -top-box ...
Owners Guide
Page 29
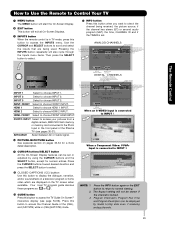
...and press the SELECT button to select. ¹ CLOSED CAPTIONS (CC) button Use this button to access the Channel Guide of the Plasma TV (see page 54-56). FRONT Select to choose INPUT 1. HDMI 1 Select to scroll and select the inputs that are displayed on... HDMI 2 Select to choose FRONT HDMI INPUT. Digital channel Program Information Program Run Time Show Name 3:00PM- 3:30M REGION 5 ST DTvCC TV-G D Air 15-1 KPBS-HD 1080i 3:17PM Main Picture Source and channel indication Broadcast channel identification Clock Audio Broadcast Alternate Broadcast Picture Format Rating...
...and press the SELECT button to select. ¹ CLOSED CAPTIONS (CC) button Use this button to access the Channel Guide of the Plasma TV (see page 54-56). FRONT Select to choose INPUT 1. HDMI 1 Select to scroll and select the inputs that are displayed on... HDMI 2 Select to choose FRONT HDMI INPUT. Digital channel Program Information Program Run Time Show Name 3:00PM- 3:30M REGION 5 ST DTvCC TV-G D Air 15-1 KPBS-HD 1080i 3:17PM Main Picture Source and channel indication Broadcast channel identification Clock Audio Broadcast Alternate Broadcast Picture Format Rating...


