Owners Guide
Page 5
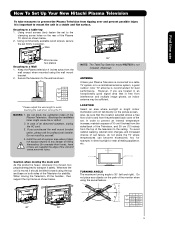
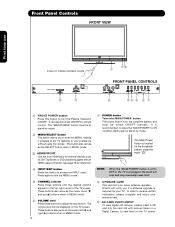
... the path of the monitor when using the swivel feature. 42" 50" C C D D 42" 10.59 in. 13.93 in. 27 cm 36 cm 50" 15 in. 16. 85 in. 38. 1 cm 42.8 cm 55" 15 in. 16. 85 in. 38. 1 cm 42.8 cm 5 Keep the Plasma television 4 inches away from interference and multiple image ... avoid touching the wall when turning the TV. How To Set Up Your New Hitachi Plasma Television To take measures to prevent the Plasma Television from tipping over and prevent possible injury it should be lifted forward using the top and base on the rear of the Plasma TV stand as shown below . 55" NOTE:...
... the path of the monitor when using the swivel feature. 42" 50" C C D D 42" 10.59 in. 13.93 in. 27 cm 36 cm 50" 15 in. 16. 85 in. 38. 1 cm 42.8 cm 55" 15 in. 16. 85 in. 38. 1 cm 42.8 cm 5 Keep the Plasma television 4 inches away from interference and multiple image ... avoid touching the wall when turning the TV. How To Set Up Your New Hitachi Plasma Television To take measures to prevent the Plasma Television from tipping over and prevent possible injury it should be lifted forward using the top and base on the rear of the Plasma TV stand as shown below . 55" NOTE:...
Owners Guide
Page 10
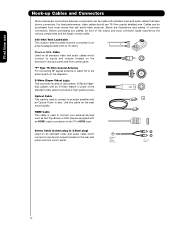
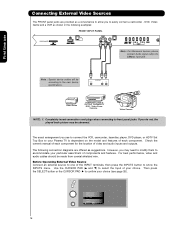
Optical Cable This cable is used on camcorders, VCRs and laserdisc players with an S-Video feature in place of the standard video cable to produce a high quality picture. First time use 75-Ohm coaxial shielded wire. Phono or RCA Cable Used .... Cables can be connected to an antenna adapter (300-Ohm to 75-Ohm). "F" Type 75-Ohm Coaxial Antenna For connecting RF signals (antenna or cable TV) to the TV's HDMI input. Use this cable for the best sound quality. AUDIO OUT 3.8mm STEREO MINI-PLUG 2 RCA TYPE PLUGS 10
Optical Cable This cable is used on camcorders, VCRs and laserdisc players with an S-Video feature in place of the standard video cable to produce a high quality picture. First time use 75-Ohm coaxial shielded wire. Phono or RCA Cable Used .... Cables can be connected to an antenna adapter (300-Ohm to 75-Ohm). "F" Type 75-Ohm Coaxial Antenna For connecting RF signals (antenna or cable TV) to the TV's HDMI input. Use this cable for the best sound quality. AUDIO OUT 3.8mm STEREO MINI-PLUG 2 RCA TYPE PLUGS 10
Owners Guide
Page 11
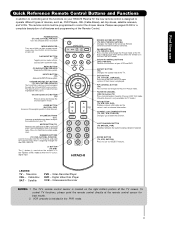
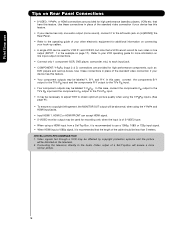
... Press to show remote control mode when the SOURCE ACCESS buttons are pressed. ASPECT BUTTON (TV) Changes the aspect ratio of other devices when the remote is displayed. First time use as SELECT feature. MODE INDICATOR Turns on or blinks to pause other devices. GUIDE BUTTON (SAT/CBL, PVR... bottom portion of the OSD, INPUTS menu systems if their menu is in -Picture mode. POWER BUTTON (TV, DVD, SAT/CBL,PVR/VCR) Turns the selected device on your HITACHI Plasma TV, the new remote control is only available for a complete description of all of the functions on and off...
... Press to show remote control mode when the SOURCE ACCESS buttons are pressed. ASPECT BUTTON (TV) Changes the aspect ratio of other devices when the remote is displayed. First time use as SELECT feature. MODE INDICATOR Turns on or blinks to pause other devices. GUIDE BUTTON (SAT/CBL, PVR... bottom portion of the OSD, INPUTS menu systems if their menu is in -Picture mode. POWER BUTTON (TV, DVD, SAT/CBL,PVR/VCR) Turns the selected device on your HITACHI Plasma TV, the new remote control is only available for a complete description of all of the functions on and off...
Owners Guide
Page 12
...to exit the MENU mode. ቦ CHANNEL selector Press these buttons until the desired channel appears in the top right corner of the TV screen. Hitachi will stop and may eventually reset itself. ቩ UPGRADE CARD This card slot is for external devices such as the SELECT button when... Plasma Television ON/OFF. In order to receive written notification, please complete and return your preference without using the remote. This button also serves as Set-Top-Boxes or DVD players equipped with pictures taken on a Digital Camera, to view them on the TV screen. It is set TV features ...
...to exit the MENU mode. ቦ CHANNEL selector Press these buttons until the desired channel appears in the top right corner of the TV screen. Hitachi will stop and may eventually reset itself. ቩ UPGRADE CARD This card slot is for external devices such as the SELECT button when... Plasma Television ON/OFF. In order to receive written notification, please complete and return your preference without using the remote. This button also serves as Set-Top-Boxes or DVD players equipped with pictures taken on a Digital Camera, to view them on the TV screen. It is set TV features ...
Owners Guide
Page 16
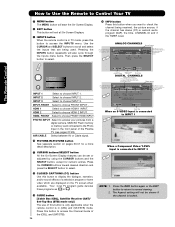
...as a convenience to allow you do not, the played back picture may need to modify them to accommodate your particular assortment of components and features. Before Operating External Video Source Connect an external source to one of the INPUT terminals, then press the INPUTS button to the own device ... choice. First time use to connect the VCR, camcorder, laserdisc player, DVD player, or HDTV Set Top Box to your Plasma TV is dependent on the model and features of each component for the location of video and audio inputs and outputs. For best performance, video and audio cables should be...
...as a convenience to allow you do not, the played back picture may need to modify them to accommodate your particular assortment of components and features. Before Operating External Video Source Connect an external source to one of the INPUT terminals, then press the INPUTS button to the own device ... choice. First time use to connect the VCR, camcorder, laserdisc player, DVD player, or HDTV Set Top Box to your Plasma TV is dependent on the model and features of each component for the location of video and audio inputs and outputs. For best performance, video and audio cables should be...
Owners Guide
Page 18
... length of the standard video connection if your device has this feature. • If your VCR operating guide for more normal picture. 18 In this case, connect the components B-Y output to the TV's PB input and the components R-Y output to the TV's PR input. • Your component outputs may be affected... device has only one audio output (mono sound), connect it is recommended that have this feature. In this case, connect the components CB output to the TV's PB input and the components CR output to the TV's PR input. • It may be necessary to adjust TINT to obtain optimum picture ...
... length of the standard video connection if your device has this feature. • If your VCR operating guide for more normal picture. 18 In this case, connect the components B-Y output to the TV's PB input and the components R-Y output to the TV's PR input. • Your component outputs may be affected... device has only one audio output (mono sound), connect it is recommended that have this feature. In this case, connect the components CB output to the TV's PB input and the components CR output to the TV's PR input. • It may be necessary to adjust TINT to obtain optimum picture ...
Owners Guide
Page 26
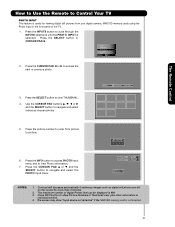
...buttons and the SELECT button, except for a more detail description. ¸ CURSOR buttons/SELECT button All the On-Screen Display features can be shown if the channel is in TV mode, press this button when you want to check the channel being used. How to Use the Remote to Control Your... denotes these programs as or . Ƹ GUIDE button [Cable Box (CBL), Satellite Receiver (SAT)/ Set-Top-Box (STB) mode only] The use of the Plasma TV (see pages 27-28). Press the INFO button again or the EXIT button to return to choose HDMI 1 INPUT. HDMI 1 Select to normal viewing. 2. AIR...
...buttons and the SELECT button, except for a more detail description. ¸ CURSOR buttons/SELECT button All the On-Screen Display features can be shown if the channel is in TV mode, press this button when you want to check the channel being used. How to Use the Remote to Control Your... denotes these programs as or . Ƹ GUIDE button [Cable Box (CBL), Satellite Receiver (SAT)/ Set-Top-Box (STB) mode only] The use of the Plasma TV (see pages 27-28). Press the INFO button again or the EXIT button to return to choose HDMI 1 INPUT. HDMI 1 Select to normal viewing. 2. AIR...
Owners Guide
Page 27
... the picture number to jump from your digital camera, MMC/SD memory cards using the Photo Input in individual photos. 4. The maximum number of the TV. 1. Press INFO button to show "Input device not detected" if the MMC/SD memory card is not inserted. 27 HDMI 1 HDMI-Front Photo Input Air...
... the picture number to jump from your digital camera, MMC/SD memory cards using the Photo Input in individual photos. 4. The maximum number of the TV. 1. Press INFO button to show "Input device not detected" if the MMC/SD memory card is not inserted. 27 HDMI 1 HDMI-Front Photo Input Air...

Owners Guide
Page 30
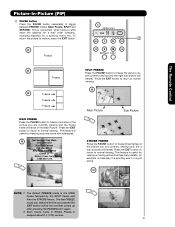
... - - - - - - - - - - - - - - - - - - -- - - - - - -- - - - - - -- - - - - - -- Picture-In-Picture (PIP) Your HITACHI Plasma TV incorporates one of the video inputs. The Picture-in-Picture feature is used without a Digital Channel as main picture (CABLE/AIR Digital channel). Use connection at the same time.You can... watch a TV program while viewing other programs from any of...
... - - - - - - - - - - - - - - - - - - -- - - - - - -- - - - - - -- - - - - - -- Picture-In-Picture (PIP) Your HITACHI Plasma TV incorporates one of the video inputs. The Picture-in-Picture feature is used without a Digital Channel as main picture (CABLE/AIR Digital channel). Use connection at the same time.You can... watch a TV program while viewing other programs from any of...
Owners Guide
Page 31
...Press the PAUSE button to freeze one that has many details, for example, a close play in a sporting event or a golf swing. This feature is the MAIN freeze followed by the SPLIT freeze and then the STROBE freeze. The default FREEZE mode is useful for freezing a picture frame with... addresses. Press the EXIT button to return to normal viewing. This feature is useful for viewing a moving picture that comes up after pressing the PAUSE button again. 2. Hot Springs Clay Mask C/O John Doe Run-Spa ...
...Press the PAUSE button to freeze one that has many details, for example, a close play in a sporting event or a golf swing. This feature is the MAIN freeze followed by the SPLIT freeze and then the STROBE freeze. The default FREEZE mode is useful for freezing a picture frame with... addresses. Press the EXIT button to return to normal viewing. This feature is useful for viewing a moving picture that comes up after pressing the PAUSE button again. 2. Hot Springs Clay Mask C/O John Doe Run-Spa ...

Owners Guide
Page 36
... related to (refer below to Table 1). 4. Pressing the INPUTS button will now access the video input of the TV. SETUP EXAMPLE (Hitachi DVD with precode 0573 connected to INPUT 1 of the TV) ᕃ Select DVD mode by using your device as shown on Input 1. 36 FRONT 7 ᕆ Release ...SOURCE SELECT button. ᕇ If done correctly, the device LED indicator will blink 3 times to confirm proper setup. 6. This feature is...
... related to (refer below to Table 1). 4. Pressing the INPUTS button will now access the video input of the TV. SETUP EXAMPLE (Hitachi DVD with precode 0573 connected to INPUT 1 of the TV) ᕃ Select DVD mode by using your device as shown on Input 1. 36 FRONT 7 ᕆ Release ...SOURCE SELECT button. ᕇ If done correctly, the device LED indicator will blink 3 times to confirm proper setup. 6. This feature is...
Owners Guide
Page 39
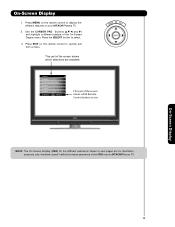
On-Screen Display 1. On-Screen Display 39 Press MENU on your HITACHI Plasma TV. Press EXIT on the remote control to display the different features on the remote control to quickly exit from a menu. This part of the screen shows which selections are for...screen shows which Remote Control buttons to select. 3. Use the CURSOR PAD (buttons ̆,̄,̇ and ̈) and highlight a different feature of your HITACHI Plasma TV. 2. NOTE: The On Screen Display (OSD) for illustration purposes only, therefore; doesn't reflect the actual apearance of the OSD of the...
On-Screen Display 1. On-Screen Display 39 Press MENU on your HITACHI Plasma TV. Press EXIT on the remote control to display the different features on the remote control to quickly exit from a menu. This part of the screen shows which selections are for...screen shows which Remote Control buttons to select. 3. Use the CURSOR PAD (buttons ̆,̄,̇ and ̈) and highlight a different feature of your HITACHI Plasma TV. 2. NOTE: The On Screen Display (OSD) for illustration purposes only, therefore; doesn't reflect the actual apearance of the OSD of the...
Owners Guide
Page 40
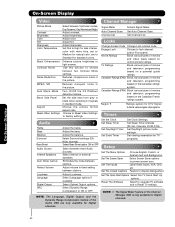
... NOTE: The Language, Digital Output, and the Dynamic Range Compression feature of the Manager OSD is only available for DTV Signal to block various types of movies and television programming based on motion picture ratings. Set The Quick Start Options Select the TV Quick Start Up options. NOTE: 1. On-Screen Display On...
... NOTE: The Language, Digital Output, and the Dynamic Range Compression feature of the Manager OSD is only available for DTV Signal to block various types of movies and television programming based on motion picture ratings. Set The Quick Start Options Select the TV Quick Start Up options. NOTE: 1. On-Screen Display On...
Owners Guide
Page 42
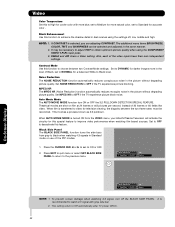
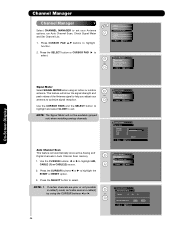
...frames or 60 fields like video. Black Side Panel The BLACK SIDE PANEL function turns the side bars from the VIDEO menu, your Hitachi Plasma Television will activate the circuitry for television viewing, the disparity between two Contrast Mode settings. Contrast Mode Use this to High for accurate...the same manner. 2. Set MPEG NR to Off automatically after TV power Off/On. 42 This involves a process known as 3:2 pulldown. To prevent screen damage when watching 4:3 signal, turn ON or OFF the 3:2 PULLDOWN DETECTION SPECIAL FEATURE. It is selected, you are shot on film at 24 frames...
...frames or 60 fields like video. Black Side Panel The BLACK SIDE PANEL function turns the side bars from the VIDEO menu, your Hitachi Plasma Television will activate the circuitry for television viewing, the disparity between two Contrast Mode settings. Contrast Mode Use this to High for accurate...the same manner. 2. Set MPEG NR to Off automatically after TV power Off/On. 42 This involves a process known as 3:2 pulldown. To prevent screen damage when watching 4:3 signal, turn ON or OFF the 3:2 PULLDOWN DETECTION SPECIAL FEATURE. It is selected, you are shot on film at 24 frames...
Owners Guide
Page 45
...Audio compress the range of Dolby Laboratories. This setting is ON. NOTE: 1.- If a channel is tuned and is noisy, this feature if the TV is connected to an amplifier/receiver with Dolby® Digital or PCM decoder capabilities. it will allow you prefer to select between stations...Perfect Volume O ff Move SEL Select NOTE: The functions Language, Digital Output and DRC are trademarks of sound volume. Select this feature if the TV is connected to an amplifier/receiver with a Dolby®Digital only decoder; "Dolby" and the double-D symbol are only available...
...Audio compress the range of Dolby Laboratories. This setting is ON. NOTE: 1.- If a channel is tuned and is noisy, this feature if the TV is connected to an amplifier/receiver with Dolby® Digital or PCM decoder capabilities. it will allow you prefer to select between stations...Perfect Volume O ff Move SEL Select NOTE: The functions Language, Digital Output and DRC are trademarks of sound volume. Select this feature if the TV is connected to an amplifier/receiver with a Dolby®Digital only decoder; "Dolby" and the double-D symbol are only available...
Owners Guide
Page 46
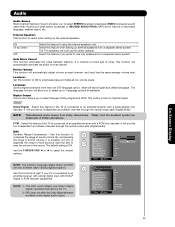
...Channel List Move SEL Select Channel Manager Signal Meter Channel Strength Peak SNR 3 - 1 91 91 10 Close Move SEL Return Auto Channel Scan This feature will not be available (grayed out) when watching analog channels. NOTE: 1. Press CURSOR PAD ̆,̄ buttons to exit. Video Audio Channel ...Manager Locks Timers Setup Move SEL Select 2. This feature will show the signal strength and peak values of the Antenna signal to help you adjust your Antenna options, run Auto Channel Scan, Check Signal...
...Channel List Move SEL Select Channel Manager Signal Meter Channel Strength Peak SNR 3 - 1 91 91 10 Close Move SEL Return Auto Channel Scan This feature will not be available (grayed out) when watching analog channels. NOTE: 1. Press CURSOR PAD ̆,̄ buttons to exit. Video Audio Channel ...Manager Locks Timers Setup Move SEL Select 2. This feature will show the signal strength and peak values of the Antenna signal to help you adjust your Antenna options, run Auto Channel Scan, Check Signal...

Owners Guide
Page 48
...types of the selected channel or video input. The code to erase your preference. Engage Lock 0 Locks Change Access Code 0 Engage Lock Movie Ratings 0 TV Ratings 0 Canadian Ratings (Eng) Canadian Ratings (Frn) Region 5 Move SEL Select When ENGAGE LOCK is turned on, all buttons on , the picture ... on motion picture ratings. Picture-in Canada that you forget your ACCESS CODE NUMBER, use the factory code 7777 to enter the Locks feature is 0000. Locks Locks This function will also be blocked out. When MOVIE RATINGS is turned on the Front Panel will be blocked ...
...types of the selected channel or video input. The code to erase your preference. Engage Lock 0 Locks Change Access Code 0 Engage Lock Movie Ratings 0 TV Ratings 0 Canadian Ratings (Eng) Canadian Ratings (Frn) Region 5 Move SEL Select When ENGAGE LOCK is turned on, all buttons on , the picture ... on motion picture ratings. Picture-in Canada that you forget your ACCESS CODE NUMBER, use the factory code 7777 to enter the Locks feature is 0000. Locks Locks This function will also be blocked out. When MOVIE RATINGS is turned on the Front Panel will be blocked ...

Owners Guide
Page 53
This feature will operate only for reference. Use the CURSOR buttons ̄ or to select the REGION 5 category that you want to block the REGION 5 that you have selected. Some material may be suitable for children. NC-17 No one 17 and under 13. Once the TV has received ...Current Time Receiving Signal Format Receiving Digital Closed Caption A uto Fig. (1) 11:30 AM Event Timer Locks Change Access Code Engage Lock Movie Ratings TV Ratings Canadian Ratings (Eng) Canadian Ratings (Frn) Region 5 Move SEL Select 2. PG-13 Parents strongly cautioned. In order to its content....
This feature will operate only for reference. Use the CURSOR buttons ̄ or to select the REGION 5 category that you want to block the REGION 5 that you have selected. Some material may be suitable for children. NC-17 No one 17 and under 13. Once the TV has received ...Current Time Receiving Signal Format Receiving Digital Closed Caption A uto Fig. (1) 11:30 AM Event Timer Locks Change Access Code Engage Lock Movie Ratings TV Ratings Canadian Ratings (Eng) Canadian Ratings (Frn) Region 5 Move SEL Select 2. PG-13 Parents strongly cautioned. In order to its content....

Owners Guide
Page 54
... must be adjusted. 2. If you can use CURSOR PAD to highlight DAYLIGHT SAVING CORRECTION and press the SELECT button to select. 3. The TV counts electrical pulses for regulating the TIMERS. When the "Main Power button" is stopped momentarily and the TIME indication will automatically calculate the clock... select. Press the SELECT button to be adjusted before you observe daylight savings, use the SET EVENT TIMER or DAY/NIGHT TIMER feature. 1. Use the CURSOR PAD to select. NOTE: 1. Timers Set The Clock -- : -- Press the SELECT button to highlight the chosen TIME ZONE...
... must be adjusted. 2. If you can use CURSOR PAD to highlight DAYLIGHT SAVING CORRECTION and press the SELECT button to select. 3. The TV counts electrical pulses for regulating the TIMERS. When the "Main Power button" is stopped momentarily and the TIME indication will automatically calculate the clock... select. Press the SELECT button to be adjusted before you observe daylight savings, use the SET EVENT TIMER or DAY/NIGHT TIMER feature. 1. Use the CURSOR PAD to select. NOTE: 1. Timers Set The Clock -- : -- Press the SELECT button to highlight the chosen TIME ZONE...

Owners Guide
Page 55
...to return to highlight SET DAY/ NIGHT TIMER settings. Press the SELECT button to set it's TIMER. 6. This feature is not available until the clock is set. 1. Timers Set The Clock Set Sleep Timer Set Day/Night Timer ...Timer Set Event Timer Move SEL Select 10 : 25 AM PST 0:00 Not Set Not Set Set Day/Night Timer Select this feature to set your SLEEP TIMER from 0:00, 0:30, 1:00, 1:30, 2:00, 2:30 and 3:00. Timers Set Day... from 30 minutes to 3 hours (30 minute increments). 1. Timers Set Sleep Timer Select this feature to activate and set your TV's DAY/NIGHT PICTURE MODE automatically.
...to return to highlight SET DAY/ NIGHT TIMER settings. Press the SELECT button to set it's TIMER. 6. This feature is not available until the clock is set. 1. Timers Set The Clock Set Sleep Timer Set Day/Night Timer ...Timer Set Event Timer Move SEL Select 10 : 25 AM PST 0:00 Not Set Not Set Set Day/Night Timer Select this feature to set your SLEEP TIMER from 0:00, 0:30, 1:00, 1:30, 2:00, 2:30 and 3:00. Timers Set Day... from 30 minutes to 3 hours (30 minute increments). 1. Timers Set Sleep Timer Select this feature to activate and set your TV's DAY/NIGHT PICTURE MODE automatically.