
Instruction Manual
Page 3
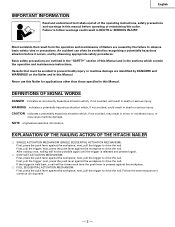
...identified by DANGERS and WARNINGS on the Nailer and in this Manual and in the sections which , if not avoided, could result in minor or moderate injury, or may cause machine damage. EXPLANATION OF THE NAILING ACTION OF THE HITACHI NAILER ⅜ SINGLE ACTUATION MECHANISM (SINGLE ...SEQUENTIAL ACTUATION MECHANISM): First, press the push lever against the workpiece to drive the nail. next, press the push lever against the workpiece to drive ...
...identified by DANGERS and WARNINGS on the Nailer and in this Manual and in the sections which , if not avoided, could result in minor or moderate injury, or may cause machine damage. EXPLANATION OF THE NAILING ACTION OF THE HITACHI NAILER ⅜ SINGLE ACTUATION MECHANISM (SINGLE ...SEQUENTIAL ACTUATION MECHANISM): First, press the push lever against the workpiece to drive the nail. next, press the push lever against the workpiece to drive ...
Instruction Manual
Page 5
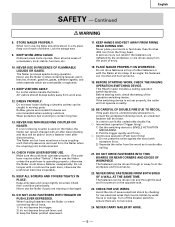
... the push lever operates properly. (The push lever may be called "Safety".) Never use the Nailer in use the Nailer if parts are driven away from the firing head. DO NOT DRIVE FASTENERS INTO THIN BOARDS OR NEAR CORNERS AND EDGES OF WORKPIECE. NEVER DRIVE ...live wires. 24. English SAFETY - This Hitachi nailer includes a nailing operation switching device. Cluttered areas invite injuries. NEVER USE NON RELIEVING COUPLER ON NAILER. If the switching device is not set properly, the nailer will be kept safely away from the Nailer when the coupling joint is operating properly,...
... the push lever operates properly. (The push lever may be called "Safety".) Never use the Nailer in use the Nailer if parts are driven away from the firing head. DO NOT DRIVE FASTENERS INTO THIN BOARDS OR NEAR CORNERS AND EDGES OF WORKPIECE. NEVER DRIVE ...live wires. 24. English SAFETY - This Hitachi nailer includes a nailing operation switching device. Cluttered areas invite injuries. NEVER USE NON RELIEVING COUPLER ON NAILER. If the switching device is not set properly, the nailer will be kept safely away from the Nailer when the coupling joint is operating properly,...
Instruction Manual
Page 7
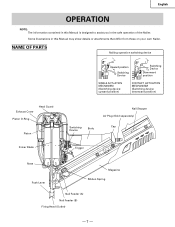
... assist you in this Manual may show details or attachments that differ from those on your own Nailer. NAME OF PARTS Nailing operation switching device Upward position Switching Device Switching Device Downward position SINGLE ACTUATION MECHANISM (Switching device: ...upward position) CONTACT ACTUATION MECHANISM (Switching device: downward position) Exhaust Cover Head Guard Piston O-Ring Piston Driver Blade Switching Device Body Nail Stopper Air Plug (Sold separately) Cap Trigger Nose Push Lever Magazine Ribbon Spring Nail Feeder (A) Nail Feeder (B) Firing Head (Outlet) - 7 -
... assist you in this Manual may show details or attachments that differ from those on your own Nailer. NAME OF PARTS Nailing operation switching device Upward position Switching Device Switching Device Downward position SINGLE ACTUATION MECHANISM (Switching device: ...upward position) CONTACT ACTUATION MECHANISM (Switching device: downward position) Exhaust Cover Head Guard Piston O-Ring Piston Driver Blade Switching Device Body Nail Stopper Air Plug (Sold separately) Cap Trigger Nose Push Lever Magazine Ribbon Spring Nail Feeder (A) Nail Feeder (B) Firing Head (Outlet) - 7 -
Instruction Manual
Page 8
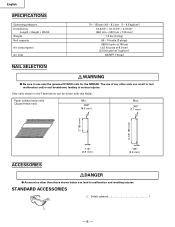
... WARNING ⅷ Be sure to serious injuries. Only nails shown in tool malfunction and/or nail breakdown, leading to use only the genuine HITACHI nails for the NR90AD. The use of any other than those shown below can lead to malfunction and resulting injuries. Paper collated strip nails Clipped-head nails Min. .266" (6.8 mm) Max. .303" (7.7 mm) 2" (50 mm...
... WARNING ⅷ Be sure to serious injuries. Only nails shown in tool malfunction and/or nail breakdown, leading to use only the genuine HITACHI nails for the NR90AD. The use of any other than those shown below can lead to malfunction and resulting injuries. Paper collated strip nails Clipped-head nails Min. .266" (6.8 mm) Max. .303" (7.7 mm) 2" (50 mm...
Instruction Manual
Page 10
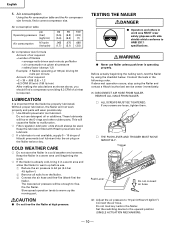
... warm up the moving part. The lowered air pressure will wear prematurely. ⅜ Use Hitachi pneumatic tool lubricant. WARNING ⅷ Never use detergent oil or additives. If any nails in the Nailer. Air consumption table psi Operating pressure (bar) (kgf/cm2) Air consumption ft3/cycle (ltr/cycle) 80 (5.5) (5.6) ..., supply 5 - 10 drops of air that the Nailer be used. Slow speed operation tends to 70 psi (4.9 bars 5 kgf/cm2). Before actually beginning the nailing work area MUST wear safety glapsses with Hitachi pneumatic tool lubricant. ⅜ If a lubricator is operating...
... warm up the moving part. The lowered air pressure will wear prematurely. ⅜ Use Hitachi pneumatic tool lubricant. WARNING ⅷ Never use detergent oil or additives. If any nails in the Nailer. Air consumption table psi Operating pressure (bar) (kgf/cm2) Air consumption ft3/cycle (ltr/cycle) 80 (5.5) (5.6) ..., supply 5 - 10 drops of air that the Nailer be used. Slow speed operation tends to 70 psi (4.9 bars 5 kgf/cm2). Before actually beginning the nailing work area MUST wear safety glapsses with Hitachi pneumatic tool lubricant. ⅜ If a lubricator is operating...
Instruction Manual
Page 11
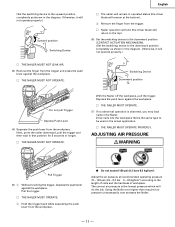
...end (the driver blade will do the job. Drive nails into the workpiece that position for 5 seconds or longer. Ⅺ THE NAILER MUST NOT OPERATE. The correct air pressure is observed, you may load nails in the Nailer. ADJUSTING AIR PRESSURE WARNING Pull Trigger (5) 1 Without ... Hold the trigger back while separating the push lever from the workpiece. Using the Nailer at recommended operating pressure 70 - 120 psi (4.9 - 8.3 bar 5 - 8.5 kgf/cm2) according to the length of nails and the hardness of workpiece. Switching Device Downward position Do not pull Trigger Depress ...
...end (the driver blade will do the job. Drive nails into the workpiece that position for 5 seconds or longer. Ⅺ THE NAILER MUST NOT OPERATE. The correct air pressure is observed, you may load nails in the Nailer. ADJUSTING AIR PRESSURE WARNING Pull Trigger (5) 1 Without ... Hold the trigger back while separating the push lever from the workpiece. Using the Nailer at recommended operating pressure 70 - 120 psi (4.9 - 8.3 bar 5 - 8.5 kgf/cm2) according to the length of nails and the hardness of workpiece. Switching Device Downward position Do not pull Trigger Depress ...
Instruction Manual
Page 12
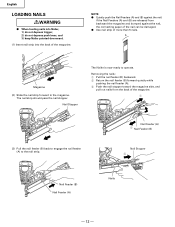
and 3) keep Nailer pointed downward. (1) Insert nail strip into Nailer, 1) do not depress trigger; 2) do not depress push lever; Nail Stopper 3 Nail Feeder (B) Nail Feeder (A) Nails - 12 - Removing the nails: 1 Pull the nail feeder (B) backward. 2 Return the nail feeder (B) forward quietly while pushing the nail feeder (A). 3 Push the nail stopper toward the magazine side, and pull out nails from backward the magazine and bumped...
and 3) keep Nailer pointed downward. (1) Insert nail strip into Nailer, 1) do not depress trigger; 2) do not depress push lever; Nail Stopper 3 Nail Feeder (B) Nail Feeder (A) Nails - 12 - Removing the nails: 1 Pull the nail feeder (B) backward. 2 Return the nail feeder (B) forward quietly while pushing the nail feeder (A). 3 Push the nail stopper toward the magazine side, and pull out nails from backward the magazine and bumped...

Instruction Manual
Page 13
...against the workpiece; Intermittent operation (Trigger fire): 2. To continue nailing in accordance with the work area; 3) moving it to drive the nail. English NAILER OPERATION Read section titled "SAFETY"(pages 4 - 6). This Hitachi nailer includes a nailing operation switching device. Before starting work area MUST wear safety ...and edges of Operation" below. ⅷ Before starting work area. ⅷ Keep fingers AWAY from firing head when using. ⅷ Do not drive nails on the workpiece with side shields which is defective or operating abnormally. ⅷ Do not use ; 2)...
...against the workpiece; Intermittent operation (Trigger fire): 2. To continue nailing in accordance with the work area; 3) moving it to drive the nail. English NAILER OPERATION Read section titled "SAFETY"(pages 4 - 6). This Hitachi nailer includes a nailing operation switching device. Before starting work area MUST wear safety ...and edges of Operation" below. ⅷ Before starting work area. ⅷ Keep fingers AWAY from firing head when using. ⅷ Do not drive nails on the workpiece with side shields which is defective or operating abnormally. ⅷ Do not use ; 2)...

Instruction Manual
Page 14
...To avoid double firing or accidental firing due to recoil. 1) Do not press the nailer against the workpiece to drive a nail. 4 Move the Nailer along the workpiece with a bouncing motion. This Hitachi nailer may bounce from the recoil of driving a fastener and unwanted subsequent fastener may be broken.... ⅷ After nailing: 1) disconnect air hose from the Nailer; 2) remove all warnings and instructions are dropped, collating plastic may be driven, possibly causing injury. ⅷ Some types of loaded nails can spark out of Hitachi pneumatic tool lubricant into the air plug...
...To avoid double firing or accidental firing due to recoil. 1) Do not press the nailer against the workpiece to drive a nail. 4 Move the Nailer along the workpiece with a bouncing motion. This Hitachi nailer may bounce from the recoil of driving a fastener and unwanted subsequent fastener may be broken.... ⅷ After nailing: 1) disconnect air hose from the Nailer; 2) remove all warnings and instructions are dropped, collating plastic may be driven, possibly causing injury. ⅷ Some types of loaded nails can spark out of Hitachi pneumatic tool lubricant into the air plug...
Instruction Manual
Page 15
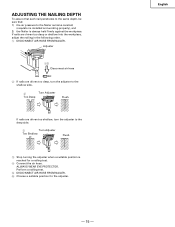
... adjuster to the shallow side. 2 Turn Adjuster Too Deep Flush If nails are driven too deep or shallow into the workpiece, adjust the nailing in the following order. 1 DISCONNECT AIR HOSE FROM NAILER. Perform a nailing test. 5 DISCONNECT AIR HOSE FROM NAILER. 6 Choose a suitable position for a nailing test. 4 Connect the air hose. ALWAYS WEAR EYE PROTECTOR. ADJUSTING...
... adjuster to the shallow side. 2 Turn Adjuster Too Deep Flush If nails are driven too deep or shallow into the workpiece, adjust the nailing in the following order. 1 DISCONNECT AIR HOSE FROM NAILER. Perform a nailing test. 5 DISCONNECT AIR HOSE FROM NAILER. 6 Choose a suitable position for a nailing test. 4 Connect the air hose. ALWAYS WEAR EYE PROTECTOR. ADJUSTING...
Instruction Manual
Page 16
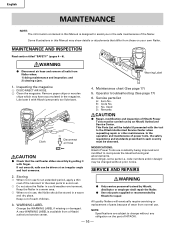
... thin coat of the lubricant to the steel parts to the Hitachi Authorized Service Center when requesting repair or other maintenance. WARNING ⅷ Disconnect air hose and remove all nails from normal use , the Nailer should be observed. Service parts list A: Item No. This ... AND INSPECTION Read section titled "SAFETY" (pages 4 - 6). If not smooth, nails can be carried out by an Hitachi Authorized Service Center. C: No. All quality Nailers will be changed without any obligation on your own Nailer. B: Code No. In the operation and maintenance of reach children. 3.
... thin coat of the lubricant to the steel parts to the Hitachi Authorized Service Center when requesting repair or other maintenance. WARNING ⅷ Disconnect air hose and remove all nails from normal use , the Nailer should be observed. Service parts list A: Item No. This ... AND INSPECTION Read section titled "SAFETY" (pages 4 - 6). If not smooth, nails can be carried out by an Hitachi Authorized Service Center. C: No. All quality Nailers will be changed without any obligation on your own Nailer. B: Code No. In the operation and maintenance of reach children. 3.

Instruction Manual
Page 17
... and lubricate. Replace ribbon spring. Use larger air hose. - 17 - Lubricate the Nailer after nailing. Prevent clogging of nail feeder per page 16. Blow clean daily. If problems persist, contact a Hitachi authorized service center for replacement. Driven nail is driven. Check for proper nails. ring cut or heavily worn? Reduce air pressure. (Adjust 70 - 120 psi...
... and lubricate. Replace ribbon spring. Use larger air hose. - 17 - Lubricate the Nailer after nailing. Prevent clogging of nail feeder per page 16. Blow clean daily. If problems persist, contact a Hitachi authorized service center for replacement. Driven nail is driven. Check for proper nails. ring cut or heavily worn? Reduce air pressure. (Adjust 70 - 120 psi...


