
Instruction Manual
Page 3
... applications other than those specified in this nailer. EXPLANATION OF THE NAILING ACTION OF THE HITACHI NAILER ⅜ SINGLE ACTUATION MECHANISM (SINGLE SEQUENTIAL ACTUATION MECHANISM): First, press the push lever against the workpiece to observe basic safety rules... operation and maintenance instructions. next, pull the trigger to continue driving nails. - 3 - Hazards that result from the operation and maintenance of Nailers are outlined in the "SAFETY" section of the operating instructions, safety precautions and warnings in death or serious injury. next, pull the trigger ...
... applications other than those specified in this nailer. EXPLANATION OF THE NAILING ACTION OF THE HITACHI NAILER ⅜ SINGLE ACTUATION MECHANISM (SINGLE SEQUENTIAL ACTUATION MECHANISM): First, press the push lever against the workpiece to observe basic safety rules... operation and maintenance instructions. next, pull the trigger to continue driving nails. - 3 - Hazards that result from the operation and maintenance of Nailers are outlined in the "SAFETY" section of the operating instructions, safety precautions and warnings in death or serious injury. next, pull the trigger ...
Instruction Manual
Page 4
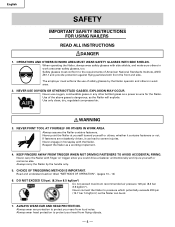
... wear safety glasses, too. Always wear ear protection to severe injuries. Respect the Nailer as the Nailer can lead to protect your head from flying objects. - 4 - Never carry the Nailer with the Nailer. ALWAYS WEAR EAR AND HEAD PROTECTION. Always assume the Nailer contains fasteners. OPERATORS AND OTHERS IN WORK AREA MUST WEAR SAFETY GLASSES WITH SIDE...
... wear safety glasses, too. Always wear ear protection to severe injuries. Respect the Nailer as the Nailer can lead to protect your head from flying objects. - 4 - Never carry the Nailer with the Nailer. ALWAYS WEAR EAR AND HEAD PROTECTION. Always assume the Nailer contains fasteners. OPERATORS AND OTHERS IN WORK AREA MUST WEAR SAFETY GLASSES WITH SIDE...
Instruction Manual
Page 5
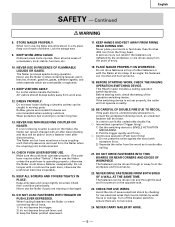
...CHECK PUSH LEVER BEFORE USE. Never use the Nailer unless the push lever is used on the opposite side. 23. and 3) keep the Nailer pointed downward. 17. KEEP HANDS AND FEET AWAY FROM FIRING HEAD DURING USE. This Hitachi nailer includes a nailing operation switching device. BE ...DEPRESSED. When loading fasteners into and through or away from the firing head. Cluttered areas invite injuries. Do not let visitors handle the Nailer. If a non relieving coupler is operating properly, otherwise the Nailer could drive a fastener unexpectedly. Do not tamper with excessive force. ...
...CHECK PUSH LEVER BEFORE USE. Never use the Nailer unless the push lever is used on the opposite side. 23. and 3) keep the Nailer pointed downward. 17. KEEP HANDS AND FEET AWAY FROM FIRING HEAD DURING USE. This Hitachi nailer includes a nailing operation switching device. BE ...DEPRESSED. When loading fasteners into and through or away from the firing head. Cluttered areas invite injuries. Do not let visitors handle the Nailer. If a non relieving coupler is operating properly, otherwise the Nailer could drive a fastener unexpectedly. Do not tamper with excessive force. ...

Instruction Manual
Page 6
... OTHER THAN THOSE SPECIFIED IN THIS MANUAL. 32. USE ONLY PARTS, ACCESSORIES OR FASTENERS SUPPLIED OR RECOMMENDED BY HITACHI. NEVER USE NAILER WHICH IS DEFECTIVE OR OPERATING ABNORMALLY. Never attempt to another location; Keep Nailers in the surface are doing maintenance and inspection; 2) clearing a jam; 3) it to an air supply. 28. SAVE THIS...
... OTHER THAN THOSE SPECIFIED IN THIS MANUAL. 32. USE ONLY PARTS, ACCESSORIES OR FASTENERS SUPPLIED OR RECOMMENDED BY HITACHI. NEVER USE NAILER WHICH IS DEFECTIVE OR OPERATING ABNORMALLY. Never attempt to another location; Keep Nailers in the surface are doing maintenance and inspection; 2) clearing a jam; 3) it to an air supply. 28. SAVE THIS...
Instruction Manual
Page 7
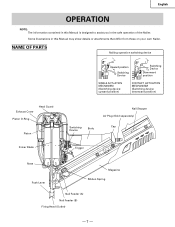
...Manual is designed to assist you in this Manual may show details or attachments that differ from those on your own Nailer. NAME OF PARTS Nailing operation switching device Upward position Switching Device Switching Device Downward position SINGLE ACTUATION MECHANISM (Switching ...device: upward position) CONTACT ACTUATION MECHANISM (Switching device: downward position) Exhaust Cover Head Guard Piston O-Ring Piston Driver Blade Switching Device Body Nail Stopper Air Plug (Sold separately) Cap Trigger Nose Push Lever ...
...Manual is designed to assist you in this Manual may show details or attachments that differ from those on your own Nailer. NAME OF PARTS Nailing operation switching device Upward position Switching Device Switching Device Downward position SINGLE ACTUATION MECHANISM (Switching ...device: upward position) CONTACT ACTUATION MECHANISM (Switching device: downward position) Exhaust Cover Head Guard Piston O-Ring Piston Driver Blade Switching Device Body Nail Stopper Air Plug (Sold separately) Cap Trigger Nose Push Lever ...
Instruction Manual
Page 8
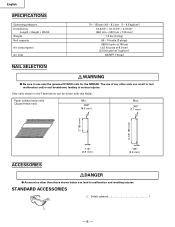
... nails shown in tool malfunction and/or nail breakdown, leading to malfunction and resulting injuries. The use only the genuine HITACHI nails for the NR90AD. STANDARD ACCESSORIES 1 Safety glasses 1 1 - 8 - Paper collated strip nails Clipped-head nails Min. .266" (6.8 mm) Max. .303" (7.7 mm) 2" (50 mm) 3-1/2" (90 mm) .113" (2.9 mm) .148" (3.8 mm) ACCESSORIES DANGER ⅷ Accessories...
... nails shown in tool malfunction and/or nail breakdown, leading to malfunction and resulting injuries. The use only the genuine HITACHI nails for the NR90AD. STANDARD ACCESSORIES 1 Safety glasses 1 1 - 8 - Paper collated strip nails Clipped-head nails Min. .266" (6.8 mm) Max. .303" (7.7 mm) 2" (50 mm) 3-1/2" (90 mm) .113" (2.9 mm) .148" (3.8 mm) ACCESSORIES DANGER ⅷ Accessories...

Instruction Manual
Page 9
...SUPPLY DANGER ⅷ NEVER use oxygen or other flammable objects at the air inlet. Filter The filter removes moisture and dirt mixed in the Nailer. Use Hitachi pneumatic tool lubricant. Install a 3/8 NPT male plug at worksite. ⅷ Clear the area of children or unauthorized personnel. The hose ... (10.4 bar 10.6 kgf/cm2) or 150% of the maximum pressure produced in the air compressor may occur. APPLICATIONS ⅜ Floor and wall framing. ⅜ Truss build-up, Window build-up. ⅜ Subflooring and roof decking. ⅜ Wall sheathing. ⅜ Mobile home and modular housing...
...SUPPLY DANGER ⅷ NEVER use oxygen or other flammable objects at the air inlet. Filter The filter removes moisture and dirt mixed in the Nailer. Use Hitachi pneumatic tool lubricant. Install a 3/8 NPT male plug at worksite. ⅷ Clear the area of children or unauthorized personnel. The hose ... (10.4 bar 10.6 kgf/cm2) or 150% of the maximum pressure produced in the air compressor may occur. APPLICATIONS ⅜ Floor and wall framing. ⅜ Truss build-up, Window build-up. ⅜ Subflooring and roof decking. ⅜ Wall sheathing. ⅜ Mobile home and modular housing...
Instruction Manual
Page 10
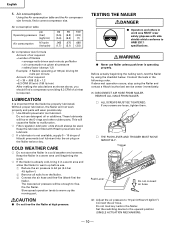
... SMOOTHLY. Without proper lubrication, the Nailer will not work . ⅜ If the Nailer is already cold, bring it in work , test the Nailer by using the Nailer and contact a Hitachi authorized service center immediately. (1) DISCONNECT AIR HOSE FROM NAILER. Connect the air hose. Air ...formula, find a compressor providing 6.3 CFM of air that the Nailer be used. These lubricants will cause the Nailer to freefire the Nailer. Before actually beginning the nailing work area MUST wear safety glapsses with Hitachi pneumatic tool lubricant. ⅜ If a lubricator is required....
... SMOOTHLY. Without proper lubrication, the Nailer will not work . ⅜ If the Nailer is already cold, bring it in work , test the Nailer by using the Nailer and contact a Hitachi authorized service center immediately. (1) DISCONNECT AIR HOSE FROM NAILER. Connect the air hose. Air ...formula, find a compressor providing 6.3 CFM of air that the Nailer be used. These lubricants will cause the Nailer to freefire the Nailer. Before actually beginning the nailing work area MUST wear safety glapsses with Hitachi pneumatic tool lubricant. ⅜ If a lubricator is required....
Instruction Manual
Page 11
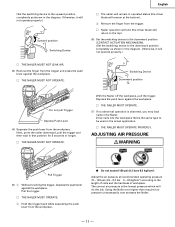
...switching device to the downward position (CONTACT ACTUATION MECHANISM). (Set the switching device to the downward position completely as shown in the diagram. Using the Nailer at recommended operating pressure 70 - 120 psi (4.9 - 8.3 bar 5 - 8.5 kgf/cm2) according to the length of nails and the hardness of... will remain at the bottom). 3 Remove the finger from the trigger and press the push lever against the workpiece. Ⅺ THE NAILER MUST NOT OPERATE. Depress the push lever against the workpiece. Switching Device Downward position Do not pull Trigger Depress Push Lever (4) Separate the...
...switching device to the downward position (CONTACT ACTUATION MECHANISM). (Set the switching device to the downward position completely as shown in the diagram. Using the Nailer at recommended operating pressure 70 - 120 psi (4.9 - 8.3 bar 5 - 8.5 kgf/cm2) according to the length of nails and the hardness of... will remain at the bottom). 3 Remove the finger from the trigger and press the push lever against the workpiece. Ⅺ THE NAILER MUST NOT OPERATE. Depress the push lever against the workpiece. Switching Device Downward position Do not pull Trigger Depress Push Lever (4) Separate the...
Instruction Manual
Page 12
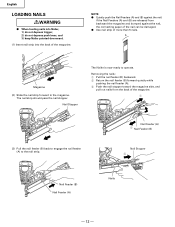
...feeder (A). 3 Push the nail stopper toward the magazine side, and pull out nails from backward the magazine and bumped against the nail. Nail Stopper The Nailer is now ready to the nail strip. NOTE: ⅷ Quietly push the Nail Feeders (A) and (B) against the nail, the connecting paper of the nail...; Use nail strip of the magazine. 1 Nail Feeder (A) 2 Nail Feeder (B) (3) Pull the nail feeder (B) back to engage the nail feeder (A) to operate. and 3) keep Nailer pointed downward. (1) Insert nail strip into Nailer, 1) do not depress trigger; 2) do not depress push lever;
...feeder (A). 3 Push the nail stopper toward the magazine side, and pull out nails from backward the magazine and bumped against the nail. Nail Stopper The Nailer is now ready to the nail strip. NOTE: ⅷ Quietly push the Nail Feeders (A) and (B) against the nail, the connecting paper of the nail...; Use nail strip of the magazine. 1 Nail Feeder (A) 2 Nail Feeder (B) (3) Pull the nail feeder (B) back to engage the nail feeder (A) to operate. and 3) keep Nailer pointed downward. (1) Insert nail strip into Nailer, 1) do not depress trigger; 2) do not depress push lever;

Instruction Manual
Page 13
...which is properly set to the upward position completely as shown in a separate location, move the nailer along the wood, repeating steps 2 - 5 as hammer. ⅷ Disconnect air hose from firing head when using. ⅷ Do not drive nails on the opposite side. ⅷ Never use ;... ACTUATION MECHANISM: First, press the push lever against the workpiece. Otherwise, it to drive the nail. English NAILER OPERATION Read section titled "SAFETY"(pages 4 - 6). This Hitachi nailer is equipped with finger off the trigger. 3 Depress the push lever firmly until the trigger is pressed against ...
...which is properly set to the upward position completely as shown in a separate location, move the nailer along the wood, repeating steps 2 - 5 as hammer. ⅷ Disconnect air hose from firing head when using. ⅷ Do not drive nails on the opposite side. ⅷ Never use ;... ACTUATION MECHANISM: First, press the push lever against the workpiece. Otherwise, it to drive the nail. English NAILER OPERATION Read section titled "SAFETY"(pages 4 - 6). This Hitachi nailer is equipped with finger off the trigger. 3 Depress the push lever firmly until the trigger is pressed against ...

Instruction Manual
Page 14
...8567; Keep your finger off the workpiece. 3 Depress the push lever against the wood with excessive force. 2) Separate the nailer from the Nailer; 3) supply 5 - 10 drops of Hitachi pneumatic tool lubricant into the air plug on the air compressor tank to drain any moisture. - 14 - NOTE: ⅷ...the push lever accidentally contacts you or others in the diagram. and 4) open the petcock on the Nailer; This Hitachi nailer may be broken. ⅷ After nailing: 1) disconnect air hose from the Nailer; 2) remove all nails from the wood as it will drive a nail. Otherwise, it recoils after...
...8567; Keep your finger off the workpiece. 3 Depress the push lever against the wood with excessive force. 2) Separate the nailer from the Nailer; 3) supply 5 - 10 drops of Hitachi pneumatic tool lubricant into the air plug on the air compressor tank to drain any moisture. - 14 - NOTE: ⅷ...the push lever accidentally contacts you or others in the diagram. and 4) open the petcock on the Nailer; This Hitachi nailer may be broken. ⅷ After nailing: 1) disconnect air hose from the Nailer; 2) remove all nails from the wood as it will drive a nail. Otherwise, it recoils after...
Instruction Manual
Page 15
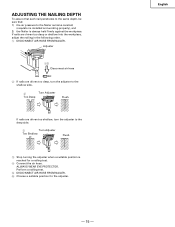
... If nails are driven too deep or shallow into the workpiece, adjust the nailing in the following order. 1 DISCONNECT AIR HOSE FROM NAILER. ALWAYS WEAR EYE PROTECTOR. ADJUSTING THE NAILING DEPTH To assure that each nail penetrates to the same depth, be sure that: 1) ...the air pressure to the Nailer remains constant (requlator is installed and working properly), and 2) the Nailer is reached for the adjuster. - 15 - English Perform a nailing test. 5 DISCONNECT AIR HOSE FROM NAILER. 6 Choose a suitable position for a nailing test. 4 Connect the ...
... If nails are driven too deep or shallow into the workpiece, adjust the nailing in the following order. 1 DISCONNECT AIR HOSE FROM NAILER. ALWAYS WEAR EYE PROTECTOR. ADJUSTING THE NAILING DEPTH To assure that each nail penetrates to the same depth, be sure that: 1) ...the air pressure to the Nailer remains constant (requlator is installed and working properly), and 2) the Nailer is reached for the adjuster. - 15 - English Perform a nailing test. 5 DISCONNECT AIR HOSE FROM NAILER. 6 Choose a suitable position for a nailing test. 4 Connect the ...
Instruction Manual
Page 16
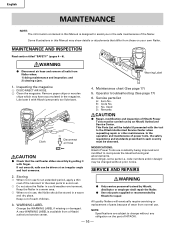
...wooden chips which may be carried out by pulling it with the tool to the Hitachi Authorized Service Center when requesting repair or other maintenance. Operator troubleshooting (See page 17) 6. Keep the Nailer in a warm area. ⅜ When not in use . A new WARNING ...C: No. Lubricate it with finger. If not smooth, nails can be helpful if presented with Hitachi pneumatic tool lubricant. Maintenance chart (See page 17) 5. B: Code No. All quality Nailers will be driven at an irregular angle and hurt someone. 4. English MAINTENANCE NOTE: The information contained...
...wooden chips which may be carried out by pulling it with the tool to the Hitachi Authorized Service Center when requesting repair or other maintenance. Operator troubleshooting (See page 17) 6. Keep the Nailer in a warm area. ⅜ When not in use . A new WARNING ...C: No. Lubricate it with finger. If not smooth, nails can be helpful if presented with Hitachi pneumatic tool lubricant. Maintenance chart (See page 17) 5. B: Code No. All quality Nailers will be driven at an irregular angle and hurt someone. 4. English MAINTENANCE NOTE: The information contained...

Instruction Manual
Page 17
.... Fill with dirt. Blow clean daily. Open petcock on air compressor tank. PROBLEM Nailer operates, but does not drive fully at faster nailing speeds. Skipping nails. Contact Hitachi for replacement. Keep lubricator filled. Check function of lubricant into the Nailer. Ribbon spring weakened or damaged? --- Nail feeder (A) worn or damaged? Drain air compressor...
.... Fill with dirt. Blow clean daily. Open petcock on air compressor tank. PROBLEM Nailer operates, but does not drive fully at faster nailing speeds. Skipping nails. Contact Hitachi for replacement. Keep lubricator filled. Check function of lubricant into the Nailer. Ribbon spring weakened or damaged? --- Nail feeder (A) worn or damaged? Drain air compressor...


