
Instruction Manual
Page 3
... Nailers are outlined in the "SAFETY" section of the operating instructions, safety precautions and warnings in this manual before it occurs, and by observing appropriate safety procedures. If the trigger is held back, a nail will result in death or serious injury. NOTE emphasizes essential information. next, pull the trigger to continue driving nails. - 3 - Failure to drive the nail. English IMPORTANT INFORMATION Read and understand tool...
... Nailers are outlined in the "SAFETY" section of the operating instructions, safety precautions and warnings in this manual before it occurs, and by observing appropriate safety procedures. If the trigger is held back, a nail will result in death or serious injury. NOTE emphasizes essential information. next, pull the trigger to continue driving nails. - 3 - Failure to drive the nail. English IMPORTANT INFORMATION Read and understand tool...
Instruction Manual
Page 4
... a working implement. 4. Use only clean, dry, regulated compressed air. Respect the Nailer as the Nailer will explode. KEEP FINGERS AWAY FROM TRIGGER WHEN NOT DRIVING FASTENERS TO AVOID ACCIDENTAL FIRING. CHOICE OF TRIGGERING METHOD IS IMPORTANT. Always wear head protection to protect your ears from flying objects. - 4 - OPERATORS AND OTHERS IN WORK AREA MUST WEAR SAFETY GLASSES WITH SIDE SHIELDS. When operating the Nailer...
... a working implement. 4. Use only clean, dry, regulated compressed air. Respect the Nailer as the Nailer will explode. KEEP FINGERS AWAY FROM TRIGGER WHEN NOT DRIVING FASTENERS TO AVOID ACCIDENTAL FIRING. CHOICE OF TRIGGERING METHOD IS IMPORTANT. Always wear head protection to protect your ears from flying objects. - 4 - OPERATORS AND OTHERS IN WORK AREA MUST WEAR SAFETY GLASSES WITH SIDE SHIELDS. When operating the Nailer...
Instruction Manual
Page 5
.... 15. CHECK PUSH LEVER BEFORE USE. KEEP ALL SCREWS AND COVERS TIGHTLY IN PLACE. When loading fasteners into and through or away from the firing head. English SAFETY - KEEP VISITORS AWAY. In order to avoid this undesirable double fire, ⅜ Intermittent operation (Trigger firing) 1) Set the switching device to drive a fastener even after nailing. 21. Continued WARNING 8. Never use , the Nailer should be hidden...
.... 15. CHECK PUSH LEVER BEFORE USE. KEEP ALL SCREWS AND COVERS TIGHTLY IN PLACE. When loading fasteners into and through or away from the firing head. English SAFETY - KEEP VISITORS AWAY. In order to avoid this undesirable double fire, ⅜ Intermittent operation (Trigger firing) 1) Set the switching device to drive a fastener even after nailing. 21. Continued WARNING 8. Never use , the Nailer should be hidden...

Instruction Manual
Page 6
... USE NAILER FOR APPLICATIONS OTHER THAN THOSE SPECIFIED IN THIS MANUAL. 32. To avoid this Manual. Keep the Nailer clean and lubricated for repairs by operators and others in use of high air pressure in the Nailer, cracks in safe working order. 5. EMPLOYER'S RESPONSIBILITIES 1. Continued WARNING 25. MAINTAIN NAILER WITH CARE. Unauthorized parts, accessories, or fasteners may cause it and injure the themselves. 29. Only service...
... USE NAILER FOR APPLICATIONS OTHER THAN THOSE SPECIFIED IN THIS MANUAL. 32. To avoid this Manual. Keep the Nailer clean and lubricated for repairs by operators and others in use of high air pressure in the Nailer, cracks in safe working order. 5. EMPLOYER'S RESPONSIBILITIES 1. Continued WARNING 25. MAINTAIN NAILER WITH CARE. Unauthorized parts, accessories, or fasteners may cause it and injure the themselves. 29. Only service...
Instruction Manual
Page 7
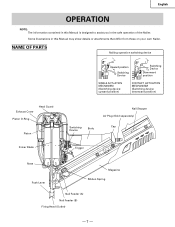
NAME OF PARTS Nailing operation switching device Upward position Switching Device Switching Device Downward position SINGLE ACTUATION MECHANISM (Switching device: upward position) CONTACT ACTUATION MECHANISM (Switching device: downward position) Exhaust Cover Head Guard Piston O-Ring Piston Driver Blade Switching Device Body Nail Stopper Air Plug (Sold separately) Cap Trigger Nose Push Lever Magazine Ribbon Spring Nail Feeder (A) Nail Feeder (B) Firing Head (Outlet) - 7 - English OPERATION NOTE: The information contained in this Manual is designed to...
NAME OF PARTS Nailing operation switching device Upward position Switching Device Switching Device Downward position SINGLE ACTUATION MECHANISM (Switching device: upward position) CONTACT ACTUATION MECHANISM (Switching device: downward position) Exhaust Cover Head Guard Piston O-Ring Piston Driver Blade Switching Device Body Nail Stopper Air Plug (Sold separately) Cap Trigger Nose Push Lever Magazine Ribbon Spring Nail Feeder (A) Nail Feeder (B) Firing Head (Outlet) - 7 - English OPERATION NOTE: The information contained in this Manual is designed to...
Instruction Manual
Page 8
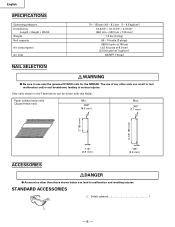
... ACCESSORIES 1 Safety glasses 1 1 - 8 - Paper collated strip nails Clipped-head nails Min. .266" (6.8 mm) Max. .303" (7.7 mm) 2" (50 mm) 3-1/2" (90 mm) .113" (2.9 mm) .148" (3.8 mm) ACCESSORIES DANGER ⅷ Accessories other nails can result in the Table below can be driven with this Nailer. The use of any other than those shown below can lead to use only the genuine HITACHI nails for the NR90AD. Only nails shown in tool...
... ACCESSORIES 1 Safety glasses 1 1 - 8 - Paper collated strip nails Clipped-head nails Min. .266" (6.8 mm) Max. .303" (7.7 mm) 2" (50 mm) 3-1/2" (90 mm) .113" (2.9 mm) .148" (3.8 mm) ACCESSORIES DANGER ⅷ Accessories other nails can result in the Table below can be driven with this Nailer. The use of any other than those shown below can lead to use only the genuine HITACHI nails for the NR90AD. Only nails shown in tool...

Instruction Manual
Page 9
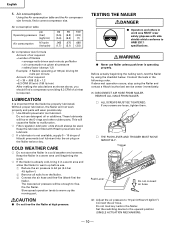
... air to change without any obligation on Nailer. 1. BEFORE OPERATION Read section titled "SAFETY" (pages 4 - 6). Install a 3/8 NPT male plug at worksite. ⅷ Clear the area of HITACHI. The hose coupling (male plug-female coupler) must remove all pressure from the Nailer when disconnected. English OPTIONAL ACCESSORIES ⅜ Pneumatic Tool Lubricant .8 oz. (25 cc) oil feeder 4 oz. (120 cc) oil feeder 1 quart (1 ltr) can be installed as a power...
... air to change without any obligation on Nailer. 1. BEFORE OPERATION Read section titled "SAFETY" (pages 4 - 6). Install a 3/8 NPT male plug at worksite. ⅷ Clear the area of HITACHI. The hose coupling (male plug-female coupler) must remove all pressure from the Nailer when disconnected. English OPTIONAL ACCESSORIES ⅜ Pneumatic Tool Lubricant .8 oz. (25 cc) oil feeder 4 oz. (120 cc) oil feeder 1 quart (1 ltr) can be installed as a power...
Instruction Manual
Page 10
... SCREWS MUST BE TIGHTENED. Set the switching device to 70 psi (4.9 bars 5 kgf/cm2). Before actually beginning the nailing work area MUST wear safety glapsses with Hitachi pneumatic tool lubricant. ⅜ If a lubricator is required. Air consumption table psi Operating pressure (bar) (kgf/cm2) Air consumption ft3/cycle (ltr/cycle) 80 (5.5) (5.6) .062 (1.7) 90 (6.2) (6.3) .075 (2.1) 100 (6.9) (7) .088 (2.5) Air compressor size formula Amount of air required =number of air that the Nailer be used...
... SCREWS MUST BE TIGHTENED. Set the switching device to 70 psi (4.9 bars 5 kgf/cm2). Before actually beginning the nailing work area MUST wear safety glapsses with Hitachi pneumatic tool lubricant. ⅜ If a lubricator is required. Air consumption table psi Operating pressure (bar) (kgf/cm2) Air consumption ft3/cycle (ltr/cycle) 80 (5.5) (5.6) .062 (1.7) 90 (6.2) (6.3) .075 (2.1) 100 (6.9) (7) .088 (2.5) Air compressor size formula Amount of air required =number of air that the Nailer be used...
Instruction Manual
Page 11
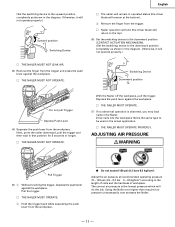
... the diagram. Otherwise, it will do the job. Drive nails into the workpiece that is observed, you may load nails in that position for 5 seconds or longer. Ⅺ THE NAILER MUST NOT OPERATE. Adjust the air pressure at the bottom). 3 Remove the finger from the trigger and press the push lever against the workpiece. Ⅺ THE NAILER MUST NOT OPERATE. Using the Nailer at a higher than required air pressure...
... the diagram. Otherwise, it will do the job. Drive nails into the workpiece that is observed, you may load nails in that position for 5 seconds or longer. Ⅺ THE NAILER MUST NOT OPERATE. Adjust the air pressure at the bottom). 3 Remove the finger from the trigger and press the push lever against the workpiece. Ⅺ THE NAILER MUST NOT OPERATE. Using the Nailer at a higher than required air pressure...
Instruction Manual
Page 12
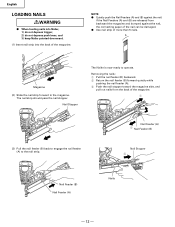
... (B) are released from the back of the magazine. 1 Nail Feeder (A) 2 Nail Feeder (B) (3) Pull the nail feeder (B) back to engage the nail feeder (A) to operate. and 3) keep Nailer pointed downward. (1) Insert nail strip into Nailer, 1) do not depress trigger; 2) do not depress push lever; NOTE: ⅷ Quietly push the Nail Feeders (A) and (B) against the nail, the connecting paper of the nail can be damaged. ⅷ Use nail strip...
... (B) are released from the back of the magazine. 1 Nail Feeder (A) 2 Nail Feeder (B) (3) Pull the nail feeder (B) back to engage the nail feeder (A) to operate. and 3) keep Nailer pointed downward. (1) Insert nail strip into Nailer, 1) do not depress trigger; 2) do not depress push lever; NOTE: ⅷ Quietly push the Nail Feeders (A) and (B) against the nail, the connecting paper of the nail can be damaged. ⅷ Use nail strip...

Instruction Manual
Page 13
... switching device to ANSI Z87.1 specifications. There are : 1. Intermittent operation (Trigger fire): 2. Continuous operation (Push lever fire): (1) Intermittent operation (Trigger fire) Use the SINGLE ACTUATION MECHANISM setting. Otherwise, it will not be driven through the wall and hit a person on the top of other nails or with a nailer operation switching device. This Hitachi nailer includes a nailing operation switching device. Explanation of workpiece. next, pull the trigger to drive the nail. After nailing once, nailing...
... switching device to ANSI Z87.1 specifications. There are : 1. Intermittent operation (Trigger fire): 2. Continuous operation (Push lever fire): (1) Intermittent operation (Trigger fire) Use the SINGLE ACTUATION MECHANISM setting. Otherwise, it will not be driven through the wall and hit a person on the top of other nails or with a nailer operation switching device. This Hitachi nailer includes a nailing operation switching device. Explanation of workpiece. next, pull the trigger to drive the nail. After nailing once, nailing...

Instruction Manual
Page 14
... wood as the desired number of the muzzle during fastening operation, because serious injury could result if the push lever accidentally contacts you or others in the diagram. If nails are followed, safe operation is possible with all warnings and instructions are dropped, collating plastic may be broken. ⅷ After nailing: 1) disconnect air hose from the Nailer; 2) remove all nails from the discharge...
... wood as the desired number of the muzzle during fastening operation, because serious injury could result if the push lever accidentally contacts you or others in the diagram. If nails are followed, safe operation is possible with all warnings and instructions are dropped, collating plastic may be broken. ⅷ After nailing: 1) disconnect air hose from the Nailer; 2) remove all nails from the discharge...
Instruction Manual
Page 15
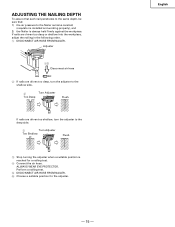
.... 1 DISCONNECT AIR HOSE FROM NAILER. ALWAYS WEAR EYE PROTECTOR. If nails are driven too shallow, turn the adjuster to the Nailer remains constant (requlator is installed and working properly), and 2) the Nailer is reached for the adjuster. - 15 - English ADJUSTING THE NAILING DEPTH To assure that each nail penetrates to the same depth, be sure that: 1) the air pressure to the deep side. 2 Turn Adjuster Too Shallow Flush 3 Stop turning the adjuster when...
.... 1 DISCONNECT AIR HOSE FROM NAILER. ALWAYS WEAR EYE PROTECTOR. If nails are driven too shallow, turn the adjuster to the Nailer remains constant (requlator is installed and working properly), and 2) the Nailer is reached for the adjuster. - 15 - English ADJUSTING THE NAILING DEPTH To assure that each nail penetrates to the same depth, be sure that: 1) the air pressure to the deep side. 2 Turn Adjuster Too Shallow Flush 3 Stop turning the adjuster when...
Instruction Manual
Page 16
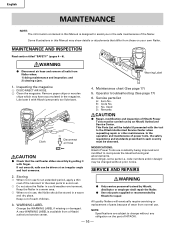
... 1 DISCONNECT AIR HOSE. 2 Clean the magazine. Remove paper chips or wooden chips which may have accumulated in this Manual is available from a Hitachi authorized service center. Operator troubleshooting (See page 17) 6. Used D: Remarks CAUTION ⅷ Repair, modification and inspection of Hitachi Power Tools must be driven at an irregular angle and hurt someone. 4. MODIFICATIONS: Hitachi Power Tools are subject to change without prior notice. Accordingly, some parts (i.e. code numbers and/or...
... 1 DISCONNECT AIR HOSE. 2 Clean the magazine. Remove paper chips or wooden chips which may have accumulated in this Manual is available from a Hitachi authorized service center. Operator troubleshooting (See page 17) 6. Used D: Remarks CAUTION ⅷ Repair, modification and inspection of Hitachi Power Tools must be driven at an irregular angle and hurt someone. 4. MODIFICATIONS: Hitachi Power Tools are subject to change without prior notice. Accordingly, some parts (i.e. code numbers and/or...

Instruction Manual
Page 17
... the Nailer life. Operator troubleshooting Most minor problems can be resolved quickly and easily using the table below. Skipping nails. Check air pressure. ring cut or heavily worn? Replace ribbon spring. Contact Hitachi for replacement. Lubricate the Nailer after nailing. Keep the Nailer lubricated. Keep the Nailer operated properly. Follow manufacturer's instructions. Slow to normal flow. Driven nail is driven. Nail feeder (A) worn or damaged? Keep push lever working properly. Promote operator safety and efficient Nailer operation. Supply...
... the Nailer life. Operator troubleshooting Most minor problems can be resolved quickly and easily using the table below. Skipping nails. Check air pressure. ring cut or heavily worn? Replace ribbon spring. Contact Hitachi for replacement. Lubricate the Nailer after nailing. Keep the Nailer lubricated. Keep the Nailer operated properly. Follow manufacturer's instructions. Slow to normal flow. Driven nail is driven. Nail feeder (A) worn or damaged? Keep push lever working properly. Promote operator safety and efficient Nailer operation. Supply...

Instruction Manual
Page 51
Shinagawa Intercity Tower A, 15-1, Konan 2-chome, Minato-ku, Tokyo 108-6020, Japan Distributed by Hitachi Koki Co., Ltd. C99124962 N Printed in Japan Norcross, GA 30093 Hitachi Koki Canada Co. 6395 Kestrel Road Mississauga ON L5T 1Z5 407 Code No. Issued by Hitachi Koki U.S.A., Ltd. 3950 Steve Reynolds Blvd.
Shinagawa Intercity Tower A, 15-1, Konan 2-chome, Minato-ku, Tokyo 108-6020, Japan Distributed by Hitachi Koki Co., Ltd. C99124962 N Printed in Japan Norcross, GA 30093 Hitachi Koki Canada Co. 6395 Kestrel Road Mississauga ON L5T 1Z5 407 Code No. Issued by Hitachi Koki U.S.A., Ltd. 3950 Steve Reynolds Blvd.


