
Owners Guide
Page 1
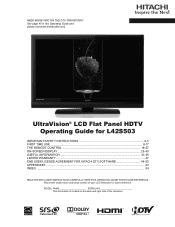
... THIS OPERATING GUIDE FOR FUTURE REFERENCE. See page 40 in this Operating Guide and please visit www.dtvtransition.org UltraVision® LCD Flat Panel HDTV Operating Guide for future reference. NEED MORE INFO ON THE DTV TRANSITION? MODEL NAME SERIAL NO This information ...located on the back and right side of your LCD Television for L42S503 IMPORTANT SAFETY INSTRUCTIONS 2-5 FIRST TIME USE ...6-17 THE REMOTE CONTROL ...18-27 ON-SCREEN DISPLAY ...28-40 USEFUL INFORMATION ...41-46 LIMITED WARRANTY ...47 END USER LICENSE AGREEMENT FOR HITACHI DTV SOFTWARE 48-52 APPENDIXES ...53 INDEX ......
... THIS OPERATING GUIDE FOR FUTURE REFERENCE. See page 40 in this Operating Guide and please visit www.dtvtransition.org UltraVision® LCD Flat Panel HDTV Operating Guide for future reference. NEED MORE INFO ON THE DTV TRANSITION? MODEL NAME SERIAL NO This information ...located on the back and right side of your LCD Television for L42S503 IMPORTANT SAFETY INSTRUCTIONS 2-5 FIRST TIME USE ...6-17 THE REMOTE CONTROL ...18-27 ON-SCREEN DISPLAY ...28-40 USEFUL INFORMATION ...41-46 LIMITED WARRANTY ...47 END USER LICENSE AGREEMENT FOR HITACHI DTV SOFTWARE 48-52 APPENDIXES ...53 INDEX ......
Owners Guide
Page 3
...risk of the FCC rules. This product incorporates copyright protection technology that interference will display television closed captioning, ( or ), in a particular installation. Reverse engineering or...to assure compliance with a protective earthing connection. FOR MORE INFORMATION, CALL 800-HITACHI. This LCD Television receiver will not occur in accordance with paragraph 15.119 and 15....must be authorized, and is encouraged to try to correct the interference by TV stations and cable companies, as well as replacement cables. FEDERAL COMMUNICATIONS COMMISSION NOTICE...
...risk of the FCC rules. This product incorporates copyright protection technology that interference will display television closed captioning, ( or ), in a particular installation. Reverse engineering or...to assure compliance with a protective earthing connection. FOR MORE INFORMATION, CALL 800-HITACHI. This LCD Television receiver will not occur in accordance with paragraph 15.119 and 15....must be authorized, and is encouraged to try to correct the interference by TV stations and cable companies, as well as replacement cables. FEDERAL COMMUNICATIONS COMMISSION NOTICE...

Owners Guide
Page 4
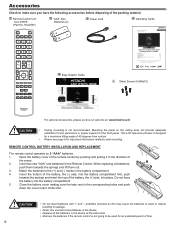
HITACHI CARES! • The consumer electronics industry is commited to climb on or play with steel studs or old cinder block construction. Care should be pulled or grabbed by curious children. WALL MOUNTING: IF YOU DECIDE TO WALL MOUNT YOUR FLAT PANEL DISPLAY, ALWAYS: • Use a mount that ... professional installation. • Make sure that they cannot be taken to walls with furniture and television sets. • Don't place flat panel displays on furniture that can easily be heavy. 4 TUNE INTO SAFETY • One size does NOT fit all enclosed instructions for proper use of ...
HITACHI CARES! • The consumer electronics industry is commited to climb on or play with steel studs or old cinder block construction. Care should be pulled or grabbed by curious children. WALL MOUNTING: IF YOU DECIDE TO WALL MOUNT YOUR FLAT PANEL DISPLAY, ALWAYS: • Use a mount that ... professional installation. • Make sure that they cannot be taken to walls with furniture and television sets. • Don't place flat panel displays on furniture that can easily be heavy. 4 TUNE INTO SAFETY • One size does NOT fit all enclosed instructions for proper use of ...

Owners Guide
Page 5
...9 8 7 0 Avoid liquids on it may shorten the life of the display unit and cause overheating. Don't place the TV in use liquid cleaners or aerosol cleaners to unplug the AC cord from the TV. FIRST TIME USE PRECAUTIONS AND REMINDERS Do not place the unit on uneven ... 5 Do not cover or block any foreign materials falls into the TV or if the TV fell down. Do not open the TV cabinet. Remember to clean the display. Avoid direct sunlight, dusty, high humidity and smokey locations. . Do not place the TV near water, such as a bathtub, shower rooms, kitchen sink, ...
...9 8 7 0 Avoid liquids on it may shorten the life of the display unit and cause overheating. Don't place the TV in use liquid cleaners or aerosol cleaners to unplug the AC cord from the TV. FIRST TIME USE PRECAUTIONS AND REMINDERS Do not place the unit on uneven ... 5 Do not cover or block any foreign materials falls into the TV or if the TV fell down. Do not open the TV cabinet. Remember to clean the display. Avoid direct sunlight, dusty, high humidity and smokey locations. . Do not place the TV near water, such as a bathtub, shower rooms, kitchen sink, ...
Owners Guide
Page 6
...in leakage. • Never mix used and new batteries in the device. • Replace all the batteries in the device at : www.hitachi.us/tv CAUTION • Ceiling mounting is located on the back and right side of time. 6 Do not force the battery into the battery compartment.... springs and insert the top of your LCD Television for L42S503 IMPORTANT SAFETY INSTRUCTIONS 2-5 FIRST TIME USE ...6-17 THE REMOTE CONTROL ...18-27 ON-SCREEN DISPLAY ...28-40 USEFUL INFORMATION ...41-46 LIMITED WARRANTY ...47 END USER LICENSE AGREEMENT FOR HITACHI DTV SOFTWARE 48-52 APPENDIXES ...53 INDEX...
...in leakage. • Never mix used and new batteries in the device. • Replace all the batteries in the device at : www.hitachi.us/tv CAUTION • Ceiling mounting is located on the back and right side of time. 6 Do not force the battery into the battery compartment.... springs and insert the top of your LCD Television for L42S503 IMPORTANT SAFETY INSTRUCTIONS 2-5 FIRST TIME USE ...6-17 THE REMOTE CONTROL ...18-27 ON-SCREEN DISPLAY ...28-40 USEFUL INFORMATION ...41-46 LIMITED WARRANTY ...47 END USER LICENSE AGREEMENT FOR HITACHI DTV SOFTWARE 48-52 APPENDIXES ...53 INDEX...
Owners Guide
Page 8
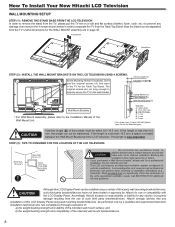
...the Wall Mount Bracket and the LCD Television. Don't use or compatibility with this LCD Display Panel. B: 8.5~10.5 mm. Accordingly, Hitachi accepts no responsibility or liability for any installation of this LCD Display Panel can be within 8.5~10.5 mm. Hitachi strongly advises that you purchased ... dimensions for the WALL MOUNT assembly are not long enough to properly secure the TV to the wall bracket. C: 1 mm. STEP (3) : TIPS TO CONSIDER FOR THE LOCATION OF THE LCD TELEVISION. Screw Length (A) Insertion length (B) Spring Washer (C) Plane Washer (D) Wall...
...the Wall Mount Bracket and the LCD Television. Don't use or compatibility with this LCD Display Panel. B: 8.5~10.5 mm. Accordingly, Hitachi accepts no responsibility or liability for any installation of this LCD Display Panel can be within 8.5~10.5 mm. Hitachi strongly advises that you purchased ... dimensions for the WALL MOUNT assembly are not long enough to properly secure the TV to the wall bracket. C: 1 mm. STEP (3) : TIPS TO CONSIDER FOR THE LOCATION OF THE LCD TELEVISION. Screw Length (A) Insertion length (B) Spring Washer (C) Plane Washer (D) Wall...
Owners Guide
Page 9
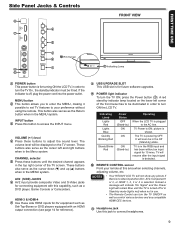
...without an input signal for 15 mins. It will be in the Off (Stand-by ) Operating When the LCD TV is plugged to the AC line. The volume level will soon be displayed on the lower left and right buttons when in the Menu system. A red stand-by mode (lights red... & HDMI-4 Use these side HDMI inputs for future software upgrades. The TV is ON; Instead a message will indicate "No Signal" and the Power Light will not show any compatible HDMI CEC devices. NOTES • Your HITACHI LCD TV will remain Blue until the desired channel appears in Stand-by indicator lamp ...
...without an input signal for 15 mins. It will be in the Off (Stand-by ) Operating When the LCD TV is plugged to the AC line. The volume level will soon be displayed on the lower left and right buttons when in the Menu system. A red stand-by mode (lights red... & HDMI-4 Use these side HDMI inputs for future software upgrades. The TV is ON; Instead a message will indicate "No Signal" and the Power Light will not show any compatible HDMI CEC devices. NOTES • Your HITACHI LCD TV will remain Blue until the desired channel appears in Stand-by indicator lamp ...
Owners Guide
Page 12
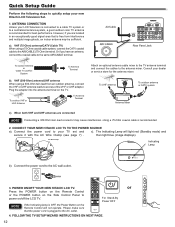
... power cord to the AIR/CABLE (75-Ohm) terminal. POWER ON/OFF YOUR NEW HITACHI LCD TV. Or if you are connected NOTE Connecting a 300-Ohm twin lead connector may be sufficient. Consult your TV set and c). The Indicating Lamp will not operate. Press the POWER button on the ... Set. 1. To UHF antenna Air/Cable To outdoor antenna or CATV system Antenna Mixer c). CONNECT YOUR NEW HITACHI LCD TV TO THE POWER SOURCE a). then light blue (image displays). However, if you have an antenna, connect the coaxial cable to the same AIR/CABLE terminal. Air/Cable RGB Rear ...
... power cord to the AIR/CABLE (75-Ohm) terminal. POWER ON/OFF YOUR NEW HITACHI LCD TV. Or if you are connected NOTE Connecting a 300-Ohm twin lead connector may be sufficient. Consult your TV set and c). The Indicating Lamp will not operate. Press the POWER button on the ... Set. 1. To UHF antenna Air/Cable To outdoor antenna or CATV system Antenna Mixer c). CONNECT YOUR NEW HITACHI LCD TV TO THE POWER SOURCE a). then light blue (image displays). However, if you have an antenna, connect the coaxial cable to the same AIR/CABLE terminal. Air/Cable RGB Rear ...
Owners Guide
Page 17
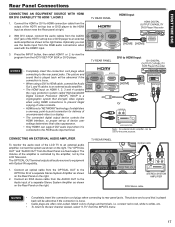
...the AUDIO OUT jack of the HDTV set top box Manufactured under license from the output of the HDTV set -up of uncompressed video to a display. • The connected digital output device controls the HDMI interface, so proper set top box or DVD player to equipment with the HDMI1 input...the INPUTS menu. 17 "Dolby" and an external audio amplifier as shown near the Rear panel at right. 2. Optionally symbol are trademarks of the LCD TV to rear panel jacks. The picture and sound that encrypts video signals when using a DVI to HDMI cable, connect the Audio Manufactured under license ...
...the AUDIO OUT jack of the HDTV set top box Manufactured under license from the output of the HDTV set -up of uncompressed video to a display. • The connected digital output device controls the HDMI interface, so proper set top box or DVD player to equipment with the HDMI1 input...the INPUTS menu. 17 "Dolby" and an external audio amplifier as shown near the Rear panel at right. 2. Optionally symbol are trademarks of the LCD TV to rear panel jacks. The picture and sound that encrypts video signals when using a DVI to HDMI cable, connect the Audio Manufactured under license ...
Owners Guide
Page 19
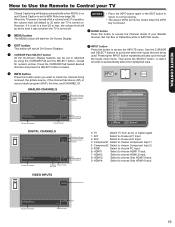
...to choose Side HDMI 4 Input. Program Information 1080i 3:17PM Clock Picture Format 19 MENU button The MENU button will exit all On-Screen Displays. AV2 3. TV Watch TV from an Air or Cable signal. 1. Pressing the INPUT button repeatedly will not be shown when the INFO key is set to With ... by using the CURSOR Pad and the SELECT button, except for numeric entries. TV 0. When the TV power is turned off at the level it is set to a level 20 or less, the volume level will display automatically when MUTE is on . GUIDE button Press this button to choose AV1...
...to choose Side HDMI 4 Input. Program Information 1080i 3:17PM Clock Picture Format 19 MENU button The MENU button will exit all On-Screen Displays. AV2 3. TV Watch TV from an Air or Cable signal. 1. Pressing the INPUT button repeatedly will not be shown when the INFO key is set to With ... by using the CURSOR Pad and the SELECT button, except for numeric entries. TV 0. When the TV power is turned off at the level it is set to a level 20 or less, the volume level will display automatically when MUTE is on . GUIDE button Press this button to choose AV1...
Owners Guide
Page 20
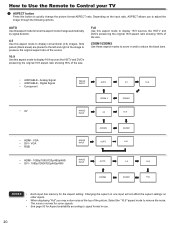
...remove the noise. ZOOM1/ZOOM2 Use these aspect modes to zoom in use. 20 How to Use the Remote to Control your TV ASPECT button Press this aspect mode to display 16:9 sources like HDTV and DVD's preserving the original 16:9 aspect ratio showing 95% of the size. Select the "16:9".... • AIR/CABLE - The noise is normal for some signals. • See page 53 for the Aspect setting. Depending on other inputs. • When displaying "Full" you to adjust the image through the following options. VGA • RGB • HDMI - 1080p/1080i/720p/480p/480i • DVI - 1080p/1080i...
...remove the noise. ZOOM1/ZOOM2 Use these aspect modes to zoom in use. 20 How to Use the Remote to Control your TV ASPECT button Press this aspect mode to display 16:9 sources like HDTV and DVD's preserving the original 16:9 aspect ratio showing 95% of the size. Select the "16:9".... • AIR/CABLE - The noise is normal for some signals. • See page 53 for the Aspect setting. Depending on other inputs. • When displaying "Full" you to adjust the image through the following options. VGA • RGB • HDMI - 1080p/1080i/720p/480p/480i • DVI - 1080p/1080i...

Owners Guide
Page 21
...these keys are for day time viewing with your TV E.SAVE (ENERGY SAVE) button Use this button to choose power consumption reduction settings based on the TV screen when available. CLOSED CAPTIONS (CC) button Use this button to display the dialogue, narration, and/ or sound effects of... a television program or home video which are displayed on 3 levels (MIN., MEDIUM, MAX). REMOTE CONTROL ...
...these keys are for day time viewing with your TV E.SAVE (ENERGY SAVE) button Use this button to choose power consumption reduction settings based on the TV screen when available. CLOSED CAPTIONS (CC) button Use this button to display the dialogue, narration, and/ or sound effects of... a television program or home video which are displayed on 3 levels (MIN., MEDIUM, MAX). REMOTE CONTROL ...
Owners Guide
Page 28
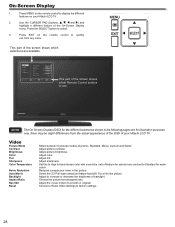
... with more blue, set to quickly exit from the actual appearance of the OSD of your Hitachi LCD TV. 2. Adjust to factory settings. 28 This part of the On-Screen Display menu. Adjust color. Choose the picture format aspect ratio. Choose to Reset Video Settings to ...there may be slight differences from any menu. Press MENU on your Hitachi LCD TV. Use the CURSOR PAD (buttons, , , and ) and highlight a different feature of the screen shows which Remote Control buttons to display the different features on the remote control to use. Adjust sharpness. Dynamic...
... with more blue, set to quickly exit from the actual appearance of the OSD of your Hitachi LCD TV. 2. Adjust to factory settings. 28 This part of the On-Screen Display menu. Adjust color. Choose the picture format aspect ratio. Choose to Reset Video Settings to ...there may be slight differences from any menu. Press MENU on your Hitachi LCD TV. Use the CURSOR PAD (buttons, , , and ) and highlight a different feature of the screen shows which Remote Control buttons to display the different features on the remote control to use. Adjust sharpness. Dynamic...
Owners Guide
Page 29
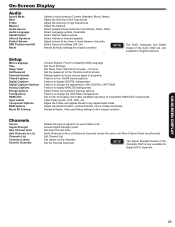
...Resets all Audio settings the original condition NOTE The Audio Language and Digital Output of compatible HDMI CEC components. ON-SCREEN DISPLAY 29 Ratings system to block various types of signal to the List (Scanned channels remain the same until New Channel Scan... hours). Select Power Consumption Savings options. Select internal or external speaker. Adjust volume to the original condition. Set Clock Settings. Set to display ANALOG dialogue/text. Set Auto Channel Scan. Select Surround settings (Off, On) Resets all Audio, Video and Setup settings to be used...
...Resets all Audio settings the original condition NOTE The Audio Language and Digital Output of compatible HDMI CEC components. ON-SCREEN DISPLAY 29 Ratings system to block various types of signal to the List (Scanned channels remain the same until New Channel Scan... hours). Select Power Consumption Savings options. Select internal or external speaker. Adjust volume to the original condition. Set Clock Settings. Set to display ANALOG dialogue/text. Set Auto Channel Scan. Select Surround settings (Off, On) Resets all Audio, Video and Setup settings to be used...

Owners Guide
Page 31
Reel120 Motion Hitachi's advanced video processor can customize each of the Video Inputs to your ...31 Use this setting if there is noise with bars to the left and right of the movie. ON-SCREEN DISPLAY (Signal 16:9 ) Full Should be immediately noticeable and the effect depends on the content of the present input .... Mid: Use this setting for a moderate smooth motion effect. Low: Use this setting for a mild smooth motion effect. Displays 4:3 programs in HDMI1, only HDMI1 will reset to execute the reset of the signal. The following settings are available to select...
Reel120 Motion Hitachi's advanced video processor can customize each of the Video Inputs to your ...31 Use this setting if there is noise with bars to the left and right of the movie. ON-SCREEN DISPLAY (Signal 16:9 ) Full Should be immediately noticeable and the effect depends on the content of the present input .... Mid: Use this setting for a moderate smooth motion effect. Low: Use this setting for a mild smooth motion effect. Displays 4:3 programs in HDMI1, only HDMI1 will reset to execute the reset of the signal. The following settings are available to select...
Owners Guide
Page 33
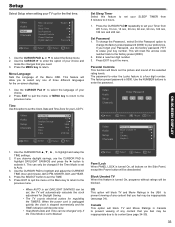
...your choice and make the changes that you to Auto. 3. Use the CURSOR ► to enter the option of three different languages for your LCD TV. If you forget your Password, use the CURSOR PAD to highlight DAYLIGHT SAVINGS and press the ► button to set the Clock, Date and...content that you observe daylight savings, use the factory password 7777 to the previous menu. • When AUTO is turned On, all buttons on -screen displays. 1. Enter a new four digit number. 3. Video Audio Setup Channels Time Mode Time Zone Daylight Savings Year Month Date Time Auto PST On 2009 Mar...
...your choice and make the changes that you to Auto. 3. Use the CURSOR ► to enter the option of three different languages for your LCD TV. If you forget your Password, use the CURSOR PAD to highlight DAYLIGHT SAVINGS and press the ► button to set the Clock, Date and...content that you observe daylight savings, use the factory password 7777 to the previous menu. • When AUTO is turned On, all buttons on -screen displays. 1. Enter a new four digit number. 3. Video Audio Setup Channels Time Mode Time Zone Daylight Savings Year Month Date Time Auto PST On 2009 Mar...
Owners Guide
Page 35
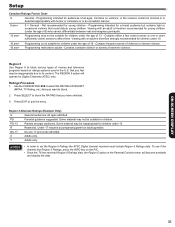
...Ratings French Chart G General - Programming intended for children. Use the CURSOR PAD t, u to select the RATING CATEGORY (MPAA, TV Rating, etc.) that you want to block the RATING that you feel may not be inappropriate due to block various types of violence...to its content. Not recommended for Digital Channels (ATSC) only. R Restricted. X Adults only. The REGION 5 option will become available and display the data. Under 17 requires accompanying parent or adult guardian. Viewing with an adult is not suitable for children under 13. Region 5 Alternate ...
...Ratings French Chart G General - Programming intended for children. Use the CURSOR PAD t, u to select the RATING CATEGORY (MPAA, TV Rating, etc.) that you want to block the RATING that you feel may not be inappropriate due to block various types of violence...to its content. Not recommended for Digital Channels (ATSC) only. R Restricted. X Adults only. The REGION 5 option will become available and display the data. Under 17 requires accompanying parent or adult guardian. Viewing with an adult is not suitable for children under 13. Region 5 Alternate ...
Owners Guide
Page 36
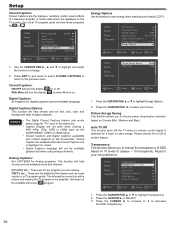
...Select Return EXIT Exit Video Audio Picture Energy Saving Min Auto TV off . Auto TV Off This function turns Off the TV when no remote control signal is displayed on the broadcaster. Please choose On or Off to select your Hitachi LCD TV. Press the CURSOR ► to increase or ƒ ...to the previous menu. Digital Captions Options This function will turn the display With Mute will help choose and set font, size, color and background style of a...
...Select Return EXIT Exit Video Audio Picture Energy Saving Min Auto TV off . Auto TV Off This function turns Off the TV when no remote control signal is displayed on the broadcaster. Please choose On or Off to select your Hitachi LCD TV. Press the CURSOR ► to increase or ƒ ...to the previous menu. Digital Captions Options This function will turn the display With Mute will help choose and set font, size, color and background style of a...
Owners Guide
Page 37
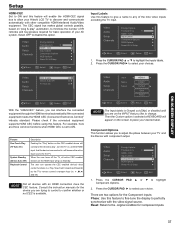
... input, that the device is set to any of your AV system. ON-SCREEN DISPLAY Setup HDMI-CEC Set to ON and this feature will enable the HDMI-CEC signal bus to allow your Hitachi LCD TV to highlight the Inputs labels. 2. CEC Input Labels Component Options RGB Options Reset AV... & Setup Move SEL Select Return EXIT Exit 1. Please check if the connected equipment supports HDMI CEC before using this feature. Feature One-Touch Play (TV Auto On) System Standby...
... input, that the device is set to any of your AV system. ON-SCREEN DISPLAY Setup HDMI-CEC Set to ON and this feature will enable the HDMI-CEC signal bus to allow your Hitachi LCD TV to highlight the Inputs labels. 2. CEC Input Labels Component Options RGB Options Reset AV... & Setup Move SEL Select Return EXIT Exit 1. Please check if the connected equipment supports HDMI CEC before using this feature. Feature One-Touch Play (TV Auto On) System Standby...

Owners Guide
Page 38
Press the CURSOR PAD ▲ or ▼ to select your LCD Television. There are 6 options for the RGB input. Clock Minimizes ... 50 Clock 50 Phase 50 Channels Auto Adjust Reset Move SEL Select Return EXIT Exit H-Position Adjusts the display position horizontally. Reset Each item in RGB Options Menu will return to the factory setting by selecting Yes....1. Reset AV & Setup This feature restores all Audio, Video and Setup configuration that you have made on the TV and it will be restored to the factory settings. Press the CURSOR PAD ► to highlight RGB Options. 2....
Press the CURSOR PAD ▲ or ▼ to select your LCD Television. There are 6 options for the RGB input. Clock Minimizes ... 50 Clock 50 Phase 50 Channels Auto Adjust Reset Move SEL Select Return EXIT Exit H-Position Adjusts the display position horizontally. Reset Each item in RGB Options Menu will return to the factory setting by selecting Yes....1. Reset AV & Setup This feature restores all Audio, Video and Setup configuration that you have made on the TV and it will be restored to the factory settings. Press the CURSOR PAD ► to highlight RGB Options. 2....


