

Owners Guide
Page 2
... power cord into your outlet, consult an electrician for tilt and stability. Caution Never remove the back cover of Hitachi LCD televisions. Keep these instructions. 2. Safety is used as the disconnect device and shall remain readily operable. To help you operate these units. A polarized plug has two blades with the recommended safety standards for replacement of your Hitachi LCD television. If an outside antenna is connected to the receiver...
... power cord into your outlet, consult an electrician for tilt and stability. Caution Never remove the back cover of Hitachi LCD televisions. Keep these instructions. 2. Safety is used as the disconnect device and shall remain readily operable. To help you operate these units. A polarized plug has two blades with the recommended safety standards for replacement of your Hitachi LCD television. If an outside antenna is connected to the receiver...

Owners Guide
Page 4
... and cause injury. However, flat panel displays are inappropriately situated on the proper stands or installed according to the manufacturer's recommendations. • Flat Panel displays that has been recommended by the display manufacturer and/or listed by curious children. WALL MOUNTING: IF YOU DECIDE TO WALL MOUNT YOUR FLAT PANEL DISPLAY, ALWAYS: • Use a mount that are not always supported on dresser, bookcases, shelves, desks, speakers, chest or carts may fall...
... and cause injury. However, flat panel displays are inappropriately situated on the proper stands or installed according to the manufacturer's recommendations. • Flat Panel displays that has been recommended by the display manufacturer and/or listed by curious children. WALL MOUNTING: IF YOU DECIDE TO WALL MOUNT YOUR FLAT PANEL DISPLAY, ALWAYS: • Use a mount that are not always supported on dresser, bookcases, shelves, desks, speakers, chest or carts may fall...
Owners Guide
Page 9
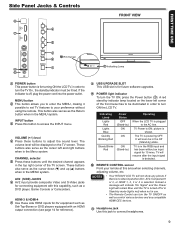
... located on the TV screen. This button also serves as control various devices and any picture if there is no video input when AV1, AV2, Component1 or 2, or HDMI 1, 2, 3 or 4 is selected. HDMI-3 & HDMI-4 Use these buttons until the TV is turned off , plug the power cord into the power outlet. NOTES • Your HITACHI LCD TV will be in the Off (Stand-by mode (lights red) when not in use. • The Remote Control can turn ON the LCD TV. A red stand-by ) Operating...
... located on the TV screen. This button also serves as control various devices and any picture if there is no video input when AV1, AV2, Component1 or 2, or HDMI 1, 2, 3 or 4 is selected. HDMI-3 & HDMI-4 Use these buttons until the TV is turned off , plug the power cord into the power outlet. NOTES • Your HITACHI LCD TV will be in the Off (Stand-by mode (lights red) when not in use. • The Remote Control can turn ON the LCD TV. A red stand-by ) Operating...
Owners Guide
Page 10
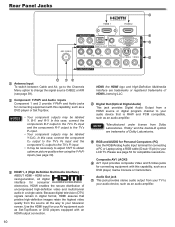
Rear Panel Jacks RGB RGB 6 7 Antenna Input To switch between Cable and Air, go to the Channels Menu option to change the signal source CABLE or AIR (see page 30). In this capability, such as a DVD player, Game Console or Camcorders. Audio Out jack This jack provides stereo audio output from the source all digital interface for connecting equipment with this case, connect the components B-Y output to the TV's Pb input and the components R-Y output to your television screen. Component: Y-PbPr and...
Rear Panel Jacks RGB RGB 6 7 Antenna Input To switch between Cable and Air, go to the Channels Menu option to change the signal source CABLE or AIR (see page 30). In this capability, such as a DVD player, Game Console or Camcorders. Audio Out jack This jack provides stereo audio output from the source all digital interface for connecting equipment with this case, connect the components B-Y output to the TV's Pb input and the components R-Y output to your television screen. Component: Y-PbPr and...
Owners Guide
Page 12
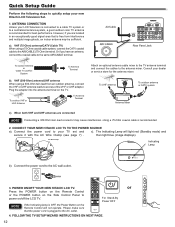
... HITACHI LCD TV TO THE POWER SOURCE a). Connect the power cord to the antenna mixer. ANTENNA CONNECTION Unless your dealer or service store for best performance. To outdoor VHF or UHF Antenna To Antenna Terminal Attach an optional antenna cable mixer to the TV antenna terminal and connect the cables to the AC wall outlet . 3. Connect the power cord to your new Hitachi LCD Television Set. 1. then light blue (image displays). Press the POWER button on the Remote Control or the POWER button on the Side Control Panel to power...
... HITACHI LCD TV TO THE POWER SOURCE a). Connect the power cord to the antenna mixer. ANTENNA CONNECTION Unless your dealer or service store for best performance. To outdoor VHF or UHF Antenna To Antenna Terminal Attach an optional antenna cable mixer to the TV antenna terminal and connect the cables to the AC wall outlet . 3. Connect the power cord to your new Hitachi LCD Television Set. 1. then light blue (image displays). Press the POWER button on the Remote Control or the POWER button on the Side Control Panel to power...

Owners Guide
Page 13
... SELECT button on the remote control. Year Month Date Time 2009 Jan 1 12:00 AM OK Previous Cancel Navigate SEL Select The fourth step is connected properly. Use the p and q CURSOR to find the channels available in your area. If you wish to help you easily setup the first time you turn off your TV, unplug the power cord and connect your Hitachi LCD TV the setup wizard screen will...
... SELECT button on the remote control. Year Month Date Time 2009 Jan 1 12:00 AM OK Previous Cancel Navigate SEL Select The fourth step is connected properly. Use the p and q CURSOR to find the channels available in your area. If you wish to help you easily setup the first time you turn off your TV, unplug the power cord and connect your Hitachi LCD TV the setup wizard screen will...

Owners Guide
Page 14
... INPUT PANEL HDMI DIGITAL or OUTPUT CAPABILITY Set-Top Box RGB [HDMI] [HDMI] HDMI OUT Home video game system B) Connecting DVI signal Audio Amplifier AUDIO IN L R L (White) SIDE INPUT PANEL R (Red) RGB [HDMI] DVI to show the Inputs List. Match colors of the INPUT terminals, then press the INPUT button to HDMI Cable RGB DVI DIGITAL OUTPUT CAPABILITY L (White) OUTPUT or L R R (Red) [DVI] DIGITAL OUTPUT DVD player Set-Top Box Home video game system The SIDE panel VIDEO and S-VIDEO jacks are offered as suggestions. Before Operating External Video Sources Connect...
... INPUT PANEL HDMI DIGITAL or OUTPUT CAPABILITY Set-Top Box RGB [HDMI] [HDMI] HDMI OUT Home video game system B) Connecting DVI signal Audio Amplifier AUDIO IN L R L (White) SIDE INPUT PANEL R (Red) RGB [HDMI] DVI to show the Inputs List. Match colors of the INPUT terminals, then press the INPUT button to HDMI Cable RGB DVI DIGITAL OUTPUT CAPABILITY L (White) OUTPUT or L R R (Red) [DVI] DIGITAL OUTPUT DVD player Set-Top Box Home video game system The SIDE panel VIDEO and S-VIDEO jacks are offered as suggestions. Before Operating External Video Sources Connect...

Owners Guide
Page 15
... hook-up cables. ♦♦ Connect only 1 component (VCR, DVD player, camcorder, etc.) to rear panel jacks. connect red to red, white to HDMI HDMI OUTPUT RGB RGB DIGITAL OUTPUT CAPABILITY RGB OPTICAL IN OUTPUT Y PB/CB PR/CR L R OUTPUT S-Video Video L R NOTE STEREO SYSTEM AMPLIFIER Cables are not included. Manufactured under license from the PC. 15 FIRST TIME USE Rear Panel Connections Outside antenna or Cable TV coaxial cable 2-Way signal splitter VCR ANT IN V LR RGB HDMI to DVI DIGITAL OUTPUT AUDIO OUT HDMI DIGITAL OUTPUT CAPABILITY HDMI to white...
... hook-up cables. ♦♦ Connect only 1 component (VCR, DVD player, camcorder, etc.) to rear panel jacks. connect red to red, white to HDMI HDMI OUTPUT RGB RGB DIGITAL OUTPUT CAPABILITY RGB OPTICAL IN OUTPUT Y PB/CB PR/CR L R OUTPUT S-Video Video L R NOTE STEREO SYSTEM AMPLIFIER Cables are not included. Manufactured under license from the PC. 15 FIRST TIME USE Rear Panel Connections Outside antenna or Cable TV coaxial cable 2-Way signal splitter VCR ANT IN V LR RGB HDMI to DVI DIGITAL OUTPUT AUDIO OUT HDMI DIGITAL OUTPUT CAPABILITY HDMI to white...
Owners Guide
Page 17
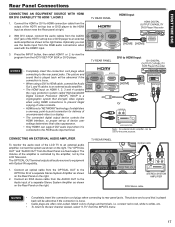
... uncompressed video to a display. • The connected digital output device controls the HDMI interface, so proper set top box Manufactured under license from the HDTV SET-TOP BOX or DVD player. The OPTICAL OUT terminal outputs all audio sources to the rear panel jacks. Match colors of the amplifier is a fixed output. Out L and R cables to rear panel jacks. CONNECTING AN EXTERNAL AUDIO AMPLIFIER To monitor the audio level of Dolby Laboratories. The picture and sound that encrypts video signals when using a DVI to an external audio amplifier, connect...
... uncompressed video to a display. • The connected digital output device controls the HDMI interface, so proper set top box Manufactured under license from the HDTV SET-TOP BOX or DVD player. The OPTICAL OUT terminal outputs all audio sources to the rear panel jacks. Match colors of the amplifier is a fixed output. Out L and R cables to rear panel jacks. CONNECTING AN EXTERNAL AUDIO AMPLIFIER To monitor the audio level of Dolby Laboratories. The picture and sound that encrypts video signals when using a DVI to an external audio amplifier, connect...

Owners Guide
Page 21
... the Channels Menu in TV mode. Select Movie for viewing with Consumer Electronics Control (CEC) through the TV and HDMI connection ; Also, these programs as or . REMOTE CONTROL > How to Use the Remote to Control your own brightness and contrast picture settings. Game for automatic brightness and contrast adjustment when playing video games.(see page 30 for controlling devices with less brightness and contrast for automatic brightness and contrast adjustment. CLOSED CAPTIONS (CC) button Use this button to choose power...
... the Channels Menu in TV mode. Select Movie for viewing with Consumer Electronics Control (CEC) through the TV and HDMI connection ; Also, these programs as or . REMOTE CONTROL > How to Use the Remote to Control your own brightness and contrast picture settings. Game for automatic brightness and contrast adjustment when playing video games.(see page 30 for controlling devices with less brightness and contrast for automatic brightness and contrast adjustment. CLOSED CAPTIONS (CC) button Use this button to choose power...

Owners Guide
Page 22
... are removed from the remote control. The new remote control is programmed for your AVR (select AVR). The remote will blink 3 times to factory default place remote control in TV mode, then press and hold TV mode key and enter "9", "8", "1" in sequence. Power button Device buttons 222 Select the desired mode: DVD, PVR/VCR, SAT/CBL or AVR by using your AV component operating guide. If the cable box does not turn off , try a different four digit preset code. 777 The remote...
... are removed from the remote control. The new remote control is programmed for your AVR (select AVR). The remote will blink 3 times to factory default place remote control in TV mode, then press and hold TV mode key and enter "9", "8", "1" in sequence. Power button Device buttons 222 Select the desired mode: DVD, PVR/VCR, SAT/CBL or AVR by using your AV component operating guide. If the cable box does not turn off , try a different four digit preset code. 777 The remote...
Owners Guide
Page 29
... & Setup Choose English, French or Spanish OSD Language. Label Video Inputs, VCR, DVD, etc. Set Labels on the channels. Feature to be used Cable or Air. ON-SCREEN DISPLAY 29 Set Channel List. Set Sleep Timer intervals (5 minutes ~ 4 hours). Feature to turn On/Off closed captions. Adjust the intensity of low frequencies. Resets all Audio settings the original condition NOTE The Audio Language and Digital Output of signal to change the OSD Menu transparency. Adjust volume to change the appearance of compatible HDMI CEC components...
... & Setup Choose English, French or Spanish OSD Language. Label Video Inputs, VCR, DVD, etc. Set Labels on the channels. Feature to be used Cable or Air. ON-SCREEN DISPLAY 29 Set Channel List. Set Sleep Timer intervals (5 minutes ~ 4 hours). Feature to turn On/Off closed captions. Adjust the intensity of low frequencies. Resets all Audio settings the original condition NOTE The Audio Language and Digital Output of signal to change the OSD Menu transparency. Adjust volume to change the appearance of compatible HDMI CEC components...
Owners Guide
Page 30
... the mode where the change the overall light output to OFF if you change . NOTE • For the PC input there are 5 Picture Modes available : Dynamic, Standard, Movie, Custom and Game mode. This means that the original picture mode is Custom mode. Set NOISE REDUCTION to match the viewing area. When film is the factory preset mode for your Hitachi LCD Television will take the video adjustments of the video inputs to Custom settings. Increase...
... the mode where the change the overall light output to OFF if you change . NOTE • For the PC input there are 5 Picture Modes available : Dynamic, Standard, Movie, Custom and Game mode. This means that the original picture mode is Custom mode. Set NOISE REDUCTION to match the viewing area. When film is the factory preset mode for your Hitachi LCD Television will take the video adjustments of the video inputs to Custom settings. Increase...

Owners Guide
Page 32
... EXIT Exit Sound Mode This function has four sound settings which may be passed through the optical audio output jack (Digital Audio). Treble This function controls the high frequency audio to adjust the function. 3. PCM.- Audio Source Multi-Channel Television Sound will have English as a default language. Please try all available options. This setting changes the format of the Audio Inputs to execute the reset of program. Select ON if using external speakers. Press the SELECT button or the...
... EXIT Exit Sound Mode This function has four sound settings which may be passed through the optical audio output jack (Digital Audio). Treble This function controls the high frequency audio to adjust the function. 3. PCM.- Audio Source Multi-Channel Television Sound will have English as a default language. Please try all available options. This setting changes the format of the Audio Inputs to execute the reset of program. Select ON if using external speakers. Press the SELECT button or the...
Owners Guide
Page 33
... the MENU key to set your Timer from 5 minutes to set to erase your key number. Set Password 1. Enter a new four digit number. 3. Video Audio Setup Channels Enter Password *** * Move SEL Select Return EXIT Exit Video Panel Lock Off Audio Block Unrated TV Off US Setup Canada Channels Region 5 ON-SCREEN DISPLAY 1. If you feel may be inappropriate (see page 34-35). 33 This feature will allow you need. 3. Use the NUMBER buttons to highlight and setup the TIME settings. 2. Use...
... the MENU key to set your Timer from 5 minutes to set to erase your key number. Set Password 1. Enter a new four digit number. 3. Video Audio Setup Channels Enter Password *** * Move SEL Select Return EXIT Exit Video Panel Lock Off Audio Block Unrated TV Off US Setup Canada Channels Region 5 ON-SCREEN DISPLAY 1. If you feel may be inappropriate (see page 34-35). 33 This feature will allow you need. 3. Use the NUMBER buttons to highlight and setup the TIME settings. 2. Use...
Owners Guide
Page 36
... 0 HDMI - Auto TV Off This function turns Off the TV when no remote control signal is not possible. Picture Energy Saving This function allows you are displayed on the TV screen. Setup Closed Captions Closed Captions are the dialogue, narration, and/or sound effects of a television program or home video which are viewing. Use the CURSOR PAD ►, ▲ and ▼ to highlight and select the function to choose power consumption reduction based on screen. • Digital Captions...
... 0 HDMI - Auto TV Off This function turns Off the TV when no remote control signal is not possible. Picture Energy Saving This function allows you are displayed on the TV screen. Setup Closed Captions Closed Captions are the dialogue, narration, and/or sound effects of a television program or home video which are viewing. Use the CURSOR PAD ►, ▲ and ▼ to highlight and select the function to choose power consumption reduction based on screen. • Digital Captions...
Owners Guide
Page 37
.... The CEC signal bus makes global controls possible, based on "plug & play , turn the TV on the HDMI input will go to Standby. Press the CURSOR PAD ▲ or ▼ to minimize the number of IR remotes and key-presses required for the TV. For example, here are three common functions when HDMI CEC is connected to discover and communicate automatically with other compatible HDMI-interfaced Audio/Video equipment...
.... The CEC signal bus makes global controls possible, based on "plug & play , turn the TV on the HDMI input will go to Standby. Press the CURSOR PAD ▲ or ▼ to minimize the number of IR remotes and key-presses required for the TV. For example, here are three common functions when HDMI CEC is connected to discover and communicate automatically with other compatible HDMI-interfaced Audio/Video equipment...
Owners Guide
Page 42
... screen display aspects cannot be set to 1080i or 720p under the HDMI device menu (of the error OSD. Turn TV on first and then HDMI device second. 9, 11 14, 17 • Check HDMI Audio settings under HDMI device menu (of the HDMI source device). • Check HDMI input picture format, if use audio optical output from the source switching delay itself Turns On by pressing the INFO button on TV, HDMI output must be switched in "Video menu" and "Audio menu". • Check the connections to external...
... screen display aspects cannot be set to 1080i or 720p under the HDMI device menu (of the error OSD. Turn TV on first and then HDMI device second. 9, 11 14, 17 • Check HDMI Audio settings under HDMI device menu (of the HDMI source device). • Check HDMI input picture format, if use audio optical output from the source switching delay itself Turns On by pressing the INFO button on TV, HDMI output must be switched in "Video menu" and "Audio menu". • Check the connections to external...
Owners Guide
Page 45
D: 1 mm. Side View Wall Mount Screw specification 45 B: 8.5~10.5 mm. C: 1 mm. E: 3 mm. Set Dimensions L42S503 model (Includes Table Top Stand) Weight (lbs./kg): 41.9/19 Units : Inches (mm) 40 (1015.40) 36 3/4 (933.50) (ACTIVE AREA) CENTER OF THE SCREEN 3 3/4 (95.60) 25 13/16 (655.10) 27 3/4 (705.00) 25 13/16 (655.10) 20 23/32 (526.20) (ACTIVE AREA...
D: 1 mm. Side View Wall Mount Screw specification 45 B: 8.5~10.5 mm. C: 1 mm. E: 3 mm. Set Dimensions L42S503 model (Includes Table Top Stand) Weight (lbs./kg): 41.9/19 Units : Inches (mm) 40 (1015.40) 36 3/4 (933.50) (ACTIVE AREA) CENTER OF THE SCREEN 3 3/4 (95.60) 25 13/16 (655.10) 27 3/4 (705.00) 25 13/16 (655.10) 20 23/32 (526.20) (ACTIVE AREA...
Owners Guide
Page 47
... of purchase by user-operated controls. SERVICE LOCATION: In-home warranty service, which includes either in accordance with the terms and conditions applicable to the part replaced. B. Damage caused by Hitachi in the Product's Operating Guide. Any Product used in any misadjustments caused by the original owner and continuing for the remainder of purchases included in the U.S.A. Improper uncrating, set -up or installation or any manner...
... of purchase by user-operated controls. SERVICE LOCATION: In-home warranty service, which includes either in accordance with the terms and conditions applicable to the part replaced. B. Damage caused by Hitachi in the Product's Operating Guide. Any Product used in any misadjustments caused by the original owner and continuing for the remainder of purchases included in the U.S.A. Improper uncrating, set -up or installation or any manner...


