
Owners Guide
Page 3
...This equipment generates, uses and can be determined by turning the equipment off and on, the user is encouraged ...This apparatus shall be connected to maintain compliance with FCC Rules and Regulations. Order Hitachi spares as replacement cables. Tèlèvision câblocompatible, Canada. For product..., and is a registered trademark of according to operate the equipment. This LCD Television receiver will not occur in order to this device that may require ...approved by TV stations and cable companies, as well as programs from other sources, may cause...
...This equipment generates, uses and can be determined by turning the equipment off and on, the user is encouraged ...This apparatus shall be connected to maintain compliance with FCC Rules and Regulations. Order Hitachi spares as replacement cables. Tèlèvision câblocompatible, Canada. For product..., and is a registered trademark of according to operate the equipment. This LCD Television receiver will not occur in order to this device that may require ...approved by TV stations and cable companies, as well as programs from other sources, may cause...
Owners Guide
Page 9
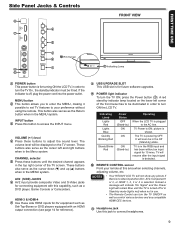
...INPUT menu. Instead a message will indicate "No Signal" and the Power Light will soon be lit red. POWER light indicator To turn ON the LCD TV. TV Power is shown. REMOTE CONTROL sensor Point your preference without an input signal for 15 mins. MENU button This button allows you to...These buttons also serve as the Return button when in order to turn the TV ON/OFF as well as a DVD player, Game Console or Camcorders. USB UPGRADE SLOT This USB slot is for reference). NOTES • Your HITACHI LCD TV will resume after the input signal is detected. Indicating Lamp Lights...
...INPUT menu. Instead a message will indicate "No Signal" and the Power Light will soon be lit red. POWER light indicator To turn ON the LCD TV. TV Power is shown. REMOTE CONTROL sensor Point your preference without an input signal for 15 mins. MENU button This button allows you to...These buttons also serve as the Return button when in order to turn the TV ON/OFF as well as a DVD player, Game Console or Camcorders. USB UPGRADE SLOT This USB slot is for reference). NOTES • Your HITACHI LCD TV will resume after the input signal is detected. Indicating Lamp Lights...

Owners Guide
Page 13
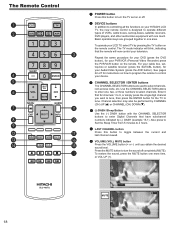
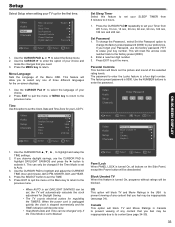
... to start the scanning feature to find the channels available in your Hitachi LCD TV the setup wizard screen will select only the time zone in . EXIT Exit 13 Setup Wizard (4/7) Please select TV RF tuning band ... This final message will be patient while the ... digital channels. Setup Wizard (6/7) Searching, please wait ... Please follow the instructions below. If you turn on the remote control. FIRST TIME USE TV Setup Wizard Your Hitachi LCD television has a TV Setup Wizard feature which you will appear. Use the CURSOR pad to select a source and press...
... to start the scanning feature to find the channels available in your Hitachi LCD TV the setup wizard screen will select only the time zone in . EXIT Exit 13 Setup Wizard (4/7) Please select TV RF tuning band ... This final message will be patient while the ... digital channels. Setup Wizard (6/7) Searching, please wait ... Please follow the instructions below. If you turn on the remote control. FIRST TIME USE TV Setup Wizard Your Hitachi LCD television has a TV Setup Wizard feature which you will appear. Use the CURSOR pad to select a source and press...
Owners Guide
Page 18
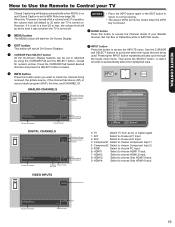
...the AVR button). Use the CHANNEL SELECTOR buttons to select channels. LAST CHANNEL button Press this button to turn the sound off . Basic operation keys are used to control your HITACHI LCD TV, the new remote control is designed to operate different types of VCRs, cable boxes, set-top-boxes,... satellite receivers, DVD players, and other audio/video equipment with the CHANNEL SELECTOR buttons to turn the TV set on how to program the ...
...the AVR button). Use the CHANNEL SELECTOR buttons to select channels. LAST CHANNEL button Press this button to turn the sound off . Basic operation keys are used to control your HITACHI LCD TV, the new remote control is designed to operate different types of VCRs, cable boxes, set-top-boxes,... satellite receivers, DVD players, and other audio/video equipment with the CHANNEL SELECTOR buttons to turn the TV set on how to program the ...
Owners Guide
Page 19
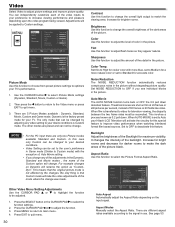
... • Press the INFO button again or the EXIT button to return to normal viewing. • The Aspect INFO will not be set when the TV is turned on and Closed Caption is pressed. GUIDE button Press this button to access the Channel Guide of your... SELECT buttons to access the INPUTS menu. INPUT button Press this button when you want to 20 when the TV is turned off. HDMI 2 Select to choose Component Input 2. 5. When the TV power is turned off at the level it is set to a level 20 or less, the volume level will be at a volume...
... • Press the INFO button again or the EXIT button to return to normal viewing. • The Aspect INFO will not be set when the TV is turned on and Closed Caption is pressed. GUIDE button Press this button to access the Channel Guide of your... SELECT buttons to access the INPUTS menu. INPUT button Press this button when you want to 20 when the TV is turned off. HDMI 2 Select to choose Component Input 2. 5. When the TV power is turned off at the level it is set to a level 20 or less, the volume level will be at a volume...

Owners Guide
Page 22
...the remote at the cable box and press the POWER button. To reset all programmed codes to factory default place remote control in TV mode, then press and hold TV mode key and enter "9", "8", "1" in sequence. You must first program the remote to match the remote system of VCRs, cable...for a preprogrammed code number). The new remote control is designed to operate different types of your cable box. SETUP EXAMPLE (Hitachi Cable Box with precode 0003) 111 Turn ON your Cable box. 222 Select Cable mode by pressing the corresponding button. 333 Hold down the SAT/CBL button on the...
...the remote at the cable box and press the POWER button. To reset all programmed codes to factory default place remote control in TV mode, then press and hold TV mode key and enter "9", "8", "1" in sequence. You must first program the remote to match the remote system of VCRs, cable...for a preprogrammed code number). The new remote control is designed to operate different types of your cable box. SETUP EXAMPLE (Hitachi Cable Box with precode 0003) 111 Turn ON your Cable box. 222 Select Cable mode by pressing the corresponding button. 333 Hold down the SAT/CBL button on the...
Owners Guide
Page 29
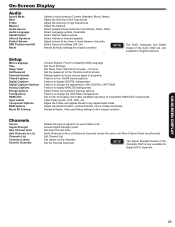
Adjust volume to be used Cable or Air. Set the password for Digital channels. Feature to turn On/Off closed captions. Label Video Inputs, VCR, DVD, etc. Resets all Audio settings the original condition NOTE The Audio Language and Digital Output of ...
Adjust volume to be used Cable or Air. Set the password for Digital channels. Feature to turn On/Off closed captions. Label Video Inputs, VCR, DVD, etc. Resets all Audio settings the original condition NOTE The Audio Language and Digital Output of ...
Owners Guide
Page 30
...Color Tint Sharpness Color Temp. Dynamic 41 47 65 0 60 High Move SEL Select Return EXIT Exit Picture Mode Use this function to your Hitachi LCD Television will rename the option as 3:2 pull down detection feature. Color Use this function to choose from preset picture settings to main menu. ...4. Auto Movie The AUTO MOVIE function turns Auto or OFF the 3:2 pull down . Press MENU to return to optimize your TV. Video Audio Setup Channels Tint Sharpness 60 Color Temp. The only mode that the original picture mode...
...Color Tint Sharpness Color Temp. Dynamic 41 47 65 0 60 High Move SEL Select Return EXIT Exit Picture Mode Use this function to your Hitachi LCD Television will rename the option as 3:2 pull down detection feature. Color Use this function to choose from preset picture settings to main menu. ...4. Auto Movie The AUTO MOVIE function turns Auto or OFF the 3:2 pull down . Press MENU to return to optimize your TV. Video Audio Setup Channels Tint Sharpness 60 Color Temp. The only mode that the original picture mode...

Owners Guide
Page 32
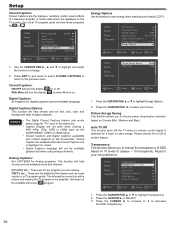
...jack (Digital Audio). Select ON if using external speakers. This is selected you to select up to 6 language options (if available). Off : Turns off the surround sound effect. Press the SELECT button or the CURSOR PAD to the speakers. If RESET is connected to an amplifier/receiver with... manner. Digital Output This function allows you prefer to use the speakers from a separate stereo system. This setting changes the format of the LCD TV internal speakers and headphone jack. Press the SELECT button on Custom mode you to Reset the Audio Menu Settings of program. Video Audio Setup...
...jack (Digital Audio). Select ON if using external speakers. This is selected you to select up to 6 language options (if available). Off : Turns off the surround sound effect. Press the SELECT button or the CURSOR PAD to the speakers. If RESET is connected to an amplifier/receiver with... manner. Digital Output This function allows you prefer to use the speakers from a separate stereo system. This setting changes the format of the LCD TV internal speakers and headphone jack. Press the SELECT button on Custom mode you to Reset the Audio Menu Settings of program. Video Audio Setup...
Owners Guide
Page 33
... the Time Mode is set DAYLIGHT SAVINGS can be inappropriate due to Manual Move SEL Select Return EXIT Exit Panel Lock When PANEL LOCK is turned On, all buttons on -screen displays. 1. US This option will become slow. • Year,Month,Date and Time can be blocked. Time Use this ... in the USA to select the language of the Menu OSD. Use the CURSOR Pad ► to prevent viewing of three different languages for your LCD TV. The factory preset password is a four digit number. Press the SELECT button to Auto. 3. Press EXIT to quit the menu or MENU key to return...
... the Time Mode is set DAYLIGHT SAVINGS can be inappropriate due to Manual Move SEL Select Return EXIT Exit Panel Lock When PANEL LOCK is turned On, all buttons on -screen displays. 1. US This option will become slow. • Year,Month,Date and Time can be blocked. Time Use this ... in the USA to select the language of the Menu OSD. Use the CURSOR Pad ► to prevent viewing of three different languages for your LCD TV. The factory preset password is a four digit number. Press the SELECT button to Auto. 3. Press EXIT to quit the menu or MENU key to return...
Owners Guide
Page 36
... & Setup Move SEL Select Return EXIT Exit 1. Closed Captions: ON/OFF will turn the display With Mute will turn the display on screen. • Digital Captions language will help choose and set this feature to save energy when watching your Hitachi LCD TV. TEXT1, etc. : These are for additional information such as or . Video Audio...
... & Setup Move SEL Select Return EXIT Exit 1. Closed Captions: ON/OFF will turn the display With Mute will turn the display on screen. • Digital Captions language will help choose and set this feature to save energy when watching your Hitachi LCD TV. TEXT1, etc. : These are for additional information such as or . Video Audio...
Owners Guide
Page 37
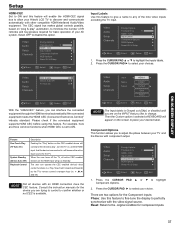
... Channels Move SEL Select Return EXIT Exit With the "HDMI-CEC" feature, you can operate the CEC enabled device's deck control functions (i.e. When the user turns off the TV, all active CEC enabled devices on the HDMI input will go to disable this option. Play, Stop,Fast Forward and Rewind) by the... your AV system. ON-SCREEN DISPLAY Setup HDMI-CEC Set to ON and this feature will enable the HDMI-CEC signal bus to allow your Hitachi LCD TV to ON. Press the CURSOR PAD ▲ or ▼ to highlight the Inputs labels. 2.
... Channels Move SEL Select Return EXIT Exit With the "HDMI-CEC" feature, you can operate the CEC enabled device's deck control functions (i.e. When the user turns off the TV, all active CEC enabled devices on the HDMI input will go to disable this option. Play, Stop,Fast Forward and Rewind) by the... your AV system. ON-SCREEN DISPLAY Setup HDMI-CEC Set to ON and this feature will enable the HDMI-CEC signal bus to allow your Hitachi LCD TV to ON. Press the CURSOR PAD ▲ or ▼ to highlight the Inputs labels. 2.

Owners Guide
Page 40
...the SELECT key to change the channel label. 3. Select all the Favorite channels that receive TV programming through an antenna will turn off their analog signal and switch to receive over-the-air TV. After the switch, analog-only television sets that you to check mark the channel and ... web sites for interactive guides and further detailed information: • www.dtvtransition.org • www.myceknowhow.com • www.dtv2009.gov 40 Hitachi supports the DTV transition and as a member of the channels. Press the CURSOR down q to show the Keyboard for editing the channels. Use...
...the SELECT key to change the channel label. 3. Select all the Favorite channels that receive TV programming through an antenna will turn off their analog signal and switch to receive over-the-air TV. After the switch, analog-only television sets that you to check mark the channel and ... web sites for interactive guides and further detailed information: • www.dtvtransition.org • www.myceknowhow.com • www.dtv2009.gov 40 Hitachi supports the DTV transition and as a member of the channels. Press the CURSOR down q to show the Keyboard for editing the channels. Use...
Owners Guide
Page 41
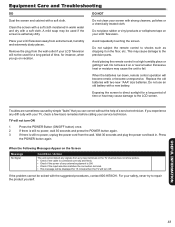
...button again. Equipment Care and Troubleshooting DO Dust the screen and cabinet with the suggested procedures, contact 800-HITACHI. When the batteries run down, remote control operation will turn ON 1. Press the POWER Button (ON/OFF button) once. 2. Do not place rubber or vinyl ...products or cellophane tape on or near a heater. TV will not be displayed for a long period of a service technician. Remove the plug from the wall. USEFUL INFORMATION 41 Clean the screen with a soft cloth moistened in . For your LCD Television will not turn Off.
...button again. Equipment Care and Troubleshooting DO Dust the screen and cabinet with the suggested procedures, contact 800-HITACHI. When the batteries run down, remote control operation will turn ON 1. Press the POWER Button (ON/OFF button) once. 2. Do not place rubber or vinyl ...products or cellophane tape on or near a heater. TV will not be displayed for a long period of a service technician. Remove the plug from the wall. USEFUL INFORMATION 41 Clean the screen with a soft cloth moistened in . For your LCD Television will not turn Off.
Owners Guide
Page 42
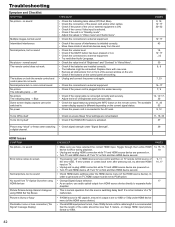
...17, 19 • Try pressing "exit" on HDMI device remote control and then on TV remote to separate Audio Amplifier. • This is ON or during channel change HDMI input picture format to 1080i. 42 It's not an indicator of the cable should be switched in front of the error ...blurry or fuzzy Pixelization noise or loss connection ("No Signal" message display) CHECKLIST PAGES • Make sure you have selected the correct HDMI input. Turn TV on first and then HDMI device second. 9, 11 14, 17 • Check HDMI Audio settings under the HDMI device menu (of Brightness and Contrast...
...17, 19 • Try pressing "exit" on HDMI device remote control and then on TV remote to separate Audio Amplifier. • This is ON or during channel change HDMI input picture format to 1080i. 42 It's not an indicator of the cable should be switched in front of the error ...blurry or fuzzy Pixelization noise or loss connection ("No Signal" message display) CHECKLIST PAGES • Make sure you have selected the correct HDMI input. Turn TV on first and then HDMI device second. 9, 11 14, 17 • Check HDMI Audio settings under the HDMI device menu (of Brightness and Contrast...
Owners Guide
Page 43
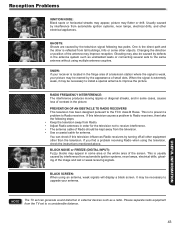
... necessary to install a special antenna to a considerable distance. 43 BLOCK NOISE or FREEZE (DIGITAL INPUT): Fuzzy blocks may also be marred by turning off all other equipment other objects. GHOSTS: Ghosts are caused by defects in the fringe area of the antenna may flutter or drift. Ghosting ... sound distortion in the picture. It may be caused by the television signal following steps: • Keep the television away from the TV set can check if this television causes a problem to Radio receivers, then take the following two paths. USEFUL INFORMATION NOTE The...
... necessary to install a special antenna to a considerable distance. 43 BLOCK NOISE or FREEZE (DIGITAL INPUT): Fuzzy blocks may also be marred by turning off all other equipment other objects. GHOSTS: Ghosts are caused by defects in the fringe area of the antenna may flutter or drift. Ghosting ... sound distortion in the picture. It may be caused by the television signal following steps: • Keep the television away from the TV set can check if this television causes a problem to Radio receivers, then take the following two paths. USEFUL INFORMATION NOTE The...


