
Owners Guide
Page 5
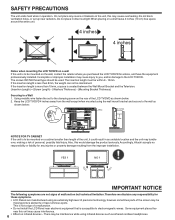
...display. TUNE INTO SAFETY • One size does NOT fit all instructions supplied by curious children. Some wall mounts are not designed to be mounted to walls with furniture and television sets. • Don't place flat panel displays on furniture that can easily ...'s recommendations for the safe installation and use of your purchase! HITACHI CARES! • The consumer electronics industry is appropiate. WALL MOUNTING: IF YOU DECIDE TO WALL MOUNT YOUR FLAT PANEL DISPLAY, ALWAYS: • Use a mount that has been recommended by the display manufacturer and/or listed...
...display. TUNE INTO SAFETY • One size does NOT fit all instructions supplied by curious children. Some wall mounts are not designed to be mounted to walls with furniture and television sets. • Don't place flat panel displays on furniture that can easily ...'s recommendations for the safe installation and use of your purchase! HITACHI CARES! • The consumer electronics industry is appropiate. WALL MOUNTING: IF YOU DECIDE TO WALL MOUNT YOUR FLAT PANEL DISPLAY, ALWAYS: • Use a mount that has been recommended by the display manufacturer and/or listed...
Owners Guide
Page 6
...inches (10 cm) free space around the entire unit. 4 inches 4 inches Notes when mounting the LCD TV/DVD on a wall If the unit is to be mounted on the wall, contact the retailer where you , and/or damage to the LCD TV/DVD. The insertion length must be used. NO !! Do not block ventilation holes, ... to the clamping screw on the unit, this may be maintained. Accordingly, Hitachi accepts no responsibility or liability for any covers or blankets on the rear of a malfunction. • Do not install the LCD Panel near electronic equipment that is less than 8mm, the weight can not ...
...inches (10 cm) free space around the entire unit. 4 inches 4 inches Notes when mounting the LCD TV/DVD on a wall If the unit is to be mounted on the wall, contact the retailer where you , and/or damage to the LCD TV/DVD. The insertion length must be used. NO !! Do not block ventilation holes, ... to the clamping screw on the unit, this may be maintained. Accordingly, Hitachi accepts no responsibility or liability for any covers or blankets on the rear of a malfunction. • Do not install the LCD Panel near electronic equipment that is less than 8mm, the weight can not ...
Owners Guide
Page 39
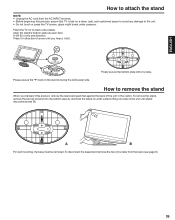
... remove the two (2) screws from the back (see B). Place the TV on the stand is laid on a flat against the back of arrow until stand disconnects (see page 6). 39 Align the stand's bottom-plate as seen here. A B For wall mounting, the base must be removed. Please assure the " " mark on...lifting one direction. Press it in direction of the unit in only one side of the unit until you transport this process, assure that TV is facing the LCD panel side. Finally secure the bottom-plate with 2 screws. It will fit in the carton. How to remove the stand When ...
... remove the two (2) screws from the back (see B). Place the TV on the stand is laid on a flat against the back of arrow until stand disconnects (see page 6). 39 Align the stand's bottom-plate as seen here. A B For wall mounting, the base must be removed. Please assure the " " mark on...lifting one direction. Press it in direction of the unit in only one side of the unit until you transport this process, assure that TV is facing the LCD panel side. Finally secure the bottom-plate with 2 screws. It will fit in the carton. How to remove the stand When ...


