
Owners Guide
Page 7
... external or internal terminals could corrode, disabling normal operation, or the battery connecting terminals could corrode, so that power will not turn on. Be careful of ambient temperature: • Using the DVD video camera/recorder in a place where the temperature is over 104ºF (40°C) or under 32ºF (0°C) will be slightly warm, but this does not indicate a fault. During playback of...
... external or internal terminals could corrode, disabling normal operation, or the battery connecting terminals could corrode, so that power will not turn on. Be careful of ambient temperature: • Using the DVD video camera/recorder in a place where the temperature is over 104ºF (40°C) or under 32ºF (0°C) will be slightly warm, but this does not indicate a fault. During playback of...

Owners Guide
Page 13
...or Card 29 RECORDABLE TIME OF MOVIE (VIDEO) ......... 29 RECORDABLE STILLS (PHOTOS) ON DISC .... 29 RECORDABLE STILLS (PHOTOS) ON CARD... 30 SIZE AND QUALITY OF PHOTOS 30 Setups Setting Up the DVD Video Camera/ Recorder 31 HOLDING DVD VIDEO CAMERA/ RECORDER 31 ATTACHING SHOULDER STRAP 32 ATTACHING LENS CAP 32 INSERTING BATTERY INTO REMOTE CONTROL 33 REMOVING BATTERY FROM REMOTE CONTROL 33 VIEWING SUBJECT THROUGH VIEWFINDER 34 VIEWING IMAGE ON LCD MONITOR SCREEN 35 CLOSING LCD MONITOR 36 SETTING DATE AND TIME 37 CHANGING DISPLAY FORMAT OF DATE AND TIME 38 Setting Up the Battery 39...
...or Card 29 RECORDABLE TIME OF MOVIE (VIDEO) ......... 29 RECORDABLE STILLS (PHOTOS) ON DISC .... 29 RECORDABLE STILLS (PHOTOS) ON CARD... 30 SIZE AND QUALITY OF PHOTOS 30 Setups Setting Up the DVD Video Camera/ Recorder 31 HOLDING DVD VIDEO CAMERA/ RECORDER 31 ATTACHING SHOULDER STRAP 32 ATTACHING LENS CAP 32 INSERTING BATTERY INTO REMOTE CONTROL 33 REMOVING BATTERY FROM REMOTE CONTROL 33 VIEWING SUBJECT THROUGH VIEWFINDER 34 VIEWING IMAGE ON LCD MONITOR SCREEN 35 CLOSING LCD MONITOR 36 SETTING DATE AND TIME 37 CHANGING DISPLAY FORMAT OF DATE AND TIME 38 Setting Up the Battery 39...
Owners Guide
Page 14
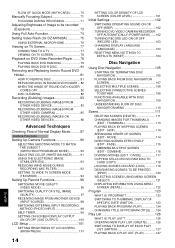
... IMAGE FROM ANOTHER DEVICE (INPUT SOURCE 98 SWITCHING EXTERNAL INPUT RECORDING METHOD (PHOTO INPUT 98 SELF-TIMER 99 SETTING ON-SCREEN DISPLAY OUTPUT ON OR OFF (OSD OUTPUT 100 LCD Setup 101 SETTING BRIGHTNESS OF LCD SCREEN (BRIGHTNESS 101 SETTING COLOR DENSITY OF LCD SCREEN (COLOR LEVEL 101 Initial Settings 102 SWITCHING OPERATING SOUND ON OR OFF (BEEP 102 TURNING DVD VIDEO CAMERA/RECORDER OFF AUTOMATICALLY (POWER SAVE) ...... 102 TURNING RECORD LED ON OR OFF (RECORD LED 103 CHANGING DISPLAY LANGUAGE (LANGUAGE 103 RESETTING MENU SETTINGS TO DEFAULTS (RESET 104 Disc Navigation Using...
... IMAGE FROM ANOTHER DEVICE (INPUT SOURCE 98 SWITCHING EXTERNAL INPUT RECORDING METHOD (PHOTO INPUT 98 SELF-TIMER 99 SETTING ON-SCREEN DISPLAY OUTPUT ON OR OFF (OSD OUTPUT 100 LCD Setup 101 SETTING BRIGHTNESS OF LCD SCREEN (BRIGHTNESS 101 SETTING COLOR DENSITY OF LCD SCREEN (COLOR LEVEL 101 Initial Settings 102 SWITCHING OPERATING SOUND ON OR OFF (BEEP 102 TURNING DVD VIDEO CAMERA/RECORDER OFF AUTOMATICALLY (POWER SAVE) ...... 102 TURNING RECORD LED ON OR OFF (RECORD LED 103 CHANGING DISPLAY LANGUAGE (LANGUAGE 103 RESETTING MENU SETTINGS TO DEFAULTS (RESET 104 Disc Navigation Using...

Owners Guide
Page 15
... PROTECTING DISC FROM WRITING (PROTECT DISC 134 INITIALIZING DVD-RAM DISC OR CARD (FORMAT DISC. Check the Following 163 Trouble Messages 165 Troubleshooting 172 System Reset 181 Major Specifications 182 To Order in the United States 184 To Order in the Canada 184 Index 185 Be sure to Optional Accessories 157 CAMERA ACCESSORIES 157 POWER SUPPLY 157 INFORMATION ON SQUARE ADAPTER .........157 Cleaning 158 Changing Setting of CD-ROM 187 English...
... PROTECTING DISC FROM WRITING (PROTECT DISC 134 INITIALIZING DVD-RAM DISC OR CARD (FORMAT DISC. Check the Following 163 Trouble Messages 165 Troubleshooting 172 System Reset 181 Major Specifications 182 To Order in the United States 184 To Order in the Canada 184 Index 185 Be sure to Optional Accessories 157 CAMERA ACCESSORIES 157 POWER SUPPLY 157 INFORMATION ON SQUARE ADAPTER .........157 Cleaning 158 Changing Setting of CD-ROM 187 English...

Owners Guide
Page 16
... power cord: When powering the DVD video camera/ recorder from shoulder. Infrared remote control (model DZ-RM3W): Use to control the DVD video camera/ recorder from /to another video device. AV/S input/output cable: Used when viewing the picture played back on the DVD video camera/recorder on this battery away from AC outlet, or charge battery. video camera/recorder to protect the lens. English Note: The provided single-sided DVD-RAM disc is not generally available in shops: When purchasing a disc, order a 60minute double-sided disc (2.8GB, in Software CD-ROM: PC connection cable...
... power cord: When powering the DVD video camera/ recorder from shoulder. Infrared remote control (model DZ-RM3W): Use to control the DVD video camera/ recorder from /to another video device. AV/S input/output cable: Used when viewing the picture played back on the DVD video camera/recorder on this battery away from AC outlet, or charge battery. video camera/recorder to protect the lens. English Note: The provided single-sided DVD-RAM disc is not generally available in shops: When purchasing a disc, order a 60minute double-sided disc (2.8GB, in Software CD-ROM: PC connection cable...

Owners Guide
Page 21
... disc; Power cable 1 2 4 3 AC adapter/charger DC power cord 2 Insert a disc (P. 44). 1Press down the DISC EJECT button once and release it. 3Insert the disc, in Round DVD Holder, into the disc guide properly until it stops, and then close the cover of disc insertion block. Disc cover PUSH CLOSE portion English 21 You can delete the recorded contents (P. 25). DISC EJECT button DISC EJECT 2Gently open the cover until it stops. 12 Try to Record and Play Back using Disc (Video and Photo...
... disc; Power cable 1 2 4 3 AC adapter/charger DC power cord 2 Insert a disc (P. 44). 1Press down the DISC EJECT button once and release it. 3Insert the disc, in Round DVD Holder, into the disc guide properly until it stops, and then close the cover of disc insertion block. Disc cover PUSH CLOSE portion English 21 You can delete the recorded contents (P. 25). DISC EJECT button DISC EJECT 2Gently open the cover until it stops. 12 Try to Record and Play Back using Disc (Video and Photo...

Owners Guide
Page 37
.... 1 Turn the DVD video camera/recorder on. 2 Press the MENU button. Note: This DVD video camera/recorder incorporates a rechargeable battery to be set the current date and time. SETTING DATE AND TIME Set the current date and time so that is highlighted first Da t e Mode Da t e Se t ENTER RETURN 1/ 1/ 2004 12: 00AM RAM depends on the date display format (set up in battery is exhausted, the date and time will be reset. Zoom : 40x MIC.F i l ter : Of f 16:9 : Of f ENTER RETURN RAM 3 Use...
.... 1 Turn the DVD video camera/recorder on. 2 Press the MENU button. Note: This DVD video camera/recorder incorporates a rechargeable battery to be set the current date and time. SETTING DATE AND TIME Set the current date and time so that is highlighted first Da t e Mode Da t e Se t ENTER RETURN 1/ 1/ 2004 12: 00AM RAM depends on the date display format (set up in battery is exhausted, the date and time will be reset. Zoom : 40x MIC.F i l ter : Of f 16:9 : Of f ENTER RETURN RAM 3 Use...

Owners Guide
Page 48
... remove the disc, replace it, or if the date changes after power is turned on, it to "Check 4" on to let it recognize the disc, you turn off. Basic Techniques This section explains about recording of switch. After several seconds, the ACCESS indicator will turn the DVD video camera/recorder on, the ACCESS indicator will light or blink to show that the DVD video camera/recorder is recognizing the disc or card: During this case, refer to "Trouble Messages...
... remove the disc, replace it, or if the date changes after power is turned on, it to "Check 4" on to let it recognize the disc, you turn off. Basic Techniques This section explains about recording of switch. After several seconds, the ACCESS indicator will turn the DVD video camera/recorder on, the ACCESS indicator will light or blink to show that the DVD video camera/recorder is recognizing the disc or card: During this case, refer to "Trouble Messages...

Owners Guide
Page 49
... recording will light. ACCESS/PC indicator Power switch 1 Turn the DVD camera/recorder on the screen (viewfinder or LCD). If using DVD-R disc, do not perform the following, or data on the disc may not be deleted. 49 English Recording will restart after the message disappears. • Do not turn power off . Pressing REC again during recording, but the operation will not be changed. • Each time the DVD video camera/recorder enters the recording pause status, the counter display will set the DVD video camera/recorder to the recording pause...
... recording will light. ACCESS/PC indicator Power switch 1 Turn the DVD camera/recorder on the screen (viewfinder or LCD). If using DVD-R disc, do not perform the following, or data on the disc may not be deleted. 49 English Recording will restart after the message disappears. • Do not turn power off . Pressing REC again during recording, but the operation will not be changed. • Each time the DVD video camera/recorder enters the recording pause status, the counter display will set the DVD video camera/recorder to the recording pause...

Owners Guide
Page 58
... the LCD monitor is open during playback of data to be restored. If the playback pause status continues for as long as 5 minutes, the DVD video camera/ recorder will enter the pause status at the last image on the amount of movie, playback sound will be played back, it may take some time for the playback image to appear. • Do not operate the power switch or remove the card while the ACCESS/PC or CARD ACCESS...
... the LCD monitor is open during playback of data to be restored. If the playback pause status continues for as long as 5 minutes, the DVD video camera/ recorder will enter the pause status at the last image on the amount of movie, playback sound will be played back, it may take some time for the playback image to appear. • Do not operate the power switch or remove the card while the ACCESS/PC or CARD ACCESS...
Owners Guide
Page 84
... "Recording Stills" on camcorder for personal enjoyment without copyguard signal - "COPY PROTECTED" appears in images recorded on page 50 for personal enjoyment. Note: • If you operate the DVD video camera/recorder connected to another device, always power the camera/ recorder from AC outlet using the AC adapter/charger. • If you to record clearer images. • The DZ-MV550A cannot record S-VIDEO input. • Reduce the volume of external input sound heard from a Hitachi VCR, change the remote control code of the VCR...
... "Recording Stills" on camcorder for personal enjoyment without copyguard signal - "COPY PROTECTED" appears in images recorded on page 50 for personal enjoyment. Note: • If you operate the DVD video camera/recorder connected to another device, always power the camera/ recorder from AC outlet using the AC adapter/charger. • If you to record clearer images. • The DZ-MV550A cannot record S-VIDEO input. • Reduce the volume of external input sound heard from a Hitachi VCR, change the remote control code of the VCR...

Owners Guide
Page 85
See "Switching External Input Recording Method (PHOTO Input)" on page 98 for details, and "Recording Stills" on the DVD video camera/ recorder to the DVD video camera/ recorder (DZ-MV580A only). 1 Set the input source on page 50 for recording movie. 85 English The picture will enable you can connect it to "LINE (L IN)". The operation of this line-input recording is the same as for how to record still images. 2 Turn on the connected device, and start on the LCD screen or...
See "Switching External Input Recording Method (PHOTO Input)" on page 98 for details, and "Recording Stills" on the DVD video camera/ recorder to the DVD video camera/ recorder (DZ-MV580A only). 1 Set the input source on page 50 for recording movie. 85 English The picture will enable you can connect it to "LINE (L IN)". The operation of this line-input recording is the same as for how to record still images. 2 Turn on the connected device, and start on the LCD screen or...

Owners Guide
Page 86
... power the DVD video camera/recorder from AC outlet, to prevent battery power from the DVD video camera/recorder to Hitachi VCR, change the remote control code of VCR, etc.* To video/ audio input jacks AV/S input/output cable (provided) Yellow White Red * If the video device to be connected has an S video input jack, you can connect it to the DVD video camera/ recorder. 1 Press the DISC NAVIGATION button. 2 Select a scene to be dubbed among the scenes recorded on this DVD video camera/ recorder (P.126). • Be sure to use Disc Navigation to create a play...
... power the DVD video camera/recorder from AC outlet, to prevent battery power from the DVD video camera/recorder to Hitachi VCR, change the remote control code of VCR, etc.* To video/ audio input jacks AV/S input/output cable (provided) Yellow White Red * If the video device to be connected has an S video input jack, you can connect it to the DVD video camera/ recorder. 1 Press the DISC NAVIGATION button. 2 Select a scene to be dubbed among the scenes recorded on this DVD video camera/ recorder (P.126). • Be sure to use Disc Navigation to create a play...
Owners Guide
Page 143
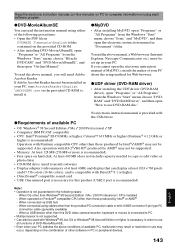
... instruction manual using cables other software in use DVD-RAM disc". English 143 When connected via USB hub - To read the above manual, a Web browser (Internet Explorer, Netscape Communicator, etc.) must be supported. • Memory: At least 128 MB (256 MB or more is recommended) • Free space on hard disk: At least 400 MB (does not include capacity needed to copy or edit video or photo data) • CD-ROM drive (used to install software) • Display adapter (video memory...
... instruction manual using cables other software in use DVD-RAM disc". English 143 When connected via USB hub - To read the above manual, a Web browser (Internet Explorer, Netscape Communicator, etc.) must be supported. • Memory: At least 128 MB (256 MB or more is recommended) • Free space on hard disk: At least 400 MB (does not include capacity needed to copy or edit video or photo data) • CD-ROM drive (used to install software) • Display adapter (video memory...

Owners Guide
Page 144
..." for the Hitachi DZMV200A, DZ-MV230A or DZ-MV270A DVD video camera/recorder. DISPLAYING INSTALLER SCREEN 1 Turn the PC on the provided CDROM. The installer screen will need to install the software on the PC being run on another UDF driver* has already been installed your PC, you wish to delete it together?" Do not connect the DVD video camera/ recorder to display it: 144 English If the installer screen does not automatically appear, use the following...
..." for the Hitachi DZMV200A, DZ-MV230A or DZ-MV270A DVD video camera/recorder. DISPLAYING INSTALLER SCREEN 1 Turn the PC on the provided CDROM. The installer screen will need to install the software on the PC being run on another UDF driver* has already been installed your PC, you wish to delete it together?" Do not connect the DVD video camera/ recorder to display it: 144 English If the installer screen does not automatically appear, use the following...
Owners Guide
Page 154
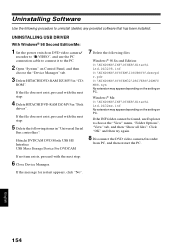
... Serial Bus controllers": Hitachi DVDCAM DVD Mode USB HS Interface USB Mass Storage Device For DVDCAM 7 Delete the following procedure to uninstall (delete) any provided software that has been installed: UNINSTALLING USB DRIVER With Windows® 98 Second Edition/Me: 1 Set the power switch on DVD video camera/ recorder to "O VIDEO", and use Explorer to the PC. 2 Open "System" on Control Panel, and then choose the "Device Manager" tab. 3 Delete HITACHI DVD-RAM DZ-MV5 in "CD- English 154 ROM". If the file...
... Serial Bus controllers": Hitachi DVDCAM DVD Mode USB HS Interface USB Mass Storage Device For DVDCAM 7 Delete the following procedure to uninstall (delete) any provided software that has been installed: UNINSTALLING USB DRIVER With Windows® 98 Second Edition/Me: 1 Set the power switch on DVD video camera/ recorder to "O VIDEO", and use Explorer to the PC. 2 Open "System" on Control Panel, and then choose the "Device Manager" tab. 3 Delete HITACHI DVD-RAM DZ-MV5 in "CD- English 154 ROM". If the file...

Owners Guide
Page 166
... a charged battery, or use another disc available, check to ALL. again. PHOTOS R disc (recordable of a still cannot be recognized properly. Replace with "Category: VIDEO or PHOTO" specified. 138 Cannot execute. CANNOT RECORD Are you have another card. 30, 111 Card error has occurred. Please reinsert a disc. (1) Turn power off, remove the battery or AC adapter/charger and reattach it, and then turn power on this DVD video camera/recorder, 135 choose "YES" and format it . Cannot execute. The card may...
... a charged battery, or use another disc available, check to ALL. again. PHOTOS R disc (recordable of a still cannot be recognized properly. Replace with "Category: VIDEO or PHOTO" specified. 138 Cannot execute. CANNOT RECORD Are you have another card. 30, 111 Card error has occurred. Please reinsert a disc. (1) Turn power off, remove the battery or AC adapter/charger and reattach it, and then turn power on this DVD video camera/recorder, 135 choose "YES" and format it . Cannot execute. The card may...

Owners Guide
Page 177
...: Copy the data to another DVD-RAM disc and then edit it is "OK". "DISC ERROR" appears A disc that should Click the "Preference" button at HS (high speed). No USB HS (high speed) Make sure that for DVD camera with connection even when the USB2.0 card. connection: It is not available on this DVD video camera/recorder is operated on file in drive: DVD-MovieAlbumSE cannot be used for date/time indication on playback screen. The actual recording time will need to install...
...: Copy the data to another DVD-RAM disc and then edit it is "OK". "DISC ERROR" appears A disc that should Click the "Preference" button at HS (high speed). No USB HS (high speed) Make sure that for DVD camera with connection even when the USB2.0 card. connection: It is not available on this DVD video camera/recorder is operated on file in drive: DVD-MovieAlbumSE cannot be used for date/time indication on playback screen. The actual recording time will need to install...

Owners Guide
Page 181
... Record Functions Setup VIDEO Mode Quality Input Source PHOTO Input Self Timer OSD Output Date Setup Date Mode Date Set LCD Setup Brightness Auto Auto On 40× Off Off FINE FINE CAMERA Field Off On M/D/Y 1/1/2004 12:00AM Color Level Initial Setup Beep Power Save Record LED Language Demo Mode On Off On English Auto * Some items will be reset: Set the date and time again before using the DVD video camera/recorder. 1 Set the power switch to "POWER OFF" to hold down the reset button for several seconds. System Reset If the DVD video camera/recorder does not operate normally...
... Record Functions Setup VIDEO Mode Quality Input Source PHOTO Input Self Timer OSD Output Date Setup Date Mode Date Set LCD Setup Brightness Auto Auto On 40× Off Off FINE FINE CAMERA Field Off On M/D/Y 1/1/2004 12:00AM Color Level Initial Setup Beep Power Save Record LED Language Demo Mode On Off On English Auto * Some items will be reset: Set the date and time again before using the DVD video camera/recorder. 1 Set the power switch to "POWER OFF" to hold down the reset button for several seconds. System Reset If the DVD video camera/recorder does not operate normally...
Owners Guide
Page 183
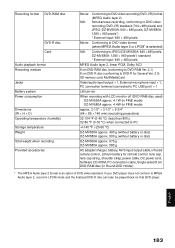
.... 490 g (without battery or disc) DZ-MV580A approx. 500 g (without battery or disc) DZ-MV550A approx. 575 g DZ-MV580A approx. 585 g AC adapter/charger, battery, AV/S input/output cable, infrared remote control, Lithium battery for General Ver. 2.0) SD memory card, MultiMediaCard Video/audio input/output × 1, External microphone input × 1, PC connection terminal (connected to PC USB port) × 1 Lithium-ion When recording with LCD monitor off (DVD-RAM disc used) DZ-MV550A approx. 4.1W (in FINE mode) DZ-MV580A approx...
.... 490 g (without battery or disc) DZ-MV580A approx. 500 g (without battery or disc) DZ-MV550A approx. 575 g DZ-MV580A approx. 585 g AC adapter/charger, battery, AV/S input/output cable, infrared remote control, Lithium battery for General Ver. 2.0) SD memory card, MultiMediaCard Video/audio input/output × 1, External microphone input × 1, PC connection terminal (connected to PC USB port) × 1 Lithium-ion When recording with LCD monitor off (DVD-RAM disc used) DZ-MV550A approx. 4.1W (in FINE mode) DZ-MV580A approx...


