
Owners Guide
Page 1
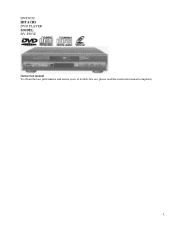
DVP303U HITACHI DVD PLAYER MODEL DV-P303U Instruction manual To obtain the best performance and ensure years of trouble-free use, please read this instruction manual completely. 1
DVP303U HITACHI DVD PLAYER MODEL DV-P303U Instruction manual To obtain the best performance and ensure years of trouble-free use, please read this instruction manual completely. 1
Owners Guide
Page 2
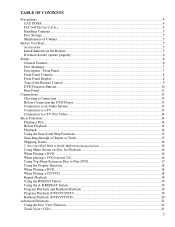
... Batteries in the Remote ...5 If remote doesn't operate properly: ...6 Setup...6 General Features...6 Disc Markings ...7 Description - TABLE OF CONTENTS Precautions ...4 CAUTIONS...4 FCC NOTE (for U.S.A.): ...4 Handling Cautions...5 Disc Storage ...5 Maintenance of the Remote Control ...9 DVD Function Buttons...10 Rear Panel ...11 Connections...13 Choosing a Connection ...13 Before Connection the DVD Player...13 Connection to an Audio System...13 Connection to a TV ...13 Connection to a TV (For Video) ...14 Basic Functions ...14 Playing a Disc...14 Before Playback ...14 Playback ...14 Using...
... Batteries in the Remote ...5 If remote doesn't operate properly: ...6 Setup...6 General Features...6 Disc Markings ...7 Description - TABLE OF CONTENTS Precautions ...4 CAUTIONS...4 FCC NOTE (for U.S.A.): ...4 Handling Cautions...5 Disc Storage ...5 Maintenance of the Remote Control ...9 DVD Function Buttons...10 Rear Panel ...11 Connections...13 Choosing a Connection ...13 Before Connection the DVD Player...13 Connection to an Audio System...13 Connection to a TV ...13 Connection to a TV (For Video) ...14 Basic Functions ...14 Playing a Disc...14 Before Playback ...14 Playback ...14 Using...
Owners Guide
Page 3
... a Bookmark ...25 Using the Zoom and 3D Sound Functions 25 Using the Zoom Function (DVD/VCD 25 Using the 3D Sound Function ...26 Changing Setup Menu...27 Using the Setup Menu ...27 Setting Up the Language Features ...27 Using the Player Menu...27 Using the Disc Menu Language ...28 Setting Up the Language Feature ...28 Using the Audio Language...28 Using the Subtitle Language ...29 Setting Up the Parental Control ...29 Setting Up the Audio Options ...30 Setting Up the Display Options...31 Troubleshooting Guide...33 Reference...34 Specifications ...34 Back cover...
... a Bookmark ...25 Using the Zoom and 3D Sound Functions 25 Using the Zoom Function (DVD/VCD 25 Using the 3D Sound Function ...26 Changing Setup Menu...27 Using the Setup Menu ...27 Setting Up the Language Features ...27 Using the Player Menu...27 Using the Disc Menu Language ...28 Setting Up the Language Feature ...28 Using the Audio Language...28 Using the Subtitle Language ...29 Setting Up the Parental Control ...29 Setting Up the Audio Options ...30 Setting Up the Display Options...31 Troubleshooting Guide...33 Reference...34 Specifications ...34 Back cover...
Owners Guide
Page 4
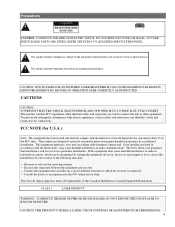
... UTILIZES A LASER. REFER SERVICING TO QUALIFIED SERVICE PERSONNEL. These limits are used in accordance with the instructions , may cause harmful interference to Part 15 of electric shock or personal injury. CAUTION: DVD PLAYERS USE AN INVISIBLE LASER BEAM WHICH CAN CAUSE HAZARDOUS RADIATION EXPOSURE IF DIRECTED. To prevent electromagnetic interference with the limits for a Class B digital device, pursuant to radio communications...
... UTILIZES A LASER. REFER SERVICING TO QUALIFIED SERVICE PERSONNEL. These limits are used in accordance with the instructions , may cause harmful interference to Part 15 of electric shock or personal injury. CAUTION: DVD PLAYERS USE AN INVISIBLE LASER BEAM WHICH CAN CAUSE HAZARDOUS RADIATION EXPOSURE IF DIRECTED. To prevent electromagnetic interference with the limits for a Class B digital device, pursuant to radio communications...
Owners Guide
Page 5
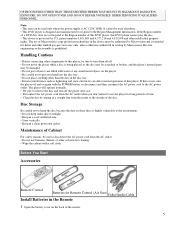
... • Before connecting other components to this DVD player cannot play the disc. • This device is protected by Macrovision and is intended for Remote Control (AA Size) Video/Audio Cable Install Batteries in the Remote 1 Open the battery cover on the back of Cabinet For safety reasons, be sure to disconnect the AC power cord from the inside to the environment. • Do not keep under direct sunlight. •...
... • Before connecting other components to this DVD player cannot play the disc. • This device is protected by Macrovision and is intended for Remote Control (AA Size) Video/Audio Cable Install Batteries in the Remote 1 Open the battery cover on the back of Cabinet For safety reasons, be sure to disconnect the AC power cord from the inside to the environment. • Do not keep under direct sunlight. •...
Owners Guide
Page 6
... Excellent Sound The Dolby Digital system developed by pressing the REPEAT button. Both regular and widescreen (16:9) pictures can be viewed. Slow Motion An important scene can be viewed in slow motion. Repeat You can repeat a song or movie simply by Dolby Labs provides crystal clear sound reproduction. DV-P303U COPY PROTECTION • Many DVD discs are aligned correctly. 3 Replace the battery cover. Use of this , you should only connect your DVD player directly...
... Excellent Sound The Dolby Digital system developed by pressing the REPEAT button. Both regular and widescreen (16:9) pictures can be viewed. Slow Motion An important scene can be viewed in slow motion. Repeat You can repeat a song or movie simply by Dolby Labs provides crystal clear sound reproduction. DV-P303U COPY PROTECTION • Many DVD discs are aligned correctly. 3 Replace the battery cover. Use of this , you should only connect your DVD player directly...
Owners Guide
Page 7
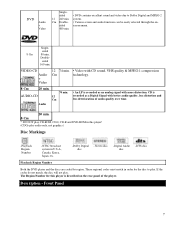
... screen menu. 480 min. 8 Cm Singlesided 80 min. AUDIO-CD 12 Cm Audio • An LP is described on - These regional codes must match in this player! (CDGs play . The Region Number for the disc to Dolby Digital and MPEG-2 12 240 min. Front Panel 7 CD is recorded as an analog signal with CD sound, VHS quality & MPEG-1 compression Cm technology. 8 Cm 20 min. 74 min. DVD Audio + Video Single- Stereo disc -Digital Audio...
... screen menu. 480 min. 8 Cm Singlesided 80 min. AUDIO-CD 12 Cm Audio • An LP is described on - These regional codes must match in this player! (CDGs play . The Region Number for the disc to Dolby Digital and MPEG-2 12 240 min. Front Panel 7 CD is recorded as an analog signal with CD sound, VHS quality & MPEG-1 compression Cm technology. 8 Cm 20 min. 74 min. DVD Audio + Video Single- Stereo disc -Digital Audio...
Owners Guide
Page 8
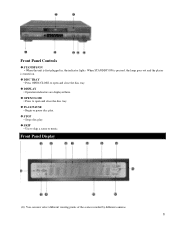
Front Panel Display (1) You can now select different viewing points of the scene recorded by different cameras. 8 Front Panel Controls Œ STANDBY/ON • When the unit is turned on. DISC TRAY • Press OPEN/CLOSE to open and close the disc tray. Ž DISPLAY • Operation indicators are displayed here. OPEN/CLOSE • Press to open and close the disc tray. PLAY/PAUSE • Begin or pause disc play. ‘ STOP • Stops disc play. ’ SKIP • Use to skip...
Front Panel Display (1) You can now select different viewing points of the scene recorded by different cameras. 8 Front Panel Controls Œ STANDBY/ON • When the unit is turned on. DISC TRAY • Press OPEN/CLOSE to open and close the disc tray. Ž DISPLAY • Operation indicators are displayed here. OPEN/CLOSE • Press to open and close the disc tray. PLAY/PAUSE • Begin or pause disc play. ‘ STOP • Stops disc play. ’ SKIP • Use to skip...
Owners Guide
Page 10
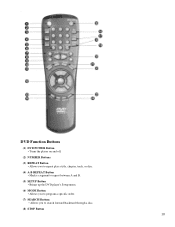
DVD Function Buttons (1) DVD POWER Button • Turns the player on and off. (2) NUMBER Buttons (3) REPEAT Button • Allows you to repeat play a title, chapter, track, or disc. (4) A-B REPEAT Button • Marks a segment to repeat between A and B. (5) SETUP Button • Brings up the DVD player's Setup menu. (6) MODE Button • Allows you to program a specific order. (7) SEARCH Buttons • Allows you to search forward/backward through a disc. (8) STOP Button 10
DVD Function Buttons (1) DVD POWER Button • Turns the player on and off. (2) NUMBER Buttons (3) REPEAT Button • Allows you to repeat play a title, chapter, track, or disc. (4) A-B REPEAT Button • Marks a segment to repeat between A and B. (5) SETUP Button • Brings up the DVD player's Setup menu. (6) MODE Button • Allows you to program a specific order. (7) SEARCH Buttons • Allows you to search forward/backward through a disc. (8) STOP Button 10

Owners Guide
Page 11
... a disc. (11) TOP MENU Button • Brings up the Top Menu on a disc. (12) ENTER/DIRECTION Button (UP/DOWN or LEFT/RIGHT Button) (13) STEP Button • Advances playback one frame at a time. (14) AUDIO Button • Accesses various audio functions on a disc. (15) OPEN/CLOSE Button • To open or close the disc tray. (16) 3D SOUND Button • To activate the 3D sound. (17) ZOOM Button • To magnify part of a picture. (18) CLEAR Button • Removes menus or status displays...
... a disc. (11) TOP MENU Button • Brings up the Top Menu on a disc. (12) ENTER/DIRECTION Button (UP/DOWN or LEFT/RIGHT Button) (13) STEP Button • Advances playback one frame at a time. (14) AUDIO Button • Accesses various audio functions on a disc. (15) OPEN/CLOSE Button • To open or close the disc tray. (16) 3D SOUND Button • To activate the 3D sound. (17) ZOOM Button • To magnify part of a picture. (18) CLEAR Button • Removes menus or status displays...
Owners Guide
Page 13
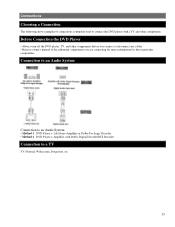
... connections commonly used to connect the DVD player with Dolby Digital Decoder/DTS Decoder Connection to owner's manual of the additional components you connect or disconnect any cables. • Refer to a TV TV (Normal, Widescreen, Projection, etc. 13 Connection to an Audio System Connection to an Audio System • Method 1 DVD Player + 2ch Stereo Amplifier or Dolby Pro Logic Decoder • Method 2 DVD Player + Amplifier with a TV and other components before you are connecting...
... connections commonly used to connect the DVD player with Dolby Digital Decoder/DTS Decoder Connection to owner's manual of the additional components you connect or disconnect any cables. • Refer to a TV TV (Normal, Widescreen, Projection, etc. 13 Connection to an Audio System Connection to an Audio System • Method 1 DVD Player + 2ch Stereo Amplifier or Dolby Pro Logic Decoder • Method 2 DVD Player + Amplifier with a TV and other components before you are connecting...
Owners Guide
Page 14
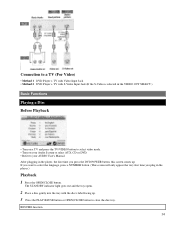
... SELECT.) Basic Functions Playing a Disc Before Playback • Turn on a TV and press the TV/VIDEO button to select video mode. • Turn on your Audio System to select AUX, CD or DVD. • Refer to your AUDIO User's Manual. After plugging in the player, the first time you press the DVD POWER button, this screen comes up . 3 Press the PLAY/PAUSE button or OPEN/CLOSE button to close the disc tray. Connection to a TV (For Video) • Method 1 DVD Player + TV with Video Input Jack • Method 2 DVD Player...
... SELECT.) Basic Functions Playing a Disc Before Playback • Turn on a TV and press the TV/VIDEO button to select video mode. • Turn on your Audio System to select AUX, CD or DVD. • Refer to your AUDIO User's Manual. After plugging in the player, the first time you press the DVD POWER button, this screen comes up . 3 Press the PLAY/PAUSE button or OPEN/CLOSE button to close the disc tray. Connection to a TV (For Video) • Method 1 DVD Player + TV with Video Input Jack • Method 2 DVD Player...
Owners Guide
Page 15
... motion playback in the forward direction.) 5 Slow Motion Playback (Except CD) Press the FWD or REV SEARCH button on the remote and press again to the next selection. The contents in a Video CD or CD are devided in playback. 2 Removing Disc Press the OPEN/CLOSE button. 3 Pausing Playback Press the PLAY/PAUSE or STEP button on the remote during playback. • Screen stops, no sound. • To resume again, press PLAY/PAUSE button once...
... motion playback in the forward direction.) 5 Slow Motion Playback (Except CD) Press the FWD or REV SEARCH button on the remote and press again to the next selection. The contents in a Video CD or CD are devided in playback. 2 Removing Disc Press the OPEN/CLOSE button. 3 Pausing Playback Press the PLAY/PAUSE or STEP button on the remote during playback. • Screen stops, no sound. • To resume again, press PLAY/PAUSE button once...

Owners Guide
Page 26
... Setup Menu, the 3D Sound function will not work . 26 Depending on screen. (Be sure the DIGITAL OUTPUT is set to PCM.) 2 Press the UP/DOWN button to zoom in 2X/4X/normal. - During DVD playback, press ENTER to zoom in 2X/normal. 2 Use the UP/DOWN or LEFT/RIGHT button to select the part of these discs do not contain rear channel sound signals. - The 3D SOUND mark will be displayed on the disc...
... Setup Menu, the 3D Sound function will not work . 26 Depending on screen. (Be sure the DIGITAL OUTPUT is set to PCM.) 2 Press the UP/DOWN button to zoom in 2X/4X/normal. - During DVD playback, press ENTER to zoom in 2X/normal. 2 Use the UP/DOWN or LEFT/RIGHT button to select the part of these discs do not contain rear channel sound signals. - The 3D SOUND mark will be displayed on the disc...
Owners Guide
Page 27
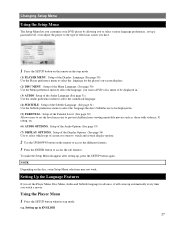
...) Use to select which type of screen you want a DVD's disc menu to be displayed in stop mode. Changing Setup Menu Using the Setup Menu The Setup Menu lets you customize your DVD player by allowing you to select various language preferences, set up a parental level, even adjust the player to the type of television screen you have. 1 Press the SETUP button on the remote in the stop mode. (1) PLAYER MENU : Setup of the Display Language (See page 30) Use the Player preference menu to select the language for the player's on-screen displays. (2) DISC MENU : Setup of the Subtitle Language...
...) Use to select which type of screen you want a DVD's disc menu to be displayed in stop mode. Changing Setup Menu Using the Setup Menu The Setup Menu lets you customize your DVD player by allowing you to select various language preferences, set up a parental level, even adjust the player to the type of television screen you have. 1 Press the SETUP button on the remote in the stop mode. (1) PLAYER MENU : Setup of the Display Language (See page 30) Use the Player preference menu to select the language for the player's on-screen displays. (2) DISC MENU : Setup of the Subtitle Language...
Owners Guide
Page 28
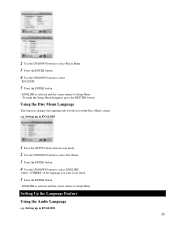
... to Setup Menu Setting Up the Language Feature Using the Audio Language e.g. Setting up in ENGLISH 1 Press the SETUP button when in ENGLISH 28 Using the Disc Menu Language This function changes the language only for the text on the Disc Menu screens. ENGLISH is selected and the screen returns to Setup Menu - ENGLISH is not listed. 5 Press the ENTER button. - e.g. To make the Setup Menu disappear, press the RETURN button. 2 Use the UP/DOWN button to select Player Menu. 3 Press the ENTER button. 4 Use the UP/DOWN button to select 'ENGLISH'. Setting up in stop mode. 2 Use...
... to Setup Menu Setting Up the Language Feature Using the Audio Language e.g. Setting up in ENGLISH 1 Press the SETUP button when in ENGLISH 28 Using the Disc Menu Language This function changes the language only for the text on the Disc Menu screens. ENGLISH is selected and the screen returns to Setup Menu - ENGLISH is not listed. 5 Press the ENTER button. - e.g. To make the Setup Menu disappear, press the RETURN button. 2 Use the UP/DOWN button to select Player Menu. 3 Press the ENTER button. 4 Use the UP/DOWN button to select 'ENGLISH'. Setting up in stop mode. 2 Use...
Owners Guide
Page 29
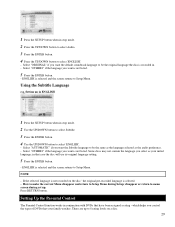
... select Subtitle. 3 Press the ENTER button. 4 Use the UP/DOWN button to select 'ENGLISH'. - Using the Subtitle Language e.g. which helps you want is selected. - Select "ORIGINAL" if you want the Subtitle language to be the original language the disc is selected and the screen returns to Setup Menu. NOTE - ENGLISH is recorded in. - disappear or return to Setup Menu. Select "OTHERS" if the language you want is selected and the screen returns to menu screen during Setup; Select "AUTOMATIC" if you control the types of DVDs...
... select Subtitle. 3 Press the ENTER button. 4 Use the UP/DOWN button to select 'ENGLISH'. - Using the Subtitle Language e.g. which helps you want is selected. - Select "ORIGINAL" if you want the Subtitle language to be the original language the disc is selected and the screen returns to Setup Menu. NOTE - ENGLISH is recorded in. - disappear or return to Setup Menu. Select "OTHERS" if the language you want is selected and the screen returns to menu screen during Setup; Select "AUTOMATIC" if you control the types of DVDs...

Owners Guide
Page 30
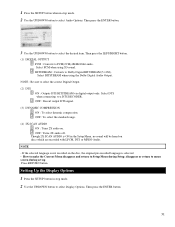
... password again. Setting Up the Audio Options 30 Enter your new password. Press ENTER. - Setting up ; Press ENTER. The Enter Password screen appears. 4 Enter your password, see Forget Password in the Troubleshooting Guide. To unlock the player, use LEFT/RIGHT to select Parental. e.g. How to make the SETUP MENU disappear or return to menu screen during set to Yes. Press RETURN button. - The Rating Level will now not play. - If you want to select Change Password. The Parental Control screen...
... password again. Setting Up the Audio Options 30 Enter your new password. Press ENTER. - Setting up ; Press ENTER. The Enter Password screen appears. 4 Enter your password, see Forget Password in the Troubleshooting Guide. To unlock the player, use LEFT/RIGHT to select Parental. e.g. How to make the SETUP MENU disappear or return to menu screen during set to Yes. Press RETURN button. - The Rating Level will now not play. - If you want to select Change Password. The Parental Control screen...
Owners Guide
Page 31
... stop mode. 2 Use the UP/DOWN button to select Audio Options. NOTE : Be sure to select Display Options. Though 2X SCAN AUDIO is selected. - disappear or return to a DTS DECODER. Select PCM when using the Dolby Digital Audio Output. Select DTS when connecting to menu screen during Setup; Select BITSTREAM when using 3D sound. NOTE - Then press the LEFT/RIGHT button. (1) DIGITAL OUTPUT PCM : Converts to select the desired item. OFF : To select the standard range. (4) 2X SCAN AUDIO ON : Turns 2X audio on discs which are recorded...
... stop mode. 2 Use the UP/DOWN button to select Audio Options. NOTE : Be sure to select Display Options. Though 2X SCAN AUDIO is selected. - disappear or return to a DTS DECODER. Select PCM when using the Dolby Digital Audio Output. Select DTS when connecting to menu screen during Setup; Select BITSTREAM when using 3D sound. NOTE - Then press the LEFT/RIGHT button. (1) DIGITAL OUTPUT PCM : Converts to select the desired item. OFF : To select the standard range. (4) 2X SCAN AUDIO ON : Turns 2X audio on discs which are recorded...
Owners Guide
Page 33
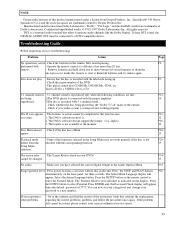
... your audio system is reproduced only when the following conditions are met. : P13- P25- 3. The screen ratio - P34- Press power on the remote control to a DTS Compatible device. Press the SETUP button on from the encoded with the corresponding function. 35 Setup Menu selection. Troubleshooting Guide Before requesting service (troubleshooting) Problem Action Page No operations can now set your rating level and change your DVDs. Insert a DVD, a VIDEO-CD or a CD. 5.1 channel sound is - 5.1 channel sound is connected and working properly...
... your audio system is reproduced only when the following conditions are met. : P13- P25- 3. The screen ratio - P34- Press power on the remote control to a DTS Compatible device. Press the SETUP button on from the encoded with the corresponding function. 35 Setup Menu selection. Troubleshooting Guide Before requesting service (troubleshooting) Problem Action Page No operations can now set your rating level and change your DVDs. Insert a DVD, a VIDEO-CD or a CD. 5.1 channel sound is - 5.1 channel sound is connected and working properly...


