

User Manual
Page 1
.... All other trademarks are the properties of these symbols are trademarks of this product, please read the "User's Manual - Projector CP-S240/CP-X250 User's Manual - Trademark acknowledgment • VGA and XGA are registered trademarks of International Business Machines Corporation. • Apple... to ensure the proper use of Video Electronics Standard Association. • Windows is subject to the pages written following this projector. WARNING This symbol indicates information that , if ignored, could possibly result in personal injury or physical damage due to incorrect...
.... All other trademarks are the properties of these symbols are trademarks of this product, please read the "User's Manual - Projector CP-S240/CP-X250 User's Manual - Trademark acknowledgment • VGA and XGA are registered trademarks of International Business Machines Corporation. • Apple... to ensure the proper use of Video Electronics Standard Association. • Windows is subject to the pages written following this projector. WARNING This symbol indicates information that , if ignored, could possibly result in personal injury or physical damage due to incorrect...

User Manual
Page 2
... Language, About contents of package 3 Go to advanced menu Fastening the lens cover 3 PICTURE Menu 27 Part names 4 Brightness, Contrast, Gamma, Projector 4 Color temp, Color, Tint, Sharpness, Control buttons 6 Progressive, My memory Remote control 6 IMAGE Menu 30 Setting up , MyScreen, MyScreen ... Language, Menu position, OSD bright., Blank, Start up 7 Arrangement 8 Aspect, Over scan, V. size, Auto adjust execute Adjusting the projector's elevator . . 9 INPUT Menu 32 Using the Security Bar 10 Color space, Component, Video format, Connecting your devices 11 Frame lock...
... Language, About contents of package 3 Go to advanced menu Fastening the lens cover 3 PICTURE Menu 27 Part names 4 Brightness, Contrast, Gamma, Projector 4 Color temp, Color, Tint, Sharpness, Control buttons 6 Progressive, My memory Remote control 6 IMAGE Menu 30 Setting up , MyScreen, MyScreen ... Language, Menu position, OSD bright., Blank, Start up 7 Arrangement 8 Aspect, Over scan, V. size, Auto adjust execute Adjusting the projector's elevator . . 9 INPUT Menu 32 Using the Security Bar 10 Color space, Component, Video format, Connecting your devices 11 Frame lock...

User Manual
Page 3
...the lens part. Fix the strap to the strap ring of the "User's Manual - Strap hole 3 Strap ring Strap Bottom side 1. Your projector should come with its many signal sources like PC, DVD and so on a screen. Use special caution for future reshipment. Fastening the lens ...cover, please fasten it where you a higher brightness image on . Push the rivet into the groove on the rivet. 3. Projector features / Preparations Projector features This projector is used to project various computer signals as well as bright and clean enough for use in low luminance rooms where low noise...
...the lens part. Fix the strap to the strap ring of the "User's Manual - Strap hole 3 Strap ring Strap Bottom side 1. Your projector should come with its many signal sources like PC, DVD and so on a screen. Use special caution for future reshipment. Fastening the lens ...cover, please fasten it where you a higher brightness image on . Push the rivet into the groove on the rivet. 3. Projector features / Preparations Projector features This projector is used to project various computer signals as well as bright and clean enough for use in low luminance rooms where low noise...

User Manual
Page 4
Part names Part names Projector Lamp cover (41) (Lamp unit is inside.) Zoom knob (19) Focus ring (19) Vent (7) Lens (17) Lens cover (3) ... intake vent are inside.) Bottom side WARNING ►During use or immediately after use, do not touch around the lamp and vents of the projector. () It could cause a burn. 4
Part names Part names Projector Lamp cover (41) (Lamp unit is inside.) Zoom knob (19) Focus ring (19) Vent (7) Lens (17) Lens cover (3) ... intake vent are inside.) Bottom side WARNING ►During use or immediately after use, do not touch around the lamp and vents of the projector. () It could cause a burn. 4

User Manual
Page 5
When this switch is pushed in, RGB OUT is selected. Under certain exceptional circumstances, the projector may not operate correctly and the microprocessor will need to a monitor, outputs the signal input via RGB IN1. When this switch is not pushed in... 5 In such a case, please push the Restart switch by an internal microprocessor. NOTE (*) About Restart switch: This projector is controlled by using a cocktail stick or similar, and before turning on again, make the projector cool down at least 10 minutes without operating. RGB OUT port: When connected to be reset. Only push...
When this switch is pushed in, RGB OUT is selected. Under certain exceptional circumstances, the projector may not operate correctly and the microprocessor will need to a monitor, outputs the signal input via RGB IN1. When this switch is not pushed in... 5 In such a case, please push the Restart switch by an internal microprocessor. NOTE (*) About Restart switch: This projector is controlled by using a cocktail stick or similar, and before turning on again, make the projector cool down at least 10 minutes without operating. RGB OUT port: When connected to be reset. Only push...

User Manual
Page 7
... 30 cm or more between the sides and other objects such as walls. • Do not place the projector on a metallic thing or anything weak in heat. • Do not place the projector on the projector. • Put nothing that gets wet. Put nothing on a carpet, cushion or bedding. • Do not... sunlight or near a hot object such as a heater. • Put nothing about lens and vents of the projector. This projector has some intake vents also on the bottom. ►Do not place the projector on an unstable, slant or vibrant surface such as a wobbly or inclined stand. • Do not place the...
... 30 cm or more between the sides and other objects such as walls. • Do not place the projector on a metallic thing or anything weak in heat. • Do not place the projector on the projector. • Put nothing that gets wet. Put nothing on a carpet, cushion or bedding. • Do not... sunlight or near a hot object such as a heater. • Put nothing about lens and vents of the projector. This projector has some intake vents also on the bottom. ►Do not place the projector on an unstable, slant or vibrant surface such as a wobbly or inclined stand. • Do not place the...
User Manual
Page 8
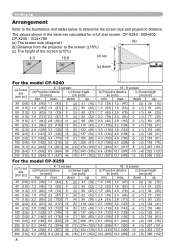
... (c) Screen height [m (inch)] [cm (inch)] min. The values shown in the table are calculated for a full size screen: CP-S240 : 800×600, CP-X250 : 1024×768 (a) The screen size (diagonal) (b) (b) Distance from the projector to determine the screen size and projection distance. Setting up Arrangement Refer to the illustrations and tables below...
... (c) Screen height [m (inch)] [cm (inch)] min. The values shown in the table are calculated for a full size screen: CP-S240 : 800×600, CP-X250 : 1024×768 (a) The screen size (diagonal) (b) (b) Distance from the projector to determine the screen size and projection distance. Setting up Arrangement Refer to the illustrations and tables below...

User Manual
Page 9
...which you can use the elevator feet to make adjustments if the surface on the both sides. 2. If necessary, you need to set the projector is 0 to the desired height and release the elevator buttons. Exceeding these range could cause malfunction, and could shorten the lifetime of projection.... When you otherwise need to adjust the elevator feet. ►Do not incline the projector rightward or leftward. You can also finely adjust the height of the elevator feet is uneven or if you release the elevator buttons,...
...which you can use the elevator feet to make adjustments if the surface on the both sides. 2. If necessary, you need to set the projector is 0 to the desired height and release the elevator buttons. Exceeding these range could cause malfunction, and could shorten the lifetime of projection.... When you otherwise need to adjust the elevator feet. ►Do not incline the projector rightward or leftward. You can also finely adjust the height of the elevator feet is uneven or if you release the elevator buttons,...

User Manual
Page 10
... wire can be used as shown in diameter can be attached as an extra theft prevention measure. Setting up to the security bar on the projector. 1. CAUTION ►The security bar is intended to prevent the...
... wire can be used as shown in diameter can be attached as an extra theft prevention measure. Setting up to the security bar on the projector. 1. CAUTION ►The security bar is intended to prevent the...

User Manual
Page 11
...computer, depending on the connectors and tighten. • Some computers may have a core only at one end, connect the core to the projector. ►Make sure that have multiple display screen modes. Please consult with VESA DDC 2B. Then the resolution will not be possible with ... an input, automatic adjustment function may take advantage of connection is attempted. • Please use the standard drivers in your computer as this projector is VESA DDC (display data channel) compatible. • Please take some time and may cause a certain picture degradation. For cables that ...
...computer, depending on the connectors and tighten. • Some computers may have a core only at one end, connect the core to the projector. ►Make sure that have multiple display screen modes. Please consult with VESA DDC 2B. Then the resolution will not be possible with ... an input, automatic adjustment function may take advantage of connection is attempted. • Please use the standard drivers in your computer as this projector is VESA DDC (display data channel) compatible. • Please take some time and may cause a certain picture degradation. For cables that ...

User Manual
Page 14
... connecting the power cord, as incorrect or faulty connections may result in fire and/or electrical shock. • Only use with the projector. AC inlet Connector of the projector. 2. Never attempt to the AC inlet of the power cord 1. If it is damaged, contact your dealer to newly get correct one...
... connecting the power cord, as incorrect or faulty connections may result in fire and/or electrical shock. • Only use with the projector. AC inlet Connector of the projector. 2. Never attempt to the AC inlet of the power cord 1. If it is damaged, contact your dealer to newly get correct one...

User Manual
Page 16
... the remote sensor). • Also a remote signal reflected in the screen etc. If it on wet objects. The remote control works with the projector's remote sensor. 30º 30º approx. 3 meters • The range of the remote sensor is difficult to send a remote signal to the... sensor directly, please try to use the reflected signal. • Since the remote control uses infrared light to send signals to the projector (Class1 LED), be sure to use the remote control in an area free from obstacles that could block the remote control's output signal to function...
... the remote sensor). • Also a remote signal reflected in the screen etc. If it on wet objects. The remote control works with the projector's remote sensor. 30º 30º approx. 3 meters • The range of the remote sensor is difficult to send a remote signal to the... sensor directly, please try to use the reflected signal. • Since the remote control uses infrared light to send signals to the projector (Class1 LED), be sure to use the remote control in an area free from obstacles that could block the remote control's output signal to function...

User Manual
Page 17
...ON position. will go off ? Attach the lens cover. (Blinking in green. Power off , and the POWER indicator will go off the projector later than the connected devices. Then wait several seconds because the buttons may not function for approximately 5 seconds. 2. Press the STANDBY/ON ...orange) POWER (Blinking in green. NOTE • Turn the power on/off ?" To display the picture, select an input signal according to the projector and the outlet. 2. Neglect could cause a burn. 1. Make sure that the power indicator lights in right order. STANDBY/ON button VIDEO RGB...
...ON position. will go off ? Attach the lens cover. (Blinking in green. Power off , and the POWER indicator will go off the projector later than the connected devices. Then wait several seconds because the buttons may not function for approximately 5 seconds. 2. Press the STANDBY/ON ...orange) POWER (Blinking in green. NOTE • Turn the power on/off ?" To display the picture, select an input signal according to the projector and the outlet. 2. Neglect could cause a burn. 1. Make sure that the power indicator lights in right order. STANDBY/ON button VIDEO RGB...

User Manual
Page 18
...MENU PAGE UP VOLUME OFF ENDENTEPARGE DOWN MUTE FERSECEZE KEYRSTEOSNEET POSITION MENU Selecting an input signal 1. Each time you press the button, the projector switches its RGB VIDEO RGB SEARCH input port as an RGB out port (the POSITION RGB IN MENU OUT switch is pushed in ...RENGTER B2/ RGB OUT RGB OUT" message will automatically disappear after a few seconds. If no input is detected at the port, the projector will check the RGB IN1 port first. A dialog will be displayed. Press the RGB button on the remote control. Operating Operating Adjusting the...
...MENU PAGE UP VOLUME OFF ENDENTEPARGE DOWN MUTE FERSECEZE KEYRSTEOSNEET POSITION MENU Selecting an input signal 1. Each time you press the button, the projector switches its RGB VIDEO RGB SEARCH input port as an RGB out port (the POSITION RGB IN MENU OUT switch is pushed in ...RENGTER B2/ RGB OUT RGB OUT" message will automatically disappear after a few seconds. If no input is detected at the port, the projector will check the RGB IN1 port first. A dialog will be displayed. Press the RGB button on the remote control. Operating Operating Adjusting the...

User Manual
Page 19
... ASPECT AUTO BLANK find any input signals. Press the SEARCH button on the remote control. ESC RESET Each time you press the button, the projector switches its input ports in turn. For an RGB signal NORMAL 4:3 16:9 VIDEO RGB SEARCH For a video signal... only 16:9 mode can be selected. Press the VIDEO button on the remote control to VIDEO signals) when TURN ON is found , the projector will check the COMPONENT VIDEO port first. COMPONENT VIDEO S-VIDEO VIDEO VIDEO RGB SEARCH ASPECT AUTO BLANK MAGNIFY ON ...
... ASPECT AUTO BLANK find any input signals. Press the SEARCH button on the remote control. ESC RESET Each time you press the button, the projector switches its input ports in turn. For an RGB signal NORMAL 4:3 16:9 VIDEO RGB SEARCH For a video signal... only 16:9 mode can be selected. Press the VIDEO button on the remote control to VIDEO signals) when TURN ON is found , the projector will check the COMPONENT VIDEO port first. COMPONENT VIDEO S-VIDEO VIDEO VIDEO RGB SEARCH ASPECT AUTO BLANK MAGNIFY ON ...

User Manual
Page 21
... zoom adjustment is changed , or when the display condition is set to move the area. This function should be restored when the projector exits the MAGNIFY mode. 21 Using the magnify feature 1. The "MAGNIFY" indication will appear on the remote control. ESC RESET ● The... mode when the input signal is changed . ● Although in several seconds with MAGNIFY ON HOME PAGE UP VOLUME no operation), and the projector will vary among inputs. MAGNIFY ON HOME PAGE UP VOLUME OFF END PAGE DOWN MUTE FREEZE KEYSTONE POSITION MENU ENTER ● The adjustable range ...
... zoom adjustment is changed , or when the display condition is set to move the area. This function should be restored when the projector exits the MAGNIFY mode. 21 Using the magnify feature 1. The "MAGNIFY" indication will appear on the remote control. ESC RESET ● The... mode when the input signal is changed . ● Although in several seconds with MAGNIFY ON HOME PAGE UP VOLUME no operation), and the projector will vary among inputs. MAGNIFY ON HOME PAGE UP VOLUME OFF END PAGE DOWN MUTE FREEZE KEYSTONE POSITION MENU ENTER ● The adjustable range ...

User Manual
Page 22
... BLANK button on the remote control. Please refer to the input signal screen when the input signal is changed, or when one of the projector's buttons or the remote control bENTuERttons of STANDBY/ON, SEARCH, RGB, VIDEO, BLANK, AUTO, ASPECESCT, VOLURMESETE, MUTE, KEYSTONE, POSITION and... MENU is pressed. POSITION MENU ENTER ESC RESET 22 FREEZE KEYSTONE ● The projector automatically returns to the BLANK item in the FREEZE mode for long time, the LCD panel might possibly be printed. Do not leave the...
... BLANK button on the remote control. Please refer to the input signal screen when the input signal is changed, or when one of the projector's buttons or the remote control bENTuERttons of STANDBY/ON, SEARCH, RGB, VIDEO, BLANK, AUTO, ASPECESCT, VOLURMESETE, MUTE, KEYSTONE, POSITION and... MENU is pressed. POSITION MENU ENTER ESC RESET 22 FREEZE KEYSTONE ● The projector automatically returns to the BLANK item in the FREEZE mode for long time, the LCD panel might possibly be printed. Do not leave the...

User Manual
Page 23
... does not have the needed utility program. In addition, the mouse may not be used only for trapezoidal distortion, zooming in pointing device (e.g. Connect the projector's USB port to control notebook PC, and other computers with built-in on the computer's configurations and mouse drivers. • The USB control...
... does not have the needed utility program. In addition, the mouse may not be used only for trapezoidal distortion, zooming in pointing device (e.g. Connect the projector's USB port to control notebook PC, and other computers with built-in on the computer's configurations and mouse drivers. • The USB control...

User Manual
Page 24
... an item. Use the cursor buttons ▲/▼ to operate the item. The basic operations of the cursor buttons on the projector. MENU [RGB] :SELECT PICTURE IMAGE INPUT SETUP SCREEN OPTION EASY MENU BRIGHTNESS +0 CONTRAST +0 GAMMA DEFAULT 1 COLOR ...When you don't do anything, the dialog will appear. Multifunctional settings Multifunctional settings Using the menu function VIDEO RGB SEARCH This projector has the following menus: PICTURE, IMAGE, INPUT, ASPECT SETUP, AUTO BLANK SCREEN, OPTION, and EASY MENU. Press the ...
... an item. Use the cursor buttons ▲/▼ to operate the item. The basic operations of the cursor buttons on the projector. MENU [RGB] :SELECT PICTURE IMAGE INPUT SETUP SCREEN OPTION EASY MENU BRIGHTNESS +0 CONTRAST +0 GAMMA DEFAULT 1 COLOR ...When you don't do anything, the dialog will appear. Multifunctional settings Multifunctional settings Using the menu function VIDEO RGB SEARCH This projector has the following menus: PICTURE, IMAGE, INPUT, ASPECT SETUP, AUTO BLANK SCREEN, OPTION, and EASY MENU. Press the ...

User Manual
Page 25
... ratio. See the COLOR item in the PICTURE menu. • When this function is not a malfunction. Using the buttons ◄/► turns off/on the projector or remote control. Please refer to the GAMMA (27) and COLOR TEMP (28) items in the PICTURE menu (28). See the item...
... ratio. See the COLOR item in the PICTURE menu. • When this function is not a malfunction. Using the buttons ◄/► turns off/on the projector or remote control. Please refer to the GAMMA (27) and COLOR TEMP (28) items in the PICTURE menu (28). See the item...


