Service Manual
Page 1
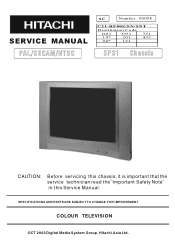
SERVICE MANUAL PAL/SECAM/NTSC SC Number : 0009E C21-RF80S/SN/SNT Destination Code O81 O51 751 19* 201 433 98* 121 3P31 Chassis CAUTION: Before servicing this chassis, it is important that the service technician read the" Important Safety Note" in this Service Manual. SPECIFICATIONS AND PARTS ARE SUBJECT TO CHANGE FOR IMPROVEMENT COLOUR TELEVISION OCT 2003 Digital Media System Group, Hitachi Asia Ltd.
SERVICE MANUAL PAL/SECAM/NTSC SC Number : 0009E C21-RF80S/SN/SNT Destination Code O81 O51 751 19* 201 433 98* 121 3P31 Chassis CAUTION: Before servicing this chassis, it is important that the service technician read the" Important Safety Note" in this Service Manual. SPECIFICATIONS AND PARTS ARE SUBJECT TO CHANGE FOR IMPROVEMENT COLOUR TELEVISION OCT 2003 Digital Media System Group, Hitachi Asia Ltd.
Service Manual
Page 16
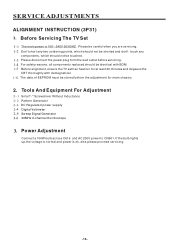
Screwdriver Without Inductance Pattern Generator DC Regulated power supply Digital Voltmeter Sweep Signal Generator 20MHz 2-channel Oscilloscope Power Adjustment Connect a 100W bulb across C616 and AC 200V power to CN601. Don t short any two soldering points, which should not be shorted and don t touch any components, which should be touched. For safety reasons, all components replaced should not be identical with demagnetizer. Please...
Screwdriver Without Inductance Pattern Generator DC Regulated power supply Digital Voltmeter Sweep Signal Generator 20MHz 2-channel Oscilloscope Power Adjustment Connect a 100W bulb across C616 and AC 200V power to CN601. Don t short any two soldering points, which should not be shorted and don t touch any components, which should be touched. For safety reasons, all components replaced should not be identical with demagnetizer. Please...
Service Manual
Page 17
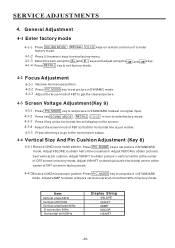
... factory mode. keys. Vertical Size And Pin Cushion Adjustment (Key 8) Receive 50HZ cross hatch pattern. Adjust VSLOPE to obtain half of CRT screen in factory mode. Adjust VAMP to enter factory menu. Screen Voltage Adjustment(Key 9) Press PIC. SERVICE ADJUSTMENTS General Adjustment Enter factory mode Press SOUND MODE , RECALL , CH I /II in turn to enter factory mode. Press 0-9 numeric keys to obtain picture s vertical overscan more than 90% in STANDARD mode. Adjust HSHIFT to set picture in factory mode. Select the item using...
... factory mode. keys. Vertical Size And Pin Cushion Adjustment (Key 8) Receive 50HZ cross hatch pattern. Adjust VSLOPE to obtain half of CRT screen in factory mode. Adjust VAMP to enter factory menu. Screen Voltage Adjustment(Key 9) Press PIC. SERVICE ADJUSTMENTS General Adjustment Enter factory mode Press SOUND MODE , RECALL , CH I /II in turn to enter factory mode. Press 0-9 numeric keys to obtain picture s vertical overscan more than 90% in STANDARD mode. Adjust HSHIFT to set picture in factory mode. Select the item using...
Service Manual
Page 18
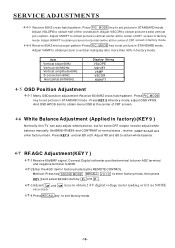
... key to obtain picture s best vertical pin cushion. SERVICE ADJUSTMENTS Receive 60HZ cross hatch pattern. Press PIC. White Balance Adjustment (Applied in factory mode. Enter the AGC item in factory mode. MODE key to obtain menu OSD at the center of CRT screen in factory mode by P+ and P - . Adjust VSCOR to exit factory mode. -18- RF.AGC Adjustment(KEY 7 ) Receive 60dB RF signal. Connect Digital voltmeter positive terminal to tuner AGC terminal and...
... key to obtain picture s best vertical pin cushion. SERVICE ADJUSTMENTS Receive 60HZ cross hatch pattern. Press PIC. White Balance Adjustment (Applied in factory mode. Enter the AGC item in factory mode. MODE key to obtain menu OSD at the center of CRT screen in factory mode by P+ and P - . Adjust VSCOR to exit factory mode. -18- RF.AGC Adjustment(KEY 7 ) Receive 60dB RF signal. Connect Digital voltmeter positive terminal to tuner AGC terminal and...
Service Manual
Page 19
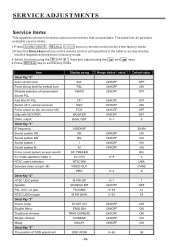
keys. -19- The table lists all possible available service items. 1.Press SOUND MODE , RECALL , CH I/II keys on remote control unit to enter factory mode. 2.Press the Direct key buttons on the remote control unit specified in the table to access directly into the respective items when in factory mode. 3.Select the item using the + and 4.Press RECALL key to exit factory mode. keys and adjust using the P+ and P - SERVICE ADJUSTMENTS Service items This appendix shows information about service items that are available.
keys. -19- The table lists all possible available service items. 1.Press SOUND MODE , RECALL , CH I/II keys on remote control unit to enter factory mode. 2.Press the Direct key buttons on the remote control unit specified in the table to access directly into the respective items when in factory mode. 3.Select the item using the + and 4.Press RECALL key to exit factory mode. keys and adjust using the P+ and P - SERVICE ADJUSTMENTS Service items This appendix shows information about service items that are available.

Service Manual
Page 23
... pure white signal in AV status and press PIC.MODE key to set picture in DYNAMIC mode. (3) Loosen the clamp screw of the deflection yoke and pull the deflection yoke towards the purity magnet. (4) Adjust purity magnet to make the green area at the center of the screen by rotating(RB) static convergence magnets. (3) Align Red/Blue with green dots at...
... pure white signal in AV status and press PIC.MODE key to set picture in DYNAMIC mode. (3) Loosen the clamp screw of the deflection yoke and pull the deflection yoke towards the purity magnet. (4) Adjust purity magnet to make the green area at the center of the screen by rotating(RB) static convergence magnets. (3) Align Red/Blue with green dots at...
Service Manual
Page 25
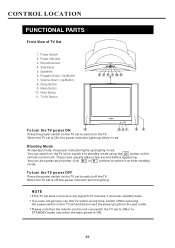
Power Indicator 3. Sleep Button 9. Mute Button 11. Side Panel 5. Speakers 6. Program Down / Up Button 7. Menu Button 10. When the TV set to ON or to STANDBY mode only when the main power is ON. -25- To turn the TV power ON 5 3 21 Press the power switch on the TV set using the button on the TV set or switch it will not light up brightly in red. Please note that the remote control unit can switch the TV set is off the set to...
Power Indicator 3. Sleep Button 9. Mute Button 11. Side Panel 5. Speakers 6. Program Down / Up Button 7. Menu Button 10. When the TV set to ON or to STANDBY mode only when the main power is ON. -25- To turn the TV power ON 5 3 21 Press the power switch on the TV set using the button on the TV set or switch it will not light up brightly in red. Please note that the remote control unit can switch the TV set is off the set to...
Service Manual
Page 26
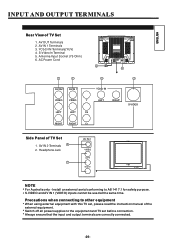
... Australia only - Switch off all power supplies to AS 1417.1 for safety purpose. Always ensure that the input and output terminals are correctly connected. -26- AC Power Cord 1 2 AV OUT AV IN 1 6 3 YCbCr IN 5 4 VIDEO VIDEO Y LEFT LEFT Cb LEFT RIGHT S-VIDEO RIGHT RIGHT Cr Side Panel of TV Set 1. Install an external aerial conforming to the equipment and TV set , please read the instruction manual of the...
... Australia only - Switch off all power supplies to AS 1417.1 for safety purpose. Always ensure that the input and output terminals are correctly connected. -26- AC Power Cord 1 2 AV OUT AV IN 1 6 3 YCbCr IN 5 4 VIDEO VIDEO Y LEFT LEFT Cb LEFT RIGHT S-VIDEO RIGHT RIGHT Cr Side Panel of TV Set 1. Install an external aerial conforming to the equipment and TV set , please read the instruction manual of the...
Service Manual
Page 27
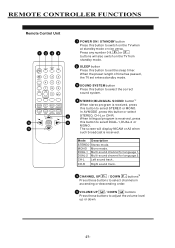
... versa. buttons*2 Press these buttons to select channels in ascending or descending order. 6 VOLUME UP + / DOWN buttons Press these buttons to select STEREO or MONO. U.N.L SETUP TUNE HOLD SUBPAGE TV/TEXT MIX CLOCK GAME LST-CH TYPE SUBTITLE CANCEL P 5 6 MENU 6 INDEX 5 P CLE-9XX 1 POWER ON / STANDBY button Press this button to switch on the TV from standby mode. 2 SLEEP button Press this button to set enters standby mode. 3 SOUND SYSTEM button Press this button to select DUAL...
... versa. buttons*2 Press these buttons to select channels in ascending or descending order. 6 VOLUME UP + / DOWN buttons Press these buttons to select STEREO or MONO. U.N.L SETUP TUNE HOLD SUBPAGE TV/TEXT MIX CLOCK GAME LST-CH TYPE SUBTITLE CANCEL P 5 6 MENU 6 INDEX 5 P CLE-9XX 1 POWER ON / STANDBY button Press this button to switch on the TV from standby mode. 2 SLEEP button Press this button to set enters standby mode. 3 SOUND SYSTEM button Press this button to select DUAL...
Service Manual
Page 28
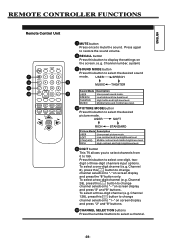
... RECALL button Press this --/--- Channel number, system) SOUND SLEEP SYS. To select a one -digit, twodigit or three-digit channels input options. button to change channel selection to "-" on screen display and press "2" and "8" buttons. button to change channel selection to "1--" on the screen. (e.g. MODE TV/AV 10 0 --/--- 11 Sound Mode Description USER User preset sound mode. CH I/II 9 SOUND MODE button Press this button to "--" on screen display and press the "8" button only. To select a three-digit channel (e.g. USER SOFT MENU INDEX P RICH STANDARD Picture Mode...
... RECALL button Press this --/--- Channel number, system) SOUND SLEEP SYS. To select a one -digit, twodigit or three-digit channels input options. button to change channel selection to "-" on screen display and press "2" and "8" buttons. button to change channel selection to "1--" on the screen. (e.g. MODE TV/AV 10 0 --/--- 11 Sound Mode Description USER User preset sound mode. CH I/II 9 SOUND MODE button Press this button to "--" on screen display and press the "8" button only. To select a three-digit channel (e.g. USER SOFT MENU INDEX P RICH STANDARD Picture Mode...
Service Manual
Page 29
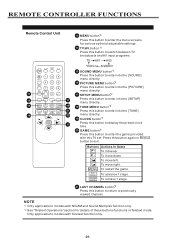
.... REMOTE CONTROLLER FUNCTIONS Remote Control Unit SOUND SLEEP SYS. To retrieve 1 stage. 21 LAST CHANNEL button*2 Press this button to enter the game provided with NICAM and Sound Multiplex function only. *2 See "Teletext Operations" section for various optional adjustable settings. 14 TV/AV button *2 Press this button to switch between TV broadcasts and AV input programs. TV AV1 AV2 YCbCr S-VIDEO 15 SOUND MENU button*2 Press this button to enter into the [SOUND] menu directly. 16 PICTURE MENU button*2 Press...
.... REMOTE CONTROLLER FUNCTIONS Remote Control Unit SOUND SLEEP SYS. To retrieve 1 stage. 21 LAST CHANNEL button*2 Press this button to enter the game provided with NICAM and Sound Multiplex function only. *2 See "Teletext Operations" section for various optional adjustable settings. 14 TV/AV button *2 Press this button to switch between TV broadcasts and AV input programs. TV AV1 AV2 YCbCr S-VIDEO 15 SOUND MENU button*2 Press this button to enter into the [SOUND] menu directly. 16 PICTURE MENU button*2 Press...
Service Manual
Page 30
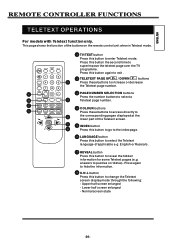
... the Teletext screen. SETUP TUNE REVEAL U.N.L HOLD SUBPAGE 4 COLOUR buttons 1 TV/TEXT CLOCK GAME LST-CH MIX TYPE SUBTITLE CANCEL P 2 Press these buttons to puzzles or riddles). CH I/II Press this button to enter Teletext mode. LANG. 3 PAGE NUMBER SELECTION buttons Press the number buttons to the corresponding pages displayed at the lower part of the buttons on the remote control unit when in Teletext mode. 1 TV/TEXT button SOUND SLEEP...
... the Teletext screen. SETUP TUNE REVEAL U.N.L HOLD SUBPAGE 4 COLOUR buttons 1 TV/TEXT CLOCK GAME LST-CH MIX TYPE SUBTITLE CANCEL P 2 Press these buttons to puzzles or riddles). CH I/II Press this button to enter Teletext mode. LANG. 3 PAGE NUMBER SELECTION buttons Press the number buttons to the corresponding pages displayed at the lower part of the buttons on the remote control unit when in Teletext mode. 1 TV/TEXT button SOUND SLEEP...
Service Manual
Page 31
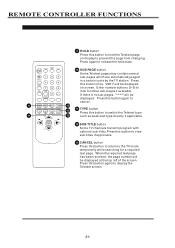
... 456 SOUND MODE 789 PIC. LANG. Press this button to view sub-titles if applicable. MENU INDEX P 12 SUB TITLE button Some TV channels transmit program with optional sub-titles.Press this button again to cancel. 9 SOUND PIC. Enter number buttons (0-9) to prevent the page from changing. If there is no sub-pages, "****" will be displayed at the top left of the screen. SETUP TUNE 10...
... 456 SOUND MODE 789 PIC. LANG. Press this button to view sub-titles if applicable. MENU INDEX P 12 SUB TITLE button Some TV channels transmit program with optional sub-titles.Press this button again to cancel. 9 SOUND PIC. Enter number buttons (0-9) to prevent the page from changing. If there is no sub-pages, "****" will be displayed at the top left of the screen. SETUP TUNE 10...
Service Manual
Page 32
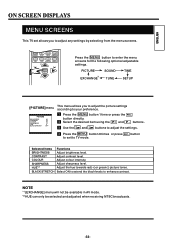
... TUNE SETUP CLE-9XX This menu allows you to adjust the picture settings [PICTURE]menu according to enter the menu screens for the following optional adjustable settings. Selected Items Functions BRIGHTNESS Adjust brightness level. CH I/II 123 RECALL MENU4 S5CR6 EENS SOUND MODE 789 PIC. button directly. 2 Select the desired item using the P+ and P - Adjust the hue towards red(+)or green(-) picture tones. BLACK STRETCH Select ON to extend the black levels to TV mode. MODE AV/TV This TV set allows0you--/-t--o adjust...
... TUNE SETUP CLE-9XX This menu allows you to adjust the picture settings [PICTURE]menu according to enter the menu screens for the following optional adjustable settings. Selected Items Functions BRIGHTNESS Adjust brightness level. CH I/II 123 RECALL MENU4 S5CR6 EENS SOUND MODE 789 PIC. button directly. 2 Select the desired item using the P+ and P - Adjust the hue towards red(+)or green(-) picture tones. BLACK STRETCH Select ON to extend the black levels to TV mode. MODE AV/TV This TV set allows0you--/-t--o adjust...

Service Manual
Page 33
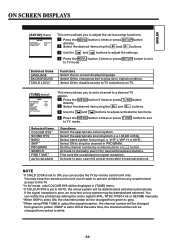
... the MENU button 2 times or press SOUND button directly. 2 Select the desired item using the P+ and P - Set the channel number for ON TIME activation. SURROUND Select ON to REMIND PROG channel. Set the clock time to switch on the TV set or a power failure occurs, the timer will only be reset. -33- Hour , minute ,channel number) using the P+ and P - Set the clock time to change to enjoy surround sound effect. [TIME] menu *1 TIME CLOCK --:-- Set the channel number...
... the MENU button 2 times or press SOUND button directly. 2 Select the desired item using the P+ and P - Set the channel number for ON TIME activation. SURROUND Select ON to REMIND PROG channel. Set the clock time to switch on the TV set or a power failure occurs, the timer will only be reset. -33- Hour , minute ,channel number) using the P+ and P - Set the clock time to change to enjoy surround sound effect. [TIME] menu *1 TIME CLOCK --:-- Set the channel number...
Service Manual
Page 34
... manually search for tuning (i.e. Set the channel number by remote control unit only. Fine tune the unsatisfactory signal reception. ON SCREEN DISPLAYS [SETUP] menu SETUP LANGUAGE BACKGROUND CHILD LOCK ENGLISH OFF OFF This menu allows you to set a channel to a desired TV station. 1 Press the MENU button 5 times or press TUNE button directly. 2 Select the desired item using the P+ and P - Select ON to change screen to blue at the same time, the channel number will be changed from any unauthorized access to adjust...
... manually search for tuning (i.e. Set the channel number by remote control unit only. Fine tune the unsatisfactory signal reception. ON SCREEN DISPLAYS [SETUP] menu SETUP LANGUAGE BACKGROUND CHILD LOCK ENGLISH OFF OFF This menu allows you to set a channel to a desired TV station. 1 Press the MENU button 5 times or press TUNE button directly. 2 Select the desired item using the P+ and P - Select ON to change screen to blue at the same time, the channel number will be changed from any unauthorized access to adjust...
Service Manual
Page 35
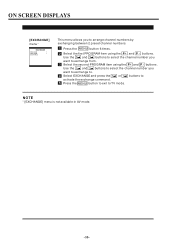
... command. 5 Press the MENU button to exit to TV mode. NOTE *1 [EXCHANGE] menu is not available in AV mode. -35- buttons. Use the + and buttons to select the channel number you want to exchange from. 3 Select the second PROGRAM item using the P+ and P - ON SCREEN DISPLAYS [EXCHANGE] menu *1 EXCHANGE PROGRAM 1 PROGRAM 1 EXCHANGE This menu allows you to arrange channel numbers by exchanging between 2 preset channel numbers. 1 Press the MENU button 6 times. 2 Select the first PROGRAM item using the P+ and...
... command. 5 Press the MENU button to exit to TV mode. NOTE *1 [EXCHANGE] menu is not available in AV mode. -35- buttons. Use the + and buttons to select the channel number you want to exchange from. 3 Select the second PROGRAM item using the P+ and P - ON SCREEN DISPLAYS [EXCHANGE] menu *1 EXCHANGE PROGRAM 1 PROGRAM 1 EXCHANGE This menu allows you to arrange channel numbers by exchanging between 2 preset channel numbers. 1 Press the MENU button 6 times. 2 Select the first PROGRAM item using the P+ and...
Service Manual
Page 49
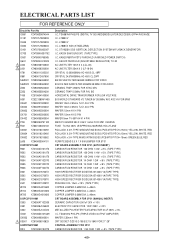
...-YDTU FAIRCHILD (FAIRCHILD POWER SWITCH) I .C. L=40mm CRT BOARD ASSEMBLY FOR 3P31 (MANUAL INSERT) CERAMIC CAPACITOR 0.001uF 2KV +/-10% ELECTROLYTIC CAPA CITOR 10UF 250V +/-20% METALLIZED POLYESTER FILM CAPACITOR 0.1uF 250V +/-5% I .C. L7805CV I .C. KA33V SAM SUNG (VT) (TAPE TYPE) I .C. TDA6107Q PHILIPS (TRIPLE VIDEO OUTPUT AMPLIFIER) WAFER 2.35mm 1 PIN CRT SOCKET G ZS10-2-108 E/E 15-18KV FOR 21"-29" CONTROL ASSEMBLY FOR 3P31...
...-YDTU FAIRCHILD (FAIRCHILD POWER SWITCH) I .C. L=40mm CRT BOARD ASSEMBLY FOR 3P31 (MANUAL INSERT) CERAMIC CAPACITOR 0.001uF 2KV +/-10% ELECTROLYTIC CAPA CITOR 10UF 250V +/-20% METALLIZED POLYESTER FILM CAPACITOR 0.1uF 250V +/-5% I .C. L7805CV I .C. KA33V SAM SUNG (VT) (TAPE TYPE) I .C. TDA6107Q PHILIPS (TRIPLE VIDEO OUTPUT AMPLIFIER) WAFER 2.35mm 1 PIN CRT SOCKET G ZS10-2-108 E/E 15-18KV FOR 21"-29" CONTROL ASSEMBLY FOR 3P31...
Service Manual
Page 51
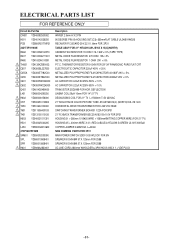
... L451 YZ480004290200 ! CRT YZ500351010B02 ! L=40mm NON COMMON PARTS FOR 3P31 MAIN POWER SWITCH SDDF-3-03 W/LOCK FOR 5N SPEAKER 8 OHM 8W 57 X 125mm FOR 2588 SPEAKER 8 OHM 8W 57 X 125mm FOR 2588 AC LINE CORD 2800mm W/HOLDER & 3PIN HOUS ING X 1 + VDE PLUG -51- H602 YZ480008156000 ! C455A YZ4300ET182C00 ! C455 YZ4300ET822C00 ! ELECTRICAL PARTS LIST FOR REFERENCE ONLY Circuit No Part No CN001 YZ540092500002...
... L451 YZ480004290200 ! CRT YZ500351010B02 ! L=40mm NON COMMON PARTS FOR 3P31 MAIN POWER SWITCH SDDF-3-03 W/LOCK FOR 5N SPEAKER 8 OHM 8W 57 X 125mm FOR 2588 SPEAKER 8 OHM 8W 57 X 125mm FOR 2588 AC LINE CORD 2800mm W/HOLDER & 3PIN HOUS ING X 1 + VDE PLUG -51- H602 YZ480008156000 ! C455A YZ4300ET182C00 ! C455 YZ4300ET822C00 ! ELECTRICAL PARTS LIST FOR REFERENCE ONLY Circuit No Part No CN001 YZ540092500002...

Service Manual
Page 53
COVER FOR TUNER 1 INLAY (G) - JACK PLATE RCA/IN/OUT + YUV+S (3P31) ENG 2 BA 3 X 8 3 KA 2.6 X 8 (BLACK) PRINTING PARTS 1 CARTON BOX (C21-RF80) ENG 1 BACK LABEL (C21-RF80) ENG 3 QC PASSED LABEL (WHITE) 1 QC PASSED LABEL (GOLD) 2 SERIAL NO.LABEL 1 INSTRUCTION BOOKLET "HITACHI" 3P31 RC09ENG 1 NAME PLATE - MECHANICAL PARTS LIST FOR REFERENCE ONLY Part No YZ2802030508M2 YZ290101603200 YZ290102303500 OP0021N61000 YZ120482590001 YZ120521990007 YZ26BA030080N0 YZ26KA026080B0 PP0021N61000 YZ010021N61002 YZ060121N6100C YZ60220021800 YZ60220121800...
COVER FOR TUNER 1 INLAY (G) - JACK PLATE RCA/IN/OUT + YUV+S (3P31) ENG 2 BA 3 X 8 3 KA 2.6 X 8 (BLACK) PRINTING PARTS 1 CARTON BOX (C21-RF80) ENG 1 BACK LABEL (C21-RF80) ENG 3 QC PASSED LABEL (WHITE) 1 QC PASSED LABEL (GOLD) 2 SERIAL NO.LABEL 1 INSTRUCTION BOOKLET "HITACHI" 3P31 RC09ENG 1 NAME PLATE - MECHANICAL PARTS LIST FOR REFERENCE ONLY Part No YZ2802030508M2 YZ290101603200 YZ290102303500 OP0021N61000 YZ120482590001 YZ120521990007 YZ26BA030080N0 YZ26KA026080B0 PP0021N61000 YZ010021N61002 YZ060121N6100C YZ60220021800 YZ60220121800...


