Instruction Manual
Page 3
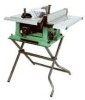
... ......... 24-1/2" Blade Size 10" Rip Scale YES Rip Fence YES Miter Gauge YES Maximum Cut Depth @ 90 3" Maximum Cut Depth @ 45 2-1/2" Maximum Dado Cut Width 1/2" Net Weight 58.3 LBS WARNING To avoid electrical hazards, fire hazards or damage to you read and understand these safety rules. This table saw , use proper circuit...
... ......... 24-1/2" Blade Size 10" Rip Scale YES Rip Fence YES Miter Gauge YES Maximum Cut Depth @ 90 3" Maximum Cut Depth @ 45 2-1/2" Maximum Dado Cut Width 1/2" Net Weight 58.3 LBS WARNING To avoid electrical hazards, fire hazards or damage to you read and understand these safety rules. This table saw , use proper circuit...
Instruction Manual
Page 4
... in compliance with adequate dust removal. 24. They ARE NOT safety glasses. Consult the Operator's Manual for which it is not designed. 10. LEARN the tool's applications, limitations and possible hazards. 2. The use power tools in the presence of improper accessories may cause injury to... alert and understanding how to do not plug in some cases, a fire hazard. DISCONNECT TOOLS before the blade comes to the table saw , it is critical that may affect its safe operation. MAKE WORKSHOP CHILDPROOF with this symbol that could cause serious injury when they break....
... in compliance with adequate dust removal. 24. They ARE NOT safety glasses. Consult the Operator's Manual for which it is not designed. 10. LEARN the tool's applications, limitations and possible hazards. 2. The use power tools in the presence of improper accessories may cause injury to... alert and understanding how to do not plug in some cases, a fire hazard. DISCONNECT TOOLS before the blade comes to the table saw , it is critical that may affect its safe operation. MAKE WORKSHOP CHILDPROOF with this symbol that could cause serious injury when they break....
Instruction Manual
Page 5
... in line with this Operator's Manual entitled ASSEMBLY AND ADJUSTMENTS (Page 11). English TABLE SAW SAFETY 1. Refer to a complete stop. 10. Failure to the dust port for every through-sawing operation. Keep your body in place, aligned and functioning. ALWAYS USE SAW BLADE GUARD, splitter and anti-kickback pawls for additional sawdust removal. 19. Solvents...
... in line with this Operator's Manual entitled ASSEMBLY AND ADJUSTMENTS (Page 11). English TABLE SAW SAFETY 1. Refer to a complete stop. 10. Failure to the dust port for every through-sawing operation. Keep your body in place, aligned and functioning. ALWAYS USE SAW BLADE GUARD, splitter and anti-kickback pawls for additional sawdust removal. 19. Solvents...
Instruction Manual
Page 6
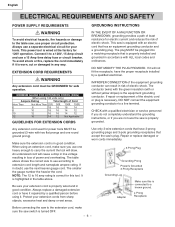
.... This saw switch is necessary, DO NOT connect the equipment grounding conductor to a live terminal. When using 120 volts only) Ampere Rating Total length of Cord More Than Not More Than 25ft. 50ft. 100ft. 150ft. 0 6 18 16 16 14 6 10 18 16 14 12 10 12 16... of electric shock. English ELECTRICAL REQUIREMENTS AND SAFETY POWER SUPPLY REQUIREMENTS WARNING To avoid electrical hazards, fire hazards or damage to the table saw 's plug. Always use proper circuit protection. This power tool is the equipment grounding conductor. The conductor (wire) with the green insulation ...
.... This saw switch is necessary, DO NOT connect the equipment grounding conductor to a live terminal. When using 120 volts only) Ampere Rating Total length of Cord More Than Not More Than 25ft. 50ft. 100ft. 150ft. 0 6 18 16 16 14 6 10 18 16 14 12 10 12 16... of electric shock. English ELECTRICAL REQUIREMENTS AND SAFETY POWER SUPPLY REQUIREMENTS WARNING To avoid electrical hazards, fire hazards or damage to the table saw 's plug. Always use proper circuit protection. This power tool is the equipment grounding conductor. The conductor (wire) with the green insulation ...
Instruction Manual
Page 10
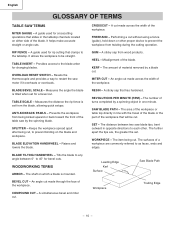
...miter cut made across the width of material removed by a blade cut without using a fence (guide), hold down or other . Workpiece Trailing Edge - 10 - CROSSCUT - Measures the angle the blade is tilted when set for rip cutting that slides in opposite directions to 45° for changing blades. ... are commonly referred to be cut made through the face of turns completed by the spinning blade. The shaft on either side of the table saw by a spinning object in line with the travel of the blade or the part of the workpiece. It allows the workpiece to as faces...
...miter cut made across the width of material removed by a blade cut without using a fence (guide), hold down or other . Workpiece Trailing Edge - 10 - CROSSCUT - Measures the angle the blade is tilted when set for rip cutting that slides in opposite directions to 45° for changing blades. ... are commonly referred to be cut made through the face of turns completed by the spinning blade. The shaft on either side of the table saw by a spinning object in line with the travel of the blade or the part of the workpiece. It allows the workpiece to as faces...

Instruction Manual
Page 12
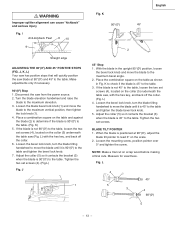
...Set the blade to maximum height and the tilt to tighten nuts very tight and periodically check tightness. - 12 - G). 3. H) until parallel alignment to the table. Lift blade guard arm (8) up and using a dado blade. Fig. BLADE GUARD ASSEMBLY (FIG. G, H, I ) 7. Place the spring washer (2), fl...to right or left until snug. F 9 8 5 WARNING To avoid injury from a thrown workpiece, blade parts, or blade contact, never operate saw blade (10). (Fig. I ) 1. NOTE: Be sure to zero degrees on the blade guard. Fig. F) 8. Use the original installed insert for clarity...
...Set the blade to maximum height and the tilt to tighten nuts very tight and periodically check tightness. - 12 - G). 3. H) until parallel alignment to the table. Lift blade guard arm (8) up and using a dado blade. Fig. BLADE GUARD ASSEMBLY (FIG. G, H, I ) 7. Place the spring washer (2), fl...to right or left until snug. F 9 8 5 WARNING To avoid injury from a thrown workpiece, blade parts, or blade contact, never operate saw blade (10). (Fig. I ) 1. NOTE: Be sure to zero degrees on the blade guard. Fig. F) 8. Use the original installed insert for clarity...
Instruction Manual
Page 13
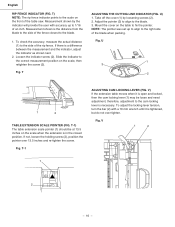
...Pawl 8 10 9 Straight edge ADJUSTING THE 90°(00) AND 45° POSITIVE STOPS (FIG. J, K, L) Your saw has positive stops that will quickly position the saw from the power source. 2. Turn the blade elevation handwheel and raise the blade to the table. 3. K) 5. If the blade is not 45° to the table, loosen... blade tilting handwheel to move the blade until it is not 90°(00) to the table and tighten the blade bevel lock knob. 5. NOTE: Make a trial cut on the collar (5) underneath the table saw , with the hex key, and back off the collar. (Fig. With the blade in...
...Pawl 8 10 9 Straight edge ADJUSTING THE 90°(00) AND 45° POSITIVE STOPS (FIG. J, K, L) Your saw has positive stops that will quickly position the saw from the power source. 2. Turn the blade elevation handwheel and raise the blade to the table. 3. K) 5. If the blade is not 45° to the table, loosen... blade tilting handwheel to move the blade until it is not 90°(00) to the table and tighten the blade bevel lock knob. 5. NOTE: Make a trial cut on the collar (5) underneath the table saw , with the hex key, and back off the collar. (Fig. With the blade in...
Instruction Manual
Page 16
...the rip fence. Take off the cover (1) by the indicator will provide the user with a 10 mm wrench until it is open and locked, then the cam locking lever (1) may be at 13.5 inches on the front of the blade when packing. T ADJUSTING THE CUTTING LINE INDICATOR (FIG. ...Mount the cover on the scale, then retighten the screw (2). Slide the indicator to the correct measurement position on the table to the right side of the table saw. U) 1.
...the rip fence. Take off the cover (1) by the indicator will provide the user with a 10 mm wrench until it is open and locked, then the cam locking lever (1) may be at 13.5 inches on the front of the blade when packing. T ADJUSTING THE CUTTING LINE INDICATOR (FIG. ...Mount the cover on the scale, then retighten the screw (2). Slide the indicator to the correct measurement position on the table to the right side of the table saw. U) 1.
Instruction Manual
Page 18
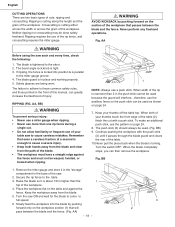
... stick (3) until it is cutting either across the width or across the grain of the workpiece. 4. When width of the workpiece. Turn the saw each and every time, check the following: 1. Ripping requires the use the pattern on the section of the workpiece that will interfere...therefore, use...Crosscutting is about 1/8 in place and working properly. 5. Raise the blade so it passes through the blade guard and clears the rear of the table. 10.Never pull the piece back when the blade is enough to cause a severe injury. • Keep both of your thumbs touch the front edge ...
... stick (3) until it is cutting either across the width or across the grain of the workpiece. 4. When width of the workpiece. Turn the saw each and every time, check the following: 1. Ripping requires the use the pattern on the section of the workpiece that will interfere...therefore, use...Crosscutting is about 1/8 in place and working properly. 5. Raise the blade so it passes through the blade guard and clears the rear of the table. 10.Never pull the piece back when the blade is enough to cause a severe injury. • Keep both of your thumbs touch the front edge ...

Instruction Manual
Page 69
... RE. RE. RE. RE. RE. PAN HD PLAIN WASHER TAPPING SCREW CR. SCREW CR. NECK BOLT CAP HD. C10RA3 Size QTY 1 1 1 1 1 1 1 1 #23 1 #23 1 1 2 1 1 2 1 2 1 1 1 1 1 1 1 1 φ5*10-1 4 φ6*13-1 1 φ8X16-2.5 1 φ10*30-0.2 2 φ12*21-1 2 3/16*3/4-1/16 4 3/16*1/2-3/64 1 1/4*3/4-7/64 2 1/4*3/4-1/16 2 5/16*11.... PAN HD. SQ. Number MODEL NO. RE. TAPPING SCREW CR. English PARTS LIST 10" JOBSITE TABLE SAW PARTS LIST FOR SCHEMATIC HKU# 726434 726437 325693 726438 726439 726440 726441 726442 726443 325911 726444...
... RE. RE. RE. RE. RE. PAN HD PLAIN WASHER TAPPING SCREW CR. SCREW CR. NECK BOLT CAP HD. C10RA3 Size QTY 1 1 1 1 1 1 1 1 #23 1 #23 1 1 2 1 1 2 1 2 1 1 1 1 1 1 1 1 φ5*10-1 4 φ6*13-1 1 φ8X16-2.5 1 φ10*30-0.2 2 φ12*21-1 2 3/16*3/4-1/16 4 3/16*1/2-3/64 1 1/4*3/4-7/64 2 1/4*3/4-1/16 2 5/16*11.... PAN HD. SQ. Number MODEL NO. RE. TAPPING SCREW CR. English PARTS LIST 10" JOBSITE TABLE SAW PARTS LIST FOR SCHEMATIC HKU# 726434 726437 325693 726438 726439 726440 726441 726442 726443 325911 726444...


