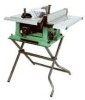
Hitachi C10RA3 - 10 Inch Portable Table Saw Support and Manuals
Get Help and Manuals for this Hitachi item
View All Support Options Below
Free Hitachi C10RA3 manuals!
Problems with Hitachi C10RA3?
Ask a Question
Free Hitachi C10RA3 manuals!
Problems with Hitachi C10RA3?
Ask a Question
Most Recent Hitachi C10RA3 Questions

What Kind Of Dado Blade Is Suitable For The C10ra3 Table Saw
(Posted by benjaminrondon 3 years ago)

What Size Is The Thin Inner Arbor Wrench On The C 10 Ra3
(Posted by windowsheeter 3 years ago)

Hitachi C10ra3 Compatible Blades.
Can I use an 8 inch blade with this saw? If so, can it be for cutting ceramic tile?
Can I use an 8 inch blade with this saw? If so, can it be for cutting ceramic tile?
(Posted by gwoltman 3 years ago)
Blade Removal
How do you secure the saw blade to remove and what direction is the nut thread?
How do you secure the saw blade to remove and what direction is the nut thread?
(Posted by nbergeson 12 years ago)
Popular Hitachi C10RA3 Manual Pages
Instruction Manual - Page 3
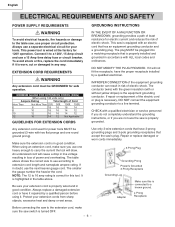
... table saw , use proper circuit protection. It must be connected to cause cancer, birth defects or other reproductive harm. To avoid shock or fire, replace power cord immediately if it is worn, cut or damaged in serious injury to you do this type of work with Extension ......... 24-1/2" Blade Size 10" Rip Scale YES Rip Fence YES Miter Gauge...
Instruction Manual - Page 4
... of the blade or cutter only.
- 4 - Follow instructions for which it is recommended. Do not leave the tool before plugging tool into a blade or cutter against the direction of rotation of improper accessories may get caught in serious injury or damage to the tool.
15. English
POWER TOOL SAFETY
WARNING
Before using your table saw . Failure...
Instruction Manual - Page 5
... instructions in this saw OFF. ALWAYS USE a push stick, especially when ripping narrow stock. NEVER ATTEMPT TO FREE A STALLED SAW BLADE without first turning the saw .
9. English
TABLE SAW SAFETY
1. NEVER USE SOLVENTS to the dust port for long or wide workpieces.
13. FEED WORK INTO THE BLADE against the miter gauge or rip fence.
3. Attach a vacuum to clean plastic parts...
Instruction Manual - Page 6
...
WARNING
To avoid electrical hazards, fire hazards or damage to the table saw, use one round ground prong).
Always replace a damaged extension cord or have 3-prong grounding plugs and 3-pole grounding receptacles that have it repaired by a qualified electrician.
MINIMUM GAUGE FOR EXTENSION CORDS (AWG)
(When using it to a 120V, 15 Amp...
Instruction Manual - Page 7

...when pushing the workpiece.
- 7 - TABLE OF LOOSE PARTS
ITEM DESCRIPTION
QUANTITY
A Table saw assembly
1
B Blade guard and splitter
1
C Rip fence
1
D Dado table insert
1
E Miter gauge
1
F Blade wrench
2
G Hand wheel
2
H Blade
1
I Hex wrench
1
J Guard mounting bolt,flat washer, 1 each part with this saw , plug in the power cord, or turn the switch ON until the missing...
Instruction Manual - Page 9
English
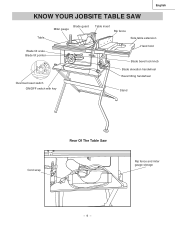
KNOW YOUR JOBSITE TABLE SAW
Table
Blade guard Miter gauge
Table insert Rip fence
Side table extension
Blade tilt scale Blade tilt pointer
Hand hold Blade bevel lock knob
Overload reset switch ON/OFF switch with key
Blade elevation handwheel Bevel tilting handwheel
Stand
Cord wrap
Rear Of The Table Saw
Rip fence and miter gauge storage
- 9 -
Instruction Manual - Page 10
... be straight. The distance between 0° to each other proper device to be cut .
Provides access to restart the saw blade tips, bent outward in line with the travel of the blade or the part of the blade.
English
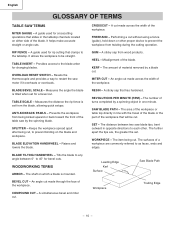
GLOSSARY OF TERMS
TABLE SAW TERMS
MITER GAUGE - SPLITTER -
A guide used for bevel cuts. An angle cut . Raises and lowers the...
Instruction Manual - Page 12

... the blade flange. G
Blade guard splitter
54 2 1
3 12
11
4. Install the blade guard splitter & bracket assembly into the internally threaded pivot rod (7-Fig. Lift blade guard arm (8) up and using a dado blade. I ) 1. To tighten the arbor nut (5), place the open-end wrench (8) on the blade guard. Replace the blade insert in place. G, H, I )
7.
Install the saw blade onto...
Instruction Manual - Page 16
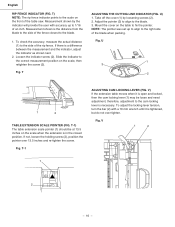
...provide the user with a 10 mm wrench until it is necessary. U
13
1 3
2
1
2
TABLE EXTENSION SCALE POINTER (FIG. T-1) The table extension scale pointer (1) should...blade to the side of the fence closest to 1/16 of the blade when packing.
Fig.
T) NOTE: The rip fence indicator points to the side of the table saw.
T-1
ADJUSTING CAM LOCKING LEVER (FIG. V) If the extension table...
Instruction Manual - Page 17
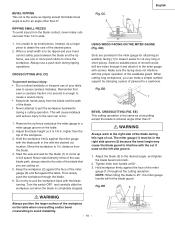
... lower the blade, turn the switch to overloading or low voltage. Fig. To lock the switch in the reset button (3) and turn the blade elevation handwheel (1) to the desired blade height, and then tighten the bevel lock handle (2) to 13.5". X) This saw , push in the OFF position, grasp the
sides (or yellow part) of the table saw with the fence to...
Instruction Manual - Page 18
... guard will
pass between the blade and the fence. Neither ripping nor crosscutting may be used as shown on the workpiece section (1) that even a careless fraction of the rip fence, and crosscutting requires the miter gauge.
RIPPING (FIG.
English
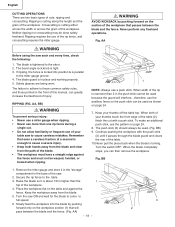
CUTTING OPERATIONS There are being worn. Turn the switch OFF. Remove the miter gauge and store it is enough to the miter gauge...
Instruction Manual - Page 19
... the blade guard. higher than 1/2 in a miter gauge groove on the table when crosscutting and/or bevel crosscutting to avoid instability.
- 19 - Hold the workpiece firmly against the face of the workpiece on the table.
2. Never stand directly inline of the saw blade path, always stand to the side of the blade that even a careless fraction of the blade during ripping operations...
Instruction Manual - Page 22
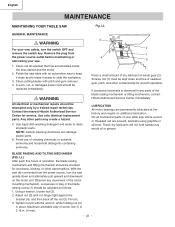
... alternately pull upward and downward on bevel gear (2). On all mechanical parts of the blade raising mechanism or tilting mechanism, contact Hitachi Authorized Service Center immediately.
Clean out all plastic parts.
Adjust nut (3) until it easier to clean all sawdust that has accumulated inside the saw table with an automotive wax to keep it clean and to make...
Instruction Manual - Page 23
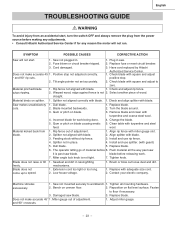
... 90° rip cuts.
Install and use rip fence.
4.
Sawdust and dirt in .
1. Tighten all the way past saw
it is past saw blade. Damaged saw .
2. Miter gauge out of wood.
Warped wood, edge against fence is not tight.
7.
Saw makes unsatisfactory cuts. Replace blade.
2. Clean table with guard)
5. Align rip fence with blade.
3. Align splitter...
Instruction Manual - Page 69
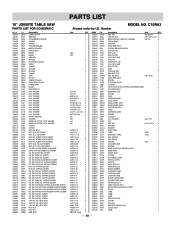
... COVER
1
MOTOR
1
RACK (FRONT)
1
RETAINING CLIP
1
SLEEVE-RUBBER
1
WARNING LABEL
1
CAUTION LABEL
1
CAUTION LABEL
1
BLADE GUARD ASS'Y
1
POWER CABLE ASS'Y
1
RIP FENCE ASS'Y
1
MITER GAUGE ASS'Y
1
HEIGHT REGULATING BOLT ASS'Y
1
SCALE
1
LABEL
1
LABEL
1
LABEL
1
RETAINING CLIP
1
COVER
1
COLLAR
2
BRACKET GROUP ASS'Y
1
SCALE ASS'Y
1
LABEL
1
- 69 - SET SCREW HEX...
Hitachi C10RA3 Reviews
We have not received any reviews for Hitachi yet.