
Hitachi C12LSH Support Question
Hitachi C12LSH Support Question
Find answers below for this question about Hitachi C12LSH - 12" Dual Bevel Sliding Compound Miter Saw.Need a Hitachi C12LSH manual? We have 2 online manuals for this item!
Question posted by rivuletcottage on April 15th, 2015
I Can Adjust The Mitre Angle All The Way On The Right But It Stops At 10 Degrees
I can adjust the mitre angle all the way on the right but it won't budge past 10 degrees when I try to adjust it to the left. This is a brand new saw and i am just setting it up.
Current Answers
Answer #1: Posted by hzplj9 on April 21st, 2015 1:40 PM
hzplj9

Member since:
June 25th, 2012 Points: 4,873,510

Member since:
June 25th, 2012 Points: 4,873,510
My suggestion is to verify that you have followed the correct procedure for assembly. Check that there is not anything underneath that is stopping it move to the left. If that proves a fault then returning it to your dealer will be the option. I have placed a link to your device.
http://www.ultimatehandyman.org/manuals/powertools/hitachi/6.pdf
Related Hitachi C12LSH Manual Pages
Instruction Manual - Page 5
....
15. Always repair or replace any way. Do not leave tool until it has first come to provide ...tool is wider than the other conditions that overhang the table of electric shock, this tool.
16. Check all other accessories.
14. POLARIZED PLUGS To reduce the risk of the slide compound miter saw blade.
17. ALWAYS USE RECOMMENDED ACCESSORIES ONLY WHEN OPERATING THIS TOOL. English
12...
Instruction Manual - Page 6
... or adjustments. 9. Hold the tool firmly
when in the proper place before attempting any abnormality whatsoever. 6. Always cease operating the saw blade. 12. Always confirm that overhang the
table of the saw . 24. Always confirm that all components are mounted properly and securely before attempting slide cutting. 18. Always use of the slide compound miter saw . 13...
Instruction Manual - Page 7
... or changing
settings.
7 Never cut ferrous metals or masonry.
Never operate the POWER TOOL unless you have taken any
medications, or have consumed any safety devices or blade guards; Never leave the POWER TOOL unattended without the guards in this could cause
the saw blade to a complete stop before using the slide compound miter saw blade. 3. When slide cutting, never...
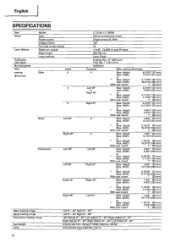
Instruction Manual - Page 10
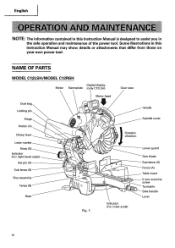
... marker
Knob (B) Indicator (For right bevel scale)
Set pin (A) Sub fence (B) Vise assembly
Fence (B)
Base
UlEI 11/
Fig. 1
Rotation direction
0
Indicator (For miter scale)
Lower guard
Saw blade
Sub fence (A) Fence (A) Table insert
5 mm machine screw Turntable Side handle Lever
10
Some illustrations in
the safe operation and maintenance of the power tool. English
.4,
NOTE: The information...
Instruction Manual - Page 12
English
SPECIFICATIONS
Item
Model
C 12LSH /C 12RSH
Motor
Type
Series commutator motor
Power source
Single-phase AC 60Hz
Voltage (Volts)
120
Full-load current (Amp)
15
Laser Marker
Maximum output
Instruction Manual - Page 16
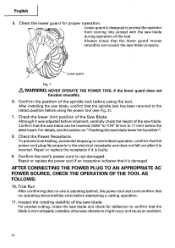
... PLUG TO AN APPROPRIATE AC POWER SOURCE, CHECK THE OPERATION OF THE TOOL AS FOLLOWS:
10. Inspect the rotating stability of the tool. Although it is inserted. Confirm that the lower guard moves
e
smoothly and covers the saw blade
during operation of the saw blade lower limit position". 8. Check the lower limit position of the...
Instruction Manual - Page 17
... the same way.
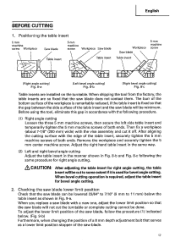
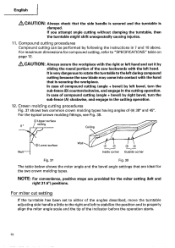
(2) Left and right bevel angle cutting Adjust the table insert in the manner shown in Fig. 9-a.
Positioning the table insert
5mm machine screw Workpiece
Saw blade
5mm
machine screw Workpiece Saw blade
Table insert
Table insert
Workpiece Saw blade
Table insert
5mm machine screw
[Right angle cutting] Fig. 8-a
[Left bevel angle cuff ng] Fig. 8-b
[Right bevel angle cutting...
Instruction Manual - Page 18
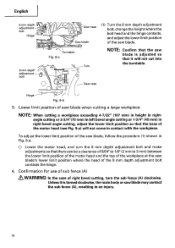
...an injury.
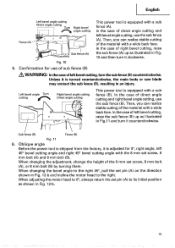
18 To adjust the lower limit position of the saw blade, follow the procedure (1) shown in right bevel angle cutting, adjust the lower limit position so...adjustment bolt contacts the hinge.
4. Lower limit position of saw blade when cutting a large workpiece
NOTE: When cutting a workpiece exceeding 4-7/32" (107 mm) in height in rightangle cutting or 2-3/4"(70 mm) in left bevel angle...
Instruction Manual - Page 19
... cutting
Direct angle cutting Turn
Right bevel angle cutting
O
IJ
Sub fence (A)
Fig. 10
This power tool is turned counterclockwise, the main body or saw blade may contact the sub fence (B), resulting in an injury. Unless it is equipped with a wide back face.
Left bevel angle Turn
cutting
ea'
0
Right bevel angle cutting Direct angle cutting
r
fry
This power tool is adjusted for...
Instruction Manual - Page 20
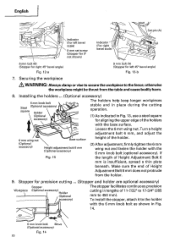
... holders
with the 6 mm knob bolt (optional accessory). Stopper for left 45° bevel angle)
Fig. 12-b
7. English
O
Set pin (A)
Indicator (For left bevel scale)
8 mm set screw (Stopper for 0° not shown)
Indicator (For right bevel scale)
Pull 00
8 mm bolt (B) (Stopper for right 45° bevel angle)
Fig. 12-a
8 mm bolt (A) (Stopper for precision cutting ... (Stopper and holder...
Instruction Manual - Page 24
...Turntable
Move the turntable left and right with the side handle loosened and set the turntable to the correct position.
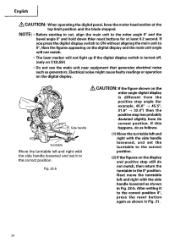
(2) If the figures on C12LSH)
• Do...miter angle digital display is turned off. (only on the display and positive stop still do as follows.
(1) Move the turntable left and right with the side handle loosened, and set it to the miter angle 0° and the
bevel angle...
Instruction Manual - Page 26
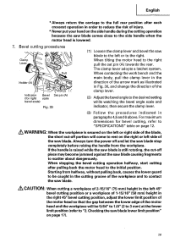
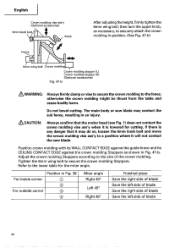
...position where it will not contact the saw blade stop completely before raising the handle from ...left side of the cut
into the workpiece.
(4) After cutting the workpiece to the desired depth, turn the power tool OFF and let
the saw blade.
3. Fig. 25
&WARNING: Always firmly clamp or vise to secure the workpiece to the full retract position.
26 Therefore, slide the workpiece to the
right...
Instruction Manual - Page 27
...and/or decreased cutting efficiency.
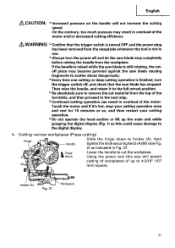
&WARNING: * Confirm that the saw blade stop your cutting operation once and rest for 10 minutes or so, and then restart your cutting operation.
* ...Press cutting)
Hinge
Handle
Slide the hinge down
Using the power tool this could cause damage to holder (A), then tighten the slide securing knob (A)/(B) (see Fig.
2) as this way will not increase the ...
Instruction Manual - Page 28
... on the handle and slide
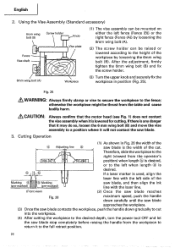
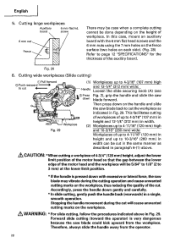
the saw blade may be case when a complete cutting cannot be 5/64" to 1/8" (2 to cut the workpiece as
described in paragraph 6-(1) above in Fig. 29. Therefore, always slide the handle away from the workpiece. r,"
S
Fig. 29
(1) Workpieces up to 10-3/16" (260 mm) in Fig. 29. Stopping the handle movement...
Instruction Manual - Page 29
... operation in Fig. 30, and change the direction of the clamp lever.
(2) Adjust the bevel angle to rest on the right or left side of the saw blade to the left or right side of injury.
* Never put your hand on page 12. Checking the saw blade stop completely before raising the handle from halfway, without pulling back, causes the lower...
Instruction Manual - Page 31
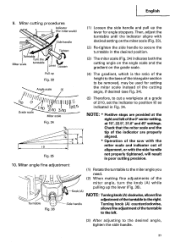
... left of the 0° center setting, at a grade of 2/10, set the indicator to the right.
Check that the miter scale and the tip of the indicator are provided at the right and left .
(3) After adjusting to the miter angle you
need.
(2) When making fine adjustments of alignment, or with desired setting on the grade scale.
b0 0
Grade scale
-ob
1"I A0
O 12/ 1O
j 0 3/1
1225
Miter...
Instruction Manual - Page 32
... case of compound cutting (angle + bevel) by following the instructions in the cutting operation.
12.
NOTE: For convenience, positive stops are ideal for the miter setting (left and
right 31.6°) positions.
For miter cut setting
If the turntable has been set to either of the angles described, move the turntable adjusting side handle a little to the right and left to stabilize...
Instruction Manual - Page 36
...right side of blade Save the left side of blade Save the right side of blade Save the left side of the crown molding.
Tighten the 6mm wing bolt to the lower table for cutting. The main body or saw... molding Stoppers. Position in Fig. 47-b. Do not bevel cutting. If there is lowered for the miter angle.
Adjust the crown molding Stoppers according to the fence; English
Crown...
Instruction Manual - Page 38
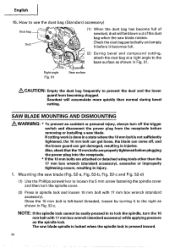
... mm box wrench (standard accessory), excessive or improperly tightening occurs, resulting in injury.
1. The saw blade rotates. Since the 10 mm bolt is left-hand threaded, loosen by turning it becomes full.
1
(2) During bevel and compound cutting,
attach the dust bag at a right angle to lock the spindle, turn the spindle cover.
(2) Press in Fig. 52-c.
How...
Parts List - Page 1
E941
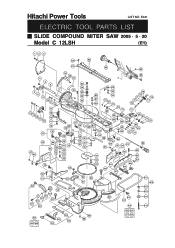
ELECTRIC TOOL PARTS LIST
SLIDE COMPOUND MITER SAW 2005 • 5 • 20
Model C 12LSH
(E1)
123
60
62
61
63
64
4 5 6
4 8
9 10 11 12
17
13
18
14
15
12
16
15 11
10
38 37
47 48
45
44
46
49
50 51
19
20 21
65 A
23
24
69
7
22
25
33
24
A 26... 613
99
618
614
617
619
615
627 605 626
603 604
602 605
59 58
606 616 617 618 Hitachi Power Tools
LIST NO.
Similar Questions

C10fs Compound Miter Saw Bearing Replacement
how do I remove the bearing from the armature
how do I remove the bearing from the armature
(Posted by Bobster8820 3 years ago)

Hitachi C12lsh Wiring Power Swith
I neglected to take a picture of the wiring of the switch. It has 3 connections.... One for the powe...
I neglected to take a picture of the wiring of the switch. It has 3 connections.... One for the powe...
(Posted by wsigurdson 9 years ago)

How To Adjust Cut Depth Hitachi 10 Compound Miter Saw Manual
(Posted by dbrag 9 years ago)

How Do I Set Laser On Hitachi C12lsh?
(Posted by Anonymous-23407 13 years ago)

Where Can I Get A Free Manual On The Hitachi C12rsh 12' Slide Compound Miter Saw
(Posted by kathy86883 14 years ago)