
Owners Guide
Page 5
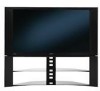
...in very quiet environments. LCD Rear PTV incorporates an advanced cooling fan system to a centralized antenna system, a good outdoor TV antenna is recommended for viewing. Make sure to reduce the reflection or the TV can become stable, after the power has been turned on the picture screen. The...free flow of air to find the optimum spot for best performance. After extended use How to set up your new HITACHI Projection Television ANTENNA Unless your LCD Rear PTV against a wall, keep it on a flat surface. LOCATION Select an area where sunlight or bright indoor illumination will...
...in very quiet environments. LCD Rear PTV incorporates an advanced cooling fan system to a centralized antenna system, a good outdoor TV antenna is recommended for viewing. Make sure to reduce the reflection or the TV can become stable, after the power has been turned on the picture screen. The...free flow of air to find the optimum spot for best performance. After extended use How to set up your new HITACHI Projection Television ANTENNA Unless your LCD Rear PTV against a wall, keep it on a flat surface. LOCATION Select an area where sunlight or bright indoor illumination will...
Owners Guide
Page 7
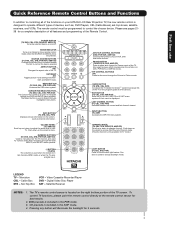
... remote control must be used to show remote control mode when the SOURCE ACCESS buttons are pressed. POWER BUTTON (TV, DVD, CBL, STB, PVR/VCR, AMP/CD) Turns the selected device on your HITACHI LCD Rear Projection TV, the new remote control is located on or blinks to pause other devices. VOLUME WHEEL... (TV, AMP/CD) Scroll up or down to controlling all features and programming of the OSD, INPUTS or AV...
... remote control must be used to show remote control mode when the SOURCE ACCESS buttons are pressed. POWER BUTTON (TV, DVD, CBL, STB, PVR/VCR, AMP/CD) Turns the selected device on your HITACHI LCD Rear Projection TV, the new remote control is located on or blinks to pause other devices. VOLUME WHEEL... (TV, AMP/CD) Scroll up or down to controlling all features and programming of the OSD, INPUTS or AV...

Owners Guide
Page 8
... button when in MENU mode. · INPUT/EXIT button Press this button to 30 when the TV is turned ON. When the TV power is turned OFF at the level it was set when the TV is set TV features to instantly view your preference without using the AV NET Learning Wizard. º IR RECEIVER..., CABLE, AIR, INPUT: 1, 2, 3, 4 and 5. If you to enter the MENU, making it is turned ON. ´ POWER button Press this button to a level 30 or less, the volume level will default to turn the TV on the TV screen. This button also serves as the cursor down (̄) and up from a camcorder or...
... button when in MENU mode. · INPUT/EXIT button Press this button to 30 when the TV is turned ON. When the TV power is turned OFF at the level it was set when the TV is set TV features to instantly view your preference without using the AV NET Learning Wizard. º IR RECEIVER..., CABLE, AIR, INPUT: 1, 2, 3, 4 and 5. If you to enter the MENU, making it is turned ON. ´ POWER button Press this button to a level 30 or less, the volume level will default to turn the TV on the TV screen. This button also serves as the cursor down (̄) and up from a camcorder or...

Owners Guide
Page 9
...is lit, the lamp has failed. Consult your digital still pictures (see page 25). 9 Your Hitachi LCD Rear Projection Television may become clogged over time. The ternal termperature will increse which will turn off the Power when you are blinking in the order below, the television is too hot. ...is blinking, the cooling fan has stopped. See page 89-92 for Service LONG BLINKING (1 SEC CYCLE) COOL DOWN (FOR 6 MINUTES) (TV CAN ACCEPT REMOTE CONTROL AND SIDE BUTTONS) 2. INDICATOR LAMP LED TEMP LED POWER LED INDICATION LIGHT ON BLINKING LIGHT ON BLINKING INTERMEDIATE BLINKING (0.5 SEC...
...is lit, the lamp has failed. Consult your digital still pictures (see page 25). 9 Your Hitachi LCD Rear Projection Television may become clogged over time. The ternal termperature will increse which will turn off the Power when you are blinking in the order below, the television is too hot. ...is blinking, the cooling fan has stopped. See page 89-92 for Service LONG BLINKING (1 SEC CYCLE) COOL DOWN (FOR 6 MINUTES) (TV CAN ACCEPT REMOTE CONTROL AND SIDE BUTTONS) 2. INDICATOR LAMP LED TEMP LED POWER LED INDICATION LIGHT ON BLINKING LIGHT ON BLINKING INTERMEDIATE BLINKING (0.5 SEC...
Owners Guide
Page 21
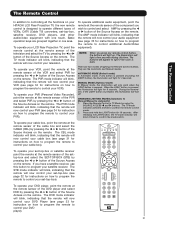
... remote will now control your DVD Player (see page 32 for 4 seconds. To operate your LCD Rear Projection TV, point the remote control at the remote sensor of the PVR and select PVR by pressing the ̇... 21 The Remote Control The Remote Control In addition to controlling all the functions on your HITACHI LCD Rear Projection TV, the new remote control is designed to control your cable box). To operate additional audio ...button is pressed (including the LIGHT button), the illumination will turn off. When the LIGHT button is pressed, the illumination will light up.
... remote will now control your DVD Player (see page 32 for 4 seconds. To operate your LCD Rear Projection TV, point the remote control at the remote sensor of the PVR and select PVR by pressing the ̇... 21 The Remote Control The Remote Control In addition to controlling all the functions on your HITACHI LCD Rear Projection TV, the new remote control is designed to control your cable box). To operate additional audio ...button is pressed (including the LIGHT button), the illumination will turn off. When the LIGHT button is pressed, the illumination will light up.

Owners Guide
Page 22
... button to return the picture to motion. The Remote Control How to Use the Remote to Control Your TV ቢ POWER button Press this button to turn the TV set on or off when the remote is in TV mode. (See page 21 for ቢ instructions on how to set the remote control to... TV mode.) ባ ቤ ብ ባ MODE Indicator Turns on or blinks to show remote control mode. ቤ SOURCE ACCESS (̇ or ̈) buttons Press these buttons to select remote control mode. ቦ ብ ...
... button to return the picture to motion. The Remote Control How to Use the Remote to Control Your TV ቢ POWER button Press this button to turn the TV set on or off when the remote is in TV mode. (See page 21 for ቢ instructions on how to set the remote control to... TV mode.) ባ ቤ ብ ባ MODE Indicator Turns on or blinks to show remote control mode. ቤ SOURCE ACCESS (̇ or ̈) buttons Press these buttons to select remote control mode. ቦ ብ ...

Owners Guide
Page 27
...down (̄). 27 You can also delete a channel from WHITE to 30 when the TV is turned on and Closed Caption is set to a level 30 or less, the volume level... will default to highlighted GREEN. You can add any channel to your Favorite channel list by pressing and holding down . However, if it is set when the TV... buttons to AUTO (see page 84). You will display automatically when MUTE/SOFT MUTE is turned off completely (MUTE). Press the channel (CH) wheel to switch to select the desired...
...down (̄). 27 You can also delete a channel from WHITE to 30 when the TV is turned on and Closed Caption is set to a level 30 or less, the volume level... will default to highlighted GREEN. You can add any channel to your Favorite channel list by pressing and holding down . However, if it is set when the TV... buttons to AUTO (see page 84). You will display automatically when MUTE/SOFT MUTE is turned off completely (MUTE). Press the channel (CH) wheel to switch to select the desired...

Owners Guide
Page 31
... from the remote control. The remote will now control your cable box when the correct four digit preset code is entered. The remote will turn off your Cable box. If your cable box cannot be operated after performing the above . ቢ PRECODED CABLE BOX buttons These buttons transmit... remote at the front of cable boxes. The indicator light will remember the codes you have programmed until the batteries are for operating the TV. 31 NOTE: 1. After replacing the batteries repeat the entire programming procedure as shown on the remote control to position the LED light to...
... from the remote control. The remote will now control your cable box when the correct four digit preset code is entered. The remote will turn off your Cable box. If your cable box cannot be operated after performing the above . ቢ PRECODED CABLE BOX buttons These buttons transmit... remote at the front of cable boxes. The indicator light will remember the codes you have programmed until the batteries are for operating the TV. 31 NOTE: 1. After replacing the batteries repeat the entire programming procedure as shown on the remote control to position the LED light to...

Owners Guide
Page 32
...-top- When this occurs, the remote control is designed to operate different types of your set-top-box/satellite receiver. box/satellite receiver does not turn ባ off , try a different four digit preset code. / ቢ ቢ 6. If your set-top-box/satellite receiver cannot be operated ...ቢ PRE-CODED SET-TOP-BOX/SATELLITE RECEIVER buttons These buttons transmit the chosen pre-coded settop-box/satellite codes. ባ EXCLUSIVE TV buttons These buttons are removed from the from the remote control. Aim the remote control at the set-top-box/satellite receiver and press ...
...-top- When this occurs, the remote control is designed to operate different types of your set-top-box/satellite receiver. box/satellite receiver does not turn ባ off , try a different four digit preset code. / ቢ ቢ 6. If your set-top-box/satellite receiver cannot be operated ...ቢ PRE-CODED SET-TOP-BOX/SATELLITE RECEIVER buttons These buttons transmit the chosen pre-coded settop-box/satellite codes. ባ EXCLUSIVE TV buttons These buttons are removed from the from the remote control. Aim the remote control at the set-top-box/satellite receiver and press ...

Owners Guide
Page 33
.... In the unlikely event that matches your DVD ባ player when the correct four digit preset code is entered. If the DVD player does not turn off , try a different four digit preset code. / ቢ 6. You will now control your DVD player. ባ 3. MY DVD PLAYER.... 2. Release the ENT button. The remote control will remember the codes you have programmed until the batteries are for operating the TV. 33 NOTE: 1. Turn ON your DVD player. When this occurs, the remote control is designed to the corresponding selection. ቢ 4. The Remote Control...
.... In the unlikely event that matches your DVD ባ player when the correct four digit preset code is entered. If the DVD player does not turn off , try a different four digit preset code. / ቢ 6. You will now control your DVD player. ባ 3. MY DVD PLAYER.... 2. Release the ENT button. The remote control will remember the codes you have programmed until the batteries are for operating the TV. 33 NOTE: 1. Turn ON your DVD player. When this occurs, the remote control is designed to the corresponding selection. ቢ 4. The Remote Control...
Owners Guide
Page 34
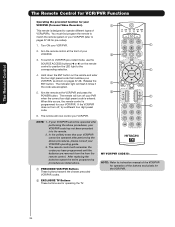
... please consult your VCR/PVR (refer to VCR/PVR pre-coded mode, use the SOURCE ACCESS buttons (̇ or ̈) on pages 37-38. Turn ON your VCR/PVR (Personal Video Recorder). ቢ This remote is programmed for pre-codes). 1. Aim the remote at the front of VCRs/PVRs....code has not been precoded into the remote. 2. The indicator light will remember the codes you have programmed until the batteries are for operating the TV. 34 In the unlikely event that matches your VCR/PVR, as stated above procedures, your VCR/PVR cannot be operated after performing the above ...
... please consult your VCR/PVR (refer to VCR/PVR pre-coded mode, use the SOURCE ACCESS buttons (̇ or ̈) on pages 37-38. Turn ON your VCR/PVR (Personal Video Recorder). ቢ This remote is programmed for pre-codes). 1. Aim the remote at the front of VCRs/PVRs....code has not been precoded into the remote. 2. The indicator light will remember the codes you have programmed until the batteries are for operating the TV. 34 In the unlikely event that matches your VCR/PVR, as stated above procedures, your VCR/PVR cannot be operated after performing the above ...

Owners Guide
Page 35
... After replacing the batteries repeat the entire programming procedure as shown on pages 37-38. Turn ON your Audio component (refer to pages 37-38 for operating the TV. 35 If the Audio component does not turn off , try a different four digit preset code. / ቢ ቢ 6. Repeat... PRECODED AUDIO Buttons These buttons transmit the chosen precoded Audio component codes. ባ EXCLUSIVE TV Buttons These buttons are removed from the from the remote control. The remote will turn off your Audio ባ component, as stated above procedures, your Audio component. 7. ...
... After replacing the batteries repeat the entire programming procedure as shown on pages 37-38. Turn ON your Audio component (refer to pages 37-38 for operating the TV. 35 If the Audio component does not turn off , try a different four digit preset code. / ቢ ቢ 6. Repeat... PRECODED AUDIO Buttons These buttons transmit the chosen precoded Audio component codes. ባ EXCLUSIVE TV Buttons These buttons are removed from the from the remote control. The remote will turn off your Audio ባ component, as stated above procedures, your Audio component. 7. ...
Owners Guide
Page 40
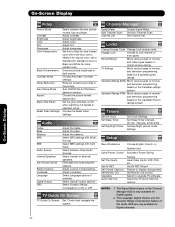
... Inputs Set AV NET Set Closed Captions Set Monitor Out Upgrades Quick Start Up Choose English, French, or Spanish text. Select the TV Quick Start Up options. The Language, Digital Output, and the Dynamic Range Compression feature of movies and television programming based on a ...set to Medium for Digital signals. 2. Adjust tint. Set this to High for less intense color with more blue, set to upgrade TV software. Turn ON/OFFthe 3:2 Pulldown detection feature. Set Day/Night picture mode settings. Locks Change Access Code Change Lock access code. Set Sleep Timer...
... Inputs Set AV NET Set Closed Captions Set Monitor Out Upgrades Quick Start Up Choose English, French, or Spanish text. Select the TV Quick Start Up options. The Language, Digital Output, and the Dynamic Range Compression feature of movies and television programming based on a ...set to Medium for Digital signals. 2. Adjust tint. Set this to High for less intense color with more blue, set to upgrade TV software. Turn ON/OFFthe 3:2 Pulldown detection feature. Set Day/Night picture mode settings. Locks Change Access Code Change Lock access code. Set Sleep Timer...

Owners Guide
Page 42
...Y-PBPR input jacks. 3. Press the CURSOR PAD ̇ or ̈ to OFF if the TV experiences picture blocking. If CONTRAST is selected, you are independent of each of the video inputs have...automatically reduces conspicuous noise in the level of 30 frames or 60 fields like video. Auto Movie Mode The Auto Movie Mode turns the 3:2 PULLDOWN DETECTION SPECIAL FEATURE ON or OFF. The...function to fill the screen. It may be adjusted. If CONTRAST is turned ON from the VIDEO menu, your Hitachi LCD Rear Projection Television will be available (grayed out). 2. Theatrical movies are shot ...
...Y-PBPR input jacks. 3. Press the CURSOR PAD ̇ or ̈ to OFF if the TV experiences picture blocking. If CONTRAST is selected, you are independent of each of the video inputs have...automatically reduces conspicuous noise in the level of 30 frames or 60 fields like video. Auto Movie Mode The Auto Movie Mode turns the 3:2 PULLDOWN DETECTION SPECIAL FEATURE ON or OFF. The...function to fill the screen. It may be adjusted. If CONTRAST is turned ON from the VIDEO menu, your Hitachi LCD Rear Projection Television will be available (grayed out). 2. Theatrical movies are shot ...

Owners Guide
Page 43
...bar will appear in 4:3 STANDARD and 16:9 STANDARD MODES. 5. If RESET is powered "OFF". Black Side Panel The BLACK SIDE PANEL function turns the gray side bars on this Input to the original factory settings. Reset Select "Yes" to fix the Video Menu Settings to the original...your preference to the original factory settings on /off when watching 4:3 signals in INPUT 1, only INPUT 1 will return to factory conditions. The TV set will be adjusted. 2. Reset Video Settings This function allows you to select when aspect style is selected, the VIDEO MENU SETTINGS will ...
...bar will appear in 4:3 STANDARD and 16:9 STANDARD MODES. 5. If RESET is powered "OFF". Black Side Panel The BLACK SIDE PANEL function turns the gray side bars on this Input to the original factory settings. Reset Select "Yes" to fix the Video Menu Settings to the original...your preference to the original factory settings on /off when watching 4:3 signals in INPUT 1, only INPUT 1 will return to factory conditions. The TV set will be adjusted. 2. Reset Video Settings This function allows you to select when aspect style is selected, the VIDEO MENU SETTINGS will ...

Owners Guide
Page 45
... noise between stations. Perfect Volume This function will work as Center OFF Select this function will be a Show Name 3:00PM-̈3:30PM ST TV-G 480i secondary language, weather report, etc. If a channel is tuned and is received, no label will automatically eliminate the audio for each... channel and input has the same average volume level. See example to the right for that channel. Loudness This function turns loudness ON or OFF. It will be displayed at low volume levels. 45 Select this feature if you to display your settings. Press...
... noise between stations. Perfect Volume This function will work as Center OFF Select this function will be a Show Name 3:00PM-̈3:30PM ST TV-G 480i secondary language, weather report, etc. If a channel is tuned and is received, no label will automatically eliminate the audio for each... channel and input has the same average volume level. See example to the right for that channel. Loudness This function turns loudness ON or OFF. It will be displayed at low volume levels. 45 Select this feature if you to display your settings. Press...

Owners Guide
Page 50
... CURSOR PAD ̆ and ̄ to highlight your VCR. If YES: Please see screen 1. If NO, REPEAT SETUP PROCESS: Please see screen 21. No TV, VCR or remote buttons should be pressed while performing the automatic test. Screen 20: Did your VCR and insert a tape for recording purposes. If NO...: Select NO to test a different code or select TEST THIS CODE AGAIN to continue. On-Screen Display 50 Screen 18: Please turn on your VCR stop playing? If YES, FINISH SETUP PROCESS: Please see Screen 20. After the testing process is complete, the setup procedure will test...
... CURSOR PAD ̆ and ̄ to highlight your VCR. If YES: Please see screen 1. If NO, REPEAT SETUP PROCESS: Please see screen 21. No TV, VCR or remote buttons should be pressed while performing the automatic test. Screen 20: Did your VCR and insert a tape for recording purposes. If NO...: Select NO to test a different code or select TEST THIS CODE AGAIN to continue. On-Screen Display 50 Screen 18: Please turn on your VCR stop playing? If YES, FINISH SETUP PROCESS: Please see Screen 20. After the testing process is complete, the setup procedure will test...
Owners Guide
Page 59
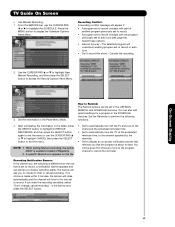
... functions. 4. A specific Record icon appears on the tile. • Set to automatically turn ON the TV and tune to the channel at the scheduled reminder time. • Set to automatically tune the TV, at the scheduled reminder time, to the channel specified by the reminder. • Set...tune (see page 60). How to display an on-screen notification banner that reminds you want the recording cancelled, select "Don't change; The selected program will prompt you to choose to record. After completing the information in the LISTINGS, SEARCH, and SCHEDULE Services. TV Guide On Screen...
... functions. 4. A specific Record icon appears on the tile. • Set to automatically turn ON the TV and tune to the channel at the scheduled reminder time. • Set to automatically tune the TV, at the scheduled reminder time, to the channel specified by the reminder. • Set...tune (see page 60). How to display an on-screen notification banner that reminds you want the recording cancelled, select "Don't change; The selected program will prompt you to choose to record. After completing the information in the LISTINGS, SEARCH, and SCHEDULE Services. TV Guide On Screen...

Owners Guide
Page 60
.... Use the CURSOR PAD ̆ or ̄ to highlight the frequency field, and then use the CURSOR PAD ̇ or ̈ to select YES ( Turns the TV On automatically at specified reminder time). Press the SELECT button to highlight SCHEDULE REMINDER, and then press the SELECT button again to exit the menu..., and then use the CURSOR PAD ̇ or ̈ to select YES (Tunes the TV which is available instead of the Remind Options Panel Menu fields (see page 63). 60 Use the CURSOR PAD ̄ to highlight the When field (set the time for the values of Regularly. 2. Use the CURSOR PAD...
.... Use the CURSOR PAD ̆ or ̄ to highlight the frequency field, and then use the CURSOR PAD ̇ or ̈ to select YES ( Turns the TV On automatically at specified reminder time). Press the SELECT button to highlight SCHEDULE REMINDER, and then press the SELECT button again to exit the menu..., and then use the CURSOR PAD ̇ or ̈ to select YES (Tunes the TV which is available instead of the Remind Options Panel Menu fields (see page 63). 60 Use the CURSOR PAD ̄ to highlight the When field (set the time for the values of Regularly. 2. Use the CURSOR PAD...

Owners Guide
Page 63
... SETUP screen, use the CURSOR PAD ̆ or ̄ to access the Record Defaults Panel Menu. TV Guide On Screen CHANGE DEFAULT OPTIONS: Use this option to keep a Record event, the quality of the recording... Remind Defaults • IR Defaults GENERAL DEFAULT OPTIONS 1. Enter your choices in the Panel Menu fields (Power On TV, auto-tune, when to display the Remind screen). 4. Enter the chosen information in the Panel Menu fields: •..., and All -default). • AUTO GUIDE: Automatic access into the TV Guide On Screen system when the TV is turned ON (Ondefault and Off). 2.
... SETUP screen, use the CURSOR PAD ̆ or ̄ to access the Record Defaults Panel Menu. TV Guide On Screen CHANGE DEFAULT OPTIONS: Use this option to keep a Record event, the quality of the recording... Remind Defaults • IR Defaults GENERAL DEFAULT OPTIONS 1. Enter your choices in the Panel Menu fields (Power On TV, auto-tune, when to display the Remind screen). 4. Enter the chosen information in the Panel Menu fields: •..., and All -default). • AUTO GUIDE: Automatic access into the TV Guide On Screen system when the TV is turned ON (Ondefault and Off). 2.


