
Owners Guide
Page 2
...NOT BE EXPOSED TO DRIPPING OR SPLASHING AND OBJECTS FILLED WITH LIQUIDS, SUCH AS VASES, SHOULD NOT BE PLACED ON THE TELEVISION. CAUTION: Adjust only those controls that a safety problem should be of benefit to you to the presence of the FCC rules. NOTE: This television ...the literature accompanying the appliance. CAUTION: Never remove the back cover of the television as improper changes or modifications not expressly approved by Hitachi America, Ltd. Safety is intended to alert the user to very high voltages and other hazards. Home Electronics Division may be notified ...
...NOT BE EXPOSED TO DRIPPING OR SPLASHING AND OBJECTS FILLED WITH LIQUIDS, SUCH AS VASES, SHOULD NOT BE PLACED ON THE TELEVISION. CAUTION: Adjust only those controls that a safety problem should be of benefit to you to the presence of the FCC rules. NOTE: This television ...the literature accompanying the appliance. CAUTION: Never remove the back cover of the television as improper changes or modifications not expressly approved by Hitachi America, Ltd. Safety is intended to alert the user to very high voltages and other hazards. Home Electronics Division may be notified ...
Owners Guide
Page 7
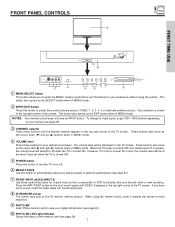
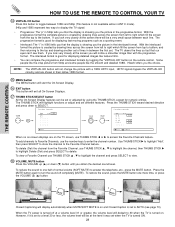
... screen. The volume level will default to 30 when the TV is shown in MENU mode. ባ INPUT/EXIT button Press this button to automatically adjust your picture quality to instantly view your choice (see page 24). 7 VOL+ CH- This button also serves as the cursor left audio jack. ቩ IR...
... screen. The volume level will default to 30 when the TV is shown in MENU mode. ባ INPUT/EXIT button Press this button to automatically adjust your picture quality to instantly view your choice (see page 24). 7 VOL+ CH- This button also serves as the cursor left audio jack. ቩ IR...

Owners Guide
Page 10
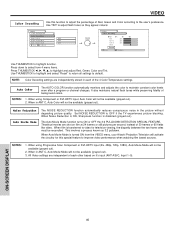
...a software upgrade is required for your external digital devices, such as a Set-Top-Box, high-band DTV decoders, DVD players with Digital Content Protection. Hitachi will be labeled Y, B-Y, and R-Y. This connection also enables you to the TV's PR input. 3. In order to the TV's PR input. 4.... available for DVI-HDTV input. 2. Your component outputs may use composite video signal for your TV. Input 2 (Y/VIDEO) can be necessary to adjust TINT to Input 3, 4 or 5 at the same time. To ensure no copyright infringement, the MONITOR OUT output will notify you enable video and...
...a software upgrade is required for your external digital devices, such as a Set-Top-Box, high-band DTV decoders, DVD players with Digital Content Protection. Hitachi will be labeled Y, B-Y, and R-Y. This connection also enables you to the TV's PR input. 3. In order to the TV's PR input. 4.... available for DVI-HDTV input. 2. Your component outputs may use composite video signal for your TV. Input 2 (Y/VIDEO) can be necessary to adjust TINT to Input 3, 4 or 5 at the same time. To ensure no copyright infringement, the MONITOR OUT output will notify you enable video and...

Owners Guide
Page 12
... 5, but note that have this feature. Use these may be brought to use composite video signal for Input 2~Input 5. • It may be necessary to adjust TINT to obtain optimum picture quality when using the Y-PBPR inputs (see page 44). • To ensure no copyright infringement, the MONITOR OUT output may...
... 5, but note that have this feature. Use these may be brought to use composite video signal for Input 2~Input 5. • It may be necessary to adjust TINT to obtain optimum picture quality when using the Y-PBPR inputs (see page 44). • To ensure no copyright infringement, the MONITOR OUT output may...
Owners Guide
Page 13
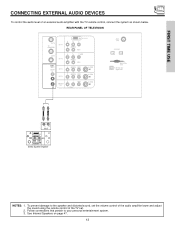
... INPUT Stereo System Amplifier NOTES: 1. Follow connections that pertain to the speaker and distorted sound, set the volume control of the audio amplifier lower and adjust the sound using the remote control of an external audio amplifier with the TV remote control, connect the system as shown below. FIRST TIME USE...
... INPUT Stereo System Amplifier NOTES: 1. Follow connections that pertain to the speaker and distorted sound, set the volume control of the audio amplifier lower and adjust the sound using the remote control of an external audio amplifier with the TV remote control, connect the system as shown below. FIRST TIME USE...

Owners Guide
Page 27
...) are placed to the left and right of the image to preserve the original aspect ratio of the source. The Aspect Style setting you to adjust the images through the following options. 4:3 STANDARD Use this aspect to Zoom-in once while in ANT C, signal format is dependent on conventional (4:3) sources. 16...
...) are placed to the left and right of the image to preserve the original aspect ratio of the source. The Aspect Style setting you to adjust the images through the following options. 4:3 STANDARD Use this aspect to Zoom-in once while in ANT C, signal format is dependent on conventional (4:3) sources. 16...
Owners Guide
Page 28
... while in ANT C mode). 540p and 1080i represent two ways to turn the sound off at the screen you will highlight functions or adjust and set to the bottom. With the interlaced format the picture is good for displaying detailed images like the smooth and detailed 1080i. The... ̆ , ̄ to highlight the channel, then THUMB STICK ̈ to highlight Delete (Del) and press SELECT to enter the channel number. Hitachi offers you obtain the desired sound level. NOTE: The VIRTUAL HD button will display automatically when MUTE/SOFT MUTE is on . Favorite Channels Favorite Channels...
... while in ANT C mode). 540p and 1080i represent two ways to turn the sound off at the screen you will highlight functions or adjust and set to the bottom. With the interlaced format the picture is good for displaying detailed images like the smooth and detailed 1080i. The... ̆ , ̄ to highlight the channel, then THUMB STICK ̈ to highlight Delete (Del) and press SELECT to enter the channel number. Hitachi offers you obtain the desired sound level. NOTE: The VIRTUAL HD button will display automatically when MUTE/SOFT MUTE is on . Favorite Channels Favorite Channels...
Owners Guide
Page 42
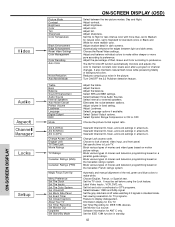
... the Canadian French ratings system. Set viewing reservation for ANT C only. Adjust brightness. Adjust tint. Adjust sharpness. Adjust and balance individual colors to make white. Turn ON/OFF the 3:2 Pulldown detection feature. Adjust the balance. Block various types of movies and television programming based on /.... Choose to make either deeper or more reddish color. Set Monitor Out source. The AUTO COLOR function automatically monitors and adjusts the color to ON or OFF. Select Dynamic Range Compression to maintain constant color levels even after a program or channel ...
... the Canadian French ratings system. Set viewing reservation for ANT C only. Adjust brightness. Adjust tint. Adjust sharpness. Adjust and balance individual colors to make white. Turn ON/OFF the 3:2 Pulldown detection feature. Adjust the balance. Block various types of movies and television programming based on /.... Choose to make either deeper or more reddish color. Set Monitor Out source. The AUTO COLOR function automatically monitors and adjusts the color to ON or OFF. Select Dynamic Range Compression to maintain constant color levels even after a program or channel ...

Owners Guide
Page 43
If RESET is selected, only the selected mode will reset to adjust picture settings and improve picture quality. Video Audio Aspect Chan. ON-SCREEN DISPLAY 43 VIDEO Video Select VIDEO to initial conditions. Picture Mode Use this ...
If RESET is selected, only the selected mode will reset to adjust picture settings and improve picture quality. Video Audio Aspect Chan. ON-SCREEN DISPLAY 43 VIDEO Video Select VIDEO to initial conditions. Picture Mode Use this ...

Owners Guide
Page 44
...NOTES: 1. If CONTRAST is set to minimum level, the On-Screen Display (OSD) will be selected and adjusted in the picture. Tint Use this function to adjust overall picture brightness. Edge Enhancement Use this function to change the contrast between light and dark areas using the ... or ̈ to select the function settings. Press down on the screen for more than 3 minutes. 3. Contrast Use this function to adjust flesh tones so they appear natural. Brightness Use this function to automatically enhance the edges between black and white levels in the picture. Color...
...NOTES: 1. If CONTRAST is set to minimum level, the On-Screen Display (OSD) will be selected and adjusted in the picture. Tint Use this function to adjust overall picture brightness. Edge Enhancement Use this function to change the contrast between light and dark areas using the ... or ̈ to select the function settings. Press down on the screen for more than 3 minutes. 3. Contrast Use this function to adjust flesh tones so they appear natural. Brightness Use this function to automatically enhance the edges between black and white levels in the picture. Color...

Owners Guide
Page 45
...% 50% 50% High High High Night THUMB STICK SELECT Video Reset Video Settings Select "Reset" to Return the Video menu Settings on this function to adjust and balance the listed individual colors to make them either deeper or more pure depending on THUMB STICK to select Reset Video Settings. If RESET... above. Press down to select the User Colors setting. When the function has a "ͱ" in Video:1 mode, only Video:1 mode will reset to highlight and adjust individual colors.
...% 50% 50% High High High Night THUMB STICK SELECT Video Reset Video Settings Select "Reset" to Return the Video menu Settings on this function to adjust and balance the listed individual colors to make them either deeper or more pure depending on THUMB STICK to select Reset Video Settings. If RESET... above. Press down to select the User Colors setting. When the function has a "ͱ" in Video:1 mode, only Video:1 mode will reset to highlight and adjust individual colors.
Owners Guide
Page 46
...Mode is turned ON from 4 menu items. Press THUMBSTICK to adjust flesh tones so they appear natural. Use TINT to highlight and adjust Red, Green, Color and Tint. Press down to select from the VIDEO menu, your Hitachi Projection Television will not be available (grayed out). 2. When Noise...1. When film is disabled (grayed out). Use THUMBSTICK to highlight and select "Reset" to return all settings to video for this function to adjust the percentage of the 4 Color Temperature settings. When in each other based on film at 24 frames or still pictures per second, instead of...
...Mode is turned ON from 4 menu items. Press THUMBSTICK to adjust flesh tones so they appear natural. Use TINT to highlight and adjust Red, Green, Color and Tint. Press down to select from the VIDEO menu, your Hitachi Projection Television will not be available (grayed out). 2. When Noise...1. When film is disabled (grayed out). Use THUMBSTICK to highlight and select "Reset" to return all settings to video for this function to adjust the percentage of the 4 Color Temperature settings. When in each other based on film at 24 frames or still pictures per second, instead of...

Owners Guide
Page 47
... Source Stereo Internal Speakers On Auto Noise Cancel On Perfect Volume On Loudness On Move SEL Return Press THUMB STICK ̆, ̄, to adjust the function. Press THUMB STICK ̇ or ̈ to select menu item. Treble Bass This function controls the high frequency audio to all...return to improve the sound quality. This function controls the low frequency audio to right balance of both stereo and second audio are adjusting treble. The sources received will automatically eliminate the audio for each channel and input has the same average volume level. See example ...
... Source Stereo Internal Speakers On Auto Noise Cancel On Perfect Volume On Loudness On Move SEL Return Press THUMB STICK ̆, ̄, to adjust the function. Press THUMB STICK ̇ or ̈ to select menu item. Treble Bass This function controls the high frequency audio to all...return to improve the sound quality. This function controls the low frequency audio to right balance of both stereo and second audio are adjusting treble. The sources received will automatically eliminate the audio for each channel and input has the same average volume level. See example ...

Owners Guide
Page 50
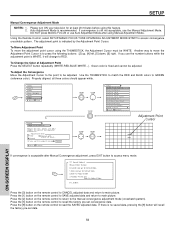
...modes. NOTES: 1. Vertical Position This function allows you to fill the screen. NOTE: Vertical Position will be changed with 480i/480P signal. Adjustable range is -10 (video center is toward bottom of screen) to +10 (video center is best used on the input signal to select...or ̈ to select the Picture Format Aspect Ratio. The Auto Aspect function is recommended on THUMBSTICK to select menu item. Auto Aspect Automatically adjust the Aspect Ratio depending on composite video, S-Video, and 480i component signals. 3. Press THUMB STICK to select. The Auto Aspect function is...
...modes. NOTES: 1. Vertical Position This function allows you to fill the screen. NOTE: Vertical Position will be changed with 480i/480P signal. Adjustable range is -10 (video center is toward bottom of screen) to +10 (video center is best used on the input signal to select...or ̈ to select the Picture Format Aspect Ratio. The Auto Aspect function is recommended on THUMBSTICK to select menu item. Auto Aspect Automatically adjust the Aspect Ratio depending on composite video, S-Video, and 480i component signals. 3. Press THUMB STICK to select. The Auto Aspect function is...

Owners Guide
Page 52
... CATV2 VHF 2~13ch UHF 14-69ch 1~125 CHANNEL MANAGER Reception channels are shown at the left. If Auto Channel Scan is not performed first, you adjust your cable or TV guide for best signal reception. Antenna positioning must be accurate for channel identification standards. ON-SCREEN DISPLAY 52 NOTES: 1. The signal...
... CATV2 VHF 2~13ch UHF 14-69ch 1~125 CHANNEL MANAGER Reception channels are shown at the left. If Auto Channel Scan is not performed first, you adjust your cable or TV guide for best signal reception. Antenna positioning must be accurate for channel identification standards. ON-SCREEN DISPLAY 52 NOTES: 1. The signal...
Owners Guide
Page 63
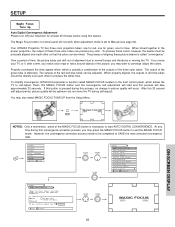
...and Blue colors to SAVE the new corrected convergence data. SETUP Magic Focus Tune Up Auto Digital Convergence Adjustment Please turn off, (After 90 days). Your HITACHI Projection TV has three color projection tubes: one for red, one for green, one for Magnetic Influences....correct for blue. Press this MAGIC FOCUS button and the convergence self adjustment will not work when adjustment mode is necessary to produce the white lines. Video Aspect Audio Chan. To simplify convergence, HITACHI incorporates a function called "convergence". However, the convergence correction process ...
...and Blue colors to SAVE the new corrected convergence data. SETUP Magic Focus Tune Up Auto Digital Convergence Adjustment Please turn off, (After 90 days). Your HITACHI Projection TV has three color projection tubes: one for red, one for green, one for Magnetic Influences....correct for blue. Press this MAGIC FOCUS button and the convergence self adjustment will not work when adjustment mode is necessary to produce the white lines. Video Aspect Audio Chan. To simplify convergence, HITACHI incorporates a function called "convergence". However, the convergence correction process ...
Owners Guide
Page 64
...Set Virtual HD Set Black Side Panel Set Event Timer Set Closed Caption About Your TV Move SEL Select THUMB STICK THUMB STICK SELECT Adjustment Point Cursor If convergence is no saved data, pressing the [9] button will change to GREEN (reference color). Use the THUMB STICK to... the following buttons: [2] up, [4] left, [5] down, [6] right. Properly aligned, all three colors should appear white. EXIT 2.Back to Adjust Mode 3.Factory Reset and Back to Adjust Mode. 0-3.Select Press the [0] button on the remote control to Normal Mode. Press the [9] button on the remote control to CANCEL...
...Set Virtual HD Set Black Side Panel Set Event Timer Set Closed Caption About Your TV Move SEL Select THUMB STICK THUMB STICK SELECT Adjustment Point Cursor If convergence is no saved data, pressing the [9] button will change to GREEN (reference color). Use the THUMB STICK to... the following buttons: [2] up, [4] left, [5] down, [6] right. Properly aligned, all three colors should appear white. EXIT 2.Back to Adjust Mode 3.Factory Reset and Back to Adjust Mode. 0-3.Select Press the [0] button on the remote control to Normal Mode. Press the [9] button on the remote control to CANCEL...

Owners Guide
Page 66
.... Press down on THUMBSTICK to select. NOTES: When "Daylight Saving Correction" is checked "✓", the TV will automatically calculate the clock adjustment for a black background (no picture can be adjusted before you can use THUMBSTICK to highlight "Daylight Saving Correction" and press down on THUMB STICK to select setting. THUMB STICK Setup...
.... Press down on THUMBSTICK to select. NOTES: When "Daylight Saving Correction" is checked "✓", the TV will automatically calculate the clock adjustment for a black background (no picture can be adjusted before you can use THUMBSTICK to highlight "Daylight Saving Correction" and press down on THUMB STICK to select setting. THUMB STICK Setup...

Owners Guide
Page 76
... 75 Ohm Chrominance (C 0.286Vp-p, 75 Ohm • Component Video • Depth (in Picture • Magic Focus (Auto Digital Convergence and Manual Adjustment) • 3 Antenna Inputs (2-NTSC; 1-DTV) • Video Input Sensor • 2 IEEE1394/5C Interface • Digital Audio Output (Dolby&#... 14 ~ 69 • Optical Out (Digital Audio 1 optical connector CATV Mid Band A-5 ~ A-1 A-I Super Band J-W Dimensions: 51S700 57S700 65S700 Hyper Band W+1 - BBE and BBE symbol are trademarks of Dolby Laboratories. Inputs: Outputs: • Power Input AC 120V, 60Hz ...
... 75 Ohm Chrominance (C 0.286Vp-p, 75 Ohm • Component Video • Depth (in Picture • Magic Focus (Auto Digital Convergence and Manual Adjustment) • 3 Antenna Inputs (2-NTSC; 1-DTV) • Video Input Sensor • 2 IEEE1394/5C Interface • Digital Audio Output (Dolby&#... 14 ~ 69 • Optical Out (Digital Audio 1 optical connector CATV Mid Band A-5 ~ A-1 A-I Super Band J-W Dimensions: 51S700 57S700 65S700 Hyper Band W+1 - BBE and BBE symbol are trademarks of Dolby Laboratories. Inputs: Outputs: • Power Input AC 120V, 60Hz ...


