
Owners Guide
Page 11
... this case, connect the components B-Y output to the TV's PB input and the components R-Y output to Off. Your HITACHI Plasma TV will illuminate. The Plasma TV is ON. INPUT 3, INPUT 4 and INPUT 5 (Y/VIDEO) can not turn the TV ON, press the main power switch located on the lower right side of the...obtain optimum picture quality when using the AV NET Learning Wizard. ቭ PHOTO INPUT Insert USB cable from your Digital Camera, USB memory or memory card USB drive to view your digital still pictures (see page 47). 4. In this input. Check the Power Light to the TV's PR input. 3.
... this case, connect the components B-Y output to the TV's PB input and the components R-Y output to Off. Your HITACHI Plasma TV will illuminate. The Plasma TV is ON. INPUT 3, INPUT 4 and INPUT 5 (Y/VIDEO) can not turn the TV ON, press the main power switch located on the lower right side of the...obtain optimum picture quality when using the AV NET Learning Wizard. ቭ PHOTO INPUT Insert USB cable from your Digital Camera, USB memory or memory card USB drive to view your digital still pictures (see page 47). 4. In this input. Check the Power Light to the TV's PR input. 3.
Owners Guide
Page 13
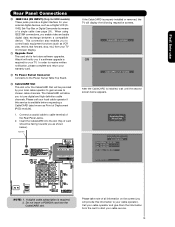
... equipment functions (such as VCR play, rewind, fast forward, stop, etc.) from your TV On-Screen Display. ቭ Upgrade Card This card slot is installed, wait until the second screen below ). First time use Rear Panel Connections ቫ IEEE1394 (DV INPUT) (Only...cable operator). Hitachi will display the following respective screens. Please call your cable service. 13 This connection also enables you will allow you enable video and audio digital data exchange between a compatible device. Do not insert a PCMCIA card into the slot (Top of card should be ...
... equipment functions (such as VCR play, rewind, fast forward, stop, etc.) from your TV On-Screen Display. ቭ Upgrade Card This card slot is installed, wait until the second screen below ). First time use Rear Panel Connections ቫ IEEE1394 (DV INPUT) (Only...cable operator). Hitachi will display the following respective screens. Please call your cable service. 13 This connection also enables you will allow you enable video and audio digital data exchange between a compatible device. Do not insert a PCMCIA card into the slot (Top of card should be ...
Owners Guide
Page 28
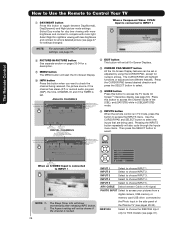
... (Press INFO again for settings changes). The Sleep Timer info will start the On-Screen Display. IEEE1394 digital camera, USB memory or memory card USB drive connected to the Photo Input in the side panel of the Program Information Show Name Program Run Time 3:00PM- 3:30PM ST TV... TIMER is set or adjusted by using the CURSOR PAD, except for day time viewing with more detailed description) Auto Closed Caption setting When an S-VIDEO Input is connected to INPUT 3 INFO Y-PBPR: 3 480i 3:17PM Input Signal Format NOTE: For automatic DAY/NIGHT picture mode Auto settings, see ...
... (Press INFO again for settings changes). The Sleep Timer info will start the On-Screen Display. IEEE1394 digital camera, USB memory or memory card USB drive connected to the Photo Input in the side panel of the Program Information Show Name Program Run Time 3:00PM- 3:30PM ST TV... TIMER is set or adjusted by using the CURSOR PAD, except for day time viewing with more detailed description) Auto Closed Caption setting When an S-VIDEO Input is connected to INPUT 3 INFO Y-PBPR: 3 480i 3:17PM Input Signal Format NOTE: For automatic DAY/NIGHT picture mode Auto settings, see ...

Owners Guide
Page 78
.... If the "CableCARD Installed" message does not appear when card is accessed. 78 Diagnostics Info. This process must be needed because the channel list is properly inserted in the CableCARD slot. 2. Follow the instructions below to access the CableCARD Information menu. 1. Video Audio TV Guide On Screen Channel Manager Locks Timers Setup... CableCARD ID and Host ID, use only. The TV will not be completed before any CableCARD information or Channel listings is installed, check the TV's card slot and CableCARD pins for obstructions or damage. 6.
.... If the "CableCARD Installed" message does not appear when card is accessed. 78 Diagnostics Info. This process must be needed because the channel list is properly inserted in the CableCARD slot. 2. Follow the instructions below to access the CableCARD Information menu. 1. Video Audio TV Guide On Screen Channel Manager Locks Timers Setup... CableCARD ID and Host ID, use only. The TV will not be completed before any CableCARD information or Channel listings is installed, check the TV's card slot and CableCARD pins for obstructions or damage. 6.

Owners Guide
Page 80
... to turn the plasma display left . 4. Press the CURSOR PAD ̈ to rotate the TV to the factory default after main power OFF/ON. Video Audio TV Guide On Screen Channel Manager Locks Timers Setup Power Swivel Move SEL Select or Power Swivel Select SEL Return Locked NOTE: 1. 2. 3. 4. ...on all modes during the next main power on /off. Setup Reset The Software MMC Software Upgrade: Main Vxxxx.xxxx Upgrade Now Please Insert MMC card before controlling the motorized stand. 2. Select the "YES" option to unlock or lock the Power Swivel. Exit the OSD menu system before upgrading....
... to turn the plasma display left . 4. Press the CURSOR PAD ̈ to rotate the TV to the factory default after main power OFF/ON. Video Audio TV Guide On Screen Channel Manager Locks Timers Setup Power Swivel Move SEL Select or Power Swivel Select SEL Return Locked NOTE: 1. 2. 3. 4. ...on all modes during the next main power on /off. Setup Reset The Software MMC Software Upgrade: Main Vxxxx.xxxx Upgrade Now Please Insert MMC card before controlling the motorized stand. 2. Select the "YES" option to unlock or lock the Power Swivel. Exit the OSD menu system before upgrading....

Owners Guide
Page 86
... System Control (Only HDX models) - Refer to change without prior notice. Models: Please access our website: www.hitachi.us/tv INPUTS/OUTPUTS • Wideband Component Y, Pb,Pr 3 • Composite Video 5 • S-Video 2 • Antenna (RF)Inputs 1 • Audio Output 1 • Monitor Output 1 • Optical... Protection V1.1 Compatible) • Photo Input (for your digital camera, USB drive or • memory card USB drive) • Technology • TV Guide On ScreenTM Video: • 1024 x 1080 Display Resolution (42") • 1366 x 768 Display Resolution (55") &#...
... System Control (Only HDX models) - Refer to change without prior notice. Models: Please access our website: www.hitachi.us/tv INPUTS/OUTPUTS • Wideband Component Y, Pb,Pr 3 • Composite Video 5 • S-Video 2 • Antenna (RF)Inputs 1 • Audio Output 1 • Monitor Output 1 • Optical... Protection V1.1 Compatible) • Photo Input (for your digital camera, USB drive or • memory card USB drive) • Technology • TV Guide On ScreenTM Video: • 1024 x 1080 Display Resolution (42") • 1366 x 768 Display Resolution (55") &#...


