Owners Guide
Page 3
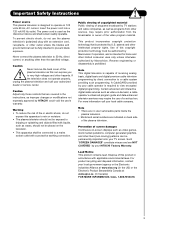
... serial numbers are NOT COVERED by U.S. Important Safety Instructions Power source This plasma television is designed to a mains socket outlet with a protective earthing connection. For more information call your HITACHI Factory Warranty. Lead Notice This product contains lead. For product recycling and... outlet. FOR MORE INFORMATION, CALL 1-800-HITACHI. 3 Caution Never remove the back cover of programs broadcast by TV stations and cable companies, as well as improper changes or modifications not expressly approved by your TV screen. Such "SCREEN DAMAGES" constitute misuse ...
... serial numbers are NOT COVERED by U.S. Important Safety Instructions Power source This plasma television is designed to a mains socket outlet with a protective earthing connection. For more information call your HITACHI Factory Warranty. Lead Notice This product contains lead. For product recycling and... outlet. FOR MORE INFORMATION, CALL 1-800-HITACHI. 3 Caution Never remove the back cover of programs broadcast by TV stations and cable companies, as well as improper changes or modifications not expressly approved by your TV screen. Such "SCREEN DAMAGES" constitute misuse ...

Owners Guide
Page 5
First time use How To Set Up Your New Hitachi Plasma Television To take measures to prevent the Plasma Television from the wall except when mounted using the wall mount bracket. 2. Wire ANTENNA Unless your Plasma Television is connected to a cable TV system or to transport it safely. A B A 42" 4 in. ... cause fire or defect. 2. If the Power Swivel feature will be used , the Plasma television should be sufficient. However, if you purchased the wall mount bracket option, please ask for model 55HDT79 & 55HDX99 is moved it is moved, two people are located in fig. (a). 6....
First time use How To Set Up Your New Hitachi Plasma Television To take measures to prevent the Plasma Television from the wall except when mounted using the wall mount bracket. 2. Wire ANTENNA Unless your Plasma Television is connected to a cable TV system or to transport it safely. A B A 42" 4 in. ... cause fire or defect. 2. If the Power Swivel feature will be used , the Plasma television should be sufficient. However, if you purchased the wall mount bracket option, please ask for model 55HDT79 & 55HDX99 is moved it is moved, two people are located in fig. (a). 6....

Owners Guide
Page 6
Please access our web site at: www.hitachi.us/tv for recommended accessories for the Plasma TV depending on the back of your TV. This metal is use STAND PLATE METAL STEP (2): Please remove the 3 screws and the STAND PLATE metal from the TV, then put back only the screw to the back cover.... the Base. so it needs to be remove to separate the TV from the STAND BASE. 4 SCREWS 3 SCREWS STAND PLATE METAL PLACE BACK THIS SCREW TV STAND BASE NOTE: Use the specified WALL MOUNT base for your new HITACHI Plasma Television SETTING FOR WALL MOUNTING STEP (1) : Please locate the STAND PLATE...
Please access our web site at: www.hitachi.us/tv for recommended accessories for the Plasma TV depending on the back of your TV. This metal is use STAND PLATE METAL STEP (2): Please remove the 3 screws and the STAND PLATE metal from the TV, then put back only the screw to the back cover.... the Base. so it needs to be remove to separate the TV from the STAND BASE. 4 SCREWS 3 SCREWS STAND PLATE METAL PLACE BACK THIS SCREW TV STAND BASE NOTE: Use the specified WALL MOUNT base for your new HITACHI Plasma Television SETTING FOR WALL MOUNTING STEP (1) : Please locate the STAND PLATE...

Owners Guide
Page 9
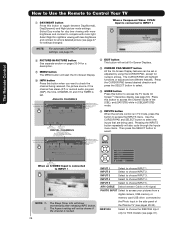
...audio devices. Pressing the Light button will illuminate the backlight for best results. 2. SOURCE ACCESS BUTTONS (TV, DVD, CBL, STB, PVR/VCR, AMP/CD) Changes the mode of the Universal Remote Control to... (TV, CBL, STB, PVR/VCR) Exits out of the OSD, INPUTS or AV NET menu systems if their menu is only available for a complete description of all of the functions on your HITACHI Plasma TV, ...the new remote control is in Set-Top-Box (STB) mode or when the TV uses a digital input. Push down to change channels ...
...audio devices. Pressing the Light button will illuminate the backlight for best results. 2. SOURCE ACCESS BUTTONS (TV, DVD, CBL, STB, PVR/VCR, AMP/CD) Changes the mode of the Universal Remote Control to... (TV, CBL, STB, PVR/VCR) Exits out of the OSD, INPUTS or AV NET menu systems if their menu is only available for a complete description of all of the functions on your HITACHI Plasma TV, ...the new remote control is in Set-Top-Box (STB) mode or when the TV uses a digital input. Push down to change channels ...

Owners Guide
Page 11
..., adjusting volume, etc. ቪ LEARNING AV NET sensor Point your digital still pictures (see page 47). 4. NOTES: 1. Your HITACHI Plasma TV will illuminate. TV MAIN POWER is shown. Your component outputs may be labeled Y-CBCR. It may be necessary to adjust TINT to obtain optimum picture quality...see Owners Guide). ቫ SIDE INPUT JACKS (for IN PUT: 5) INPUT 5 provide Y-PBPR jacks for remote ON/OFF operation. The Plasma TV is set to the TV's PR input. 3. Your component outputs may use . 2. In this input. INPUT 3, INPUT 4 and INPUT 5 (Y/VIDEO) can not turn ...
..., adjusting volume, etc. ቪ LEARNING AV NET sensor Point your digital still pictures (see page 47). 4. NOTES: 1. Your HITACHI Plasma TV will illuminate. TV MAIN POWER is shown. Your component outputs may be labeled Y-CBCR. It may be necessary to adjust TINT to obtain optimum picture quality...see Owners Guide). ቫ SIDE INPUT JACKS (for IN PUT: 5) INPUT 5 provide Y-PBPR jacks for remote ON/OFF operation. The Plasma TV is set to the TV's PR input. 3. Your component outputs may use . 2. In this input. INPUT 3, INPUT 4 and INPUT 5 (Y/VIDEO) can not turn ...

Owners Guide
Page 15
... OUTPUT R L DVI DIGITAL OUTPUT CAPABILITY DVD , Set Top Box, Video Game Console. Use the CURSOR PAD (̆ and ̄) to select the Input of your Plasma TV is dependent on the model and features of each component for the location of components and features. The exact arrangement you use DVI to HDMI...
... OUTPUT R L DVI DIGITAL OUTPUT CAPABILITY DVD , Set Top Box, Video Game Console. Use the CURSOR PAD (̆ and ̄) to select the Input of your Plasma TV is dependent on the model and features of each component for the location of components and features. The exact arrangement you use DVI to HDMI...
Owners Guide
Page 21
... VCR AUDIO OUT VIDEO OUT OUTPUT VCR Stereo System Amplifier OPTICAL IN CONNECTING MONITOR OUT The MONITOR OUT terminal outputs video and audio of the Plasma TV to the OUTPUT (AUDIO/R) jack on the right. The "OPTICAL OUT" from the Optical out to the Optical input of the VCR or the ... Laserdisk player. Connecting Video: Connect the cable from the AUDIO OUT of a separate Stereo System Amplifier as shown on the Rear Panel on the TV Rear Panel. Video takes priority. 21 Connect the cable from the VIDEO INPUT of the VCR or the laserdisc player to the INPUT (MONO)/L(AUDIO...
... VCR AUDIO OUT VIDEO OUT OUTPUT VCR Stereo System Amplifier OPTICAL IN CONNECTING MONITOR OUT The MONITOR OUT terminal outputs video and audio of the Plasma TV to the OUTPUT (AUDIO/R) jack on the right. The "OPTICAL OUT" from the Optical out to the Optical input of the VCR or the ... Laserdisk player. Connecting Video: Connect the cable from the AUDIO OUT of a separate Stereo System Amplifier as shown on the Rear Panel on the TV Rear Panel. Video takes priority. 21 Connect the cable from the VIDEO INPUT of the VCR or the laserdisc player to the INPUT (MONO)/L(AUDIO...

Owners Guide
Page 22
... control to control the Audio/Video equipment command without the equipment's remote control. You can connect the Plasma Television with an AV Network feature. Connect your Hitachi Plasma Television and external Audio/Video equipment (VCR and DVD Player). Place the IR Blaster in place. 3. Infrared...sensor of the external components you can use Connecting External Video Sources Your HITACHI Plasma Television is setup, it allows your IR Blaster cable to control your equipment using your HITACHI Plasma TV Remote Control. CONNECTING EXTERNAL AUDIO/VIDEO COMPONENTS TO IR OUT FOR AV ...
... control to control the Audio/Video equipment command without the equipment's remote control. You can connect the Plasma Television with an AV Network feature. Connect your Hitachi Plasma Television and external Audio/Video equipment (VCR and DVD Player). Place the IR Blaster in place. 3. Infrared...sensor of the external components you can use Connecting External Video Sources Your HITACHI Plasma Television is setup, it allows your IR Blaster cable to control your equipment using your HITACHI Plasma TV Remote Control. CONNECTING EXTERNAL AUDIO/VIDEO COMPONENTS TO IR OUT FOR AV ...
Owners Guide
Page 23
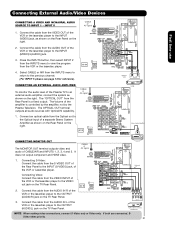
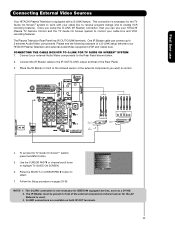
...necessary for IEEE1394 equipped devices, such as a D-VHS. 2. One IR Blaster cable can use Connecting External Video Sources Your HITACHI Plasma Television is equipped with your external Audio/Video components to enable VCR recording features. Please see the following example of the external...external components you can connect up to 2 external Audio/Video components. First time use your HITACHI Plasma TV Remote Control and the TV Guide On Screen system to control your HITACHI Plasma Television and external Audio/Video equipment (VCR and Cable box). Place the IR Blaster in ...
...necessary for IEEE1394 equipped devices, such as a D-VHS. 2. One IR Blaster cable can use Connecting External Video Sources Your HITACHI Plasma Television is equipped with your external Audio/Video components to enable VCR recording features. Please see the following example of the external...external components you can connect up to 2 external Audio/Video components. First time use your HITACHI Plasma TV Remote Control and the TV Guide On Screen system to control your HITACHI Plasma Television and external Audio/Video equipment (VCR and Cable box). Place the IR Blaster in ...
Owners Guide
Page 25
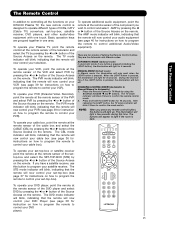
...the remote will appear to control your VCR). There are two modes of the Source Access on the remote. The buttons will now control your Plasma TV, point the remote control at the remote sensor of the settop-box and select the SET-TOP-BOX (STB) by pressing the ̇ or... on the remote. The Remote Control The Remote Control In addition to controlling all the functions on your HITACHI Plasma TV, the new remote control is designed to operate different types of VCRs, CATV (Cable TV) converters, set -top-box). The PVR mode indicator will blink, indicating that the remote will now...
...the remote will appear to control your VCR). There are two modes of the Source Access on the remote. The buttons will now control your Plasma TV, point the remote control at the remote sensor of the settop-box and select the SET-TOP-BOX (STB) by pressing the ̇ or... on the remote. The Remote Control The Remote Control In addition to controlling all the functions on your HITACHI Plasma TV, the new remote control is designed to operate different types of VCRs, CATV (Cable TV) converters, set -top-box). The PVR mode indicator will blink, indicating that the remote will now...
Owners Guide
Page 28
... through the Inputs menu items. Then press the SELECT button to select. Press this button to access the Channel Guide of the Plasma TV (see page 31). 28 button repeatedly will highlight ቫ INFO button Press this button when you want to check the channel being...INPUT 4 Photo Input IEEE 1394 Air / Cable Input 1 Input 2 Move SEL Sel. Program Information Program Run Time INFO Show Name 3:00PM- 3:30PM ST TV-G ALT U.S. Select to select. INPUT 5 Select to choose INPUT 3. Audio Broadcast Broadcast Rating Picture Format ተ INPUTS button When the remote control is ...
... through the Inputs menu items. Then press the SELECT button to select. Press this button to access the Channel Guide of the Plasma TV (see page 31). 28 button repeatedly will highlight ቫ INFO button Press this button when you want to check the channel being...INPUT 4 Photo Input IEEE 1394 Air / Cable Input 1 Input 2 Move SEL Sel. Program Information Program Run Time INFO Show Name 3:00PM- 3:30PM ST TV-G ALT U.S. Select to select. INPUT 5 Select to choose INPUT 3. Audio Broadcast Broadcast Rating Picture Format ተ INPUTS button When the remote control is ...

Owners Guide
Page 33
...move with a 1080i/720p signal. This feature is not available with every press of the video inputs. Picture-in-Picture (PIP) Your HITACHI Plasma TV incorporates one Tuner technology designed for PIP availability. Please see page 34). The Picture-in-Picture feature is viewed in the main picture, ...Press the CURSOR PAD ( ̇ or ̈) to cycle through the three different modes. This feature allows you want to watch a TV program while viewing other programs from any of the CURSOR PAD buttons. Please refer to view Digital Channels and Video inputs on the screen. Use...
...move with a 1080i/720p signal. This feature is not available with every press of the video inputs. Picture-in-Picture (PIP) Your HITACHI Plasma TV incorporates one Tuner technology designed for PIP availability. Please see page 34). The Picture-in-Picture feature is viewed in the main picture, ...Press the CURSOR PAD ( ̇ or ̈) to cycle through the three different modes. This feature allows you want to watch a TV program while viewing other programs from any of the CURSOR PAD buttons. Please refer to view Digital Channels and Video inputs on the screen. Use...

Owners Guide
Page 45
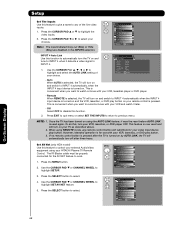
... conspicuous noise in the picture. Turn On/Off the 3:2 Pulldown detection feature. * and ** For HDX Model Only (HDT models use . Press EXIT on your HITACHI Plasma TV. 2. Vide o Audio TV Guide On Screen Channel Manager Locks Timers Setup Power Swivel Move SEL Select This part of the screen shows which Remote Control buttons to...
... conspicuous noise in the picture. Turn On/Off the 3:2 Pulldown detection feature. * and ** For HDX Model Only (HDT models use . Press EXIT on your HITACHI Plasma TV. 2. Vide o Audio TV Guide On Screen Channel Manager Locks Timers Setup Power Swivel Move SEL Select This part of the screen shows which Remote Control buttons to...

Owners Guide
Page 51
... CURSOR PAD ̇ or ̈ to highlight surround option. 2.- This is often done to create a more speakers to the rear of the Plasma TV internal speakers. Use cursor ̆ or ̄ to adjust the function. 3. Off : turns off the surround sound effect. Balance Surround Bass... with normal surround technology. Use cursor ̇ or ̈ to select menu item. Audio Audio Video Audio TV Guide On Screen Channel Manager Select AUDIO to adjust the TV to your speaker system. Wide Surround : Reproduce much better quality 5 channel sound signals from one dimension ( Mono...
... CURSOR PAD ̇ or ̈ to highlight surround option. 2.- This is often done to create a more speakers to the rear of the Plasma TV internal speakers. Use cursor ̆ or ̄ to adjust the function. 3. Off : turns off the surround sound effect. Balance Surround Bass... with normal surround technology. Use cursor ̇ or ̈ to select menu item. Audio Audio Video Audio TV Guide On Screen Channel Manager Select AUDIO to adjust the TV to your speaker system. Wide Surround : Reproduce much better quality 5 channel sound signals from one dimension ( Mono...

Owners Guide
Page 53
... (Check all setting are automatically updated several times a day. On-Screen Display 53 TV Guide On Screen TV Guide On Screen The TV Guide On-Screen system is complete, the program listings are correct please select Yes to... continue. *If a setting is wrong please select No to this feature. 2. To Setup the TV Guide On Screen System: 1. Screen 4: Are the above settings correct ? If using a VCR, you immediate access to...: Pressing the GUIDE button also allows you must first setup the Plasma TV as shown on Page 23. Use the CURSOR PAD ̄ to continue.
... (Check all setting are automatically updated several times a day. On-Screen Display 53 TV Guide On Screen TV Guide On Screen The TV Guide On-Screen system is complete, the program listings are correct please select Yes to... continue. *If a setting is wrong please select No to this feature. 2. To Setup the TV Guide On Screen System: 1. Screen 4: Are the above settings correct ? If using a VCR, you immediate access to...: Pressing the GUIDE button also allows you must first setup the Plasma TV as shown on Page 23. Use the CURSOR PAD ̄ to continue.

Owners Guide
Page 55
.... Screen 13: When a CODE for your VCR. The Plasma TV should be in standby mode in order to see other code alternatives that the setup procedure is complete, then press SELECT button to the TV Guide Instruction Book. 55 Screen 14: None of the Hitachi codes appeared to continually receive updated program listings from...
.... Screen 13: When a CODE for your VCR. The Plasma TV should be in standby mode in order to see other code alternatives that the setup procedure is complete, then press SELECT button to the TV Guide Instruction Book. 55 Screen 14: None of the Hitachi codes appeared to continually receive updated program listings from...
Owners Guide
Page 68
...disabled in the INPUTS selection. INPUT 4 Auto Link Use this function to watch it must be reset before AUTO LINK is selected, the TV will turn on and switch to record a movie with your external Audio/Video equipment using the AUTO LINK feature, it later. - This... Saver 1. Off Select OFF to any remote control button will automatically turn your HITACHI Plasma TV Remote Control. NOTE: 1. Once the TV has been turned on by AUTO LINK, the TV will substitute for use with your TV as described above. 2. When using REMOTE mode, any of your VCR, laserdisc...
...disabled in the INPUTS selection. INPUT 4 Auto Link Use this function to watch it must be reset before AUTO LINK is selected, the TV will turn on and switch to record a movie with your external Audio/Video equipment using the AUTO LINK feature, it later. - This... Saver 1. Off Select OFF to any remote control button will automatically turn your HITACHI Plasma TV Remote Control. NOTE: 1. Once the TV has been turned on by AUTO LINK, the TV will substitute for use with your TV as described above. 2. When using REMOTE mode, any of your VCR, laserdisc...

Owners Guide
Page 72
... wait while AV NET Learns the command.... If the IR code transfer was not completed, the screen below appears, then select "OK" to AV NET. TV Softkeys POWER CH̆ VOL̆ MUTE CH̄ VOL̄ AUDIO SOURCE 1 SOURCE 2 SOURCE 3 SOURCE 4 SOURCE 5 SOURCE 6 SOURCE 7 SOURCE 8 SOURCE 9 ... Receiver Setup Press and hold the VOL ̆ button of your A/V Receiver remote control while pointing directly at the learning AV NET sensor of the Plasma TV (located at the lower right corner of the screen) at a distance of your A/V Receiver. Move SEL Select Cancel OK 11. Brand Name IR ...
... wait while AV NET Learns the command.... If the IR code transfer was not completed, the screen below appears, then select "OK" to AV NET. TV Softkeys POWER CH̆ VOL̆ MUTE CH̄ VOL̄ AUDIO SOURCE 1 SOURCE 2 SOURCE 3 SOURCE 4 SOURCE 5 SOURCE 6 SOURCE 7 SOURCE 8 SOURCE 9 ... Receiver Setup Press and hold the VOL ̆ button of your A/V Receiver remote control while pointing directly at the learning AV NET sensor of the Plasma TV (located at the lower right corner of the screen) at a distance of your A/V Receiver. Move SEL Select Cancel OK 11. Brand Name IR ...

Owners Guide
Page 74
...Settings Press and hold the ̈ "Play button" of the DVD remote control while pointing directly at the learning AV NET sensor of the Plasma TV (located at the lower right corner of the screen) at a distance of the DVD. 17. AV Net Setup Wizard : Custom Settings ...PAD ̇ or ̈ to choose the device you wish to learn ? Custom Device DVD3 13. Select another softkey to learn . (Example: DVD 3) 8. TV Softkeys POWER ̇̇ ̈̈ MENU ̇̇ ̈ ̈̈ SELECT ̆ ̈ EXIT ̄ ̇ Move SEL Select Back...
...Settings Press and hold the ̈ "Play button" of the DVD remote control while pointing directly at the learning AV NET sensor of the Plasma TV (located at the lower right corner of the screen) at a distance of the DVD. 17. AV Net Setup Wizard : Custom Settings ...PAD ̇ or ̈ to choose the device you wish to learn ? Custom Device DVD3 13. Select another softkey to learn . (Example: DVD 3) 8. TV Softkeys POWER ̇̇ ̈̈ MENU ̇̇ ̈ ̈̈ SELECT ̆ ̈ EXIT ̄ ̇ Move SEL Select Back...

Owners Guide
Page 77
... select the function. 3. OR Audio Out: • Select AUDIO OUT FIXED to have Audio volume that can control the volume output by the Plasma TV Volume Up/Down. You can be available (grayed out). 2. Use the CURSOR PAD ̇ or ̈ to output the audio and video..., AIR). When using MONITOR OUT for some kinds of external components. YES S-Video_1 YES YES YES YES Video_1 - YES ANT Analog Channel Video - When TV TUNER OUT is not available for recording, set the VIDEO OUT to change. 2. YES Cable) Analog Channel Video - YES YES YES Input 5 HDMI_5 -...
... select the function. 3. OR Audio Out: • Select AUDIO OUT FIXED to have Audio volume that can control the volume output by the Plasma TV Volume Up/Down. You can be available (grayed out). 2. Use the CURSOR PAD ̇ or ̈ to output the audio and video..., AIR). When using MONITOR OUT for some kinds of external components. YES S-Video_1 YES YES YES YES Video_1 - YES ANT Analog Channel Video - When TV TUNER OUT is not available for recording, set the VIDEO OUT to change. 2. YES Cable) Analog Channel Video - YES YES YES Input 5 HDMI_5 -...


