Owners Guide
Page 1
Updated 04.25.06 PLASMA TELEVISION Operating Guide for energy efficiency. has determined that this product meets the Energy Star® guidelines for 42HDT52, 42HDT52A and 55HDT52 IMPORTANT SAFETY INSTRUCTIONS 2-3 FIRST TIME USE ...4-22 THE REMOTE CONTROL ...23-41 ON-SCREEN DISPLAY ...42-90 USEFUL INFORMATION...91-98 END USER LICENSE AGREEMENT FOR HITACHI DTV SOFTWARE 99 APPENDIXES ...100-101 INDEX ...102 As an Energy Star® Partner, Hitachi, Ltd.
Updated 04.25.06 PLASMA TELEVISION Operating Guide for energy efficiency. has determined that this product meets the Energy Star® guidelines for 42HDT52, 42HDT52A and 55HDT52 IMPORTANT SAFETY INSTRUCTIONS 2-3 FIRST TIME USE ...4-22 THE REMOTE CONTROL ...23-41 ON-SCREEN DISPLAY ...42-90 USEFUL INFORMATION...91-98 END USER LICENSE AGREEMENT FOR HITACHI DTV SOFTWARE 99 APPENDIXES ...100-101 INDEX ...102 As an Energy Star® Partner, Hitachi, Ltd.
Owners Guide
Page 2
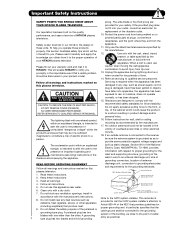
... or other electrical circuits. 18. Protect the power cord from being walked on the quality, performance, and ease of service of HITACHI plasma televisions. Only use the attachments/accessories specified by the manufacturer, or sold with a dry cloth. 7. This will be located in ...the improbable event that produce heat. Televisions are YOUR HITACHI PLASMA TELEVISION provided for Our reputation has been built on or pinched particularly at plugs, convenience receptacles, and the point where they exit ...
... or other electrical circuits. 18. Protect the power cord from being walked on the quality, performance, and ease of service of HITACHI plasma televisions. Only use the attachments/accessories specified by the manufacturer, or sold with a dry cloth. 7. This will be located in ...the improbable event that produce heat. Televisions are YOUR HITACHI PLASMA TELEVISION provided for Our reputation has been built on or pinched particularly at plugs, convenience receptacles, and the point where they exit ...
Owners Guide
Page 3
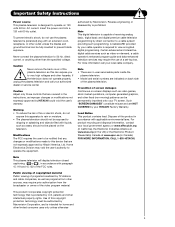
... high voltages and other than the specified voltage. Caution Never remove the back cover of the plasma television as improper changes or modifications not expressly approved by HITACHI could void the user's warranty. Home Electronics Division may void the user's authority to view encrypted...parts inside the plasma television. • Model and serial numbers are not expressly approved by your local cable company. Dispose of the FCC rules. FOR MORE INFORMATION, CALL 1-800-HITACHI. This product incorporates copyright protection technology that are NOT COVERED by TV stations and cable...
... high voltages and other than the specified voltage. Caution Never remove the back cover of the plasma television as improper changes or modifications not expressly approved by HITACHI could void the user's warranty. Home Electronics Division may void the user's authority to view encrypted...parts inside the plasma television. • Model and serial numbers are not expressly approved by your local cable company. Dispose of the FCC rules. FOR MORE INFORMATION, CALL 1-800-HITACHI. This product incorporates copyright protection technology that are NOT COVERED by TV stations and cable...
Owners Guide
Page 4
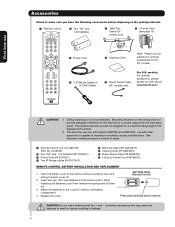
...; 2 IR Mouse Cables or G-LINK Cables ¶ Power Swivel Cable (42" models only) access our web site at: www.hitachi.us/tv CAUTION: 1. HL02065). · Two "AA" size, 1.5V batteries (P# FQ00021). » Power Cord (P# EV01841). ¿ Two... accessories before disposing of stand. ³ Remote Control Unit CLU-3851WL (Part No. This plasma television product is designed for the front glass panel. Mounting the panel on bottom of the packing... "AA" size batteries for the 55" models. BOTTOM VIEW (Remote Control) Press down and sliding the back cover off. 2. Replace the cover....
...; 2 IR Mouse Cables or G-LINK Cables ¶ Power Swivel Cable (42" models only) access our web site at: www.hitachi.us/tv CAUTION: 1. HL02065). · Two "AA" size, 1.5V batteries (P# FQ00021). » Power Cord (P# EV01841). ¿ Two... accessories before disposing of stand. ³ Remote Control Unit CLU-3851WL (Part No. This plasma television product is designed for the front glass panel. Mounting the panel on bottom of the packing... "AA" size batteries for the 55" models. BOTTOM VIEW (Remote Control) Press down and sliding the back cover off. 2. Replace the cover....

Owners Guide
Page 5
...Wire ANTENNA Unless your Plasma Television is connected to a cable TV system or to a centralized antenna system, a good outdoor color TV antenna is moved, two people are not included (Optional). 42" 55" 5 However, if... fig. (b). First time use How To Set Up Your New Hitachi Plasma Television To take measures to prevent the Plasma Television from tipping over and prevent possible injury it is important to... on the rear of the Plasma Rear Panel. When moving the main unit As this product is heavy, whenever it is recommended for model 55HDT52 are required to transport it safely...
...Wire ANTENNA Unless your Plasma Television is connected to a cable TV system or to a centralized antenna system, a good outdoor color TV antenna is moved, two people are not included (Optional). 42" 55" 5 However, if... fig. (b). First time use How To Set Up Your New Hitachi Plasma Television To take measures to prevent the Plasma Television from tipping over and prevent possible injury it is important to... on the rear of the Plasma Rear Panel. When moving the main unit As this product is heavy, whenever it is recommended for model 55HDT52 are required to transport it safely...

Owners Guide
Page 6
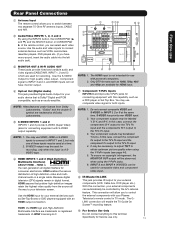
...the antenna mixer. Consult your new HITACHI Plasma Television VIEWING The best picture is recommended. AIR To second antenna CABLE To outdoor antenna or CATV cable When both VHF and UHF antennas are connected Attach an optional antenna cable mixer to the TV antenna terminal, and connect the cables...' 20' S 80 BEST HORIZONTAL ANTENNA CONNECTIONS TO REAR JACK PANEL 4" Minimum L 5' 10' 15' 20' VIEWING ANGLE 80 S VHF (75-Ohm) antenna/CATV (Cable TV) When using a 300-Ohm twin lead from an outdoor antenna, connect the VHF or UHF antenna leads to screws of the VHF or UHF adapter...
...the antenna mixer. Consult your new HITACHI Plasma Television VIEWING The best picture is recommended. AIR To second antenna CABLE To outdoor antenna or CATV cable When both VHF and UHF antennas are connected Attach an optional antenna cable mixer to the TV antenna terminal, and connect the cables...' 20' S 80 BEST HORIZONTAL ANTENNA CONNECTIONS TO REAR JACK PANEL 4" Minimum L 5' 10' 15' 20' VIEWING ANGLE 80 S VHF (75-Ohm) antenna/CATV (Cable TV) When using a 300-Ohm twin lead from an outdoor antenna, connect the VHF or UHF antenna leads to screws of the VHF or UHF adapter...

Owners Guide
Page 7
... an antenna adapter (300-Ohm to the Photo Input in front of the corresponding IR window of the Plasma television. This connection allows your TV, and the TV Guide On ScreenTM system, to control your Plasma Television when A/V Network is used to connect your digital camera to 75-Ohm). IEEE1394 Cable This cable...cable must place the IR Mouse in the side of your digital television to an audio amplifier with an S-Video feature in place of the Plasma Television. Phono Connector Used on all standard video and audio cables which connect to the left and right audio inputs on the rear and ...
... an antenna adapter (300-Ohm to the Photo Input in front of the corresponding IR window of the Plasma television. This connection allows your TV, and the TV Guide On ScreenTM system, to control your Plasma Television when A/V Network is used to connect your digital camera to 75-Ohm). IEEE1394 Cable This cable...cable must place the IR Mouse in the side of your digital television to an audio amplifier with an S-Video feature in place of the Plasma Television. Phono Connector Used on all standard video and audio cables which connect to the left and right audio inputs on the rear and ...

Owners Guide
Page 8
... the Freeze mode of the Remote Control. LAST CHANNEL BUTTON (TV, CBL, STB, PVR) Switches between DAY and NIGHT mode. INPUTS BUTTON (TV, AMP) Accesses the INPUTS menu system. / CHANNEL WHEEL (TV, CBL, STB, PVR/VCR, AMP/CD) Scroll up and down on your HITACHI Plasma TV, the new remote control is displayed. Pressing any button...
... the Freeze mode of the Remote Control. LAST CHANNEL BUTTON (TV, CBL, STB, PVR) Switches between DAY and NIGHT mode. INPUTS BUTTON (TV, AMP) Accesses the INPUTS menu system. / CHANNEL WHEEL (TV, CBL, STB, PVR/VCR, AMP/CD) Scroll up and down on your HITACHI Plasma TV, the new remote control is displayed. Pressing any button...
Owners Guide
Page 9
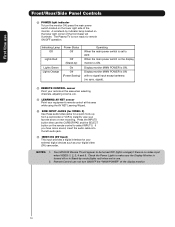
...774; INPUT 5 L/MONO AUDIO R ቨ ቢ SIDE POWER button Press this button to OFF or the TV is unplugged, the clock will be turned ON/OFF manually. One of the differences are the handles that are only... cables. This button also serves as the SELECT button when in the top right corner of the 55" model is recommended to leave the "MAIN POWER" to the claw. The volume level will stop...mode. ቤ PHOTO INPUT Insert USB cable from the 42" models. Press again to turn the Plasma Television ON/OFF. Hook the band to ON condition (lights red) for the complete system, and ...
...774; INPUT 5 L/MONO AUDIO R ቨ ቢ SIDE POWER button Press this button to OFF or the TV is unplugged, the clock will be turned ON/OFF manually. One of the differences are the handles that are only... cables. This button also serves as the SELECT button when in the top right corner of the 55" model is recommended to leave the "MAIN POWER" to the claw. The volume level will stop...mode. ቤ PHOTO INPUT Insert USB cable from the 42" models. Press again to turn the Plasma Television ON/OFF. Hook the band to ON condition (lights red) for the complete system, and ...
Owners Guide
Page 10
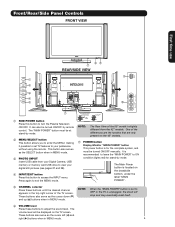
... jacks for your external digital devices such as your favorite show or new recording. A red stand-by mode (lights red) when not in use. 2. Your HITACHI Plasma TV will illuminate. Display monitor MAIN POWER is ON with no signal input except antenna (no video input when VIDEO: 1, 2, 3, 4 and 5. Check the Power Light to.... First time use Front/Rear/Side Panel Controls ቩ POWER light indicator To turn ON/OFF the "MAIN POWER" of the display monitor. 10 The Plasma TV is ON. Display monitor MAIN POWER is no sync.
... jacks for your external digital devices such as your favorite show or new recording. A red stand-by mode (lights red) when not in use. 2. Your HITACHI Plasma TV will illuminate. Display monitor MAIN POWER is ON with no signal input except antenna (no video input when VIDEO: 1, 2, 3, 4 and 5. Check the Power Light to.... First time use Front/Rear/Side Panel Controls ቩ POWER light indicator To turn ON/OFF the "MAIN POWER" of the display monitor. 10 The Plasma TV is ON. Display monitor MAIN POWER is no sync.
Owners Guide
Page 11
...to your television screen. ቩ IR Blaster/G-LINK This jack provides IR output to the TV's PR input. 3. Specifically for Service use composite video signal for use with your Plasma Television's remote control in a single cable. Only DTV formats such as 1080i, 720p,... feature. "Dolby" and the double-D symbol are trademarks or registered ቪ For Service Use Only trademarks of high-definition video and multichannel audio in TV mode. Your component outputs may use only. 11 INPUT 3 and INPUT 4 (Y/VIDEO) can be labeled ቦ S-VIDEO INPUTS 1 and 2 INPUTS...
...to your television screen. ቩ IR Blaster/G-LINK This jack provides IR output to the TV's PR input. 3. Specifically for Service use composite video signal for use with your Plasma Television's remote control in a single cable. Only DTV formats such as 1080i, 720p,... feature. "Dolby" and the double-D symbol are trademarks or registered ቪ For Service Use Only trademarks of high-definition video and multichannel audio in TV mode. Your component outputs may use only. 11 INPUT 3 and INPUT 4 (Y/VIDEO) can be labeled ቦ S-VIDEO INPUTS 1 and 2 INPUTS...

Owners Guide
Page 13
... wire. Photo Input IEEE 1394 Cable Air Input 1 Move SEL Sel. 13 Then press the SELECT button or the CURSOR PAD ̈ to confirm your TV. 4. Fold and close the ferrite core while being careful not to left audio jack of each component for the location of the VIDEO cable. If... connection cord plugs when connecting to pinch the cable. If you do not, the played back picture may need to modify them to accommodate your Plasma TV is dependent on the Ferrite ferrite core near the Photo Input Core or IEEE 1394 Input as shown. 2. IEEE 1394 Cable Ferrite Core USB Cable...
... wire. Photo Input IEEE 1394 Cable Air Input 1 Move SEL Sel. 13 Then press the SELECT button or the CURSOR PAD ̈ to confirm your TV. 4. Fold and close the ferrite core while being careful not to left audio jack of each component for the location of the VIDEO cable. If... connection cord plugs when connecting to pinch the cable. If you do not, the played back picture may need to modify them to accommodate your Plasma TV is dependent on the Ferrite ferrite core near the Photo Input Core or IEEE 1394 Input as shown. 2. IEEE 1394 Cable Ferrite Core USB Cable...

Owners Guide
Page 19
...Digital Transmission Content Protection (DTCP). 2. Press the INPUTS button on the Remote Control. 3. When using IEEE1394 connections, you to control the D-VHS from the TV IEEE1394 menu (see page 29). / G-LINK IEEE1394 DV INPUT IEEE1394 Cabl e LINE OUT R (MONO)/L VIDEO 1 R (MONO)/L VIDEO 2 S-VIDEO ... TA L INTERF ACE IEEE1394 Digital VCR (D-VHS) 19 IEEE 1394 allows the plasma television and the external device to the IEEE1394 input terminals shown below. It will be received by the TV. This connection also enables you to control basic equipment functions (such as a Digital...
...Digital Transmission Content Protection (DTCP). 2. Press the INPUTS button on the Remote Control. 3. When using IEEE1394 connections, you to control the D-VHS from the TV IEEE1394 menu (see page 29). / G-LINK IEEE1394 DV INPUT IEEE1394 Cabl e LINE OUT R (MONO)/L VIDEO 1 R (MONO)/L VIDEO 2 S-VIDEO ... TA L INTERF ACE IEEE1394 Digital VCR (D-VHS) 19 IEEE 1394 allows the plasma television and the external device to the IEEE1394 input terminals shown below. It will be received by the TV. This connection also enables you to control basic equipment functions (such as a Digital...

Owners Guide
Page 20
... CONNECTING A VIDEO AND MONAURAL AUDIO SOURCE TO INPUT 1, INPUT 2 OR INPUT 5 1. Connect the Cable and/or Air cables 2. The Volume of the Plasma TV to the INPUT (S-VIDEO) jack, of the VCR or Laserdisk player. Connecting S-Video: Connect the cable from the AUDIO IN R of CABLE/AIR and ... pages 88 and 89. Connect the cable from the AUDIO IN L of the VCR or the laserdisc player to the OUTPUT (AUDIO/L) jack on the TV Rear Panel. / G-LINK Optional R L V S-VIDEO INPUT 2. Connect the cable from the VCR or the laserdisc player. 4. CONNECTING AN EXTERNAL AUDIO AMPLIFIER ...
... CONNECTING A VIDEO AND MONAURAL AUDIO SOURCE TO INPUT 1, INPUT 2 OR INPUT 5 1. Connect the Cable and/or Air cables 2. The Volume of the Plasma TV to the INPUT (S-VIDEO) jack, of the VCR or Laserdisk player. Connecting S-Video: Connect the cable from the AUDIO IN R of CABLE/AIR and ... pages 88 and 89. Connect the cable from the AUDIO IN L of the VCR or the laserdisc player to the OUTPUT (AUDIO/L) jack on the TV Rear Panel. / G-LINK Optional R L V S-VIDEO INPUT 2. Connect the cable from the VCR or the laserdisc player. 4. CONNECTING AN EXTERNAL AUDIO AMPLIFIER ...

Owners Guide
Page 21
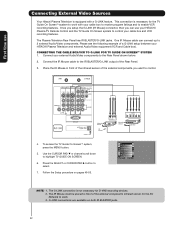
.... You can connect up to highlight SETUP. 6. Each IR Mouse cable can use Connecting External Video Sources Your Hitachi Plasma Television is setup, it allows your IR Mouse connector to select. 7. Use the CURSOR PAD ̄ or ...the Audio/Video components for the AV Network to the IR BLASTER output of an AV Network setup between your Hitachi Plasma Television and external Audio/Video equipment (VCR and DVD Player). Use the CURSOR PAD ̄ or channel ...Infrared Sensor OUTPUT Y PB/CB PR/CR R L DVD Player 4. This feature helps to control your Hitachi Plasma TV Remote Control.
.... You can connect up to highlight SETUP. 6. Each IR Mouse cable can use Connecting External Video Sources Your Hitachi Plasma Television is setup, it allows your IR Mouse connector to select. 7. Use the CURSOR PAD ̄ or ...the Audio/Video components for the AV Network to the IR BLASTER output of an AV Network setup between your Hitachi Plasma Television and external Audio/Video equipment (VCR and DVD Player). Use the CURSOR PAD ̄ or channel ...Infrared Sensor OUTPUT Y PB/CB PR/CR R L DVD Player 4. This feature helps to control your Hitachi Plasma TV Remote Control.
Owners Guide
Page 22
...VCR TO G-LINK FOR TV GUIDE ON SCREENTM SYSTEM 1. To access the TV Guide On-ScreenTM system, press the MENU button. 5. This connection is not necessary for D-VHS recording devices. 2. The Plasma Television Rear Panel has IR BLASTER/G-LINK jacks. Connect your HITACHI Plasma Television and external Audio/... a G-LINK setup between your external Audio/Video components to the Rear Panel shown below. 2. First time use your HITACHI Plasma TV Remote Control and the TV Guide On Screen system to control your cable box and VCR recording features. Please see the following example of the external...
...VCR TO G-LINK FOR TV GUIDE ON SCREENTM SYSTEM 1. To access the TV Guide On-ScreenTM system, press the MENU button. 5. This connection is not necessary for D-VHS recording devices. 2. The Plasma Television Rear Panel has IR BLASTER/G-LINK jacks. Connect your HITACHI Plasma Television and external Audio/... a G-LINK setup between your external Audio/Video components to the Rear Panel shown below. 2. First time use your HITACHI Plasma TV Remote Control and the TV Guide On Screen system to control your cable box and VCR recording features. Please see the following example of the external...
Owners Guide
Page 23
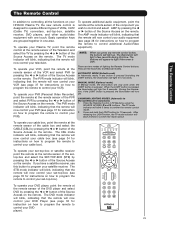
... satellite receiver, use this time. The Remote Control The Remote Control In addition to controlling all the functions on your HITACHI Plasma TV, the new remote control is dark. The TV mode indicator will blink, indicating that the remote will blink 3 times to control your cable box). The buttons will .... To operate your DVD player). 23 When the LIGHT button is pressed. CHANGING LIGHTING MODES (Automatic to Manual/Manual to control your Plasma TV, point the remote control at the remote sensor of the Source Access on how to program the remote to confirm the mode switch....
... satellite receiver, use this time. The Remote Control The Remote Control In addition to controlling all the functions on your HITACHI Plasma TV, the new remote control is dark. The TV mode indicator will blink, indicating that the remote will blink 3 times to control your cable box). The buttons will .... To operate your DVD player). 23 When the LIGHT button is pressed. CHANGING LIGHTING MODES (Automatic to Manual/Manual to control your Plasma TV, point the remote control at the remote sensor of the Source Access on how to program the remote to confirm the mode switch....

Owners Guide
Page 26
... button will start the On-Screen Display. ቫ INFO button Press this button when you want to choose Cable. Select to access the TV Guide On ScreenTM interactive display (see page 29). This Icon will appear only after releasing INFO button. Select to choose the IEEE1394 Input (...setting 16:9 Standard 1:00AM Aspect Mode Event Timer. The Aspect setting will show momentarily after the Event Timer in TV mode, press this button to access the Channel Guide of the Plasma TV (see page 44. ቩ PICTURE-IN-PICTURE button See separate section on pages 31-33 for a more...
... button will start the On-Screen Display. ቫ INFO button Press this button when you want to choose Cable. Select to access the TV Guide On ScreenTM interactive display (see page 29). This Icon will appear only after releasing INFO button. Select to choose the IEEE1394 Input (...setting 16:9 Standard 1:00AM Aspect Mode Event Timer. The Aspect setting will show momentarily after the Event Timer in TV mode, press this button to access the Channel Guide of the Plasma TV (see page 44. ቩ PICTURE-IN-PICTURE button See separate section on pages 31-33 for a more...

Owners Guide
Page 31
... while viewing other programs from any of the main picture. The Remote Control Picture-in-Picture (PIP) Your HITACHI Plasma TV incorporates Two Tuner technology designed for each. Sub-picture channel availability depends on the INPUT signal. This feature is only available with separate tuning control ...
... while viewing other programs from any of the main picture. The Remote Control Picture-in-Picture (PIP) Your HITACHI Plasma TV incorporates Two Tuner technology designed for each. Sub-picture channel availability depends on the INPUT signal. This feature is only available with separate tuning control ...

Owners Guide
Page 42
This part of the screen shows which selections are available. On-Screen Display 1. Use the CURSOR PAD (buttons ̆, ̄, ̇ and ̈) or CHANNEL WHEEL to navigate to quickly exit from a menu. Video Audio TV Guide On Screen Channel Manager Locks Timers Setup Power Swivel Move SEL Select This part of the screen shows which Remote Control buttons to use. Press MENU on the remote control to display the different features on the remote control to a different menu item. 3. Press EXIT on your HITACHI Plasma TV. 2. On-Screen Display 42
This part of the screen shows which selections are available. On-Screen Display 1. Use the CURSOR PAD (buttons ̆, ̄, ̇ and ̈) or CHANNEL WHEEL to navigate to quickly exit from a menu. Video Audio TV Guide On Screen Channel Manager Locks Timers Setup Power Swivel Move SEL Select This part of the screen shows which Remote Control buttons to use. Press MENU on the remote control to display the different features on the remote control to a different menu item. 3. Press EXIT on your HITACHI Plasma TV. 2. On-Screen Display 42


