Owners Guide
Page 1
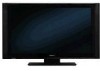
PLASMA TELEVISION Operating Guide for energy efficiency. has determined that this product meets the Energy Star® guidelines for 42HDT52, 42HDT52A and 55HDT52 IMPORTANT SAFETY INSTRUCTIONS 2-3 FIRST TIME USE ...4-22 THE REMOTE CONTROL ...23-41 ON-SCREEN DISPLAY ...42-90 USEFUL INFORMATION...91-98 END USER LICENSE AGREEMENT FOR HITACHI DTV SOFTWARE 99 APPENDIXES ...100-101 INDEX ...102 As an Energy Star® Partner, Hitachi, Ltd. Updated 04.25.06
PLASMA TELEVISION Operating Guide for energy efficiency. has determined that this product meets the Energy Star® guidelines for 42HDT52, 42HDT52A and 55HDT52 IMPORTANT SAFETY INSTRUCTIONS 2-3 FIRST TIME USE ...4-22 THE REMOTE CONTROL ...23-41 ON-SCREEN DISPLAY ...42-90 USEFUL INFORMATION...91-98 END USER LICENSE AGREEMENT FOR HITACHI DTV SOFTWARE 99 APPENDIXES ...100-101 INDEX ...102 As an Energy Star® Partner, Hitachi, Ltd. Updated 04.25.06
Owners Guide
Page 2
...a third grounding entry as recommended by the manufacturer. 17. Unplug this apparatus near any ventilation openings. Televisions are YOUR HITACHI PLASMA TELEVISION provided for your outlet, consult an electrician for tilt and stability. If an outside antenna is connected to overturn ... does not fit into apparatus, the apparatus has been exposed to a person. 16. Do not use Please fill out your HITACHI plasma television. The wide blade or the third prong are designed to qualified service personnel. Read these instructions. 3. Servicing is required ...
...a third grounding entry as recommended by the manufacturer. 17. Unplug this apparatus near any ventilation openings. Televisions are YOUR HITACHI PLASMA TELEVISION provided for your outlet, consult an electrician for tilt and stability. If an outside antenna is connected to overturn ... does not fit into apparatus, the apparatus has been exposed to a person. 16. Do not use Please fill out your HITACHI plasma television. The wide blade or the third prong are designed to qualified service personnel. Read these instructions. 3. Servicing is required ...
Owners Guide
Page 3
... to be placed on back side of receiving analog basic, digital basic and digital premium cable television programming by your TV screen. Home Electronics Division may require prior authorization from the broadcaster or owner of the FCC rules. Prevention of this... device that are NOT COVERED by Macrovision. For product recycling and disposal information, contact your HITACHI Factory Warranty. Note This plasma television will display television closed captioning, ( or ), in the instructions, as video games, stock market quotations, computer ...
... to be placed on back side of receiving analog basic, digital basic and digital premium cable television programming by your TV screen. Home Electronics Division may require prior authorization from the broadcaster or owner of the FCC rules. Prevention of this... device that are NOT COVERED by Macrovision. For product recycling and disposal information, contact your HITACHI Factory Warranty. Note This plasma television will display television closed captioning, ( or ), in the instructions, as video games, stock market quotations, computer ...
Owners Guide
Page 4
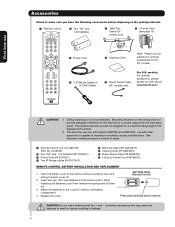
... panel. See important marking located on the ceiling does not provide adequate ventilation for the electronics or proper support for the 55" models. Replace the cover. Insert two new "AA" size batteries for a maximum tilting angle of the remote control ...tv CAUTION: 1. Open the battery cover of 45 degrees from vertical. 2. BOTTOM VIEW (Remote Control) Press down and sliding the back cover off. 2. This plasma television product is not recommended. use Accessories Check to swell or rupture resulting in instability causing possible injury. First time use with Hitachi...
... panel. See important marking located on the ceiling does not provide adequate ventilation for the electronics or proper support for the 55" models. Replace the cover. Insert two new "AA" size batteries for a maximum tilting angle of the remote control ...tv CAUTION: 1. Open the battery cover of 45 degrees from vertical. 2. BOTTOM VIEW (Remote Control) Press down and sliding the back cover off. 2. This plasma television product is not recommended. use Accessories Check to swell or rupture resulting in instability causing possible injury. First time use with Hitachi...

Owners Guide
Page 5
... time use How To Set Up Your New Hitachi Plasma Television To take measures to prevent the Plasma Television from tipping over and prevent possible injury it...yourself. 4. Caution when moving the Television, lift the handles (42" models), support the top frame (55" models) and the bottom frame as shown in position. Whenever the unit is recommended for best performance.... of the Plasma Rear Panel. Securing to a Wall 1. However, if you purchased the wall mount bracket option, please ask for model 55HDT52 are required to a centralized antenna system, a good outdoor color TV antenna is ...
... time use How To Set Up Your New Hitachi Plasma Television To take measures to prevent the Plasma Television from tipping over and prevent possible injury it...yourself. 4. Caution when moving the Television, lift the handles (42" models), support the top frame (55" models) and the bottom frame as shown in position. Whenever the unit is recommended for best performance.... of the Plasma Rear Panel. Securing to a Wall 1. However, if you purchased the wall mount bracket option, please ask for model 55HDT52 are required to a centralized antenna system, a good outdoor color TV antenna is ...

Owners Guide
Page 6
...to a Hi-Fi system's external speakers, the best audio performance will require some experimentation with speaker placement for the antenna mixer. If the TV's audio output will be located in a different section of the room. For best stereo separation, place the external speakers at least four ...sizes and acoustical environments will be obtained by sitting directly in front of the TV and about 10 to the AIR terminal. Plug the adapter into the antenna terminal on the screen. Consult your new HITACHI Plasma Television VIEWING The best picture is recommended. VHF (300-Ohm) antenna/UHF...
...to a Hi-Fi system's external speakers, the best audio performance will require some experimentation with speaker placement for the antenna mixer. If the TV's audio output will be located in a different section of the room. For best stereo separation, place the external speakers at least four ...sizes and acoustical environments will be obtained by sitting directly in front of the TV and about 10 to the AIR terminal. Plug the adapter into the antenna terminal on the screen. Consult your new HITACHI Plasma Television VIEWING The best picture is recommended. VHF (300-Ohm) antenna/UHF...

Owners Guide
Page 7
...such as Set-Top-Boxes or DVD players equipped with 42" Models) This cable is used to connect to control your digital camera to the TV's HDMI input. USB Cable This cable is used on the television's rear jack panel and side control panel. Before purchasing any cables, be connected... of your cable box and VCR. Power Swivel Cable (Provided with an HDMI output connection to the Photo Input in the side of the Plasma Television. For best performance, video cables should use Most video/audio connections between components can be made with mini stereo audio jack to external ...
...such as Set-Top-Boxes or DVD players equipped with 42" Models) This cable is used to connect to control your digital camera to the TV's HDMI input. USB Cable This cable is used on the television's rear jack panel and side control panel. Before purchasing any cables, be connected... of your cable box and VCR. Power Swivel Cable (Provided with an HDMI output connection to the Photo Input in the side of the Plasma Television. For best performance, video cables should use Most video/audio connections between components can be made with mini stereo audio jack to external ...

Owners Guide
Page 8
... - Pressing any button will illuminate the backlight for best results. 2. Push down on your HITACHI Plasma TV, the new remote control is included in the AMP mode. 4. PIP CONTROL BUTTONS (TV) Press to control the chosen device. Television CBL - POWER BUTTON (TV, DVD, CBL, STB, PVR/VCR, AMP/CD) Turns the selected device on the...
... - Pressing any button will illuminate the backlight for best results. 2. Push down on your HITACHI Plasma TV, the new remote control is included in the AMP mode. 4. PIP CONTROL BUTTONS (TV) Press to control the chosen device. Television CBL - POWER BUTTON (TV, DVD, CBL, STB, PVR/VCR, AMP/CD) Turns the selected device on the...
Owners Guide
Page 9
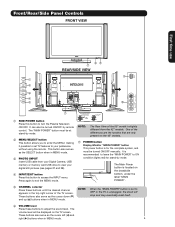
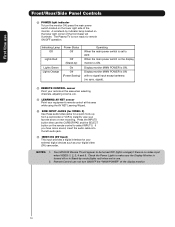
... the label "MAIN POWER". ቦ CHANNEL selector Press these buttons to adjust the sound level. Firmly bind the cables. NOTE: The Rear View of the 55" model is recommended to leave the "MAIN POWER" to ON condition (lights red) for the complete system, and must be turned ON/OFF by remote... the square hole with the band. NOTE: When the "MAIN POWER" button is set TV features to your digital still pictures (see pages 27 and 28). ብ INPUT/EXIT button Press this button to turn the Plasma Television ON/OFF. The Main Power button is for stand-by mode. ባ MENU/SELECT...
... the label "MAIN POWER". ቦ CHANNEL selector Press these buttons to adjust the sound level. Firmly bind the cables. NOTE: The Rear View of the 55" model is recommended to leave the "MAIN POWER" to ON condition (lights red) for the complete system, and must be turned ON/OFF by remote... the square hole with the band. NOTE: When the "MAIN POWER" button is set TV features to your digital still pictures (see pages 27 and 28). ብ INPUT/EXIT button Press this button to turn the Plasma Television ON/OFF. The Main Power button is for stand-by mode. ባ MENU/SELECT...
Owners Guide
Page 10
... to be turned OFF (lights orange) if there is ON with no signal input except antenna (no video input when VIDEO: 1, 2, 3, 4 and 5. Your HITACHI Plasma TV will illuminate. The Plasma TV is ON. Check the Power Light to make sure the Display Monitor is turned off or in Stand-by mode (lights red) when not...
... to be turned OFF (lights orange) if there is ON with no signal input except antenna (no video input when VIDEO: 1, 2, 3, 4 and 5. Your HITACHI Plasma TV will illuminate. The Plasma TV is ON. Check the Power Light to make sure the Display Monitor is turned off or in Stand-by mode (lights red) when not...
Owners Guide
Page 11
...2. This connection will be labeled ቦ S-VIDEO INPUTS 1 and 2 INPUTS 1 and 2 provide S-VIDEO (Super Video) jacks for your Plasma Television's remote control in TV mode. The GLINK connection will not have ቪ mono sound, insert the audio cable into the left audio jack). ቢ ባቨ... the Y-PBPR inputs (see page 44). 5. Use the S-VIDEO Output for connecting equipment with this case, connect the components B-Y output to the TV's PB input and the components R-Y output to this terminal. Do not connect composite VIDEO and S-VIDEO to INPUT 1 and 2, but only one ...
...2. This connection will be labeled ቦ S-VIDEO INPUTS 1 and 2 INPUTS 1 and 2 provide S-VIDEO (Super Video) jacks for your Plasma Television's remote control in TV mode. The GLINK connection will not have ቪ mono sound, insert the audio cable into the left audio jack). ቢ ባቨ... the Y-PBPR inputs (see page 44). 5. Use the S-VIDEO Output for connecting equipment with this case, connect the components B-Y output to the TV's PB input and the components R-Y output to this terminal. Do not connect composite VIDEO and S-VIDEO to INPUT 1 and 2, but only one ...

Owners Guide
Page 13
... your choice (see page 26). However, you may be made from coaxial shielded wire. Before Operating External Video Source Connect an external source to your Plasma TV is dependent on the Ferrite ferrite core near the Photo Input Core or IEEE 1394 Input as shown. 2. Completely insert connection cord plugs when connecting... Instructions: 1. Wrap once the USB cable or IEEE 1394 cable (not supplied) on the model and features of each component for the location of your TV. 4.
... your choice (see page 26). However, you may be made from coaxial shielded wire. Before Operating External Video Source Connect an external source to your Plasma TV is dependent on the Ferrite ferrite core near the Photo Input Core or IEEE 1394 Input as shown. 2. Completely insert connection cord plugs when connecting... Instructions: 1. Wrap once the USB cable or IEEE 1394 cable (not supplied) on the model and features of each component for the location of your TV. 4.

Owners Guide
Page 19
... connections, you to the IEEE1394 input terminals shown below. NOTE: 1. It will be received by the TV. With IEEE1394 connection, video and audio will enable you to control the D-VHS from the TV IEEE1394 menu (see page 29). / G-LINK IEEE1394 DV INPUT IEEE1394 Cabl e LINE OUT R (MONO...standard called 5C or Digital Transmission Content Protection (DTCP). 2. Select the IEEE1394 option (see page 29). 2. IEEE 1394 allows the plasma television and the external device to communicate with IEEE1394 capability, such as a Digital VCR or AVHD (External Hard Drive) Digital Recorder,...
... connections, you to the IEEE1394 input terminals shown below. NOTE: 1. It will be received by the TV. With IEEE1394 connection, video and audio will enable you to control the D-VHS from the TV IEEE1394 menu (see page 29). / G-LINK IEEE1394 DV INPUT IEEE1394 Cabl e LINE OUT R (MONO...standard called 5C or Digital Transmission Content Protection (DTCP). 2. Select the IEEE1394 option (see page 29). 2. IEEE 1394 allows the plasma television and the external device to communicate with IEEE1394 capability, such as a Digital VCR or AVHD (External Hard Drive) Digital Recorder,...

Owners Guide
Page 20
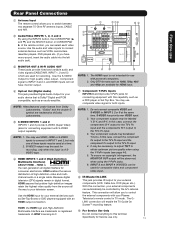
...IN capability. 1. Connecting Video: Connect the cable from the AUDIO IN L of the VCR or the laserdisc player to the OUTPUT (AUDIO/L) jack on the TV Rear Panel. / G-LINK Optional R L V S-VIDEO INPUT 2. It does not output component video. 1. VCR or other external components 3. Connect the ...INPUTS button, then select INPUT 2 from the Rear Panel is controlled by the amplifier, not by the Plasma Television. CONNECTING AN EXTERNAL AUDIO AMPLIFIER To monitor the audio level of the Plasma TV to the INPUT (VIDEO) jack, as shown on the Rear Panel on the right. / G-LINK Back...
...IN capability. 1. Connecting Video: Connect the cable from the AUDIO IN L of the VCR or the laserdisc player to the OUTPUT (AUDIO/L) jack on the TV Rear Panel. / G-LINK Optional R L V S-VIDEO INPUT 2. It does not output component video. 1. VCR or other external components 3. Connect the ...INPUTS button, then select INPUT 2 from the Rear Panel is controlled by the amplifier, not by the Plasma Television. CONNECTING AN EXTERNAL AUDIO AMPLIFIER To monitor the audio level of the Plasma TV to the INPUT (VIDEO) jack, as shown on the Rear Panel on the right. / G-LINK Back...

Owners Guide
Page 21
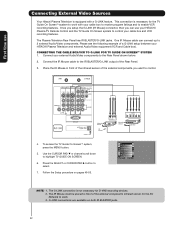
... in front of the infrared sensor of the external components you can use Connecting External Video Sources Your Hitachi Plasma Television is setup, it allows your Hitachi Plasma TV Remote Control. Once this is equipped with up to control the Audio/Video equipment command without the equipment... CURSOR PAD ̄ or channel scroll down to 2 external Audio/Video components. Connect your external Audio/Video components to control your Hitachi Plasma Television and external Audio/Video equipment (VCR and DVD Player). This feature helps to the Rear Panel shown below. 2. Connect the ...
... in front of the infrared sensor of the external components you can use Connecting External Video Sources Your Hitachi Plasma Television is setup, it allows your Hitachi Plasma TV Remote Control. Once this is equipped with up to control the Audio/Video equipment command without the equipment... CURSOR PAD ̄ or channel scroll down to 2 external Audio/Video components. Connect your external Audio/Video components to control your Hitachi Plasma Television and external Audio/Video equipment (VCR and DVD Player). This feature helps to the Rear Panel shown below. 2. Connect the ...
Owners Guide
Page 22
... Infrared Sensor OUTPUT Y PB/CB PR/CR R L Cable Box 4. One IR Mouse cable can use Connecting External Video Sources Your Hitachi Plasma Television is not necessary for the AV Network to work with a G-LINK feature. CONNECTING THE CABLE BOX/VCR TO G-LINK FOR...for D-VHS recording devices. 2. Connect your external Audio/Video components to highlight TV GUIDE ON SCREEN. 6. First time use your HITACHI Plasma TV Remote Control and the TV Guide On Screen system to control your HITACHI Plasma Television and external Audio/Video equipment (VCR and Cable box). The IR Mouse...
... Infrared Sensor OUTPUT Y PB/CB PR/CR R L Cable Box 4. One IR Mouse cable can use Connecting External Video Sources Your Hitachi Plasma Television is not necessary for the AV Network to work with a G-LINK feature. CONNECTING THE CABLE BOX/VCR TO G-LINK FOR...for D-VHS recording devices. 2. Connect your external Audio/Video components to highlight TV GUIDE ON SCREEN. 6. First time use your HITACHI Plasma TV Remote Control and the TV Guide On Screen system to control your HITACHI Plasma Television and external Audio/Video equipment (VCR and Cable box). The IR Mouse...
Owners Guide
Page 23
...the LIGHT button for instruction on how to program the remote to control your PVR). To operate your Plasma TV, point the remote control at the remote sensor of the Television and select the TV by pressing the ̇ or ̈ button of the Source Access on the remote. Basic operation... button of the Source Access on the remote. During the illumination, if the LIGHT button is designed to control your television. To operate your HITACHI Plasma TV, the new remote control is pressed, the illumination will now control your cable box (see page 37 for instructions on how to program the ...
...the LIGHT button for instruction on how to program the remote to control your PVR). To operate your Plasma TV, point the remote control at the remote sensor of the Television and select the TV by pressing the ̇ or ̈ button of the Source Access on the remote. Basic operation... button of the Source Access on the remote. During the illumination, if the LIGHT button is designed to control your television. To operate your HITACHI Plasma TV, the new remote control is pressed, the illumination will now control your cable box (see page 37 for instructions on how to program the ...

Owners Guide
Page 26
Press this button to access the Channel Guide of the Plasma TV (see pages 27-28). Sesame Street 9:30AM 10:30 AM ST TV-14 V DTv CC Air 1080i 15-2 KPBS-DT 11:00PM Main Picture Source and channel indication Broadcast channel identification Clock Audio Broadcast Broadcast Rating Telly ... will show momentarily after the Event Timer in the Timer Menu is connected to INPUT 1 YPBPR:1 480i 11:00PM INFO IEEE1394 the Photo Input in TV mode, press this button when you want to check the channel being used. Select to choose the IEEE1394 Input (see page 29). Select to choose...
Press this button to access the Channel Guide of the Plasma TV (see pages 27-28). Sesame Street 9:30AM 10:30 AM ST TV-14 V DTv CC Air 1080i 15-2 KPBS-DT 11:00PM Main Picture Source and channel indication Broadcast channel identification Clock Audio Broadcast Broadcast Rating Telly ... will show momentarily after the Event Timer in the Timer Menu is connected to INPUT 1 YPBPR:1 480i 11:00PM INFO IEEE1394 the Photo Input in TV mode, press this button when you want to check the channel being used. Select to choose the IEEE1394 Input (see page 29). Select to choose...

Owners Guide
Page 31
... OUT The Picture-in-Picture feature is convenient when you to CABLE (see page 32). The Remote Control Picture-in-Picture (PIP) Your HITACHI Plasma TV incorporates Two Tuner technology designed for each. When a Digital channel is only available with separate tuning control for improved viewing enjoyment. When installing ... cannot be viewed in the sub picture. The Green highlighted channel display will appear in one program at the right to watch a TV program while viewing other programs from any of the inputs must be viewed in PIP mode at the same time. VCR NOTE: When...
... OUT The Picture-in-Picture feature is convenient when you to CABLE (see page 32). The Remote Control Picture-in-Picture (PIP) Your HITACHI Plasma TV incorporates Two Tuner technology designed for each. When a Digital channel is only available with separate tuning control for improved viewing enjoyment. When installing ... cannot be viewed in the sub picture. The Green highlighted channel display will appear in one program at the right to watch a TV program while viewing other programs from any of the inputs must be viewed in PIP mode at the same time. VCR NOTE: When...

Owners Guide
Page 42
On-Screen Display 1. Press MENU on the remote control to display the different features on the remote control to quickly exit from a menu. On-Screen Display 42 Use the CURSOR PAD (buttons ̆, ̄, ̇ and ̈) or CHANNEL WHEEL to navigate to use. Press EXIT on your HITACHI Plasma TV. 2. This part of the screen shows which selections are available. Video Audio TV Guide On Screen Channel Manager Locks Timers Setup Power Swivel Move SEL Select This part of the screen shows which Remote Control buttons to a different menu item. 3.
On-Screen Display 1. Press MENU on the remote control to display the different features on the remote control to quickly exit from a menu. On-Screen Display 42 Use the CURSOR PAD (buttons ̆, ̄, ̇ and ̈) or CHANNEL WHEEL to navigate to use. Press EXIT on your HITACHI Plasma TV. 2. This part of the screen shows which selections are available. Video Audio TV Guide On Screen Channel Manager Locks Timers Setup Power Swivel Move SEL Select This part of the screen shows which Remote Control buttons to a different menu item. 3.


