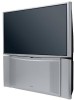
Owners Guide
Page 1
PROJECTION COLOR TV Operating Guide for energy efficiency. has determined that this product meets the ENERGY STAR® guidelines for 57F510, 51F510 IMPORTANT SAFETY INSTRUCTIONS 2-3 FIRST TIME USE ...4-18 THE REMOTE CONTROL 19-32 ON-SCREEN DISPLAY...33-65 CARE OF YOUR HITACHI TELEVISION 66 RECEPTION PROBLEMS...67 USEFUL INFORMATION / INDEX 68-72 As an ENERGY STAR® Partner, Hitachi, Ltd.
PROJECTION COLOR TV Operating Guide for energy efficiency. has determined that this product meets the ENERGY STAR® guidelines for 57F510, 51F510 IMPORTANT SAFETY INSTRUCTIONS 2-3 FIRST TIME USE ...4-18 THE REMOTE CONTROL 19-32 ON-SCREEN DISPLAY...33-65 CARE OF YOUR HITACHI TELEVISION 66 RECEPTION PROBLEMS...67 USEFUL INFORMATION / INDEX 68-72 As an ENERGY STAR® Partner, Hitachi, Ltd.
Owners Guide
Page 3
...wide screen format or zoomed to grounding electrodes and requirements for long periods of the polarized or ground- Servicing is protected by TV stations and cable companies, as well as to proper grounding for the mast and supporting structure, grounding of the video program ...that is required when the apparatus has been damaged in Canada). Install in wire to comply with the recommended safety standards for your HITACHI Factory Warranty. • PUBLIC VIEWING OF COPYRIGHTED MATERIAL Public viewing of programs broadcast by U.S. Use only with the apparatus. Unplug this...
...wide screen format or zoomed to grounding electrodes and requirements for long periods of the polarized or ground- Servicing is protected by TV stations and cable companies, as well as to proper grounding for the mast and supporting structure, grounding of the video program ...that is required when the apparatus has been damaged in Canada). Install in wire to comply with the recommended safety standards for your HITACHI Factory Warranty. • PUBLIC VIEWING OF COPYRIGHTED MATERIAL Public viewing of programs broadcast by U.S. Use only with the apparatus. Unplug this...

Owners Guide
Page 5
... there is recommended for viewing. FIRST TIME USE HOW TO SET UP YOUR NEW HITACHI PROJECTION TV ANTENNA Unless your TV is connected to a cable TV system or to a centralized antenna system, a good outdoor TV antenna is no picture distortion. 5 To avoid cabinet warping, cabinet color changes, ...direct sunlight or near a heating appliance, etc. Picture brightness decreases as the viewer moves to the left and right of the HITACHI Projection Television is seen by placing the speakers equidistant from the side of external speakers, may appear on the picture screen. ...
... there is recommended for viewing. FIRST TIME USE HOW TO SET UP YOUR NEW HITACHI PROJECTION TV ANTENNA Unless your TV is connected to a cable TV system or to a centralized antenna system, a good outdoor TV antenna is no picture distortion. 5 To avoid cabinet warping, cabinet color changes, ...direct sunlight or near a heating appliance, etc. Picture brightness decreases as the viewer moves to the left and right of the HITACHI Projection Television is seen by placing the speakers equidistant from the side of external speakers, may appear on the picture screen. ...
Owners Guide
Page 6
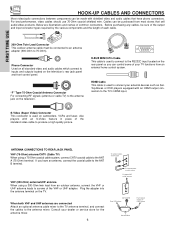
... purchasing any cables, be purchased from an external home control system. "F" Type 75-Ohm Coaxial Antenna Connector For connecting RF signals (antenna or cable TV) to the antenna jack on the television. 12345 6789 D-SUB MINI 9-Pin Cable This cable is used on all standard video and audio cables which...or CATV System Antenna Mixer VHF (300-Ohm) antenna/UHF antenna When using a 75-Ohm coaxial cable system, connect CATV coaxial cable to the TV's HDMI input. Phono Connector Used on camcorders, VCRs and laser- If you can be sure of the output and input connector types required by the...
... purchasing any cables, be purchased from an external home control system. "F" Type 75-Ohm Coaxial Antenna Connector For connecting RF signals (antenna or cable TV) to the antenna jack on the television. 12345 6789 D-SUB MINI 9-Pin Cable This cable is used on all standard video and audio cables which...or CATV System Antenna Mixer VHF (300-Ohm) antenna/UHF antenna When using a 75-Ohm coaxial cable system, connect CATV coaxial cable to the TV's HDMI input. Phono Connector Used on camcorders, VCRs and laser- If you can be sure of the output and input connector types required by the...
Owners Guide
Page 7
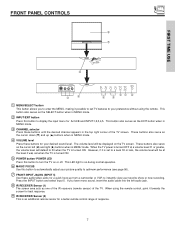
... MENU mode. ቤ CHANNEL selector Press these audio/video jacks for a better remote control range of response. 7 When the TV power is turned OFF at the level it was set when the TV is turned ON. ቦ POWER button/ POWER LED Press this button to display the input menu for your desired... the cursor down (̄) and up from a camcorder or VCR to a level 30 or less, the volume level will default to 30 when the TV is set TV features to optimum performance (see page 56). ቨ FRONT INPUT JACKS (INPUT 5) Use these buttons until the desired channel appears in MENU mode. However...
... MENU mode. ቤ CHANNEL selector Press these audio/video jacks for a better remote control range of response. 7 When the TV power is turned OFF at the level it was set when the TV is turned ON. ቦ POWER button/ POWER LED Press this button to display the input menu for your desired... the cursor down (̄) and up from a camcorder or VCR to a level 30 or less, the volume level will default to 30 when the TV is set TV features to optimum performance (see page 56). ቨ FRONT INPUT JACKS (INPUT 5) Use these buttons until the desired channel appears in MENU mode. However...

Owners Guide
Page 8
... a convenience to allow you to front panel jacks. FRONT PANEL JACKS AND CONNECTORS The front panel jacks are provided as shown in place of your TV. 8 If you do not, the played back picture may be abnormal. 2.
... a convenience to allow you to front panel jacks. FRONT PANEL JACKS AND CONNECTORS The front panel jacks are provided as shown in place of your TV. 8 If you do not, the played back picture may be abnormal. 2.
Owners Guide
Page 9
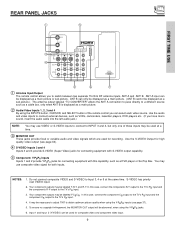
...remote control allows you can select each video source. You may be labeled Y, B-Y, and R-Y. In this case, connect the components B-Y output to the TV's PB input and the components R-Y output to Input 3, 4 or 5 at a time. ቤ MONITOR OUT These jacks provide fixed or variable audio... both inputs. NOTES: 1. Use the S-VIDEO Output for composite video and component video input. 9 Do not connect composite VIDEO and S-VIDEO to the TV's PR input. 3. It may use composite video signal for recording. ANT A input can only be displayed as a main picture. (ANT B cannot ...
...remote control allows you can select each video source. You may be labeled Y, B-Y, and R-Y. In this case, connect the components B-Y output to the TV's PB input and the components R-Y output to Input 3, 4 or 5 at a time. ቤ MONITOR OUT These jacks provide fixed or variable audio... both inputs. NOTES: 1. Use the S-VIDEO Output for composite video and component video input. 9 Do not connect composite VIDEO and S-VIDEO to the TV's PR input. 3. It may use composite video signal for recording. ANT A input can only be displayed as a main picture. (ANT B cannot ...
Owners Guide
Page 11
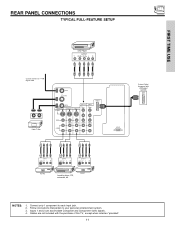
...4. REAR PANEL CONNECTIONS TYPICAL FULL-FEATURE SETUP FIRST TIME USE DVD Player OUTPUT Y PB/CB PR/CR L R Outside antenna or digital cable INPUT OUTPUT Cable TV Box ANT A To Converter ANT B MONITOR OUT S-VIDEO INPUT 4 INPUT 3 INPUT 2 Y/ VIDEO PB INPUT 1 Y/ VIDEO PB HDMI 1 VIDEO L AUDIO... R PR PR (MONO) (MONO) (MONO) (MONO) RS232C 1 2 345 6 789 External Digital Component with the purchase of this TV, except when noted as "provided". 11 VCR #1 NOTES: 1. Follow connections that pertain to each input jack. 2. Cables are not included with HDMI output capability...
...4. REAR PANEL CONNECTIONS TYPICAL FULL-FEATURE SETUP FIRST TIME USE DVD Player OUTPUT Y PB/CB PR/CR L R Outside antenna or digital cable INPUT OUTPUT Cable TV Box ANT A To Converter ANT B MONITOR OUT S-VIDEO INPUT 4 INPUT 3 INPUT 2 Y/ VIDEO PB INPUT 1 Y/ VIDEO PB HDMI 1 VIDEO L AUDIO... R PR PR (MONO) (MONO) (MONO) (MONO) RS232C 1 2 345 6 789 External Digital Component with the purchase of this TV, except when noted as "provided". 11 VCR #1 NOTES: 1. Follow connections that pertain to each input jack. 2. Cables are not included with HDMI output capability...

Owners Guide
Page 12
... to Input 3, Input 4 or Input 5, but note that have this feature. In this case, connect the components CB output to the TV's PB input and the components CR output to the TV's PR input. • Your component outputs may be used for VCR #1 and VCR #2, but only one audio output (mono sound... has this feature. • If your hook-up cables. • A single VCR can be labeled Y-CBCR. In this case, connect the components B-Y output to the TV's PB input and the components R-Y output to the TV's PR input. • You may be labeled Y, B-Y, and R-Y.
... to Input 3, Input 4 or Input 5, but note that have this feature. In this case, connect the components CB output to the TV's PB input and the components CR output to the TV's PR input. • Your component outputs may be used for VCR #1 and VCR #2, but only one audio output (mono sound... has this feature. • If your hook-up cables. • A single VCR can be labeled Y-CBCR. In this case, connect the components B-Y output to the TV's PB input and the components R-Y output to the TV's PR input. • You may be labeled Y, B-Y, and R-Y.

Owners Guide
Page 14
... the back panel of your choice. However, you use to connect the VCR, camcorder, laserdisc player, DVD player, or HDTV Set Top Box to your TV set is dependent on the model and features of each component for the location of the VCR or the laserdisc player to the INPUT (VIDEO...) jack, as suggestions. Use the CURSOR buttons to select the Antenna and Input of the TV (i.e., VCR/laserdisc player, etc. Then press the SELECT button to view the program from the VIDEO INPUT JACK on the...
... the back panel of your choice. However, you use to connect the VCR, camcorder, laserdisc player, DVD player, or HDTV Set Top Box to your TV set is dependent on the model and features of each component for the location of the VCR or the laserdisc player to the INPUT (VIDEO...) jack, as suggestions. Use the CURSOR buttons to select the Antenna and Input of the TV (i.e., VCR/laserdisc player, etc. Then press the SELECT button to view the program from the VIDEO INPUT JACK on the...

Owners Guide
Page 15
...) (MONO) (MONO) RS232C 1 2 345 6 789 OUTPUT RL V VCR NOTES: 1. Refer to the INPUT (AUDIO/R) jack. 3. A single VCR can be used for more information on the TV set below. 2. FIRST TIME USE CONNECTING EXTERNAL VIDEO SOURCES CONNECTING A STEREO SOURCE TO INPUT1~INPUT5 1. Connect the cable from the AUDIO OUT R of the VCR...
...) (MONO) (MONO) RS232C 1 2 345 6 789 OUTPUT RL V VCR NOTES: 1. Refer to the INPUT (AUDIO/R) jack. 3. A single VCR can be used for more information on the TV set below. 2. FIRST TIME USE CONNECTING EXTERNAL VIDEO SOURCES CONNECTING A STEREO SOURCE TO INPUT1~INPUT5 1. Connect the cable from the AUDIO OUT R of the VCR...

Owners Guide
Page 16
... laserdisc player to rear panel jacks. A single VCR can be abnormal if the connection is played back will be used for more information on the TV set below. 2. ANT A To Converter ANT B MONITOR OUT S-VIDEO INPUT 4 INPUT 3 INPUT 2 Y/ VIDEO PB INPUT 1 Y/ VIDEO PB HDMI 1 VIDEO L AUDIO R AUDIO TO HI-FI PR...
... laserdisc player to rear panel jacks. A single VCR can be abnormal if the connection is played back will be used for more information on the TV set below. 2. ANT A To Converter ANT B MONITOR OUT S-VIDEO INPUT 4 INPUT 3 INPUT 2 Y/ VIDEO PB INPUT 1 Y/ VIDEO PB HDMI 1 VIDEO L AUDIO R AUDIO TO HI-FI PR...

Owners Guide
Page 17
... 1 VIDEO L AUDIO R AUDIO TO HI-FI PR PR (MONO) (MONO) (MONO) (MONO) RS232C 1 2 345 6 789 DVI to rear panel jacks. The HDMI input on the TV set top box or DVD player to a display. 4. FIRST TIME USE CONNECTING EXTERNAL VIDEO SOURCES CONNECTING A COMPONENT SOURCE WITH HDMI or DVI CAPABILITY TO INPUT...
... 1 VIDEO L AUDIO R AUDIO TO HI-FI PR PR (MONO) (MONO) (MONO) (MONO) RS232C 1 2 345 6 789 DVI to rear panel jacks. The HDMI input on the TV set top box or DVD player to a display. 4. FIRST TIME USE CONNECTING EXTERNAL VIDEO SOURCES CONNECTING A COMPONENT SOURCE WITH HDMI or DVI CAPABILITY TO INPUT...

Owners Guide
Page 18
... 1 2 345 6 789 OUTPUT R L PR PB Y DVD Player NOTES: 1. The VIDEO OSD label disappears automatically after approximately four seconds. 7. See page 12 for tips on the TV set top box to the INPUT (PR) jack. 4. CONNECTING EXTERNAL VIDEO SOURCES CONNECTING A COMPONENT SOURCE TO INPUT 1 OR 2: Y-PBPR. 1. Connect the cable from the INPUTS...
... 1 2 345 6 789 OUTPUT R L PR PB Y DVD Player NOTES: 1. The VIDEO OSD label disappears automatically after approximately four seconds. 7. See page 12 for tips on the TV set top box to the INPUT (PR) jack. 4. CONNECTING EXTERNAL VIDEO SOURCES CONNECTING A COMPONENT SOURCE TO INPUT 1 OR 2: Y-PBPR. 1. Connect the cable from the INPUTS...

Owners Guide
Page 19
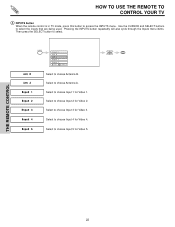
THE REMOTE CONTROL THE REMOTE CONTROL In addition to controlling all the functions on your HITACHI Projection TV, the new remote control is designed to operate different types of the VCR and press the VCR button. The remote will now control your SAT). ...To operate your VCR, point the remote at the remote sensor of VCRs, CATV (Cable TV) converters, set-top-box, satellite receiver (SAT) and DVD players with one area. If you have a satellite receiver, use this button to program your satellite...
THE REMOTE CONTROL THE REMOTE CONTROL In addition to controlling all the functions on your HITACHI Projection TV, the new remote control is designed to operate different types of the VCR and press the VCR button. The remote will now control your SAT). ...To operate your VCR, point the remote at the remote sensor of VCRs, CATV (Cable TV) converters, set-top-box, satellite receiver (SAT) and DVD players with one area. If you have a satellite receiver, use this button to program your satellite...
Owners Guide
Page 20
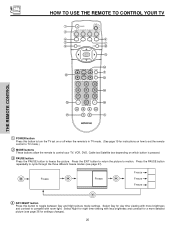
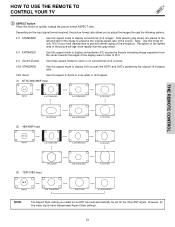
...to return the picture to compete with less brightness and contrast for instructions on how to set on or off when the remote is in TV mode. (See page 19 for a more brightness and contrast to motion. Freeze Freeze Freeze Freeze Freeze ብ DAY/NIGHT button Press ... cycle through the three different freeze modes (see page 36 for night time viewing with room light. HOW TO USE THE REMOTE TO CONTROL YOUR TV ቢ ባ ቧ ብ ቦ ቨ ቩ ቫ ቭ ተ ቱ ቲ ታ ቤ THE REMOTE CONTROL ቢ POWER button Press ...
...to return the picture to compete with less brightness and contrast for instructions on how to set on or off when the remote is in TV mode. (See page 19 for a more brightness and contrast to motion. Freeze Freeze Freeze Freeze Freeze ብ DAY/NIGHT button Press ... cycle through the three different freeze modes (see page 36 for night time viewing with room light. HOW TO USE THE REMOTE TO CONTROL YOUR TV ቢ ባ ቧ ብ ቦ ቨ ቩ ቫ ቭ ተ ቱ ቲ ታ ቤ THE REMOTE CONTROL ቢ POWER button Press ...
Owners Guide
Page 21
... set for only 15% of your total viewing time to quickly change the picture format ASPECT ratio. HOW TO USE THE REMOTE TO CONTROL YOUR TV ቦ ASPECT button Press this button to prevent uneven aging of the source. However, all five video inputs have independent Aspect Style settings. 21 Depending...
... set for only 15% of your total viewing time to quickly change the picture format ASPECT ratio. HOW TO USE THE REMOTE TO CONTROL YOUR TV ቦ ASPECT button Press this button to prevent uneven aging of the source. However, all five video inputs have independent Aspect Style settings. 21 Depending...
Owners Guide
Page 22
... also cycle through the Inputs menu items. Then press the SELECT button to access the INPUTS menu. HOW TO USE THE REMOTE TO CONTROL YOUR TV ቧ INPUTS button When the remote control is in...
... also cycle through the Inputs menu items. Then press the SELECT button to access the INPUTS menu. HOW TO USE THE REMOTE TO CONTROL YOUR TV ቧ INPUTS button When the remote control is in...

Owners Guide
Page 23
.... NOTES: 1. Press the INFO button again or the EXIT button to return to VIDEO: 1. THE REMOTE CONTROL HOW TO USE THE REMOTE TO CONTROL YOUR TV ቨ PICTURE-IN-PICTURE button See separate section on pages 25-27 for numeric entries. Press this button to access the Channel Guide of this...
.... NOTES: 1. Press the INFO button again or the EXIT button to return to VIDEO: 1. THE REMOTE CONTROL HOW TO USE THE REMOTE TO CONTROL YOUR TV ቨ PICTURE-IN-PICTURE button See separate section on pages 25-27 for numeric entries. Press this button to access the Channel Guide of this...

Owners Guide
Page 24
... is set to AUTO (see page 63). However, if it is set when the TV is GREEN. When the TV power is turned off completely (MUTE). Enter "0" first for the TV to tune. You will default to 30 when the TV is turned on and Closed Caption is on . Ant A 22 FAV Ant A 22... down the FAV CH button until the displayed channel turns highlighted GREEN to WHITE. THE REMOTE CONTROL HOW TO USE THE REMOTE TO CONTROL YOUR TV ቯ VOLUME (VOL), MUTE button Press the VOLUME button (̆ or ̄) until you wish to tune then wait a few seconds for channels 1 to 9, or...
... is set to AUTO (see page 63). However, if it is set when the TV is GREEN. When the TV power is turned off completely (MUTE). Enter "0" first for the TV to tune. You will default to 30 when the TV is turned on and Closed Caption is on . Ant A 22 FAV Ant A 22... down the FAV CH button until the displayed channel turns highlighted GREEN to WHITE. THE REMOTE CONTROL HOW TO USE THE REMOTE TO CONTROL YOUR TV ቯ VOLUME (VOL), MUTE button Press the VOLUME button (̆ or ̄) until you wish to tune then wait a few seconds for channels 1 to 9, or...


