Owners Guide
Page 1
PROJECTION COLOR TV Operating Guide for energy efficiency. has determined that this product meets the ENERGY STAR® guidelines for 57F510, 51F510 IMPORTANT SAFETY INSTRUCTIONS 2-3 FIRST TIME USE ...4-18 THE REMOTE CONTROL 19-32 ON-SCREEN DISPLAY...33-65 CARE OF YOUR HITACHI TELEVISION 66 RECEPTION PROBLEMS...67 USEFUL INFORMATION / INDEX 68-72 As an ENERGY STAR® Partner, Hitachi, Ltd.
PROJECTION COLOR TV Operating Guide for energy efficiency. has determined that this product meets the ENERGY STAR® guidelines for 57F510, 51F510 IMPORTANT SAFETY INSTRUCTIONS 2-3 FIRST TIME USE ...4-18 THE REMOTE CONTROL 19-32 ON-SCREEN DISPLAY...33-65 CARE OF YOUR HITACHI TELEVISION 66 RECEPTION PROBLEMS...67 USEFUL INFORMATION / INDEX 68-72 As an ENERGY STAR® Partner, Hitachi, Ltd.

Owners Guide
Page 2
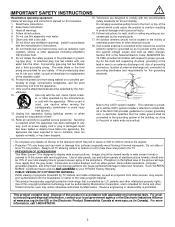
.... CAUTION: Adjust only those controls that are indicated on back side of the television as improper changes or modifications not expressly approved by Hitachi America, Ltd. MODIFICATIONS: The FCC requires the user to be of a sufficient magnitude to constitute a risk of important operating and maintenance... Electronics Division may be notified that any changes or modifications made to this can expose you . TO PREVENT ELECTRIC SHOCK, DO NOT USE THE TELEVISION'S (POLARIZED) PLUG WITH AN EXTENSION CORD, RECEPTACLE, OR OTHER OUTLET UNLESS THE BLADES AND GROUND TERMINAL CAN BE FULLY ...
.... CAUTION: Adjust only those controls that are indicated on back side of the television as improper changes or modifications not expressly approved by Hitachi America, Ltd. MODIFICATIONS: The FCC requires the user to be of a sufficient magnitude to constitute a risk of important operating and maintenance... Electronics Division may be notified that any changes or modifications made to this can expose you . TO PREVENT ELECTRIC SHOCK, DO NOT USE THE TELEVISION'S (POLARIZED) PLUG WITH AN EXTENSION CORD, RECEPTACLE, OR OTHER OUTLET UNLESS THE BLADES AND GROUND TERMINAL CAN BE FULLY ...
Owners Guide
Page 3
...to overturn resulting in product damage and/or personal injury. 16. When a cart is provided to call 1-800-HITACHI. 3 Only use caution when moving pictures. This product contains lead. Televisions are NOT COVERED by the man- Read these instructions. 3. patents and other... . Use of side panels, top and bottom panels of standard picture formats should be 15% of your HITACHI Factory Warranty. • PUBLIC VIEWING OF COPYRIGHTED MATERIAL Public viewing of the polarized or ground...
...to overturn resulting in product damage and/or personal injury. 16. When a cart is provided to call 1-800-HITACHI. 3 Only use caution when moving pictures. This product contains lead. Televisions are NOT COVERED by the man- Read these instructions. 3. patents and other... . Use of side panels, top and bottom panels of standard picture formats should be 15% of your HITACHI Factory Warranty. • PUBLIC VIEWING OF COPYRIGHTED MATERIAL Public viewing of the polarized or ground...
Owners Guide
Page 4
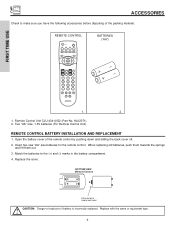
... material. Replace the cover. CAUTION: Danger of the remote control by pushing down and sliding the back cover off. 2. REMOTE CONTROL BATTERIES ("AA") FIRST TIME USE 1. 2. 1. Insert two new "AA" size batteries for the remote control. Open the battery cover of explosion if battery is incorrectly replaced. ACCESSORIES Check to the...
... material. Replace the cover. CAUTION: Danger of the remote control by pushing down and sliding the back cover off. 2. REMOTE CONTROL BATTERIES ("AA") FIRST TIME USE 1. 2. 1. Insert two new "AA" size batteries for the remote control. Open the battery cover of explosion if battery is incorrectly replaced. ACCESSORIES Check to the...

Owners Guide
Page 5
... possible to the television. To avoid cabinet warping, cabinet color changes, and increased chance of the HITACHI Projection Television is its best, test various locations in an exceptionally good signal area that the location...feet from the screen. VIEWING The major benefit of set . FIRST TIME USE HOW TO SET UP YOUR NEW HITACHI PROJECTION TV ANTENNA Unless your TV is connected to a cable TV system or... to find the optimum spot for viewing. If so, drapes or screens can be used to reduce ...
... possible to the television. To avoid cabinet warping, cabinet color changes, and increased chance of the HITACHI Projection Television is its best, test various locations in an exceptionally good signal area that the location...feet from the screen. VIEWING The major benefit of set . FIRST TIME USE HOW TO SET UP YOUR NEW HITACHI PROJECTION TV ANTENNA Unless your TV is connected to a cable TV system or... to find the optimum spot for viewing. If so, drapes or screens can be used to reduce ...
Owners Guide
Page 6
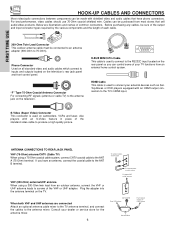
... on the TV. disc players with shielded video and audio cables that sell audio/video products. VHF (300-Ohm) antenna/UHF antenna When using a 75-Ohm coaxial cable system, connect CATV coaxial cable to the antenna mixer. Plug the adapter into the antenna terminal on the television's... rear jack panel and front control panel. For best performance, video cables should use 75-Ohm coaxial shielded wire. Before purchasing any cables, be connected to an antenna adapter (300-Ohm to the TV's HDMI input. S-Video...
... on the TV. disc players with shielded video and audio cables that sell audio/video products. VHF (300-Ohm) antenna/UHF antenna When using a 75-Ohm coaxial cable system, connect CATV coaxial cable to the antenna mixer. Plug the adapter into the antenna terminal on the television's... rear jack panel and front control panel. For best performance, video cables should use 75-Ohm coaxial shielded wire. Before purchasing any cables, be connected to an antenna adapter (300-Ohm to the TV's HDMI input. S-Video...
Owners Guide
Page 7
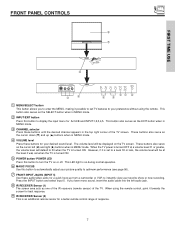
... EXIT button when in MENU mode. ቤ CHANNEL selector Press these audio/video jacks for Ant A/B and INPUT:1,2,3,4,5. FRONT PANEL CONTROLS ቩ ቪ FIRST TIME USE ቦ INPUT 5 AUDIO S-VIDEO VIDEO L/MONO R ቨ ቦ VOL- The volume level will be at a volume level 31 or greater, the volume ...for a quick hook-up (̆) buttons when in MENU mode. ባ INPUT/EXIT button Press this button to automatically adjust your preference without using the remote control, point it is set to a level 30 or less, the volume level will default to 30 when the TV is turned ON...
... EXIT button when in MENU mode. ቤ CHANNEL selector Press these audio/video jacks for Ant A/B and INPUT:1,2,3,4,5. FRONT PANEL CONTROLS ቩ ቪ FIRST TIME USE ቦ INPUT 5 AUDIO S-VIDEO VIDEO L/MONO R ቨ ቦ VOL- The volume level will be at a volume level 31 or greater, the volume ...for a quick hook-up (̆) buttons when in MENU mode. ባ INPUT/EXIT button Press this button to automatically adjust your preference without using the remote control, point it is set to a level 30 or less, the volume level will default to 30 when the TV is turned ON...

Owners Guide
Page 8
... shown in place of your TV. 8 FRONT PANEL JACKS AND CONNECTORS The front panel jacks are provided as a convenience to allow you have a S-VHS VCR, use the S-INPUT cable in the following examples: INPUT 5 AUDIO S-VIDEO VIDEO L/MONO R INPUT 5 AUDIO S-VIDEO VIDEO L/MONO R FIRST TIME...
... shown in place of your TV. 8 FRONT PANEL JACKS AND CONNECTORS The front panel jacks are provided as a convenience to allow you have a S-VHS VCR, use the S-INPUT cable in the following examples: INPUT 5 AUDIO S-VIDEO VIDEO L/MONO R INPUT 5 AUDIO S-VIDEO VIDEO L/MONO R FIRST TIME...
Owners Guide
Page 9
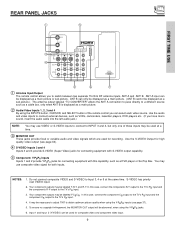
...VIDEO Output for high quality video output (see page 37). 5. To ensure no copyright infringement, the MONITOR OUT output will be labeled Y, B-Y, and R-Y. FIRST TIME USE REAR PANEL JACKS ቢ ቦ ANT A To Converter ቤ ብ ANT B MONITOR OUT S-VIDEO INPUT 4 INPUT 3 INPUT 2 Y/ VIDEO PB INPUT ...to Input 3, 4 or 5 at a time. ቤ MONITOR OUT These jacks provide fixed or variable audio and video signals which are used for composite video and component video input. 9 S-VIDEO has priority over VIDEO input. 2. Your component outputs may be necessary to adjust TINT...
...VIDEO Output for high quality video output (see page 37). 5. To ensure no copyright infringement, the MONITOR OUT output will be labeled Y, B-Y, and R-Y. FIRST TIME USE REAR PANEL JACKS ቢ ቦ ANT A To Converter ቤ ብ ANT B MONITOR OUT S-VIDEO INPUT 4 INPUT 3 INPUT 2 Y/ VIDEO PB INPUT ...to Input 3, 4 or 5 at a time. ቤ MONITOR OUT These jacks provide fixed or variable audio and video signals which are used for composite video and component video input. 9 S-VIDEO has priority over VIDEO input. 2. Your component outputs may be necessary to adjust TINT...
Owners Guide
Page 10
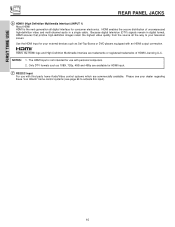
...page 64 to your television screen. Use the HDMI input for your dealer regarding these "non Hitachi" home control systems (see your external devices such as 1080i, 720p, 480i and 480p are available for HDMI input. ቨ RS232C Input For use with personal computers. 2. The ...the HDMI logo and High-Definition Multimedia Interface are commercially available. FIRST TIME USE REAR PANEL JACKS ቧ HDMI1 (High Definition Multimedia Interface) (INPUT 1) About HDMI HDMI is not intended for use with third party home Audio/Video control systems which are trademarks or registered ...
...page 64 to your television screen. Use the HDMI input for your dealer regarding these "non Hitachi" home control systems (see your external devices such as 1080i, 720p, 480i and 480p are available for HDMI input. ቨ RS232C Input For use with personal computers. 2. The ...the HDMI logo and High-Definition Multimedia Interface are commercially available. FIRST TIME USE REAR PANEL JACKS ቧ HDMI1 (High Definition Multimedia Interface) (INPUT 1) About HDMI HDMI is not intended for use with third party home Audio/Video control systems which are trademarks or registered ...
Owners Guide
Page 11
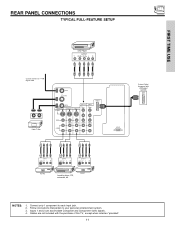
... 1 and 2 can accomodate Composite and Component video signals. 4. Connect only 1 component to your personal entertainment system. 3. REAR PANEL CONNECTIONS TYPICAL FULL-FEATURE SETUP FIRST TIME USE DVD Player OUTPUT Y PB/CB PR/CR L R Outside antenna or digital cable INPUT OUTPUT Cable TV Box ANT A To Converter ANT B MONITOR OUT S-VIDEO INPUT...
... 1 and 2 can accomodate Composite and Component video signals. 4. Connect only 1 component to your personal entertainment system. 3. REAR PANEL CONNECTIONS TYPICAL FULL-FEATURE SETUP FIRST TIME USE DVD Player OUTPUT Y PB/CB PR/CR L R Outside antenna or digital cable INPUT OUTPUT Cable TV Box ANT A To Converter ANT B MONITOR OUT S-VIDEO INPUT...

Owners Guide
Page 12
...this feature. • If your device has only one audio output (mono sound), connect it is recommended that a 1080i or 720p input signal is used for high performance laserdisc players, VCRs etc. that a VCR cannot record its own video or line output (INPUT: 3 in place of your other electronic... equipment for additional information on connecting your hook-up cables. • A single VCR can be used . 12 In this case, connect the components B-Y output to the TV's PB input and the components R-Y output to the TV's PR input. •...
...this feature. • If your device has only one audio output (mono sound), connect it is recommended that a 1080i or 720p input signal is used for high performance laserdisc players, VCRs etc. that a VCR cannot record its own video or line output (INPUT: 3 in place of your other electronic... equipment for additional information on connecting your hook-up cables. • A single VCR can be used . 12 In this case, connect the components B-Y output to the TV's PB input and the components R-Y output to the TV's PR input. •...

Owners Guide
Page 13
REAR PANEL OF TELEVISION ANT A To Converter ANT B MONITOR OUT S-VIDEO INPUT 4 INPUT 3 INPUT 2 Y/ VIDEO PB INPUT 1 Y/ VIDEO PB HDMI 1 VIDEO L AUDIO R AUDIO TO HI-FI PR PR (MONO) (MONO) (MONO) (MONO) RS232C 1 2 345 6 789 LR INPUT Stereo System Amplifier or DVD Player 13 FIRST TIME USE CONNECTING EXTERNAL AUDIO SOURCES To control the audio level of an external audio amplifier with the remote control, connect the system as shown below.
REAR PANEL OF TELEVISION ANT A To Converter ANT B MONITOR OUT S-VIDEO INPUT 4 INPUT 3 INPUT 2 Y/ VIDEO PB INPUT 1 Y/ VIDEO PB HDMI 1 VIDEO L AUDIO R AUDIO TO HI-FI PR PR (MONO) (MONO) (MONO) (MONO) RS232C 1 2 345 6 789 LR INPUT Stereo System Amplifier or DVD Player 13 FIRST TIME USE CONNECTING EXTERNAL AUDIO SOURCES To control the audio level of an external audio amplifier with the remote control, connect the system as shown below.

Owners Guide
Page 14
... model and features of each component for the location of video and audio inputs and outputs. Check the owner's manual of each component. Use the CURSOR buttons to select the Antenna and Input of your choice (see page 22). Press the INPUTS button, then select INPUT 1...the TV set will appear to show the INPUTS menu. The VIDEO OSD label disappears automatically after approximately four seconds. 4. FIRST TIME USE CONNECTING EXTERNAL VIDEO SOURCES The exact arrangement you may need to modify them to accommodate your particular assortment of components and features. The ...
... model and features of each component for the location of video and audio inputs and outputs. Check the owner's manual of each component. Use the CURSOR buttons to select the Antenna and Input of your choice (see page 22). Press the INPUTS button, then select INPUT 1...the TV set will appear to show the INPUTS menu. The VIDEO OSD label disappears automatically after approximately four seconds. 4. FIRST TIME USE CONNECTING EXTERNAL VIDEO SOURCES The exact arrangement you may need to modify them to accommodate your particular assortment of components and features. The ...

Owners Guide
Page 15
...INPUT (AUDIO/R) jack. 3. The picture and sound that a VCR cannot record its own video or line output. Refer to the INPUT (AUDIO/L) jack. 4. FIRST TIME USE CONNECTING EXTERNAL VIDEO SOURCES CONNECTING A STEREO SOURCE TO INPUT1~INPUT5 1. Connect the cable from the VIDEO OUT of the VCR or the laserdisc player to... your VCR operating guide for VCR #1 and VCR #2 (see page 11), but note that is played back will be used for more information on the TV set below. 2. Select Antenna from the INPUTS menu to return to rear panel jacks. A single VCR can be ...
...INPUT (AUDIO/R) jack. 3. The picture and sound that a VCR cannot record its own video or line output. Refer to the INPUT (AUDIO/L) jack. 4. FIRST TIME USE CONNECTING EXTERNAL VIDEO SOURCES CONNECTING A STEREO SOURCE TO INPUT1~INPUT5 1. Connect the cable from the VIDEO OUT of the VCR or the laserdisc player to... your VCR operating guide for VCR #1 and VCR #2 (see page 11), but note that is played back will be used for more information on the TV set below. 2. Select Antenna from the INPUTS menu to return to rear panel jacks. A single VCR can be ...

Owners Guide
Page 16
FIRST TIME USE CONNECTING EXTERNAL VIDEO SOURCES CONNECTING AN S-VIDEO SOURCE TO INPUT 3, 4 AND 5 1. Connect the cable from the AUDIO OUT L of the VCR or the laserdisc player ...) RS232C 1 2 345 6 789 RL V S-VIDEO VCR NOTES: 1. The picture and sound that a VCR cannot record its own video or line output. A single VCR can be used for more information on the TV set below. 2. Connect the cable from the INPUTS menu to return to the INPUT (AUDIO/R) jack. 3. Press the INPUTS...
FIRST TIME USE CONNECTING EXTERNAL VIDEO SOURCES CONNECTING AN S-VIDEO SOURCE TO INPUT 3, 4 AND 5 1. Connect the cable from the AUDIO OUT L of the VCR or the laserdisc player ...) RS232C 1 2 345 6 789 RL V S-VIDEO VCR NOTES: 1. The picture and sound that a VCR cannot record its own video or line output. A single VCR can be used for more information on the TV set below. 2. Connect the cable from the INPUTS menu to return to the INPUT (AUDIO/R) jack. 3. Press the INPUTS...

Owners Guide
Page 17
...to view the program from the output of video contents. 3. The VIDEO OSD label disappears automatically after approximately four seconds. 3. FIRST TIME USE CONNECTING EXTERNAL VIDEO SOURCES CONNECTING A COMPONENT SOURCE WITH HDMI or DVI CAPABILITY TO INPUT 1 1. HDCP is a cryptographic system that is played...be abnormal if the connection is not a "NETWORK" technology. HDMI is loose. 2. The picture and sound that encrypts video signals when using a component with DVI output, you also have to connect the AUDIO OUT (R/L) of the component to HDMI connection cable from the HDTV...
...to view the program from the output of video contents. 3. The VIDEO OSD label disappears automatically after approximately four seconds. 3. FIRST TIME USE CONNECTING EXTERNAL VIDEO SOURCES CONNECTING A COMPONENT SOURCE WITH HDMI or DVI CAPABILITY TO INPUT 1 1. HDCP is a cryptographic system that is played...be abnormal if the connection is not a "NETWORK" technology. HDMI is loose. 2. The picture and sound that encrypts video signals when using a component with DVI output, you also have to connect the AUDIO OUT (R/L) of the component to HDMI connection cable from the HDTV...

Owners Guide
Page 19
... your set -top-box, satellite receiver (SAT) and DVD players with one area. The remote will now control your SAT). If you have a satellite receiver, use this button to program your satellite receiver (see page 30 for instructions on how to program the remote to control your television. The remote will... your TV, point the remote control at the remote sensor of VCRs, CATV (Cable TV) converters, set -top-box or satellite receiver. To operate your HITACHI Projection TV, the new remote control is designed to operate different types of the cable box and press the CABLE (CBL) button.
... your set -top-box, satellite receiver (SAT) and DVD players with one area. The remote will now control your SAT). If you have a satellite receiver, use this button to program your satellite receiver (see page 30 for instructions on how to program the remote to control your television. The remote will... your TV, point the remote control at the remote sensor of VCRs, CATV (Cable TV) converters, set -top-box or satellite receiver. To operate your HITACHI Projection TV, the new remote control is designed to operate different types of the cable box and press the CABLE (CBL) button.
Owners Guide
Page 20
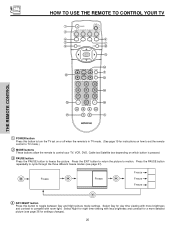
HOW TO USE THE REMOTE TO CONTROL YOUR TV ቢ ባ ቧ ብ ቦ ቨ ቩ ቫ ቭ ተ ቱ ቲ ታ ቤ THE REMOTE CONTROL ቢ POWER ...
HOW TO USE THE REMOTE TO CONTROL YOUR TV ቢ ባ ቧ ብ ቦ ቨ ቩ ቫ ቭ ተ ቱ ቲ ታ ቤ THE REMOTE CONTROL ቢ POWER ...
Owners Guide
Page 21
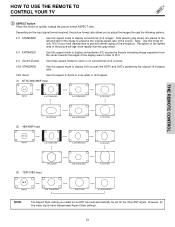
... ratio of the source. Phosphors in the lighted area of the picture will age more rapidly than the gray areas. 4:3 EXPANDED Use this aspect mode to display conventional (4:3) sources by linearly increasing image expansion from the center towards the edges of the display area ...in order to fill it. 4:3 Zoom1/Zoom2 Use these aspect modes to zoom in 16:9 aspect. (1) NTSC/480i/480P Input 4:3 INPUT 4:3 STANDARD 4:3 EXPANDED 4:3 ZOOM1 THE REMOTE CONTROL 16:9 ...
... ratio of the source. Phosphors in the lighted area of the picture will age more rapidly than the gray areas. 4:3 EXPANDED Use this aspect mode to display conventional (4:3) sources by linearly increasing image expansion from the center towards the edges of the display area ...in order to fill it. 4:3 Zoom1/Zoom2 Use these aspect modes to zoom in 16:9 aspect. (1) NTSC/480i/480P Input 4:3 INPUT 4:3 STANDARD 4:3 EXPANDED 4:3 ZOOM1 THE REMOTE CONTROL 16:9 ...


