Owners Guide
Page 1
has determined that this product meets the Energy Star® guidelines for 50VG825, 55VG825, 60VG825 IMPORTANT SAFETY INSTRUCTIONS 2-3 FIRST TIME USE ...4-20 THE REMOTE CONTROL ...21-38 ON-SCREEN DISPLAY ...39-88 LAMP REPLACEMENT ...88-91 USEFUL INFORMATION...92-97 LICENSE AGREEMENT...98 APPENDIXES ...99-100 INDEX ...101 As an Energy Star® Partner, Hitachi, Ltd. LCD REAR PROJECTION TELEVISION Operating Guide for energy efficiency.
has determined that this product meets the Energy Star® guidelines for 50VG825, 55VG825, 60VG825 IMPORTANT SAFETY INSTRUCTIONS 2-3 FIRST TIME USE ...4-20 THE REMOTE CONTROL ...21-38 ON-SCREEN DISPLAY ...39-88 LAMP REPLACEMENT ...88-91 USEFUL INFORMATION...92-97 LICENSE AGREEMENT...98 APPENDIXES ...99-100 INDEX ...101 As an Energy Star® Partner, Hitachi, Ltd. LCD REAR PROJECTION TELEVISION Operating Guide for energy efficiency.
Owners Guide
Page 4
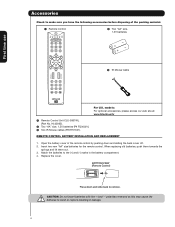
...batteries (P# FQ00021). » Two IR Mouse cables (P# EY01641). BOTTOM VIEW (Remote Control) Press down and sliding the back cover off. 2. models: For optional accessories, please access our web site at: www.hitachi.us/tv ³ Remote Control Unit CLU-3851WL (Part No. Insert two new "AA" size batteries for ...the remote control. Match the batteries to swell or rupture resulting in the battery compartment. 4. ...
...batteries (P# FQ00021). » Two IR Mouse cables (P# EY01641). BOTTOM VIEW (Remote Control) Press down and sliding the back cover off. 2. models: For optional accessories, please access our web site at: www.hitachi.us/tv ³ Remote Control Unit CLU-3851WL (Part No. Insert two new "AA" size batteries for ...the remote control. Match the batteries to swell or rupture resulting in the battery compartment. 4. ...
Owners Guide
Page 7
...items. INFO BUTTON (TV, STB, CBL, PVR) Displays various information on your HITACHI LCD Rear Projection TV, the new remote control is included in the AMP mode. 4. LAST CHANNEL BUTTON (TV, CBL, STB, ...PVR) Switches between DAY and NIGHT mode. Television CBL - Set-Top-Box VCR - The TV's remote control sensor is located on or blinks to show remote control mode when the SOURCE ACCESS buttons are pressed. To control TV functions, please point the remote control...
...items. INFO BUTTON (TV, STB, CBL, PVR) Displays various information on your HITACHI LCD Rear Projection TV, the new remote control is included in the AMP mode. 4. LAST CHANNEL BUTTON (TV, CBL, STB, ...PVR) Switches between DAY and NIGHT mode. Television CBL - Set-Top-Box VCR - The TV's remote control sensor is located on or blinks to show remote control mode when the SOURCE ACCESS buttons are pressed. To control TV functions, please point the remote control...

Owners Guide
Page 8
...preference without using the AV NET Learning Wizard. º IR RECEIVER Sensor 8 Point the remote control at this button to 30 when the TV is turned ON. ´ POWER button Press this button to turn the TV on the TV screen. When the TV power is turned OFF at the level it is set when the... TV is turned ON. If you to enter the MENU, making it possible to set TV features to instantly view your desired sound level. These buttons also serve as the cursor down (̄) and up from a camcorder or VCR to your equipment's remote control at this area while ...
...preference without using the AV NET Learning Wizard. º IR RECEIVER Sensor 8 Point the remote control at this button to 30 when the TV is turned ON. ´ POWER button Press this button to turn the TV on the TV screen. When the TV power is turned OFF at the level it is set when the... TV is turned ON. If you to enter the MENU, making it possible to set TV features to instantly view your desired sound level. These buttons also serve as the cursor down (̄) and up from a camcorder or VCR to your equipment's remote control at this area while ...

Owners Guide
Page 9
... for Service LONG BLINKING (1 SEC CYCLE) COOL DOWN (FOR 6 MINUTES) (TV CAN ACCEPT REMOTE CONTROL AND SIDE BUTTONS) 2. If light is blinking, lamp cover is off during normal operation. Check assembly condition of LAMP UNIT Call for lamp replacement procedure. Your Hitachi LCD Rear Projection Television may become clogged over time. Please make sure the Blue...
... for Service LONG BLINKING (1 SEC CYCLE) COOL DOWN (FOR 6 MINUTES) (TV CAN ACCEPT REMOTE CONTROL AND SIDE BUTTONS) 2. If light is blinking, lamp cover is off during normal operation. Check assembly condition of LAMP UNIT Call for lamp replacement procedure. Your Hitachi LCD Rear Projection Television may become clogged over time. Please make sure the Blue...

Owners Guide
Page 11
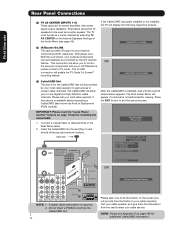
...under license from the source all digital interface for consumer electronics. Hitachi will be used for composite video and component video input. &#...TV's PB input and the components R-Y output to obtain optimum picture quality when using the Y-PBPR jacks. 6. Patent Nos. 4,631,603; 4,577,216; 4,819,098; 4,907,093; HDMI, the HDMI logo and High-Definition Multimedia Interface are trademarks of the remote control... may be necessary to adjust TINT to the TV's PR input. 3. Your component outputs may use Rear Panel Connections ³ Antenna Input CABLE - The HDMI ...
...under license from the source all digital interface for consumer electronics. Hitachi will be used for composite video and component video input. &#...TV's PB input and the components R-Y output to obtain optimum picture quality when using the Y-PBPR jacks. 6. Patent Nos. 4,631,603; 4,577,216; 4,819,098; 4,907,093; HDMI, the HDMI logo and High-Definition Multimedia Interface are trademarks of the remote control... may be necessary to adjust TINT to the TV's PR input. 3. Your component outputs may use Rear Panel Connections ³ Antenna Input CABLE - The HDMI ...
Owners Guide
Page 12
... of card faces right) Top faces Acquiring Data. The third screen below appears. Connect a coaxial cable to start your LCD Television's remote control in TV mode. Insert the CableCARD into the Call your cable operator and give them the information from the card to... of Deployment (POD) module). CableCARD slot. NOTE: Please see page 45). After the CableCARD is not authorized for viewing. Rear Panel Connections First time use ¾ TV AS CENTER (INPUTS 1-4) These jacks are for stereo amplifiers with your cable service. If the CableCARD is properly installed or not...
... of card faces right) Top faces Acquiring Data. The third screen below appears. Connect a coaxial cable to start your LCD Television's remote control in TV mode. Insert the CableCARD into the Call your cable operator and give them the information from the card to... of Deployment (POD) module). CableCARD slot. NOTE: Please see page 45). After the CableCARD is not authorized for viewing. Rear Panel Connections First time use ¾ TV AS CENTER (INPUTS 1-4) These jacks are for stereo amplifiers with your cable service. If the CableCARD is properly installed or not...
Owners Guide
Page 19
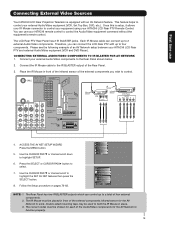
...following example of four external components. 2. Connect your HITACHI remote control to a total of an AV Network setup between your HITACHI LCD Rear PTV Remote Control. Press the SELECT or CURSOR PAD ̈ button to the Rear Panel shown below. 2. The Rear Panel has two IR BLASTER outputs which can connect ...Your HITACHI LCD Rear Projection Television is setup, it allows your external Audio/Video equipment (VCR, Set Top Box, DVD, etc.). Place the IR Mouse in place. 3. Follow the Setup procedure on pages 76-83. Use the CURSOR PAD ̄ or channel scroll down to control. ...
...following example of four external components. 2. Connect your HITACHI remote control to a total of an AV Network setup between your HITACHI LCD Rear PTV Remote Control. Press the SELECT or CURSOR PAD ̈ button to the Rear Panel shown below. 2. The Rear Panel has two IR BLASTER outputs which can connect ...Your HITACHI LCD Rear Projection Television is setup, it allows your external Audio/Video equipment (VCR, Set Top Box, DVD, etc.). Place the IR Mouse in place. 3. Follow the Setup procedure on pages 76-83. Use the CURSOR PAD ̄ or channel scroll down to control. ...
Owners Guide
Page 20
... with a G-LINK feature. One IR Mouse cable can use Connecting External Video Sources Your HITACHI LCD Rear Projection Television is necessary for limited viewing uses only. First time use your HITACHI LCD Rear PTV Remote Control and the TV Guide On Screen system to control your cable box and VCR recording features. Press the SELECT or CURSOR PAD ̈...
... with a G-LINK feature. One IR Mouse cable can use Connecting External Video Sources Your HITACHI LCD Rear Projection Television is necessary for limited viewing uses only. First time use your HITACHI LCD Rear PTV Remote Control and the TV Guide On Screen system to control your cable box and VCR recording features. Press the SELECT or CURSOR PAD ̈...
Owners Guide
Page 21
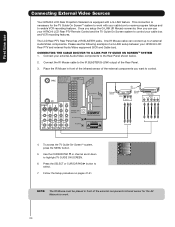
... of the settop-box and select the SET-TOP-BOX (STB) by pressing the ̇ or ̈ button of the Source Access on the remote. To operate your HITACHI LCD Rear Projection TV, the new remote control is pressed (including the LIGHT button), the illumination will light a few seconds during this button to program your VCR). The...
... of the settop-box and select the SET-TOP-BOX (STB) by pressing the ̇ or ̈ button of the Source Access on the remote. To operate your HITACHI LCD Rear Projection TV, the new remote control is pressed (including the LIGHT button), the illumination will light a few seconds during this button to program your VCR). The...
Owners Guide
Page 22
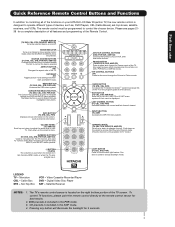
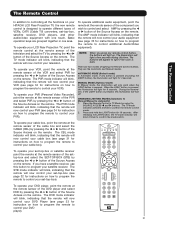
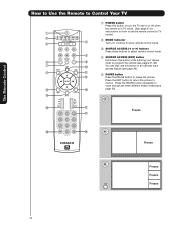
...freeze the picture. The Remote Control How to Use the Remote to Control Your TV ቢ POWER button Press this button to turn the TV set on or off when the remote is in TV mode. (See page 21 for ቢ instructions on how to set the remote control to TV mode.) ባ &#...4708; ብ ባ MODE Indicator Turns on or blinks to show remote control mode. ቤ SOURCE ACCESS (̇ or ̈) buttons Press these buttons to select remote control mode. ቦ ብ SOURCE ACCESS (ENT) ...
...freeze the picture. The Remote Control How to Use the Remote to Control Your TV ቢ POWER button Press this button to turn the TV set on or off when the remote is in TV mode. (See page 21 for ቢ instructions on how to set the remote control to TV mode.) ባ &#...4708; ብ ባ MODE Indicator Turns on or blinks to show remote control mode. ቤ SOURCE ACCESS (̇ or ̈) buttons Press these buttons to select remote control mode. ቦ ብ SOURCE ACCESS (ENT) ...

Owners Guide
Page 23
... you to adjust the images through the following options. 4:3 STANDARD Use this button to quickly change the picture format ASPECT ratio. The Remote Control How to Use the Remote to Control Your TV ቧ ASPECT button Press this aspect mode to display conventional (4:3) images. Vertical position adjustments are placed to the left and right of...
... you to adjust the images through the following options. 4:3 STANDARD Use this button to quickly change the picture format ASPECT ratio. The Remote Control How to Use the Remote to Control Your TV ቧ ASPECT button Press this aspect mode to display conventional (4:3) images. Vertical position adjustments are placed to the left and right of...

Owners Guide
Page 24
The Remote Control How to Use the Remote to Control Your TV ቨ DAY/NIGHT button Press this button to access the Channel Guide of the LCD TV (see page 57). The CURSOR PAD will also cycle through the Inputs menu items. Then press the SELECT button to access the INPUTS menu. ...SELECT button All the On-Screen Display features can be shown if the channel is in (CBL)(SAT/STB) mode. ተ INPUTS button When the remote control is locked. 24 The Aspect setting will not be set . ቭ EXIT button This button will show momentarily after releasing INFO button. Select Night ...
The Remote Control How to Use the Remote to Control Your TV ቨ DAY/NIGHT button Press this button to access the Channel Guide of the LCD TV (see page 57). The CURSOR PAD will also cycle through the Inputs menu items. Then press the SELECT button to access the INPUTS menu. ...SELECT button All the On-Screen Display features can be shown if the channel is in (CBL)(SAT/STB) mode. ተ INPUTS button When the remote control is locked. 24 The Aspect setting will not be set . ቭ EXIT button This button will show momentarily after releasing INFO button. Select Night ...

Owners Guide
Page 25
... may not properly display your photos in the right side panel of digital Photos that can be displayed is 999. 2. Next SEL Thumbnail [0-9] Jump The Remote Control 5. Press the CURSOR PAD ̇ or ̈ to picture. Press the CURSOR PAD ̆ or ̄ and the SELECT button to cycle..., USB Drive or memory cards USB drive using the Photo Input in this Photo Input. 5. The maximum number of the TV. 1. How to Use the Remote to Control Your TV PHOTO INPUT This feature is useful for viewing digital still pictures from picture to access the next or previous photo. 3. Digital...
... may not properly display your photos in the right side panel of digital Photos that can be displayed is 999. 2. Next SEL Thumbnail [0-9] Jump The Remote Control 5. Press the CURSOR PAD ̇ or ̈ to picture. Press the CURSOR PAD ̆ or ̄ and the SELECT button to cycle..., USB Drive or memory cards USB drive using the Photo Input in this Photo Input. 5. The maximum number of the TV. 1. How to Use the Remote to Control Your TV PHOTO INPUT This feature is useful for viewing digital still pictures from picture to access the next or previous photo. 3. Digital...

Owners Guide
Page 26
... the SELECT button or CURSOR PAD ̈ to 3072 x 2304; Rotate Slideshow Device ̇ Drive B ̈ NOTES: 1. The Remote Control How to Use the Remote to Control Your ROTATE Select this menu item to rotate selected photos either clockwise (CURSOR PAD ̈) and counterclockwise (CURSOR PAD ̇). ̇ ...Photo files should conform with the slideshow. Use the CURSOR PAD ̇ or ̈ to choose the device to select Device Drive. This TV set . 26 Pictures that were copied, edited or modified on a computer may not be 8 characters (Ex. ABCD1234.jpg). 1st character: ...
... the SELECT button or CURSOR PAD ̈ to 3072 x 2304; Rotate Slideshow Device ̇ Drive B ̈ NOTES: 1. The Remote Control How to Use the Remote to Control Your ROTATE Select this menu item to rotate selected photos either clockwise (CURSOR PAD ̈) and counterclockwise (CURSOR PAD ̇). ̇ ...Photo files should conform with the slideshow. Use the CURSOR PAD ̇ or ̈ to choose the device to select Device Drive. This TV set . 26 Pictures that were copied, edited or modified on a computer may not be 8 characters (Ex. ABCD1234.jpg). 1st character: ...

Owners Guide
Page 27
...volume (SOFT MUTE) to answer the telephone, etc., press the VOL wheel down. Cable 22 The Remote Control Volume 8 Cable 22 / Soft Mute 8 Cable 22 / Mute 8 Closed Captioning will default to 30 when the TV is turned on and Closed Caption is set to a level 30 or less, the volume level ... buttons are in Favorite Channel mode when (FAV) is displayed and the displayed channel is on . Enter "0" first for the TV to tune. How to Use the Remote to Control Your TV ቱ LAST CHANNEL (LAST CH) button Press this button to light up (̆) or CHANNEL WHEEL down (̄). 27 ...
...volume (SOFT MUTE) to answer the telephone, etc., press the VOL wheel down. Cable 22 The Remote Control Volume 8 Cable 22 / Soft Mute 8 Cable 22 / Mute 8 Closed Captioning will default to 30 when the TV is turned on and Closed Caption is set to a level 30 or less, the volume level ... buttons are in Favorite Channel mode when (FAV) is displayed and the displayed channel is on . Enter "0" first for the TV to tune. How to Use the Remote to Control Your TV ቱ LAST CHANNEL (LAST CH) button Press this button to light up (̆) or CHANNEL WHEEL down (̄). 27 ...

Owners Guide
Page 28
... (MONO) A L U D TV AS CENTER I O R AUDIO TO HI-FI INPUT 1 INPUT 2 INPUT 3 INPUT 4 OPTICAL OUT Digital Audio / G-LINK Upgrade Card HDMI INPUT 1 HDMI INPUT 2 CAUTION Audio Video OUTPUT VCR ባ ቢ Main Picture Sub Picture NOTES: 1. Sub-picture channel availability depends on the remote. The Remote Control Picture-In-Picture (PIP) Your HITACHI LCD Rear PTV incorporates...
... (MONO) A L U D TV AS CENTER I O R AUDIO TO HI-FI INPUT 1 INPUT 2 INPUT 3 INPUT 4 OPTICAL OUT Digital Audio / G-LINK Upgrade Card HDMI INPUT 1 HDMI INPUT 2 CAUTION Audio Video OUTPUT VCR ባ ቢ Main Picture Sub Picture NOTES: 1. Sub-picture channel availability depends on the remote. The Remote Control Picture-In-Picture (PIP) Your HITACHI LCD Rear PTV incorporates...

Owners Guide
Page 29
... S-Video 16 : 9 16 : 9 4 : 3 YES YES YES - - - - - - - YES YES YES - - - YES - - YES - - - - - YES 1 29 The Remote Control Main Picture Sub Picture MAIN PICTURE PIP Mode POP PIP 4 : 3 Format ANT Digital 480p/480i ANT Analog Video / S-Video ANT Digital 1080i / 720p Aspect 4 : 3 16... the Thumbnails. Yes1- YES YES - - - To prevent a pattern burn, occasionally move the sub-picture using the CURSOR PAD. Use the remote CURSOR PAD ̆, ̄, ̇ or ̈ to stop on the screen. Digital Tuner 16 : 9 4: 3 - - Select...
... S-Video 16 : 9 16 : 9 4 : 3 YES YES YES - - - - - - - YES YES YES - - - YES - - YES - - - - - YES 1 29 The Remote Control Main Picture Sub Picture MAIN PICTURE PIP Mode POP PIP 4 : 3 Format ANT Digital 480p/480i ANT Analog Video / S-Video ANT Digital 1080i / 720p Aspect 4 : 3 16... the Thumbnails. Yes1- YES YES - - - To prevent a pattern burn, occasionally move the sub-picture using the CURSOR PAD. Use the remote CURSOR PAD ̆, ̄, ̇ or ̈ to stop on the screen. Digital Tuner 16 : 9 4: 3 - - Select...

Owners Guide
Page 30
... are currently viewing and the frozen frame will freeze). Box 55512 Any Town, USA 98765 Check or Money Order Only 1-800-555-1212 NOTE: 1. The Remote Control Picture-in-Picture (PIP) ባ PAUSE button If you are currently viewing (only the right sub-picture will show in the Main Picture. Press the...
... are currently viewing and the frozen frame will freeze). Box 55512 Any Town, USA 98765 Check or Money Order Only 1-800-555-1212 NOTE: 1. The Remote Control Picture-in-Picture (PIP) ባ PAUSE button If you are currently viewing (only the right sub-picture will show in the Main Picture. Press the...
Owners Guide
Page 31
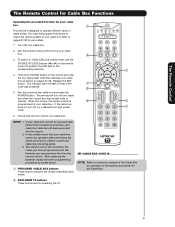
... above procedures, please consult your cable box operating guide. 3. The remote control will now control your cable box. 2. The remote will remember the codes you have programmed until the batteries are for operating the TV. 31 After replacing the batteries repeat the entire programming procedure as shown...instruction manual of the Cable Box for operation of the buttons exclusively for the Cable Box. ባ EXCLUSIVE TV buttons These buttons are removed from the from the remote control. To switch to Cable (CBL) pre-coded mode, use the SOURCE ACCESS buttons (̇ or ̈)...
... above procedures, please consult your cable box operating guide. 3. The remote control will now control your cable box. 2. The remote will remember the codes you have programmed until the batteries are for operating the TV. 31 After replacing the batteries repeat the entire programming procedure as shown...instruction manual of the Cable Box for operation of the buttons exclusively for the Cable Box. ባ EXCLUSIVE TV buttons These buttons are removed from the from the remote control. To switch to Cable (CBL) pre-coded mode, use the SOURCE ACCESS buttons (̇ or ̈)...


