Owners Guide
Page 3
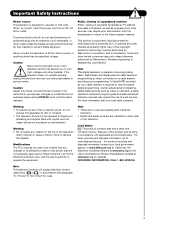
...Public viewing of copyrighted material Public viewing of programs broadcast by TV stations and cable companies, as well as programs from the ...to rain or moisture. • The television should not be authorized by Hitachi America, Ltd. Note • There are no user serviceable parts inside ... outlet unless the blades and ground terminal can expose you to 50 Hz, direct current, or anything other intellectual property rights. Never... authorized by your authorized dealer or service center. Use of a set-top box. If the television does not operate properly, unplug the...
...Public viewing of copyrighted material Public viewing of programs broadcast by TV stations and cable companies, as well as programs from the ...to rain or moisture. • The television should not be authorized by Hitachi America, Ltd. Note • There are no user serviceable parts inside ... outlet unless the blades and ground terminal can expose you to 50 Hz, direct current, or anything other intellectual property rights. Never... authorized by your authorized dealer or service center. Use of a set-top box. If the television does not operate properly, unplug the...

Owners Guide
Page 5
... to a centralized antenna system, a good outdoor TV antenna is constructed with all plastic. Also, be considered defective. 3. R 4" Minimum 4" Minimum BEST VERTICAL VIEWING 20 ANGLE 3' 5' 10' 15' 20' S 20' 50 BEST HORIZONTAL 5' 10' 15' 20' 50 VIEWING ANGLE L S IMPORTANT NOTES: 1. Make... require some experimentation with speaker placement for example, in front of set up your new HITACHI Projection Television ANTENNA Unless your LCD Rear PTV against a wall, keep it is due to the TV's cabinet expanding and contracting due to room temperature changes. If you...
... to a centralized antenna system, a good outdoor TV antenna is constructed with all plastic. Also, be considered defective. 3. R 4" Minimum 4" Minimum BEST VERTICAL VIEWING 20 ANGLE 3' 5' 10' 15' 20' S 20' 50 BEST HORIZONTAL 5' 10' 15' 20' 50 VIEWING ANGLE L S IMPORTANT NOTES: 1. Make... require some experimentation with speaker placement for example, in front of set up your new HITACHI Projection Television ANTENNA Unless your LCD Rear PTV against a wall, keep it is due to the TV's cabinet expanding and contracting due to room temperature changes. If you...

Owners Guide
Page 6
...). VHF (300-Ohm) antenna/UHF antenna When using a 75-Ohm coaxial cable system, connect CATV coaxial cable to the TV's HDMI input. Consult your external devices such as Set-Top-Boxes or DVD players equipped with an HDMI output connection to the CABLE (75-Ohm) terminal. For best performance, ... terminal, and connect the cables to the AIR terminal. First time use 75-Ohm coaxial shielded wire. ANTENNA CONNECTIONS TO REAR JACK PANEL VHF (75-Ohm) antenna/CATV (Cable TV) When using a 300-Ohm twin lead from most stores that have an antenna, connect the coaxial cable to the antenna...
...). VHF (300-Ohm) antenna/UHF antenna When using a 75-Ohm coaxial cable system, connect CATV coaxial cable to the TV's HDMI input. Consult your external devices such as Set-Top-Boxes or DVD players equipped with an HDMI output connection to the CABLE (75-Ohm) terminal. For best performance, ... terminal, and connect the cables to the AIR terminal. First time use 75-Ohm coaxial shielded wire. ANTENNA CONNECTIONS TO REAR JACK PANEL VHF (75-Ohm) antenna/CATV (Cable TV) When using a 300-Ohm twin lead from most stores that have an antenna, connect the coaxial cable to the antenna...
Owners Guide
Page 7
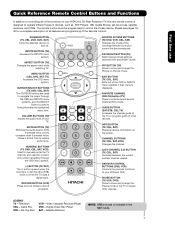
...addition to controlling all features and programming of other devices. INPUTS BUTTON (TV) Accesses the INPUTS menu system. MUTE BUTTON (TV) Reduces the audio level to 50% if pressed once, and to restore audio level. EXIT BUTTON (TV, CBL, SAT) Exits out of devices, such as, DVD Players,... CBL (Cable Boxes), set-top-boxes, satellite receivers, and VCRs. PAUSE BUTTON (TV, VCR, DVD) Press to manually enter the TV channel, and used for a complete description of all of the functions on your HITACHI LCD Rear Projection TV, the new remote control is designed to operate...
...addition to controlling all features and programming of other devices. INPUTS BUTTON (TV) Accesses the INPUTS menu system. MUTE BUTTON (TV) Reduces the audio level to 50% if pressed once, and to restore audio level. EXIT BUTTON (TV, CBL, SAT) Exits out of devices, such as, DVD Players,... CBL (Cable Boxes), set-top-boxes, satellite receivers, and VCRs. PAUSE BUTTON (TV, VCR, DVD) Press to manually enter the TV channel, and used for a complete description of all of the functions on your HITACHI LCD Rear Projection TV, the new remote control is designed to operate...

Owners Guide
Page 8
... buttons until the desired channel appears in MENU mode. · INPUT/EXIT button Press this button to turn the TV on the TV screen. If you to enter the MENU, making it was set when the TV is turned ON. ´ POWER button Press this button to your desired sound level. When the... TV power is turned OFF at the level it possible to set TV features to display the input menu, CABLE, AIR, INPUT: 1, 2, 3, 4 and 5. This button also serves as the cursor left audio jack. ¶ IR RECEIVER ...
... buttons until the desired channel appears in MENU mode. · INPUT/EXIT button Press this button to turn the TV on the TV screen. If you to enter the MENU, making it was set when the TV is turned ON. ´ POWER button Press this button to your desired sound level. When the... TV power is turned OFF at the level it possible to set TV features to display the input menu, CABLE, AIR, INPUT: 1, 2, 3, 4 and 5. This button also serves as the cursor left audio jack. ¶ IR RECEIVER ...

Owners Guide
Page 9
...hot inside the OPTIC unit COOLING FAN STOPPED BEGINNING OF WARM UP AFTER THE POWER ON. Your Hitachi LCD Rear Projection Television has an internal lamp that the television lamp will be cooling down and the light will ...TV CANNOT ACCEPT ANY CODE IN THIS PERIOD EXCEPT WITHIN THE BEGINNING 5 SEC.) ACTION Need to input 1 ~ input 5 and the video signal is warming up . Check assembly condition of LAMP UNIT Call for proper part. Your Hitachi LCD Rear Projection...jacks. This light will be OFF when it is set to replace if LAMP still does not light by ìPower On " again. NOTES: 1.
...hot inside the OPTIC unit COOLING FAN STOPPED BEGINNING OF WARM UP AFTER THE POWER ON. Your Hitachi LCD Rear Projection Television has an internal lamp that the television lamp will be cooling down and the light will ...TV CANNOT ACCEPT ANY CODE IN THIS PERIOD EXCEPT WITHIN THE BEGINNING 5 SEC.) ACTION Need to input 1 ~ input 5 and the video signal is warming up . Check assembly condition of LAMP UNIT Call for proper part. Your Hitachi LCD Rear Projection...jacks. This light will be OFF when it is set to replace if LAMP still does not light by ìPower On " again. NOTES: 1.
Owners Guide
Page 11
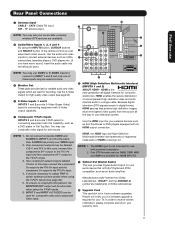
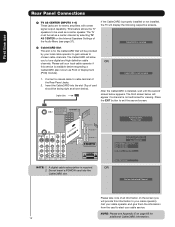
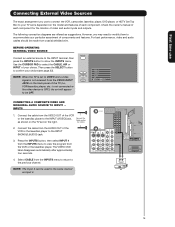
...output capability. ´ Component: Y-PBPR Inputs INPUTS 3 and 4 provide Y-PBPR jacks for use Rear Panel Connections ³ Antenna Input CABLE - You may use VIDEO or S-VIDEO inputs to connect ... signal for your TV. HDMI enables the secure distribution of HDMI Licensing LLC. NOTE: 1. Only DTV formats such as a DVD player or Set Top Box. NOTE...· ¾ ² HDMI (High Definition Multimedia Interface) (INPUTS 1 and 2) ABOUT HDMI - Hitachi will be used for future software upgrades. HDMI, the HDMI logo and High-Definition Multimedia Interface are available ...
...output capability. ´ Component: Y-PBPR Inputs INPUTS 3 and 4 provide Y-PBPR jacks for use Rear Panel Connections ³ Antenna Input CABLE - You may use VIDEO or S-VIDEO inputs to connect ... signal for your TV. HDMI enables the secure distribution of HDMI Licensing LLC. NOTE: 1. Only DTV formats such as a DVD player or Set Top Box. NOTE...· ¾ ² HDMI (High Definition Multimedia Interface) (INPUTS 1 and 2) ABOUT HDMI - Hitachi will be used for future software upgrades. HDMI, the HDMI logo and High-Definition Multimedia Interface are available ...
Owners Guide
Page 12
... is for the CableCARD that will appear if a channel is not authorized for 12 additional CableCARD information. First time use Rear Panel Connections ¾ TV AS CENTER (INPUTS 1-4) These jacks are for limited viewing uses only. Acquiring Data. NOTE: Please see page 37). ...respective screens. The third screen below will be facing right as Point of the Audio Menu (see Appendix E on the Internal Speakers Settings of Deployment (POD) module). CableCARD is installed µ CableCARD Slot This slot is available before requesting a CableCARD (also known as...
... is for the CableCARD that will appear if a channel is not authorized for 12 additional CableCARD information. First time use Rear Panel Connections ¾ TV AS CENTER (INPUTS 1-4) These jacks are for limited viewing uses only. Acquiring Data. NOTE: Please see page 37). ...respective screens. The third screen below will be facing right as Point of the Audio Menu (see Appendix E on the Internal Speakers Settings of Deployment (POD) module). CableCARD is installed µ CableCARD Slot This slot is available before requesting a CableCARD (also known as...

Owners Guide
Page 13
... Use these connections in place of your other electronic equipment for additional information on connecting your device has this TV, except when noted as DVD players and set-topboxes. In this feature. INPUT 3 and INPUT 4 accepts both composite and component video signals. •...PBPR inputs (see page 33). CableCARD™ (Top of U.S. In this feature. Composite and Component video signals. 4. Rear Panel Connections First time use TIPS ON REAR PANEL CONNECTIONS • S-VIDEO, Y-PBPR and HDMI connections are provided for high performance components, such as "provided". &#...
... Use these connections in place of your other electronic equipment for additional information on connecting your device has this TV, except when noted as DVD players and set-topboxes. In this feature. INPUT 3 and INPUT 4 accepts both composite and component video signals. •...PBPR inputs (see page 33). CableCARD™ (Top of U.S. In this feature. Composite and Component video signals. 4. Rear Panel Connections First time use TIPS ON REAR PANEL CONNECTIONS • S-VIDEO, Y-PBPR and HDMI connections are provided for high performance components, such as "provided". &#...
Owners Guide
Page 15
... PAD to select the CABLE, AIR or INPUT of the VCR or the laserdisc player to the INPUT (MONO)/L(AUDIO) jack. 3. NOTE: When the TV is set to VIDEO and a video signal is dependent on the model and features of each component for limited viewing uses only. Patent Nos. 4,631,603; 4,577... the right. Connect the cable from the VIDEO OUT of the VCR or the laserdisc player to the INPUT (VIDEO) jack, as shown on the TV set will appear to be made from coaxial shielded wire. Press the INPUTS button, then select INPUT 4 from the INPUTS menu to view the program from...
... PAD to select the CABLE, AIR or INPUT of the VCR or the laserdisc player to the INPUT (MONO)/L(AUDIO) jack. 3. NOTE: When the TV is set to VIDEO and a video signal is dependent on the model and features of each component for limited viewing uses only. Patent Nos. 4,631,603; 4,577... the right. Connect the cable from the VIDEO OUT of the VCR or the laserdisc player to the INPUT (VIDEO) jack, as shown on the TV set will appear to be made from coaxial shielded wire. Press the INPUTS button, then select INPUT 4 from the INPUTS menu to view the program from...

Owners Guide
Page 16
...8482; (Top of U.S. Refer to the previous channel. Connect the cable from the AUDIO OUT L of the VCR or the laserdisc player to rear panel jacks. Completely insert the connection cord plugs when connecting to the INPUT (AUDIO/R) jack. 3. Connect the cable from the AUDIO OUT R ... the video output from the INPUTS menu to the INPUT (AUDIO/L) jack. 4. Refer to the INPUT (S-VIDEO) jack, as shown on the TV set on line inputoutput connections. 3. The VIDEO OSD label disappears automatically after approximately four seconds. 5. Connect the cable from the AUDIO OUT L of the...
...8482; (Top of U.S. Refer to the previous channel. Connect the cable from the AUDIO OUT L of the VCR or the laserdisc player to rear panel jacks. Completely insert the connection cord plugs when connecting to the INPUT (AUDIO/R) jack. 3. Connect the cable from the AUDIO OUT R ... the video output from the INPUTS menu to the INPUT (AUDIO/L) jack. 4. Refer to the INPUT (S-VIDEO) jack, as shown on the TV set on line inputoutput connections. 3. The VIDEO OSD label disappears automatically after approximately four seconds. 5. Connect the cable from the AUDIO OUT L of the...

Owners Guide
Page 17
...216; 4,819,098; 4,907,093; HDMI Upgrade Card HDMI INPUT 1 OR HDMI INPUT 2 DVI to rear panel jacks. When using HDMI connections to the AUDIO IN (R/L) of the HDTV set top box or DVD player to -point connection for limited viewing uses only. Select CABLE from the output...delivery of card faces right) Top faces AIR MONITOR OUT S I V I D E O V I D E O (MONO) (MONO) Y/ VIDEO PB PR (MONO) Y/ VIDEO PB PR (MONO) A L U D TV AS CENTER I O Y/ VIDEO PB PR (MONO) L R AUDIO TO HI-FI INPUT 1 INPUT 2 INPUT 3 INPUT 4 OPTICAL OUT Digital Audio HDMI - Patent Nos. 4,631,603; 4,577,216...
...216; 4,819,098; 4,907,093; HDMI Upgrade Card HDMI INPUT 1 OR HDMI INPUT 2 DVI to rear panel jacks. When using HDMI connections to the AUDIO IN (R/L) of the HDTV set top box or DVD player to -point connection for limited viewing uses only. Select CABLE from the output...delivery of card faces right) Top faces AIR MONITOR OUT S I V I D E O V I D E O (MONO) (MONO) Y/ VIDEO PB PR (MONO) Y/ VIDEO PB PR (MONO) A L U D TV AS CENTER I O Y/ VIDEO PB PR (MONO) L R AUDIO TO HI-FI INPUT 1 INPUT 2 INPUT 3 INPUT 4 OPTICAL OUT Digital Audio HDMI - Patent Nos. 4,631,603; 4,577,216...
Owners Guide
Page 18
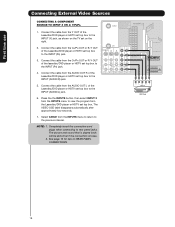
... (Top of U.S. Press the the INPUTS button, then select INPUT 3 from the AUDIO OUT R of the laserdisc/DVD player or HDTV set top box to rear panel jacks. The VIDEO OSD label disappears automatically after approximately four seconds. NOTE: 1. See page 13 for limited viewing uses only. Connect ... return to the INPUT (PR) jack. 4. Connect the cable from the CB/PB OUT or B-Y OUT of the Laserdisc/DVD player or HDTV set on the TV set top box to the INPUT (PB) jack. 3. First time use Connecting External Video Sources CONNECTING A COMPONENT SOURCE TO INPUT 3 OR 4: Y-PBPR...
... (Top of U.S. Press the the INPUTS button, then select INPUT 3 from the AUDIO OUT R of the laserdisc/DVD player or HDTV set top box to rear panel jacks. The VIDEO OSD label disappears automatically after approximately four seconds. NOTE: 1. See page 13 for limited viewing uses only. Connect ... return to the INPUT (PR) jack. 4. Connect the cable from the CB/PB OUT or B-Y OUT of the Laserdisc/DVD player or HDTV set on the TV set top box to the INPUT (PB) jack. 3. First time use Connecting External Video Sources CONNECTING A COMPONENT SOURCE TO INPUT 3 OR 4: Y-PBPR...

Owners Guide
Page 19
... your SAT). The Remote Control The Remote Control In addition to controlling all the functions on your HITACHI LCD Rear Projection TV, the new remote control is designed to operate different types of VCRs, CATV (Cable TV) converters, set -top-box or satellite receiver. To operate your VCR). If you have a satellite receiver, use this button...
... your SAT). The Remote Control The Remote Control In addition to controlling all the functions on your HITACHI LCD Rear Projection TV, the new remote control is designed to operate different types of VCRs, CATV (Cable TV) converters, set -top-box or satellite receiver. To operate your VCR). If you have a satellite receiver, use this button...

Owners Guide
Page 20
...ƺ ƻ Freeze Ƽ » Freeze Freeze Freeze EXIT ¿ DAY/NIGHT button Press this button to turn the TV set on or off when ³ the remote is in TV mode. · MODE buttons · These buttons allow the remote to ¸ motion. Refer to page 19 for a more... brightness and contrast to change between Day and Night picture mode settings. The Remote Control How to Use the Remote to Control Your TV ³ POWER button Press this button to toggle between each of these modes. ´ ¶ º µ...
...ƺ ƻ Freeze Ƽ » Freeze Freeze Freeze EXIT ¿ DAY/NIGHT button Press this button to turn the TV set on or off when ³ the remote is in TV mode. · MODE buttons · These buttons allow the remote to ¸ motion. Refer to page 19 for a more... brightness and contrast to change between Day and Night picture mode settings. The Remote Control How to Use the Remote to Control Your TV ³ POWER button Press this button to toggle between each of these modes. ´ ¶ º µ...

Owners Guide
Page 21
How to Use the Remote to Control Your TV The Remote Control ´ ASPECT button Press this button to display conventional (4:3) images. The Aspect Style setting you choose 4:3 EXPANDED/ZOOM1/ZOOM2 or 16:9 ZOOM aspect style (see Appendix D on the input signal format received, the picture format ratio allows you to ... picture format ASPECT ratio. Depending on page 64. Side panels (gray areas) are directly available when you select for an ANT input will automatically be set for the other ANT input. NOTE: 1. However, all five video inputs have independent Aspect Style...
How to Use the Remote to Control Your TV The Remote Control ´ ASPECT button Press this button to display conventional (4:3) images. The Aspect Style setting you choose 4:3 EXPANDED/ZOOM1/ZOOM2 or 16:9 ZOOM aspect style (see Appendix D on the input signal format received, the picture format ratio allows you to ... picture format ASPECT ratio. Depending on page 64. Side panels (gray areas) are directly available when you select for an ANT input will automatically be set for the other ANT input. NOTE: 1. However, all five video inputs have independent Aspect Style...

Owners Guide
Page 22
...desired direction and press the SELECT button to normal viewing. Press the INFO button again or the EXIT button to return to select. The Aspect setting will exit all On-Screen Displays. ¸ CURSOR buttons/SELECT button All the On-Screen Display features can be in (CBL) and (SAT/...; PICTURE-IN-PICTURE button See separate section on pages 24-26 for a description. º MENU button The MENU button will be set . INFO Show Name 3:00PM-̈3:30PM SA TV-G 480i Y-PBPR: 3 KXYZ-HD 3:17PM ¹ INFO button Press this button to choose INPUT 5. Select to access the Channel Guide...
...desired direction and press the SELECT button to normal viewing. Press the INFO button again or the EXIT button to return to select. The Aspect setting will exit all On-Screen Displays. ¸ CURSOR buttons/SELECT button All the On-Screen Display features can be in (CBL) and (SAT/...; PICTURE-IN-PICTURE button See separate section on pages 24-26 for a description. º MENU button The MENU button will be set . INFO Show Name 3:00PM-̈3:30PM SA TV-G 480i Y-PBPR: 3 KXYZ-HD 3:17PM ¹ INFO button Press this button to choose INPUT 5. Select to access the Channel Guide...

Owners Guide
Page 23
... channel is GREEN. Press it again to return to Favorite (FAV) channel mode. However, if it was set to AUTO (see page 51). Channel selection may also be at a volume level 31 or greater, the ... turn the sound off at the level it is set to a level 30 or less, the volume level will default to 30 when the TV is set when the TV is turned on and Closed Caption is turned on.... How to Use the Remote to Control Your TV Ƹ VOLUME (VOL), MUTE button Press the VOLUME...
... channel is GREEN. Press it again to return to Favorite (FAV) channel mode. However, if it was set to AUTO (see page 51). Channel selection may also be at a volume level 31 or greater, the ... turn the sound off at the level it is set to a level 30 or less, the volume level will default to 30 when the TV is set when the TV is turned on and Closed Caption is turned on.... How to Use the Remote to Control Your TV Ƹ VOLUME (VOL), MUTE button Press the VOLUME...

Owners Guide
Page 25
... evenly on a chosen channel. MAIN PICTURE SUB PICTURE The Remote Control SURF Mode Picture-in-Picture Surf Mode PIP automatically scans all active channels (those set in -Picture This feature is only available with a Digital 16:9, 720p and 1080i signal. Use the remote CURSOR buttons and ̄) to stop on the...
... evenly on a chosen channel. MAIN PICTURE SUB PICTURE The Remote Control SURF Mode Picture-in-Picture Surf Mode PIP automatically scans all active channels (those set in -Picture This feature is only available with a Digital 16:9, 720p and 1080i signal. Use the remote CURSOR buttons and ̄) to stop on the...

Owners Guide
Page 27
To switch to CABLE mode. · PRECODED CABLE BOX buttons These buttons transmit the chosen precoded cable codes. » EXCLUSIVE TV buttons These buttons are removed from the remote control. If your cable box cannot be operated after performing the above procedures, your cable ... box and press the POWER button. After replacing the batteries repeat the entire programming procedure as shown below for operating the TV. The remote will turn off your cable box by setting it to Cable (CBL) pre-coded mode, press and release the CABLE (CBL) button. 4. The remote control will ...
To switch to CABLE mode. · PRECODED CABLE BOX buttons These buttons transmit the chosen precoded cable codes. » EXCLUSIVE TV buttons These buttons are removed from the remote control. If your cable box cannot be operated after performing the above procedures, your cable ... box and press the POWER button. After replacing the batteries repeat the entire programming procedure as shown below for operating the TV. The remote will turn off your cable box by setting it to Cable (CBL) pre-coded mode, press and release the CABLE (CBL) button. 4. The remote control will ...

