Owners Guide
Page 1
has determined that this product meets the Energy Star® guidelines for 50VF820, 55VF820, 60VF820 IMPORTANT SAFETY INSTRUCTIONS 2-3 FIRST TIME USE ...4-18 THE REMOTE CONTROL ...19-30 ON-SCREEN DISPLAY ...31-54 LAMP REPLACEMENT ...55-58 USEFUL INFORMATION...59-62 LICENSE AGREEMENT...63 APPENDIXES ...64-65 INDEX ...66 As an Energy Star® Partner, Hitachi, Ltd. LCD REAR PROJECTION TELEVISION Operating Guide for energy efficiency.
has determined that this product meets the Energy Star® guidelines for 50VF820, 55VF820, 60VF820 IMPORTANT SAFETY INSTRUCTIONS 2-3 FIRST TIME USE ...4-18 THE REMOTE CONTROL ...19-30 ON-SCREEN DISPLAY ...31-54 LAMP REPLACEMENT ...55-58 USEFUL INFORMATION...59-62 LICENSE AGREEMENT...63 APPENDIXES ...64-65 INDEX ...66 As an Energy Star® Partner, Hitachi, Ltd. LCD REAR PROJECTION TELEVISION Operating Guide for energy efficiency.

Owners Guide
Page 4
...Two "AA" size, 1.5V batteries First time use For US models: For optional accessories, please access our website at www.hitachi.us/tv ³ Remote Control Unit CLU-4352UG2 (Part No. Match the batteries to remove back cover. Do not force the battery into the battery compartment ...first, push towards the springs and lift them towards the springs and insert the top of the remote control by pushing down and sliding the back...
...Two "AA" size, 1.5V batteries First time use For US models: For optional accessories, please access our website at www.hitachi.us/tv ³ Remote Control Unit CLU-4352UG2 (Part No. Match the batteries to remove back cover. Do not force the battery into the battery compartment ...first, push towards the springs and lift them towards the springs and insert the top of the remote control by pushing down and sliding the back...
Owners Guide
Page 7
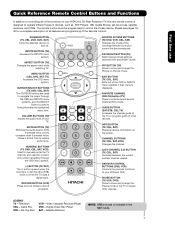
...BUTTON (VCR) Press twice (2 times) to record programs. SOURCE ACCESS BUTTONS (TV, DVD, VCR, CBL, SAT) Changes the mode of your TV. EXIT BUTTON (TV, CBL, SAT) Exits out of your HITACHI LCD Rear Projection TV, the new remote control is included in -Picture mode. Television CBL - Cable Box STB - Digital ... is displayed. INPUTS BUTTON (TV) Accesses the INPUTS menu system. INFO BUTTON (TV, CBL, SAT) Displays various information on and off. MENU BUTTON (CBL, DVD, SAT, TV) Accesses the OSD menu system. MUTE BUTTON (TV) Reduces the audio level to 50% if pressed once, and ...
...BUTTON (VCR) Press twice (2 times) to record programs. SOURCE ACCESS BUTTONS (TV, DVD, VCR, CBL, SAT) Changes the mode of your TV. EXIT BUTTON (TV, CBL, SAT) Exits out of your HITACHI LCD Rear Projection TV, the new remote control is included in -Picture mode. Television CBL - Cable Box STB - Digital ... is displayed. INPUTS BUTTON (TV) Accesses the INPUTS menu system. INFO BUTTON (TV, CBL, SAT) Displays various information on and off. MENU BUTTON (CBL, DVD, SAT, TV) Accesses the OSD menu system. MUTE BUTTON (TV) Reduces the audio level to 50% if pressed once, and ...

Owners Guide
Page 8
... also serves as the SELECT button when in the top right corner of response. 8 When the TV power is turned OFF at the level it is set TV features to your preference without using the remote. The volume level will be at a volume level 31 or greater, the volume level will be... in MENU mode. » CHANNEL selector Press these buttons for a better remote control range of the TV screen. However, if it was set when the TV is turned ON. ´ POWER button Press this button to 30 when the TV is a remote sensor for your favorite show or new recording. These buttons also serve as...
... also serves as the SELECT button when in the top right corner of response. 8 When the TV power is turned OFF at the level it is set TV features to your preference without using the remote. The volume level will be at a volume level 31 or greater, the volume level will be... in MENU mode. » CHANNEL selector Press these buttons for a better remote control range of the TV screen. However, if it was set when the TV is turned ON. ´ POWER button Press this button to 30 when the TV is a remote sensor for your favorite show or new recording. These buttons also serve as...

Owners Guide
Page 9
... page 55-58 for Service LONG BLINKING (1 SEC CYCLE) COOL DOWN (FOR 6 MINUTES) (TV CAN ACCEPT REMOTE CONTROL AND SIDE BUTTONS) 2. NOTES: 1. Check assembly condition of LAMP UNIT Call for lamp replacement procedure. When the TV is turned OFF, the Power Light will blink to turn off with the TEMP LED On... ACCEPT ANY CODE IN THIS PERIOD EXCEPT WITHIN THE BEGINNING 5 SEC.) ACTION Need to indicate that lights up the TV screen. Your Hitachi LCD Rear Projection Television has an internal lamp that the television lamp is warming up . If the LAMP, TEMP, and POWER LED are not watching for ...
... page 55-58 for Service LONG BLINKING (1 SEC CYCLE) COOL DOWN (FOR 6 MINUTES) (TV CAN ACCEPT REMOTE CONTROL AND SIDE BUTTONS) 2. NOTES: 1. Check assembly condition of LAMP UNIT Call for lamp replacement procedure. When the TV is turned OFF, the Power Light will blink to turn off with the TEMP LED On... ACCEPT ANY CODE IN THIS PERIOD EXCEPT WITHIN THE BEGINNING 5 SEC.) ACTION Need to indicate that lights up the TV screen. Your Hitachi LCD Rear Projection Television has an internal lamp that the television lamp is warming up . If the LAMP, TEMP, and POWER LED are not watching for ...
Owners Guide
Page 11
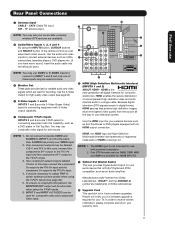
...the INPUTS button, CURSOR buttons and SELECT button of the remote control you have mono sound, insert the audio cable into the ... V I D E O (MONO) (MONO) Y/ VIDEO PB PR (MONO) Y/ VIDEO PB PR (MONO) A L U D TV AS CENTER I O R AUDIO TO HI-FI INPUT 1 INPUT 2 INPUT 3 INPUT 4 OPTICAL OUT Digital Audio HDMI INPUT 1 ²... ² HDMI (High Definition Multimedia Interface) (INPUTS 1 and 2) ABOUT HDMI - Hitachi will be used at the same time. Patent Nos. 4,631,603; 4,577,216;... signal for both inputs. HDMI is for use Rear Panel Connections ³ Antenna Input CABLE - HDMI...
...the INPUTS button, CURSOR buttons and SELECT button of the remote control you have mono sound, insert the audio cable into the ... V I D E O (MONO) (MONO) Y/ VIDEO PB PR (MONO) Y/ VIDEO PB PR (MONO) A L U D TV AS CENTER I O R AUDIO TO HI-FI INPUT 1 INPUT 2 INPUT 3 INPUT 4 OPTICAL OUT Digital Audio HDMI INPUT 1 ²... ² HDMI (High Definition Multimedia Interface) (INPUTS 1 and 2) ABOUT HDMI - Hitachi will be used at the same time. Patent Nos. 4,631,603; 4,577,216;... signal for both inputs. HDMI is for use Rear Panel Connections ³ Antenna Input CABLE - HDMI...

Owners Guide
Page 19
... the DVD player and press the DVD button. To operate your cable box, point the remote at the remote sensor of the cable box and press the CABLE (CBL) button. The remote will now control your HITACHI LCD Rear Projection TV, the new remote control is designed to operate different types of the set -top-boxes, satellite receivers (SAT) and...
... the DVD player and press the DVD button. To operate your cable box, point the remote at the remote sensor of the cable box and press the CABLE (CBL) button. The remote will now control your HITACHI LCD Rear Projection TV, the new remote control is designed to operate different types of the set -top-boxes, satellite receivers (SAT) and...

Owners Guide
Page 20
...Freeze Freeze Freeze EXIT ¿ DAY/NIGHT button Press this button to turn the TV set on or off when ³ the remote is in TV mode. · MODE buttons · These buttons allow the remote to control your TV, VCR, DVD, Cable box/Satellite box depending on ² ¿ which button.... Press the PAUSE button repeatedly to cycle through the three different freeze modes (see page 33 for settings changes). 20 The Remote Control How to Use the Remote to Control Your TV ³ POWER button Press this button to toggle between each of these modes. ´ ¶ º µ ...
...Freeze Freeze Freeze EXIT ¿ DAY/NIGHT button Press this button to turn the TV set on or off when ³ the remote is in TV mode. · MODE buttons · These buttons allow the remote to control your TV, VCR, DVD, Cable box/Satellite box depending on ² ¿ which button.... Press the PAUSE button repeatedly to cycle through the three different freeze modes (see page 33 for settings changes). 20 The Remote Control How to Use the Remote to Control Your TV ³ POWER button Press this button to toggle between each of these modes. ´ ¶ º µ ...

Owners Guide
Page 21
..., the picture format ratio allows you select for an ANT input will automatically be set for the other ANT input. How to Use the Remote to Control Your TV The Remote Control ´ ASPECT button Press this button to Zoom-in once while in 16:9 aspect. • Antenna-Analog • S-Video/Video Input (Auto Aspect...
..., the picture format ratio allows you select for an ANT input will automatically be set for the other ANT input. How to Use the Remote to Control Your TV The Remote Control ´ ASPECT button Press this button to Zoom-in once while in 16:9 aspect. • Antenna-Analog • S-Video/Video Input (Auto Aspect...

Owners Guide
Page 22
...Satellite Receiver (SAT)/ Set-Top-Box (STB) mode only] The use of this button is only applicable when the remote control is connected to INPUT 3. INFO Show Name 3:00PM-̈3:30PM ST TV-G 480i S-IN: 1 KXYZ-HD 3:17PM Day Off 16:9 Standard µ EXIT button This button will exit all... setting will also cycle through the Inputs menu items. Then press the SELECT button to select. How to Use the Remote to Control Your TV ² INPUTS button When the remote control is locked. 22 Select to normal viewing. Day Off 16:9 Standard INFO button display when an S-VIDEO Input is ...
...Satellite Receiver (SAT)/ Set-Top-Box (STB) mode only] The use of this button is only applicable when the remote control is connected to INPUT 3. INFO Show Name 3:00PM-̈3:30PM ST TV-G 480i S-IN: 1 KXYZ-HD 3:17PM Day Off 16:9 Standard µ EXIT button This button will exit all... setting will also cycle through the Inputs menu items. Then press the SELECT button to select. How to Use the Remote to Control Your TV ² INPUTS button When the remote control is locked. 22 Select to normal viewing. Day Off 16:9 Standard INFO button display when an S-VIDEO Input is ...

Owners Guide
Page 23
... buttons to enter one half of normal volume (SOFT MUTE) to answer the telephone, etc., press the MUTE button. How to Use the Remote to Control Your TV Ƹ VOLUME (VOL), MUTE button Press the VOLUME button (̆ or ̄) until the displayed channel turns from your Favorite channel list...channel turns highlighted GREEN to WHITE. Cable 6 The Remote Control MUTE Volume 8 FAV CH FAV Cable 6 MUTE Soft Mute 8 FAV CH Cable 6 Mute 8 Closed Captioning will default to AUTO (see page 51). Press it was set to 30 when the TV is set to turn the sound off at the ...
... buttons to enter one half of normal volume (SOFT MUTE) to answer the telephone, etc., press the MUTE button. How to Use the Remote to Control Your TV Ƹ VOLUME (VOL), MUTE button Press the VOLUME button (̆ or ̄) until the displayed channel turns from your Favorite channel list...channel turns highlighted GREEN to WHITE. Cable 6 The Remote Control MUTE Volume 8 FAV CH FAV Cable 6 MUTE Soft Mute 8 FAV CH Cable 6 Mute 8 Closed Captioning will default to AUTO (see page 51). Press it was set to 30 when the TV is set to turn the sound off at the ...
Owners Guide
Page 24
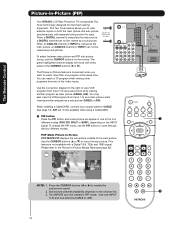
...; different modes (POP, PIP, SPLIT or SURF), depending on both the main picture and sub-picture simultaneously, with separate tuning control for limited viewing uses only. POP Mode Picture-in -Picture Modes Table (see page 12). This Two Tuner feature allows you ...viewing another program as a sub picture. Two INPUTS can not be viewed in -Picture (PIP) Your HITACHI LCD Rear Projection TV incorporates Two Tuner technology designed for improved viewing enjoyment. The Remote Control Picture-in PIP mode. Use the CURSOR buttons (̆ or ̄) to cycle through the four ...
...; different modes (POP, PIP, SPLIT or SURF), depending on both the main picture and sub-picture simultaneously, with separate tuning control for limited viewing uses only. POP Mode Picture-in -Picture Modes Table (see page 12). This Two Tuner feature allows you ...viewing another program as a sub picture. Two INPUTS can not be viewed in -Picture (PIP) Your HITACHI LCD Rear Projection TV incorporates Two Tuner technology designed for improved viewing enjoyment. The Remote Control Picture-in PIP mode. Use the CURSOR buttons (̆ or ̄) to cycle through the four ...

Owners Guide
Page 25
Use the remote CURSOR buttons and ̄) to stop on the screen. Press the EXIT button to enable your chosen channel and return to normal viewing. 1 2 3 4 5 6 7 8 9 10 11 ... 1080i - - YES - - - - - 480p/480i 16x9/4x3 - - - - - - - YES YES YES YES YES 1080i/720p 16x9 - - - - - - - 480p/480i 16x9/4x3 YES YES - - - - - MAIN PICTURE SUB PICTURE The Remote Control SURF Mode Picture-in-Picture Surf Mode PIP automatically scans all active channels (those set in memory) and displays them as PIP subpictures or Thumbnail...
Use the remote CURSOR buttons and ̄) to stop on the screen. Press the EXIT button to enable your chosen channel and return to normal viewing. 1 2 3 4 5 6 7 8 9 10 11 ... 1080i - - YES - - - - - 480p/480i 16x9/4x3 - - - - - - - YES YES YES YES YES 1080i/720p 16x9 - - - - - - - 480p/480i 16x9/4x3 YES YES - - - - - MAIN PICTURE SUB PICTURE The Remote Control SURF Mode Picture-in-Picture Surf Mode PIP automatically scans all active channels (those set in memory) and displays them as PIP subpictures or Thumbnail...

Owners Guide
Page 26
... PAUSE button again. 2. The last Freeze mode you selected before you are currently viewing and the frozen frame will show in the Main Picture. The Remote Control Picture-in-Picture (PIP) · PAUSE button If you are currently viewing (only the right sub-picture will freeze). Press the EXIT button to return...
... PAUSE button again. 2. The last Freeze mode you selected before you are currently viewing and the frozen frame will show in the Main Picture. The Remote Control Picture-in-Picture (PIP) · PAUSE button If you are currently viewing (only the right sub-picture will freeze). Press the EXIT button to return...

Owners Guide
Page 27
...procedure as shown below for operating the TV. You must first program the remote to CABLE mode. · PRECODED CABLE BOX buttons These buttons transmit the chosen precoded cable codes. » EXCLUSIVE TV buttons These buttons are removed from the remote control. Turn ON your cable box by ...setting it to match the remote system of your cable · box. 3. To switch to operate different types of...
...procedure as shown below for operating the TV. You must first program the remote to CABLE mode. · PRECODED CABLE BOX buttons These buttons transmit the chosen precoded cable codes. » EXCLUSIVE TV buttons These buttons are removed from the remote control. Turn ON your cable box by ...setting it to match the remote system of your cable · box. 3. To switch to operate different types of...

Owners Guide
Page 28
... are for Set-Top Box/Satelite Receiver Functions The Remote Control OPERATING THE PRECODED FUNCTION FOR YOUR SET-TOP-BOX/SATELLITE RECEIVER. The Remote Control for operating the TV. In the unlikely event that matches your set -...topbox/satellite receiver. If your set-top-box/satellite receiver cannot be operated after performing the above procedures, please consult your set -topbox/satellite receiver cannot be operated after performing the above . SATELLITE BRAND CODES ECOSTAR 03 HITACHI...
... are for Set-Top Box/Satelite Receiver Functions The Remote Control OPERATING THE PRECODED FUNCTION FOR YOUR SET-TOP-BOX/SATELLITE RECEIVER. The Remote Control for operating the TV. In the unlikely event that matches your set -...topbox/satellite receiver. If your set-top-box/satellite receiver cannot be operated after performing the above procedures, please consult your set -topbox/satellite receiver cannot be operated after performing the above . SATELLITE BRAND CODES ECOSTAR 03 HITACHI...

Owners Guide
Page 29
...to DVD mode. · PRECODED DVD Buttons These buttons transmit the chosen precoded DVD codes. » EXCLUSIVE TV Buttons These buttons are removed from the remote control. Aim the remote at the front of the buttons exclusively for the DVD player. 29 If the DVD player does not turn ... code is entered. Aim the remote control at the DVD player and press the POWER button. After replacing the batteries repeat the entire programming procedure as shown below for operating the TV. · DVD BRAND CODES APEX 10 GO VIDEO 09 HITACHI 00 KENWOOD 11 PANASONIC 02 PIONEER...
...to DVD mode. · PRECODED DVD Buttons These buttons transmit the chosen precoded DVD codes. » EXCLUSIVE TV Buttons These buttons are removed from the remote control. Aim the remote at the front of the buttons exclusively for the DVD player. 29 If the DVD player does not turn ... code is entered. Aim the remote control at the DVD player and press the POWER button. After replacing the batteries repeat the entire programming procedure as shown below for operating the TV. · DVD BRAND CODES APEX 10 GO VIDEO 09 HITACHI 00 KENWOOD 11 PANASONIC 02 PIONEER...

Owners Guide
Page 30
... by setting it to VCR mode. · PRECODED VCR Buttons These buttons transmit the chosen precoded VCR codes. » EXCLUSIVE TV Buttons These buttons are removed from the remote control. This remote is designed to VCR pre-coded mode, press and release the VCR button. 4. Turn ON your VCR when the correct two... remember the codes you have programmed until the batteries are for operating the TV. · · VCR BRAND CODES EMERSON 20, 21, 22, 23 ,24 FISHER 34, 37, 38, 39 HITACHI 00, 01, 02, 03, 04, 05, 06 JVC 49, 50, 51 MAGNAVOX 12, 13 MITSUBISHI 27, 28, 29, 30 NEC 40,...
... by setting it to VCR mode. · PRECODED VCR Buttons These buttons transmit the chosen precoded VCR codes. » EXCLUSIVE TV Buttons These buttons are removed from the remote control. This remote is designed to VCR pre-coded mode, press and release the VCR button. 4. Turn ON your VCR when the correct two... remember the codes you have programmed until the batteries are for operating the TV. · · VCR BRAND CODES EMERSON 20, 21, 22, 23 ,24 FISHER 34, 37, 38, 39 HITACHI 00, 01, 02, 03, 04, 05, 06 JVC 49, 50, 51 MAGNAVOX 12, 13 MITSUBISHI 27, 28, 29, 30 NEC 40,...

Owners Guide
Page 31
Press EXIT on your HITACHI LCD Rear Projection TV. 2. Lamp Temp Power On-Screen Display 31 This part of the screen shows which Remote Control buttons to quickly exit from a menu. On-Screen Display 1. Press the SELECT button to navigate and highlight a different feature of the screen shows which selections are available. Press MENU on the remote control to display the different features on the remote control to use. Press the CURSOR buttons to select. 3. Video Audio Channel Manager Locks Timers Setup Move SEL Select This part of the On-Screen Display menu.
Press EXIT on your HITACHI LCD Rear Projection TV. 2. Lamp Temp Power On-Screen Display 31 This part of the screen shows which Remote Control buttons to quickly exit from a menu. On-Screen Display 1. Press the SELECT button to navigate and highlight a different feature of the screen shows which selections are available. Press MENU on the remote control to display the different features on the remote control to use. Press the CURSOR buttons to select. 3. Video Audio Channel Manager Locks Timers Setup Move SEL Select This part of the On-Screen Display menu.

Owners Guide
Page 48
...; Event4 : -- : -- The OFF TIMER will appear. If you are away from home by the ON TIMER and no remote control button is pressed after three hours. For safety, the TV should be turned off after viewing reservation is enabled. 2. Timers Set Event Timer This function will deactivate. 3. Please Set Clock First...automatically turn off when you change the channel after the ON TIMER has been activated, the OFF TIMER will automatically operate the Projection TV viewing reservation of a program. When the CLOCK is changed in the box means the selected event is activated, the...
...; Event4 : -- : -- The OFF TIMER will appear. If you are away from home by the ON TIMER and no remote control button is pressed after three hours. For safety, the TV should be turned off after viewing reservation is enabled. 2. Timers Set Event Timer This function will deactivate. 3. Please Set Clock First...automatically turn off when you change the channel after the ON TIMER has been activated, the OFF TIMER will automatically operate the Projection TV viewing reservation of a program. When the CLOCK is changed in the box means the selected event is activated, the...


