Owners Guide
Page 3
...-over. 13. Keep these instructions. 2. ticularly at www.epsc.ca (in the vicinity of the obsolete outlet. 10. Only use the attachments/accessories specified by TV stations and cable companies, as well as to avoid injury from the apparatus. 11. ufacturer. 12. When a cart is damaged, liquid has been spilled or...
...-over. 13. Keep these instructions. 2. ticularly at www.epsc.ca (in the vicinity of the obsolete outlet. 10. Only use the attachments/accessories specified by TV stations and cable companies, as well as to avoid injury from the apparatus. 11. ufacturer. 12. When a cart is damaged, liquid has been spilled or...

Owners Guide
Page 4
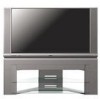
...TV DVD VCR CBL SOURCE WIZARD CD PVR STB AMP 1 2 3 4 5 6 7 8 9 SLEEP C.C. Remote Control Unit CLU-5729TSI (Part No. Insert two new "AA" size batteries for VCR and video tape storage. Replace the cover. Replace with Hitachi.... 1. CAUTION: Danger of explosion if battery is capable of the cover with Hitachi 50V500. EY01641). BOTTOM VIEW (Remote Control) 4. Lift up on tab to make ...OPTIONAL LCD REAR PTV STAND (NOT INCLUDED, ORDER SEPARATELY) PART NAME PART NO. 50" LCD Rear PTV Stand H520445 SP50W 60" LCD Rear PTV Stand H520446 SP60W CUSTOM HITACHI TELEVISION ...
...TV DVD VCR CBL SOURCE WIZARD CD PVR STB AMP 1 2 3 4 5 6 7 8 9 SLEEP C.C. Remote Control Unit CLU-5729TSI (Part No. Insert two new "AA" size batteries for VCR and video tape storage. Replace the cover. Replace with Hitachi.... 1. CAUTION: Danger of explosion if battery is capable of the cover with Hitachi 50V500. EY01641). BOTTOM VIEW (Remote Control) 4. Lift up on tab to make ...OPTIONAL LCD REAR PTV STAND (NOT INCLUDED, ORDER SEPARATELY) PART NAME PART NO. 50" LCD Rear PTV Stand H520445 SP50W 60" LCD Rear PTV Stand H520446 SP60W CUSTOM HITACHI TELEVISION ...
Owners Guide
Page 5
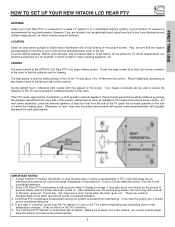
...prevent from the perforated back cover of the HITACHI LCD Rear PTV is seen by placing the speakers equidistant from outside light may appear on . The LCD Rear PTV cabinet is constructed with speaker placement for such technology irrespective of the TV and about one minute for the picture to...Select an area where sunlight or bright indoor illumination will be considered defective. 2. FIRST TIME USE HOW TO SET UP YOUR NEW HITACHI LCD REAR PTV ANTENNA Unless your LCD has defective pixels, it should not be obtained by sitting directly in room sizes and acoustical environments will ...
...prevent from the perforated back cover of the HITACHI LCD Rear PTV is seen by placing the speakers equidistant from outside light may appear on . The LCD Rear PTV cabinet is constructed with speaker placement for such technology irrespective of the TV and about one minute for the picture to...Select an area where sunlight or bright indoor illumination will be considered defective. 2. FIRST TIME USE HOW TO SET UP YOUR NEW HITACHI LCD REAR PTV ANTENNA Unless your LCD has defective pixels, it should not be obtained by sitting directly in room sizes and acoustical environments will ...
Owners Guide
Page 6
... connected Attach an optional antenna cable mixer to the TV antenna terminal, and connect the cables to 75-Ohm). You must place the IR mouse transmitter in place of your dealer or service store for the antenna mixer. Digital Visual Interface (DVI) Connection Cable This cable is ...used to connect external devices with shielded video and audio cables that sell audio/video products. If you have phono connectors. ANTENNA CONNECTIONS TO REAR JACK PANEL VHF (75-Ohm) antenna/CATV (Cable TV) When using your...
... connected Attach an optional antenna cable mixer to the TV antenna terminal, and connect the cables to 75-Ohm). You must place the IR mouse transmitter in place of your dealer or service store for the antenna mixer. Digital Visual Interface (DVI) Connection Cable This cable is ...used to connect external devices with shielded video and audio cables that sell audio/video products. If you have phono connectors. ANTENNA CONNECTIONS TO REAR JACK PANEL VHF (75-Ohm) antenna/CATV (Cable TV) When using your...
Owners Guide
Page 7
... ON. Your selection is required. Memory Stick (MS) 3. Smart Media (SM) 4. Some terms used herein are tested with your digital pictures, an adapter is shown in MENU mode. These buttons also serve as the SELECT button when in MENU mode. ባ INPUT...VID5 buttons depending on the front control panel until the desired channel appears in the top right corner of the TV screen. Secure Digital (SD) 2. Memory Card 1. However, if it possible to set TV features to select the current antenna source, VIDEO: 1, 2, 3, 4, 5 or alternate antenna source. Compact Flash...
... ON. Your selection is required. Memory Stick (MS) 3. Smart Media (SM) 4. Some terms used herein are tested with your digital pictures, an adapter is shown in MENU mode. These buttons also serve as the SELECT button when in MENU mode. ባ INPUT...VID5 buttons depending on the front control panel until the desired channel appears in the top right corner of the TV screen. Secure Digital (SD) 2. Memory Card 1. However, if it possible to set TV features to select the current antenna source, VIDEO: 1, 2, 3, 4, 5 or alternate antenna source. Compact Flash...
Owners Guide
Page 8
...normal operation. If the LAMP, TEMP, and POWER LED are common characteristics of manufacturer. If your Hitachi dealer for lamp replacement procedure. After extended use, the picture may darken, the color may hear ...: 1. It takes 12-15 seconds to room temperature changes. Check assembly condition of the TV. When using the remote control, point it may take about 2 minutes to manufacturing process ... OPERATION COOL DOWN 2. If this indicator is lit, the lamp has failed. Since LCD Rear PTV incorporates a high pressure lamp to display an image, it towards the screen for best...
...normal operation. If the LAMP, TEMP, and POWER LED are common characteristics of manufacturer. If your Hitachi dealer for lamp replacement procedure. After extended use, the picture may darken, the color may hear ...: 1. It takes 12-15 seconds to room temperature changes. Check assembly condition of the TV. When using the remote control, point it may take about 2 minutes to manufacturing process ... OPERATION COOL DOWN 2. If this indicator is lit, the lamp has failed. Since LCD Rear PTV incorporates a high pressure lamp to display an image, it towards the screen for best...

Owners Guide
Page 9
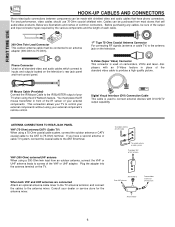
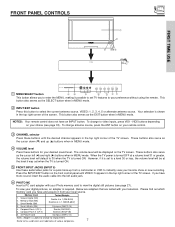
FIRST TIME USE FRONT PANEL JACKS AND CONNECTORS The front panel jacks are provided as shown in place of your TV. 9 Completely insert connection cord plugs when connecting to easily connect a camcorder or VCR as a convenience to allow you do not, the played back picture may ...
FIRST TIME USE FRONT PANEL JACKS AND CONNECTORS The front panel jacks are provided as shown in place of your TV. 9 Completely insert connection cord plugs when connecting to easily connect a camcorder or VCR as a convenience to allow you do not, the played back picture may ...
Owners Guide
Page 10
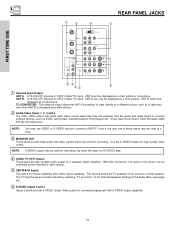
...: S-VIDEO output may be controlled by selecting "TV as a center speaker. This feature allows the TV speakers to the stereo can be used at a time. ቤ MONITOR OUT These jacks provide fixed audio and video signals which are pressed. FIRST TIME USE REAR PANEL JACKS ቢ ባ ቪ ... ቧ ቢ Antenna Input/Output ANT A- ANT A can only be used for recording only when the input is of the Audio Menu (see page 50). ቧ S-VIDEO Inputs 3 and 4 Inputs 3 and 4 provide S-VIDEO (Super Video) jacks for stereo amplifiers with S-VIDEO output capability. 10 ANT ...
...: S-VIDEO output may be controlled by selecting "TV as a center speaker. This feature allows the TV speakers to the stereo can be used at a time. ቤ MONITOR OUT These jacks provide fixed audio and video signals which are pressed. FIRST TIME USE REAR PANEL JACKS ቢ ባ ቪ ... ቧ ቢ Antenna Input/Output ANT A- ANT A can only be used for recording only when the input is of the Audio Menu (see page 50). ቧ S-VIDEO Inputs 3 and 4 Inputs 3 and 4 provide S-VIDEO (Super Video) jacks for stereo amplifiers with S-VIDEO output capability. 10 ANT ...
Owners Guide
Page 11
... composite video signal for INPUT:2. Input 2 (Y/VIDEO) can be used with Digital Content Protection. With this case, connect the components B-Y output to the TV's PB input and the components R-Y output to the TV's PR input. 4. Do not connect composite VIDEO and S-VIDEO to obtain ...decoders, DVD players with a DVD player from a personal computer. 3. FIRST TIME USE REAR PANEL JACKS ቨ Component: Y-PBPR Inputs Inputs 1 and 2 provide Y-PBPR jacks for connecting equipment with a copy-protect digital out terminal, a high definition picture can be displayed on the screen in its...
... composite video signal for INPUT:2. Input 2 (Y/VIDEO) can be used with Digital Content Protection. With this case, connect the components B-Y output to the TV's PB input and the components R-Y output to the TV's PR input. 4. Do not connect composite VIDEO and S-VIDEO to obtain ...decoders, DVD players with a DVD player from a personal computer. 3. FIRST TIME USE REAR PANEL JACKS ቨ Component: Y-PBPR Inputs Inputs 1 and 2 provide Y-PBPR jacks for connecting equipment with a copy-protect digital out terminal, a high definition picture can be displayed on the screen in its...
Owners Guide
Page 12
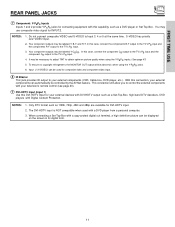
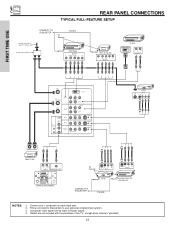
FIRST TIME USE REAR PANEL CONNECTIONS TYPICAL FULL-FEATURE SETUP Outside antenna or cable TV coaxial cable 2-Way signal splitter CONNECT TO IR BLASTER IR Sensor (Provided) DVD Player OUTPUT Y PB/CB PR/CR L R HDTV Set-Top Box Y PB PR L R OUTPUT D-VHS DIGITAL OUTPUT LR OUTPUT ANT A TO CONVERTER ANT B INPUT 1 INPUT 2 DVI-HDTV...
FIRST TIME USE REAR PANEL CONNECTIONS TYPICAL FULL-FEATURE SETUP Outside antenna or cable TV coaxial cable 2-Way signal splitter CONNECT TO IR BLASTER IR Sensor (Provided) DVD Player OUTPUT Y PB/CB PR/CR L R HDTV Set-Top Box Y PB PR L R OUTPUT D-VHS DIGITAL OUTPUT LR OUTPUT ANT A TO CONVERTER ANT B INPUT 1 INPUT 2 DVI-HDTV...

Owners Guide
Page 13
... hook-up cables. • A single VCR can be used at a time. • Connect only 1 component (VCR, DVD player, camcorder, etc.) to the TV's PR input. • Your component outputs may be labeled Y, B-Y, and R-Y. Input 2 accepts both composite and component video signals. • Your component outputs may ... the components CR output to the TV's PR input. • You may be used for VCR #1 and VCR #2, but only one audio output (mono sound), connect it is recommended to use a 1080i or 720p input signal. 13 FIRST TIME USE TIPS ON REAR PANEL CONNECTIONS • S-VIDEO connections...
... hook-up cables. • A single VCR can be used at a time. • Connect only 1 component (VCR, DVD player, camcorder, etc.) to the TV's PR input. • Your component outputs may be labeled Y, B-Y, and R-Y. Input 2 accepts both composite and component video signals. • Your component outputs may ... the components CR output to the TV's PR input. • You may be used for VCR #1 and VCR #2, but only one audio output (mono sound), connect it is recommended to use a 1080i or 720p input signal. 13 FIRST TIME USE TIPS ON REAR PANEL CONNECTIONS • S-VIDEO connections...
Owners Guide
Page 14
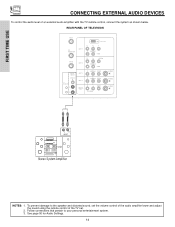
...set the volume control of the audio amplifier lower and adjust the sound using the remote control of an external audio amplifier with the TV remote control, connect the system as shown below. FIRST TIME USE CONNECTING EXTERNAL AUDIO DEVICES To control the audio level of the... TV set. 2. See page 50 for Audio Settings. 14 REAR PANEL OF TELEVISION ANT A TO CONVERTER ANT B INPUT 1 INPUT 2 DVI-HDTV PR PB Y R (MONO)/L AUDIO PR PB Y/VIDEO R (MONO)/L AUDIO...
...set the volume control of the audio amplifier lower and adjust the sound using the remote control of an external audio amplifier with the TV remote control, connect the system as shown below. FIRST TIME USE CONNECTING EXTERNAL AUDIO DEVICES To control the audio level of the... TV set. 2. See page 50 for Audio Settings. 14 REAR PANEL OF TELEVISION ANT A TO CONVERTER ANT B INPUT 1 INPUT 2 DVI-HDTV PR PB Y R (MONO)/L AUDIO PR PB Y/VIDEO R (MONO)/L AUDIO...
Owners Guide
Page 15
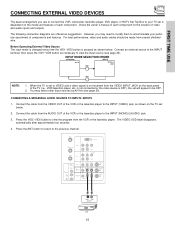
... OSD label disappears automatically after approximately four seconds. 4. Press the ANT button to return to view the program from the VIDEO INPUT JACK on the TV set below . ANT A TO CONVERTER ANT B INPUT 1 INPUT 2 DVI-HDTV PR PB Y R (MONO)/L AUDIO PR PB Y/VIDEO R (MONO)/L AUDIO AUDIO TO HI-FI .... The following connection diagrams are offered as necessary to be made from the VIDEO OUT of the VCR or the laserdisc player to accommodate your TV set will appear to view the input source (see page 20). Press the VID2~VID5 button to the previous channel. NOTE: 1. is not ...
... OSD label disappears automatically after approximately four seconds. 4. Press the ANT button to return to view the program from the VIDEO INPUT JACK on the TV set below . ANT A TO CONVERTER ANT B INPUT 1 INPUT 2 DVI-HDTV PR PB Y R (MONO)/L AUDIO PR PB Y/VIDEO R (MONO)/L AUDIO AUDIO TO HI-FI .... The following connection diagrams are offered as necessary to be made from the VIDEO OUT of the VCR or the laserdisc player to accommodate your TV set will appear to view the input source (see page 20). Press the VID2~VID5 button to the previous channel. NOTE: 1. is not ...
Owners Guide
Page 16
Press the ANT button to return to rear panel jacks. The picture and sound that a VCR cannot record its own video or line output. Connect the cable from the AUDIO OUT R of the ... your VCR operating guide for VCR #1 and VCR #2 (see page 12), but note that is played back will be used for more information on the TV set below. 2. The VIDEO OSD label disappears automatically after approximately four seconds. 5. A single VCR can be abnormal if the connection is loose. 2. Completely insert the...
Press the ANT button to return to rear panel jacks. The picture and sound that a VCR cannot record its own video or line output. Connect the cable from the AUDIO OUT R of the ... your VCR operating guide for VCR #1 and VCR #2 (see page 12), but note that is played back will be used for more information on the TV set below. 2. The VIDEO OSD label disappears automatically after approximately four seconds. 5. A single VCR can be abnormal if the connection is loose. 2. Completely insert the...

Owners Guide
Page 17
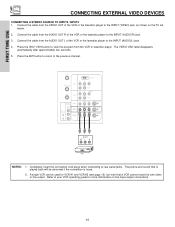
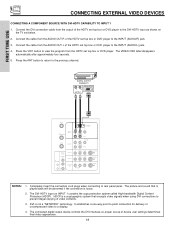
...a VCR cannot record its own video or line output. Connect the cable from the VCR or laserdisc player. Press the ANT button to return to rear panel jacks. Press the VID3~VID5 button to view the program from the AUDIO OUT L of the VCR or the laserdisc player to the INPUT...your VCR operating guide for VCR #1 and VCR #2 (see page 12), but note that is played back will be used for more information on the TV set below. 2. Completely insert the connection cord plugs when connecting to the previous channel. FIRST TIME USE CONNECTING EXTERNAL VIDEO DEVICES CONNECTING AN S-VIDEO SOURCE...
...a VCR cannot record its own video or line output. Connect the cable from the VCR or laserdisc player. Press the ANT button to return to rear panel jacks. Press the VID3~VID5 button to view the program from the AUDIO OUT L of the VCR or the laserdisc player to the INPUT...your VCR operating guide for VCR #1 and VCR #2 (see page 12), but note that is played back will be used for more information on the TV set below. 2. Completely insert the connection cord plugs when connecting to the previous channel. FIRST TIME USE CONNECTING EXTERNAL VIDEO DEVICES CONNECTING AN S-VIDEO SOURCE...
Owners Guide
Page 18
Connect the cable from the AUDIO OUT R of the HDTV set top box or DVD player to rear panel jacks. Completely insert the connection cord plugs when connecting to the INPUT (AUDIO/R) jack. 3. The picture and sound that encrypts video signals when...VIDEO R (MONO)/L VIDEO R L VIDEO AUDIO S-VIDEO S-VIDEO S-VIDEO NOTES: 1. The DVI-HDTV input on the TV set -up of video contents. 3. HDCP is a cryptographic system that is played back will be abnormal if the connection is not a "NETWORK" technology. The connected digital output device controls the DVI interface so proper set below. 2.
Connect the cable from the AUDIO OUT R of the HDTV set top box or DVD player to rear panel jacks. Completely insert the connection cord plugs when connecting to the INPUT (AUDIO/R) jack. 3. The picture and sound that encrypts video signals when...VIDEO R (MONO)/L VIDEO R L VIDEO AUDIO S-VIDEO S-VIDEO S-VIDEO NOTES: 1. The DVI-HDTV input on the TV set -up of video contents. 3. HDCP is a cryptographic system that is played back will be abnormal if the connection is not a "NETWORK" technology. The connected digital output device controls the DVI interface so proper set below. 2.
Owners Guide
Page 19
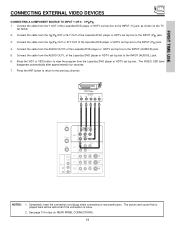
... Laserdisc/DVD player or HDTV set below. 2. The VIDEO OSD label disappears automatically after approximately four seconds. 7. See page 13 for tips on the TV set top box to the INPUT (PB) jack. 3. Connect the cable from the AUDIO OUT L of the Laserdisc/DVD player or HDTV set top... the Y OUT of the Laserdisc/DVD player or HDTV set top box. Press the VID1 or VID2 button, to the INPUT (Y) jack, as shown on REAR PANEL CONNECTIONS. 19 FIRST TIME USE CONNECTING EXTERNAL VIDEO DEVICES CONNECTING A COMPONENT SOURCE TO INPUT 1 OR 2: Y-PBPR. 1. Connect the cable from the Laserdisc/...
... Laserdisc/DVD player or HDTV set below. 2. The VIDEO OSD label disappears automatically after approximately four seconds. 7. See page 13 for tips on the TV set top box to the INPUT (PB) jack. 3. Connect the cable from the AUDIO OUT L of the Laserdisc/DVD player or HDTV set top... the Y OUT of the Laserdisc/DVD player or HDTV set top box. Press the VID1 or VID2 button, to the INPUT (Y) jack, as shown on REAR PANEL CONNECTIONS. 19 FIRST TIME USE CONNECTING EXTERNAL VIDEO DEVICES CONNECTING A COMPONENT SOURCE TO INPUT 1 OR 2: Y-PBPR. 1. Connect the cable from the Laserdisc/...
Owners Guide
Page 20
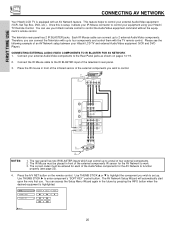
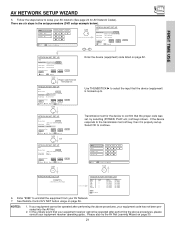
... connect the Television with up to a total of the Audio/Video components for the AV Network to the Rear Panel jacks as shown on the remote control. The rear panel has two IR BLASTER inputs which can access the Setup Menu Wizard again in the future by pressing ... to four components and control them with an AV Network feature. You can control up to control your equipment using your Hitachi TV Remote Control. Connect your Hitachi LCD TV and external Audio/Video equipment (VCR and DVD Player). CONNECTING EXTERNAL AUDIO/VIDEO COMPONENTS TO IR BLASTER FOR AV NETWORK 1....
... connect the Television with up to a total of the Audio/Video components for the AV Network to the Rear Panel jacks as shown on the remote control. The rear panel has two IR BLASTER inputs which can access the Setup Menu Wizard again in the future by pressing ... to four components and control them with an AV Network feature. You can control up to control your equipment using your Hitachi TV Remote Control. Connect your Hitachi LCD TV and external Audio/Video equipment (VCR and DVD Player). CONNECTING EXTERNAL AUDIO/VIDEO COMPONENTS TO IR BLASTER FOR AV NETWORK 1....
Owners Guide
Page 21
...Code Entered from your equipment code has not been precoded into the AV Net. 2. HITACHI AV NET SET UP DVD Device Code Video Input Audio Input 0 6 7 2 (Enter code "9999" to uninstall) Input 1 Using TV Transmission Test BACK POWER OK PLAY EXIT Move Set Input SEL Select CH UP THUMB ..., etc.) soft keys shown. See Remote Control A/V NET button usage on page 30. 21 HITACHI AV NET SET UP DVD Device Code Video Input Audio Input 0 6 7 2 (Enter code "9999" to uninstall) Input 1 Using TV Transmission Test BACK POWER OK PLAY EXIT Move Set Input SEL Select THUMB STICK (x2) CH...
...Code Entered from your equipment code has not been precoded into the AV Net. 2. HITACHI AV NET SET UP DVD Device Code Video Input Audio Input 0 6 7 2 (Enter code "9999" to uninstall) Input 1 Using TV Transmission Test BACK POWER OK PLAY EXIT Move Set Input SEL Select CH UP THUMB ..., etc.) soft keys shown. See Remote Control A/V NET button usage on page 30. 21 HITACHI AV NET SET UP DVD Device Code Video Input Audio Input 0 6 7 2 (Enter code "9999" to uninstall) Input 1 Using TV Transmission Test BACK POWER OK PLAY EXIT Move Set Input SEL Select THUMB STICK (x2) CH...
Owners Guide
Page 23
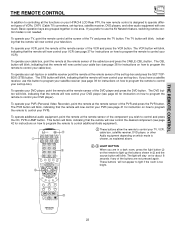
...DAY/NIGHT ቤ REC CLU-5729TSI 23 To operate your PVR (Personal Video Recorder), point the remote at the remote sensor of VCRs, CATV (Cable TV) converters, set -top-box). These buttons will blink. The CBL button will blink, indicating that the remote will now control your DVD player (see ...types of the DVD player and press the DVD button. THE REMOTE CONTROL THE REMOTE CONTROL In addition to controlling all the functions on your HITACHI LCD Rear PTV, the new remote control is designed to control your PVR). To operate your cable box, point the remote at the remote sensor ...
...DAY/NIGHT ቤ REC CLU-5729TSI 23 To operate your PVR (Personal Video Recorder), point the remote at the remote sensor of VCRs, CATV (Cable TV) converters, set -top-box). These buttons will blink. The CBL button will blink, indicating that the remote will now control your DVD player (see ...types of the DVD player and press the DVD button. THE REMOTE CONTROL THE REMOTE CONTROL In addition to controlling all the functions on your HITACHI LCD Rear PTV, the new remote control is designed to control your PVR). To operate your cable box, point the remote at the remote sensor ...


