
Owners Guide
Page 1
LCD REAR PROJECTION TELEVISION 50V500 60V500A OPERATING GUIDE IMPORTANT SAFETY INSTRUCTIONS 2-3 FIRST TIME USE THE REMOTE CONTROL 4-22 Page 7 updated 01/09/04 23-43 Video Audio Aspect Chan. Manager Locks Setup Move SEL Sel ON-SCREEN DISPLAY 44-68 USEFUL INFORMATION INDEX 69-80 As an ENERGY STAR® Partner, Hitachi, Ltd. has determined that this product meets the ENERGY STAR® guidelines for energy efficiency.
LCD REAR PROJECTION TELEVISION 50V500 60V500A OPERATING GUIDE IMPORTANT SAFETY INSTRUCTIONS 2-3 FIRST TIME USE THE REMOTE CONTROL 4-22 Page 7 updated 01/09/04 23-43 Video Audio Aspect Chan. Manager Locks Setup Move SEL Sel ON-SCREEN DISPLAY 44-68 USEFUL INFORMATION INDEX 69-80 As an ENERGY STAR® Partner, Hitachi, Ltd. has determined that this product meets the ENERGY STAR® guidelines for energy efficiency.
Owners Guide
Page 5
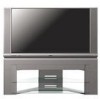
... the perforated back cover of TFT LCD technology due to a Hi-Fi system's external speakers, the best audio performance will not fall directly on . If the TV's audio output will be considered defective. 4. These are located in an exceptionally good signal area that the location selected... etc. LOCATION Select an area where sunlight or bright indoor illumination will be obtained by sitting directly in front of the HITACHI LCD Rear PTV is constructed with speaker placement for example, in room sizes and acoustical environments will require some experimentation with all the time...
... the perforated back cover of TFT LCD technology due to a Hi-Fi system's external speakers, the best audio performance will not fall directly on . If the TV's audio output will be considered defective. 4. These are located in an exceptionally good signal area that the location selected... etc. LOCATION Select an area where sunlight or bright indoor illumination will be obtained by sitting directly in front of the HITACHI LCD Rear PTV is constructed with speaker placement for example, in room sizes and acoustical environments will require some experimentation with all the time...
Owners Guide
Page 6
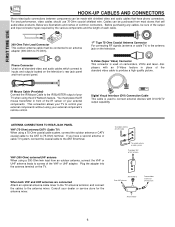
...Ohm) antenna/UHF antenna When using the A/V Network feature. "F" Type 75-Ohm Coaxial Antenna Connector For connecting RF signals (antenna or cable TV) to screws of the VHF or UHF adapter. disc players with DVI-HDTV output capability. To outdoor antenna or CATV cable To second antenna...Phono Connector Used on the television's rear jack panel and front control panel. Before purchasing any cables, be connected to an antenna adapter (300-Ohm to inputs and outputs located on all standard video and audio cables which connect to 75-Ohm). Digital Visual Interface (DVI) Connection Cable ...
...Ohm) antenna/UHF antenna When using the A/V Network feature. "F" Type 75-Ohm Coaxial Antenna Connector For connecting RF signals (antenna or cable TV) to screws of the VHF or UHF adapter. disc players with DVI-HDTV output capability. To outdoor antenna or CATV cable To second antenna...Phono Connector Used on the television's rear jack panel and front control panel. Before purchasing any cables, be connected to an antenna adapter (300-Ohm to inputs and outputs located on all standard video and audio cables which connect to 75-Ohm). Digital Visual Interface (DVI) Connection Cable ...
Owners Guide
Page 7
... page 33). This button also serves as the SELECT button when in the top right corner of the TV screen. These buttons also serve as the cursor down (̄) and up from your digital pictures, an adapter is turned ON. If you to enter the MENU, making it from a camcorder or VCR...). To change for a quick hook-up (̆) buttons when in the top right corner of the screen. These buttons also serve as the cursor left audio jack. ቧ PHOTO MC Insert a PC card adapter with your favorite show or new recording. However, if it was set to 30 when the...
... page 33). This button also serves as the SELECT button when in the top right corner of the TV screen. These buttons also serve as the cursor down (̄) and up from your digital pictures, an adapter is turned ON. If you to enter the MENU, making it from a camcorder or VCR...). To change for a quick hook-up (̆) buttons when in the top right corner of the screen. These buttons also serve as the cursor left audio jack. ቧ PHOTO MC Insert a PC card adapter with your favorite show or new recording. However, if it was set to 30 when the...

Owners Guide
Page 9
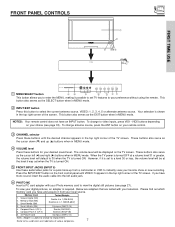
...: 1. If you do not, the played back picture may be abnormal. 2. If you have a mono VCR, insert the audio cable into the left audio jack of the standard video cable. 3. Completely insert connection cord plugs when connecting to easily connect a camcorder or VCR as a convenience ...to allow you to front panel jacks. FIRST TIME USE FRONT PANEL JACKS AND CONNECTORS The front panel jacks are provided as shown in place of your TV....
...: 1. If you do not, the played back picture may be abnormal. 2. If you have a mono VCR, insert the audio cable into the left audio jack of the standard video cable. 3. Completely insert connection cord plugs when connecting to easily connect a camcorder or VCR as a convenience ...to allow you to front panel jacks. FIRST TIME USE FRONT PANEL JACKS AND CONNECTORS The front panel jacks are provided as shown in place of your TV....
Owners Guide
Page 10
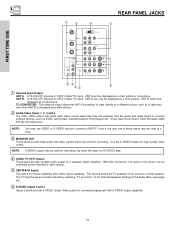
...output allows the ANT A connection to pass directly to a different source, such as a cable box, only when ANT B is of the Audio Menu (see page 50). ቧ S-VIDEO Inputs 3 and 4 Inputs 3 and 4 provide S-VIDEO (Super Video) jacks for stereo amplifiers with S-VIDEO output ...TV) input. Use the S-VIDEO Output for high quality video output. ANT B- ANT B cannot be displayed as a center speaker. FIRST TIME USE REAR PANEL JACKS ቢ ባ ቪ ቨ ANT A TO CONVERTER ANT B INPUT 1 INPUT 2 DVI-HDTV PR PB Y R (MONO)/L AUDIO PR PB Y/VIDEO R (MONO)/L AUDIO AUDIO...
...output allows the ANT A connection to pass directly to a different source, such as a cable box, only when ANT B is of the Audio Menu (see page 50). ቧ S-VIDEO Inputs 3 and 4 Inputs 3 and 4 provide S-VIDEO (Super Video) jacks for stereo amplifiers with S-VIDEO output ...TV) input. Use the S-VIDEO Output for high quality video output. ANT B- ANT B cannot be displayed as a center speaker. FIRST TIME USE REAR PANEL JACKS ቢ ባ ቪ ቨ ANT A TO CONVERTER ANT B INPUT 1 INPUT 2 DVI-HDTV PR PB Y R (MONO)/L AUDIO PR PB Y/VIDEO R (MONO)/L AUDIO AUDIO...
Owners Guide
Page 12
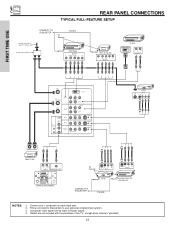
... TIME USE REAR PANEL CONNECTIONS TYPICAL FULL-FEATURE SETUP Outside antenna or cable TV coaxial cable 2-Way signal splitter CONNECT TO IR BLASTER IR Sensor (Provided) DVD Player OUTPUT Y PB/CB PR/CR L R HDTV Set-Top Box Y PB PR L R OUTPUT D-VHS DIGITAL OUTPUT LR ...OUTPUT ANT A TO CONVERTER ANT B INPUT 1 INPUT 2 DVI-HDTV PR PB Y R (MONO)/L AUDIO PR PB Y/VIDEO R (MONO)/L AUDIO AUDIO...
... TIME USE REAR PANEL CONNECTIONS TYPICAL FULL-FEATURE SETUP Outside antenna or cable TV coaxial cable 2-Way signal splitter CONNECT TO IR BLASTER IR Sensor (Provided) DVD Player OUTPUT Y PB/CB PR/CR L R HDTV Set-Top Box Y PB PR L R OUTPUT D-VHS DIGITAL OUTPUT LR ...OUTPUT ANT A TO CONVERTER ANT B INPUT 1 INPUT 2 DVI-HDTV PR PB Y R (MONO)/L AUDIO PR PB Y/VIDEO R (MONO)/L AUDIO AUDIO...

Owners Guide
Page 13
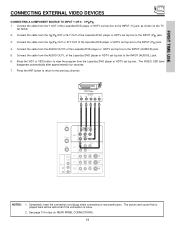
...inputs. (See page 47) • To ensure no copyright infringement, the MONITOR OUT output may be labeled Y-CBCR. FIRST TIME USE TIPS ON REAR PANEL CONNECTIONS • S-VIDEO connections are provided for high performance components, such as DVD players and set- Use these connections in place of these ... for VCR #1 and VCR #2, but only one audio output (mono sound), connect it is recommended to the left audio jack on page 12). In this case, connect the components CB output to the TV's PB input and the components CR output to the TV's PR input. • You may use VIDEO...
...inputs. (See page 47) • To ensure no copyright infringement, the MONITOR OUT output may be labeled Y-CBCR. FIRST TIME USE TIPS ON REAR PANEL CONNECTIONS • S-VIDEO connections are provided for high performance components, such as DVD players and set- Use these connections in place of these ... for VCR #1 and VCR #2, but only one audio output (mono sound), connect it is recommended to the left audio jack on page 12). In this case, connect the components CB output to the TV's PB input and the components CR output to the TV's PR input. • You may use VIDEO...
Owners Guide
Page 14
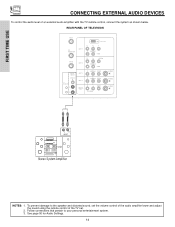
See page 50 for Audio Settings. 14 FIRST TIME USE CONNECTING EXTERNAL AUDIO DEVICES To control the audio level of the TV set the volume control of the audio amplifier lower and adjust the sound using the remote control of an external audio amplifier with the TV remote control, connect... the system as shown below. Follow connections that pertain to the speaker and distorted sound, set . 2. To prevent damage to your personal entertainment system. 3. REAR PANEL OF TELEVISION ANT A TO CONVERTER ...
See page 50 for Audio Settings. 14 FIRST TIME USE CONNECTING EXTERNAL AUDIO DEVICES To control the audio level of the TV set the volume control of the audio amplifier lower and adjust the sound using the remote control of an external audio amplifier with the TV remote control, connect... the system as shown below. Follow connections that pertain to the speaker and distorted sound, set . 2. To prevent damage to your personal entertainment system. 3. REAR PANEL OF TELEVISION ANT A TO CONVERTER ...
Owners Guide
Page 15
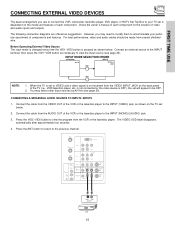
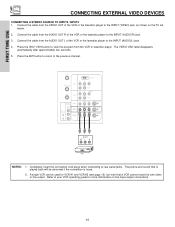
...) jack, as suggestions. NOTE: 1. is not connected or the video device is not received from the VIDEO OUT of the TV (i.e., VCR/laserdisc player, etc. CONNECTING A MONAURAL AUDIO SOURCE TO INPUT2~INPUT5 1. The VIDEO OSD label disappears automatically after approximately four seconds. 4. However, you use to connect the ... for the location of the VCR or the laserdisc player to view the program from the AUDIO OUT of video and audio inputs and outputs. You may need to modify them to accommodate your TV set below . Connect the cable from the VCR or the laserdisc player. ANT A TO...
...) jack, as suggestions. NOTE: 1. is not connected or the video device is not received from the VIDEO OUT of the TV (i.e., VCR/laserdisc player, etc. CONNECTING A MONAURAL AUDIO SOURCE TO INPUT2~INPUT5 1. The VIDEO OSD label disappears automatically after approximately four seconds. 4. However, you use to connect the ... for the location of the VCR or the laserdisc player to view the program from the AUDIO OUT of video and audio inputs and outputs. You may need to modify them to accommodate your TV set below . Connect the cable from the VCR or the laserdisc player. ANT A TO...
Owners Guide
Page 16
...rear panel jacks. Press the VID2~VID5 button to view the program from the AUDIO OUT R of the VCR or the laserdisc player to the INPUT (AUDIO...to the INPUT (AUDIO/R) jack. 3. ANT A TO CONVERTER ANT B INPUT 1 INPUT 2 DVI-HDTV PR PB Y R (MONO)/L AUDIO PR PB Y/VIDEO R (MONO)/L AUDIO AUDIO TO HI-FI ...CENTER IN IR BLASTER L R INPUT 3 INPUT 4 MONITOR OUT R (MONO)/L VIDEO R (MONO)/L VIDEO R L VIDEO AUDIO S-VIDEO S-VIDEO...the previous channel. Connect the cable from the AUDIO OUT L of the VCR or the laserdisc ...
...rear panel jacks. Press the VID2~VID5 button to view the program from the AUDIO OUT R of the VCR or the laserdisc player to the INPUT (AUDIO...to the INPUT (AUDIO/R) jack. 3. ANT A TO CONVERTER ANT B INPUT 1 INPUT 2 DVI-HDTV PR PB Y R (MONO)/L AUDIO PR PB Y/VIDEO R (MONO)/L AUDIO AUDIO TO HI-FI ...CENTER IN IR BLASTER L R INPUT 3 INPUT 4 MONITOR OUT R (MONO)/L VIDEO R (MONO)/L VIDEO R L VIDEO AUDIO S-VIDEO S-VIDEO...the previous channel. Connect the cable from the AUDIO OUT L of the VCR or the laserdisc ...

Owners Guide
Page 17
... but note that is loose. 2. Press the ANT button to return to rear panel jacks. A single VCR can be abnormal if the connection is played back will be used for more information on the TV set below. 2. Refer to the INPUT (AUDIO/L) jack. 4. Connect the cable from the S-VIDEO OUT of the VCR... or the laserdisc player to the INPUT (S-VIDEO) jack, as shown on line input-output connections. 17 Connect the cable from the AUDIO OUT R of the VCR ...
... but note that is loose. 2. Press the ANT button to return to rear panel jacks. A single VCR can be abnormal if the connection is played back will be used for more information on the TV set below. 2. Refer to the INPUT (AUDIO/L) jack. 4. Connect the cable from the S-VIDEO OUT of the VCR... or the laserdisc player to the INPUT (S-VIDEO) jack, as shown on line input-output connections. 17 Connect the cable from the AUDIO OUT R of the VCR ...
Owners Guide
Page 18
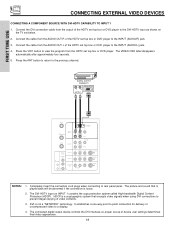
...the DVI-HDTV input as shown on INPUT 1 contains the copy protection system called High-bandwidth Digital Content Protection (HDCP). The DVI-HDTV input on the TV set top box or DVD player to the INPUT (AUDIO/R) jack. 3. Press the VID1 button to view the program from the output of device ...user settings determines final video appearance. 18 Press the ANT button to return to rear panel jacks. Completely insert the connection...
...the DVI-HDTV input as shown on INPUT 1 contains the copy protection system called High-bandwidth Digital Content Protection (HDCP). The DVI-HDTV input on the TV set top box or DVD player to the INPUT (AUDIO/R) jack. 3. Press the VID1 button to view the program from the output of device ...user settings determines final video appearance. 18 Press the ANT button to return to rear panel jacks. Completely insert the connection...
Owners Guide
Page 19
... to the INPUT (PR) jack. 4. The VIDEO OSD label disappears automatically after approximately four seconds. 7. Press the ANT button to return to the INPUT (AUDIO/L) jack. 6. Connect the cable from the Y OUT of the Laserdisc/DVD player or HDTV set top box. Connect the cable from the... AUDIO OUT L of the Laserdisc/DVD player or HDTV set below. 2. Completely insert the connection cord plugs when connecting to the INPUT (Y) jack, as shown on REAR PANEL CONNECTIONS. 19 See page 13 for tips on the TV set top box to rear panel jacks. FIRST TIME USE...
... to the INPUT (PR) jack. 4. The VIDEO OSD label disappears automatically after approximately four seconds. 7. Press the ANT button to return to the INPUT (AUDIO/L) jack. 6. Connect the cable from the Y OUT of the Laserdisc/DVD player or HDTV set top box. Connect the cable from the... AUDIO OUT L of the Laserdisc/DVD player or HDTV set below. 2. Completely insert the connection cord plugs when connecting to the INPUT (Y) jack, as shown on REAR PANEL CONNECTIONS. 19 See page 13 for tips on the TV set top box to rear panel jacks. FIRST TIME USE...
Owners Guide
Page 20
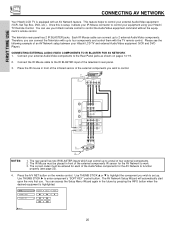
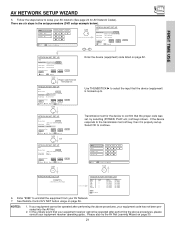
...button on pages 14~19. 2. Use THUMB STICK ̆ or ̄ to highlight the component you wish to set up to control your Hitachi LCD TV and external Audio/Video equipment (VCR and DVD Player). The AV Network Setup Wizard will automatically start upon the very first use your... Hitachi TV Remote Control. Therefore, you wish to a total of the television's rear panel. 3. The rear panel has two IR BLASTER inputs which can use . The correct codes ...
...button on pages 14~19. 2. Use THUMB STICK ̆ or ̄ to highlight the component you wish to set up to control your Hitachi LCD TV and external Audio/Video equipment (VCR and DVD Player). The AV Network Setup Wizard will automatically start upon the very first use your... Hitachi TV Remote Control. Therefore, you wish to a total of the television's rear panel. 3. The rear panel has two IR BLASTER inputs which can use . The correct codes ...
Owners Guide
Page 21
... the input that the device (equipment) is hooked-up . HITACHI AV NET SETTING LIST Device DVD VCR CBL STB PVR AVR Custom Code 0672 Video INPUT 1 Not Setup Not Setup Not Setup Not Setup Not Setup Not Setup Audio Using TV Not Setup Not Setup Not Setup Not Setup Not Setup Not...to setup your AV network (See page 22 for the device to your AV Network. 7. NOTES: 1. HITACHI AV NET SET UP DVD Device Code Video Input Audio Input 0 6 7 2 (Enter code "9999" to uninstall) Input 1 Using TV Transmission Test BACK POWER OK PLAY EXIT Move Set Input SEL Select CH UP THUMB STICK SELECT...
... the input that the device (equipment) is hooked-up . HITACHI AV NET SETTING LIST Device DVD VCR CBL STB PVR AVR Custom Code 0672 Video INPUT 1 Not Setup Not Setup Not Setup Not Setup Not Setup Not Setup Audio Using TV Not Setup Not Setup Not Setup Not Setup Not Setup Not...to setup your AV network (See page 22 for the device to your AV Network. 7. NOTES: 1. HITACHI AV NET SET UP DVD Device Code Video Input Audio Input 0 6 7 2 (Enter code "9999" to uninstall) Input 1 Using TV Transmission Test BACK POWER OK PLAY EXIT Move Set Input SEL Select CH UP THUMB STICK SELECT...
Owners Guide
Page 22
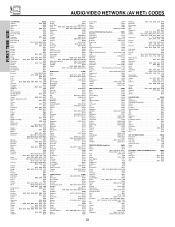
...0775 Echostar 1005, 0775 Expressvu 0775 GE 0566 GOI 0775 General Instrument 0869 HTS 0775 Hitachi 0819 Hughes Network Systems 1142, 0749, 1749 JVC 0775 Magnavox 0724, 0722 Memorex 0724...Optimus 0395, 0300 Panasonic 0308, 0521 Parasound 0246 Philips 0269, 0892 Pioneer 0013, 0300 Polk Audio 0269, 0892 RCA 0300 Realistic 0395 Sansui 0321 Shure 0264 Sony 0689, 0220 Soundesign 0078, ..., 0158 0189, 0405, 1321, 1388 Akai 0076, 0224 Alco 1390 Anam 1074, 1609 Apex Digital 1257 Arcam 1120 Audiotronic 1189 Audiovox 1390 Bose 1229 Capetronic 0531 Carver 1089, 1189, 0008, 0042...
...0775 Echostar 1005, 0775 Expressvu 0775 GE 0566 GOI 0775 General Instrument 0869 HTS 0775 Hitachi 0819 Hughes Network Systems 1142, 0749, 1749 JVC 0775 Magnavox 0724, 0722 Memorex 0724...Optimus 0395, 0300 Panasonic 0308, 0521 Parasound 0246 Philips 0269, 0892 Pioneer 0013, 0300 Polk Audio 0269, 0892 RCA 0300 Realistic 0395 Sansui 0321 Shure 0264 Sony 0689, 0220 Soundesign 0078, ..., 0158 0189, 0405, 1321, 1388 Akai 0076, 0224 Alco 1390 Anam 1074, 1609 Apex Digital 1257 Arcam 1120 Audiotronic 1189 Audiovox 1390 Bose 1229 Capetronic 0531 Carver 1089, 1189, 0008, 0042...
Owners Guide
Page 23
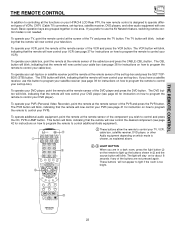
..., indicating that the remote will now control your PVR (see page 39 for instructions on how to program the remote to control additional Audio equipment). ቢ POWER ባ TV DVD VCR CBL SOURCE WIZARD CD PVR STB AMP 1 2 3 4 5 6 ቤ 7 8 9 SLEEP C.C. To operate your PVR (...In addition to controlling all the functions on your HITACHI LCD Rear PTV, the new remote control is designed to operate different types of VCRs, CATV (Cable TV) converters, set-top-box, satellite receiver, DVD players, and other Audio equipment depending on which mode is chosen, as explained...
..., indicating that the remote will now control your PVR (see page 39 for instructions on how to program the remote to control additional Audio equipment). ቢ POWER ባ TV DVD VCR CBL SOURCE WIZARD CD PVR STB AMP 1 2 3 4 5 6 ቤ 7 8 9 SLEEP C.C. To operate your PVR (...In addition to controlling all the functions on your HITACHI LCD Rear PTV, the new remote control is designed to operate different types of VCRs, CATV (Cable TV) converters, set-top-box, satellite receiver, DVD players, and other Audio equipment depending on which mode is chosen, as explained...

Owners Guide
Page 25
...seconds for channels 1 to 9, or simply press the single digit channel you want to check the channel being received, the picture source, if the channel has stereo (ST) or second audio program (SAP), the time, CHANNEL ID and if the ... this timer, up (̆) or down (̄). THE REMOTE CONTROL HOW TO USE THE REMOTE TO CONTROL YOUR LCD REAR PTV ቨ PVR (Personal Video Recorder) button When pressed, this button will blink to indicate the remote is in ...three hours. The DASH (-) button can also access this feature on your TV, then enter the remaining two numbers using the number buttons.
...seconds for channels 1 to 9, or simply press the single digit channel you want to check the channel being received, the picture source, if the channel has stereo (ST) or second audio program (SAP), the time, CHANNEL ID and if the ... this timer, up (̆) or down (̄). THE REMOTE CONTROL HOW TO USE THE REMOTE TO CONTROL YOUR LCD REAR PTV ቨ PVR (Personal Video Recorder) button When pressed, this button will blink to indicate the remote is in ...three hours. The DASH (-) button can also access this feature on your TV, then enter the remaining two numbers using the number buttons.
Owners Guide
Page 26
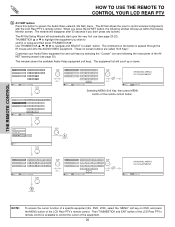
...following the instructions of the equipment. 26 These on OSD, and press the MENU button of the LCD Rear PTV's remote control is passed through the IR mouse and onto the AUDIO/VIDEO equipment. The command on the button is available to control or setup and then press THUMBSTICK &#... the user to highlight the equipment you don't press any buttons. VCR PV Recorder AV Receiver POWER CH ̄ CH ̆ MENU THUMB STICK 1 2 3 TV/VCR SELECT 4 5 6 MORE 7 8 9 MENU MENU 0 Move SEL Previous Page B See Page 29 ORIGINAL MENU OF EQUIPMENT Move AV NET Return NOTE: To...
...following the instructions of the equipment. 26 These on OSD, and press the MENU button of the LCD Rear PTV's remote control is passed through the IR mouse and onto the AUDIO/VIDEO equipment. The command on the button is available to control or setup and then press THUMBSTICK &#... the user to highlight the equipment you don't press any buttons. VCR PV Recorder AV Receiver POWER CH ̄ CH ̆ MENU THUMB STICK 1 2 3 TV/VCR SELECT 4 5 6 MORE 7 8 9 MENU MENU 0 Move SEL Previous Page B See Page 29 ORIGINAL MENU OF EQUIPMENT Move AV NET Return NOTE: To...


