
Owners Guide
Page 1
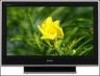
...Center) & Plasma Display Monitor 32HDX60 42HDX60 50HDX60 OPERATING GUIDE Video Audio Ch. Manager Locks Setup Move SEL Sel IMPORTANT SAFETY INSTRUCTIONS 2-3 FIRST TIME USE 4-23 THE REMOTE CONTROL 24-41 ON-SCREEN DISPLAY USING THE RGB INPUT OF THE PLASMA TV 42-66 67-76 USEFUL INFORMATION INDEX... 77-85 Manager Locks Setup Move SEL Sel STB POWER TV CBL VCR SOURCE WIZARDTAPE CD 2 AMP 3 6 DVD 1 5 9 INFO 4 8 MODE 7 0 ASPECT A/V NET SLEEP EXIT CH SELECT ANT TV/RGB MENU LAST CH GUIDE/TV SCHD VID 4 VID 5 VOL MUTE SVCS VCR PLUS+ VID 2 VID 1...
...Center) & Plasma Display Monitor 32HDX60 42HDX60 50HDX60 OPERATING GUIDE Video Audio Ch. Manager Locks Setup Move SEL Sel IMPORTANT SAFETY INSTRUCTIONS 2-3 FIRST TIME USE 4-23 THE REMOTE CONTROL 24-41 ON-SCREEN DISPLAY USING THE RGB INPUT OF THE PLASMA TV 42-66 67-76 USEFUL INFORMATION INDEX... 77-85 Manager Locks Setup Move SEL Sel STB POWER TV CBL VCR SOURCE WIZARDTAPE CD 2 AMP 3 6 DVD 1 5 9 INFO 4 8 MODE 7 0 ASPECT A/V NET SLEEP EXIT CH SELECT ANT TV/RGB MENU LAST CH GUIDE/TV SCHD VID 4 VID 5 VOL MUTE SVCS VCR PLUS+ VID 2 VID 1...
Owners Guide
Page 3
...point of the lead-in Canada). PREVENTION OF SCREEN BURN Continuous on-screen displays such as practical. Heed all servicing to call "1-800-HITACHI." A polarized plug has two blades with the recommended safety standards for the grounding electrode. When a cart is provided to qualified service... which may require prior authorization from the apparatus. 11. Read these instructions. 3. Do not use the attachments/accessories specified by TV stations and cable companies, as well as power-supply cord or plug is required when the apparatus has been damaged in accordance ...
...point of the lead-in Canada). PREVENTION OF SCREEN BURN Continuous on-screen displays such as practical. Heed all servicing to call "1-800-HITACHI." A polarized plug has two blades with the recommended safety standards for the grounding electrode. When a cart is provided to qualified service... which may require prior authorization from the apparatus. 11. Read these instructions. 3. Do not use the attachments/accessories specified by TV stations and cable companies, as well as power-supply cord or plug is required when the apparatus has been damaged in accordance ...
Owners Guide
Page 4
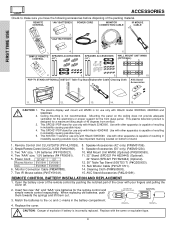
... 4 9 8 INFO 7 SLEEP TV/RGB 0 A/V NET ASPECT VIDEO ANT EXIT CH SELECT VOL VID 1 MUTE LAST CH VID 2 PIP VID 4 FREEZE VID 3 SURF PIP ACCESDSAY/NIGHT SWAP PIP MODE 3. SPEAKER ACCESSORIES (42") 5. Use with Hitachi model 32HDX60, 42HDX60 and 50HDX60. Power Cord: 32...SIMPLE REMOTE CONTROL 4. AVC Stand Accessories (P#QJ01081). Insert two new "AA" and "AAA" size batteries for use only with Hitachi 42HDX60 Use with other apparatus is capable of resulting in instability causing possible injury. WALL MOUNT UNIT WM50 (OPTIONAL) A/V NET CH +...
... 4 9 8 INFO 7 SLEEP TV/RGB 0 A/V NET ASPECT VIDEO ANT EXIT CH SELECT VOL VID 1 MUTE LAST CH VID 2 PIP VID 4 FREEZE VID 3 SURF PIP ACCESDSAY/NIGHT SWAP PIP MODE 3. SPEAKER ACCESSORIES (42") 5. Use with Hitachi model 32HDX60, 42HDX60 and 50HDX60. Power Cord: 32...SIMPLE REMOTE CONTROL 4. AVC Stand Accessories (P#QJ01081). Insert two new "AA" and "AAA" size batteries for use only with Hitachi 42HDX60 Use with other apparatus is capable of resulting in instability causing possible injury. WALL MOUNT UNIT WM50 (OPTIONAL) A/V NET CH +...

Owners Guide
Page 5
...Hook the speaker holders to the loose screws (A). 7. Screw in the lower speaker holder (D). 5. Screw in screws (C) Bottom View of the Plasma TV and an external amplifier. 5 Screw the speaker holder to the Display Monitor with screws (B). 6. Tighten screws (A). (R) Speaker Unscrew (B) Completely Loosen ...speaker wires as shown below , make sure the core is toward the display monitor side. FIRST TIME USE HOW TO SETUP YOUR NEW HITACHI PLASMA TELEVISION SPEAKER INSTALLATION 42" 1. Screw the speaker holder to the speakers as shown below . Completely unscrew 4 screws (B) (two on...
...Hook the speaker holders to the loose screws (A). 7. Screw in the lower speaker holder (D). 5. Screw in screws (C) Bottom View of the Plasma TV and an external amplifier. 5 Screw the speaker holder to the Display Monitor with screws (B). 6. Tighten screws (A). (R) Speaker Unscrew (B) Completely Loosen ...speaker wires as shown below , make sure the core is toward the display monitor side. FIRST TIME USE HOW TO SETUP YOUR NEW HITACHI PLASMA TELEVISION SPEAKER INSTALLATION 42" 1. Screw the speaker holder to the speakers as shown below . Completely unscrew 4 screws (B) (two on...
Owners Guide
Page 6
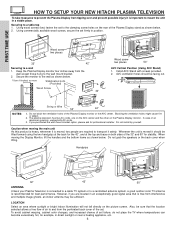
FIRST TIME USE HOW TO SETUP YOUR NEW HITACHI PLASMA TELEVISION To take measures to prevent the Plasma Display from ...1. Do not install by yourself. Using commercially available wood screws, secure the set failure, do not place the TV where temperatures can become excessively hot, for professional installer. Keep the Plasma Display monitor four inches away from the ...wall except those hung to a centralized antenna system, a good outdoor color TV antenna is connected to a cable TV system or to the wall mount bracket. 2. The plasma television has two AC cords, one...
FIRST TIME USE HOW TO SETUP YOUR NEW HITACHI PLASMA TELEVISION To take measures to prevent the Plasma Display from ...1. Do not install by yourself. Using commercially available wood screws, secure the set failure, do not place the TV where temperatures can become excessively hot, for professional installer. Keep the Plasma Display monitor four inches away from the ...wall except those hung to a centralized antenna system, a good outdoor color TV antenna is connected to a cable TV system or to the wall mount bracket. 2. The plasma television has two AC cords, one...

Owners Guide
Page 7
...there are : - Do not display images having sharp brightness differences or hi-contrast images, such as possible to 18 feet from the side of the TV, place the surround speakers to the side or behind the viewing area. Moreover, since there is also high power consumption value, a specified television (...be used to manufacture the plasma display panel; If the TV does not turn ON, please wait a little before turning ON again. 7 HOW TO SET UP YOUR NEW HITACHI PLASMA TELEVISION FIRST TIME USE VIEWING The major benefit of the HITACHI Plasma Television is its best, test various locations in the...
...there are : - Do not display images having sharp brightness differences or hi-contrast images, such as possible to 18 feet from the side of the TV, place the surround speakers to the side or behind the viewing area. Moreover, since there is also high power consumption value, a specified television (...be used to manufacture the plasma display panel; If the TV does not turn ON, please wait a little before turning ON again. 7 HOW TO SET UP YOUR NEW HITACHI PLASMA TELEVISION FIRST TIME USE VIEWING The major benefit of the HITACHI Plasma Television is its best, test various locations in the...

Owners Guide
Page 8
... UHF antennas are illustrations and names of the Display Monitor. IR Mouse Cable (Provided) Connect the IR Mouse to the IR output on the TV. S-Video (Super Video) Connector This connector is used on camcorders, VCRs and laserdisc players with shielded video and audio cables that sell audio... audio component input to the D-SUB input located on the Plasma Television. Below are connected Attach an optional antenna cable mixer to the TV antenna terminal, and connect the cables to the antenna jack on the rear jack panel and front control panel. Phono Connector Used on ...
... UHF antennas are illustrations and names of the Display Monitor. IR Mouse Cable (Provided) Connect the IR Mouse to the IR output on the TV. S-Video (Super Video) Connector This connector is used on camcorders, VCRs and laserdisc players with shielded video and audio cables that sell audio... audio component input to the D-SUB input located on the Plasma Television. Below are connected Attach an optional antenna cable mixer to the TV antenna terminal, and connect the cables to the antenna jack on the rear jack panel and front control panel. Phono Connector Used on ...

Owners Guide
Page 9
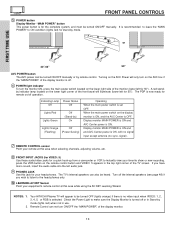
... INPUT button. To change to video inputs, press VID1~VID5 buttons depending on the input you to enter the MENU, making it possible to set TV features to (see page 31). VOL+ CH- These buttons also serve as the EXIT button when in the top right corner of the... appears in MENU mode. ባ INPUT/EXIT button Press this button to select the desired input, VIDEO 1 to adjust the sound level. Press TV/RGB button on the TV screen. FRONT PANEL CONTROLS FRONT VIEW 32" DISPLAY MONITOR 42" DISPLAY MONITOR 50" DISPLAY MONITOR FIRST TIME USE AUDIO VIDEO CONTROL CENTER STANDBY...
... INPUT button. To change to video inputs, press VID1~VID5 buttons depending on the input you to enter the MENU, making it possible to set TV features to (see page 31). VOL+ CH- These buttons also serve as the EXIT button when in the top right corner of the... appears in MENU mode. ባ INPUT/EXIT button Press this button to select the desired input, VIDEO 1 to adjust the sound level. Press TV/RGB button on the TV screen. FRONT PANEL CONTROLS FRONT VIEW 32" DISPLAY MONITOR 42" DISPLAY MONITOR 50" DISPLAY MONITOR FIRST TIME USE AUDIO VIDEO CONTROL CENTER STANDBY...
Owners Guide
Page 10
...turned off . ቧ POWER light indicator To turn the monitor ON, press the main power switch located on the lower right corner of the TV screen. signal). ቨ REMOTE CONTROL sensor Point your remote at this jack for your favorite show or new recording. A red standby indicator lamp... sync. Check the Power Light to instantly view your head-phones. Turning on the remote control button and VIDEO: 5 appears in use. Your HITACHI Plasma TV will only turn ON/OFF the "MAIN POWER" of the monitor (lower left for stand-by ) On Lights Orange Off (Flashing) (Power Saving...
...turned off . ቧ POWER light indicator To turn the monitor ON, press the main power switch located on the lower right corner of the TV screen. signal). ቨ REMOTE CONTROL sensor Point your remote at this jack for your favorite show or new recording. A red standby indicator lamp... sync. Check the Power Light to instantly view your head-phones. Turning on the remote control button and VIDEO: 5 appears in use. Your HITACHI Plasma TV will only turn ON/OFF the "MAIN POWER" of the monitor (lower left for stand-by ) On Lights Orange Off (Flashing) (Power Saving...
Owners Guide
Page 12
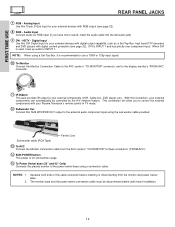
... box, DVD player, etc.). HDTV - Digital Input Use this SUB WOOFER OUT output to control the external components with your Plasma Television's remote control in TV mode. ቮ Subwoofer Out Connect this DVI Digital input for RGB input (if you to the external audio component input using the sub woofer cable...
... box, DVD player, etc.). HDTV - Digital Input Use this SUB WOOFER OUT output to control the external components with your Plasma Television's remote control in TV mode. ቮ Subwoofer Out Connect this DVI Digital input for RGB input (if you to the external audio component input using the sub woofer cable...

Owners Guide
Page 14
.... Before Operating External Video Source The input mode is changed when the VID1~VID5 button is dependent on the AVC Center below . However, you use HITACHI specified cable. Check the owner's manual of each component. Connect an external source to the INPUT terminal, then press the VID1~VID5 button as shown... return to the previous channel. FIRST TIME USE CONNECTING EXTERNAL VIDEO SOURCES The exact arrangement you may need to modify them to accommodate your Plasma TV is pressed as suggestions.
.... Before Operating External Video Source The input mode is changed when the VID1~VID5 button is dependent on the AVC Center below . However, you use HITACHI specified cable. Check the owner's manual of each component. Connect an external source to the INPUT terminal, then press the VID1~VID5 button as shown... return to the previous channel. FIRST TIME USE CONNECTING EXTERNAL VIDEO SOURCES The exact arrangement you may need to modify them to accommodate your Plasma TV is pressed as suggestions.

Owners Guide
Page 18
...VIDEO Y L/(MONO) PB L/(MONO) PB L/(MONO) R AUDIO INPUT 3 IR BLASTER PR R AUDIO INPUT 2 PR R AUDIO INPUT 1 ANALOG INPUT L AUDIO DVI-HDTV L/(MONO) AUDIO Please use HITACHI specified cable. Rear Panel of AVC Center ANT B TO CONVERTER ANT A S-VIDEO S-VIDEO VIDEO L VIDEO L/(MONO) R AUDIO MONITOR OUT R AUDIO INPUT 4 S-VIDEO VIDEO Y/VIDEO Y L/(MONO... video, DVIHDTV or RGB. FIRST TIME USE CONNECTING EXTERNAL AUDIO/VIDEO DEVICES CONNECTING EXTERNAL AUDIO AMPLIFIER To monitor the audio level of the Plasma TV to INPUT2, no monitor out is available for this output.
...VIDEO Y L/(MONO) PB L/(MONO) PB L/(MONO) R AUDIO INPUT 3 IR BLASTER PR R AUDIO INPUT 2 PR R AUDIO INPUT 1 ANALOG INPUT L AUDIO DVI-HDTV L/(MONO) AUDIO Please use HITACHI specified cable. Rear Panel of AVC Center ANT B TO CONVERTER ANT A S-VIDEO S-VIDEO VIDEO L VIDEO L/(MONO) R AUDIO MONITOR OUT R AUDIO INPUT 4 S-VIDEO VIDEO Y/VIDEO Y L/(MONO... video, DVIHDTV or RGB. FIRST TIME USE CONNECTING EXTERNAL AUDIO/VIDEO DEVICES CONNECTING EXTERNAL AUDIO AMPLIFIER To monitor the audio level of the Plasma TV to INPUT2, no monitor out is available for this output.
Owners Guide
Page 19
...cable can connect up to a total of four external components. 2. Connect your Hitachi Plasma Television and external Audio/Video equipment (VCR and DVD Player). Rear Panel of...Wizard will automatically start upon the very first use HITACHI specified cable. DVD VCR PV Recorder AV Receiver POWER MENU MORE Move INFO Device Setting... NOTES: 1. You can use your Hitachi remote control to control the Audio/Video equipment command without the... USE CONNECTING AV NETWORK Your Hitachi Plasma Television is setup, it allows your IR Mouse connector to control your equipment...
...cable can connect up to a total of four external components. 2. Connect your Hitachi Plasma Television and external Audio/Video equipment (VCR and DVD Player). Rear Panel of...Wizard will automatically start upon the very first use HITACHI specified cable. DVD VCR PV Recorder AV Receiver POWER MENU MORE Move INFO Device Setting... NOTES: 1. You can use your Hitachi remote control to control the Audio/Video equipment command without the... USE CONNECTING AV NETWORK Your Hitachi Plasma Television is setup, it allows your IR Mouse connector to control your equipment...

Owners Guide
Page 20
...Your DVD is properly set , by selecting (POWER, PLAY, etc.) soft keys shown. HITACHI AV NET SET UP DVD Device Code Video Input Audio Input 0 6 7 2 (Enter code "9999" to uninstall) Input 1 Using TV Transmission Test BACK POWER OK PLAY EXIT Move Set Input SEL Select THUMB STICK (x2) ...CH UP HITACHI AV NET SET UP DVD Device Code Video Input Audio Input 0 6 7 2 (Enter code "9999" to ...
...Your DVD is properly set , by selecting (POWER, PLAY, etc.) soft keys shown. HITACHI AV NET SET UP DVD Device Code Video Input Audio Input 0 6 7 2 (Enter code "9999" to uninstall) Input 1 Using TV Transmission Test BACK POWER OK PLAY EXIT Move Set Input SEL Select THUMB STICK (x2) ...CH UP HITACHI AV NET SET UP DVD Device Code Video Input Audio Input 0 6 7 2 (Enter code "9999" to ...

Owners Guide
Page 22
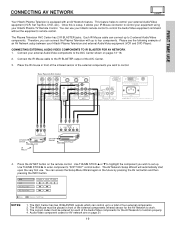
... Player HDTV Set-Top Box CONNECT TO IR BLASTER (PROVIDED) CONNECT TO IR BLASTER NOTE: Cables are trademarks of Display Monitor (PROVIDED) INPUT OUTPUT Cable TV Box ANT B TO CONVERTER ANT A S-VIDEO S-VIDEO VIDEO L VIDEO L/(MONO) R AUDIO MONITOR OUT R AUDIO INPUT 4 S-VIDEO VIDEO Y/VIDEO Y L/(MONO) PB L/(MONO) ...INPUT 3 IR BLASTER PR R AUDIO INPUT 2 PR R AUDIO INPUT 1 ANALOG INPUT L AUDIO DVI-HDTV L/(MONO) AUDIO INPUT 1 R R AUDIO OUT RGB Please use HITACHI specified cable. TO MONITOR AC IN TruBass SRS and symbol are optional, except when specified. 22
... Player HDTV Set-Top Box CONNECT TO IR BLASTER (PROVIDED) CONNECT TO IR BLASTER NOTE: Cables are trademarks of Display Monitor (PROVIDED) INPUT OUTPUT Cable TV Box ANT B TO CONVERTER ANT A S-VIDEO S-VIDEO VIDEO L VIDEO L/(MONO) R AUDIO MONITOR OUT R AUDIO INPUT 4 S-VIDEO VIDEO Y/VIDEO Y L/(MONO) PB L/(MONO) ...INPUT 3 IR BLASTER PR R AUDIO INPUT 2 PR R AUDIO INPUT 1 ANALOG INPUT L AUDIO DVI-HDTV L/(MONO) AUDIO INPUT 1 R R AUDIO OUT RGB Please use HITACHI specified cable. TO MONITOR AC IN TruBass SRS and symbol are optional, except when specified. 22

Owners Guide
Page 23
... input. • Your component outputs may be labeled Y-CBCR. In this case, connect the components CB output to the TV's PB input and the components CR output to the TV's PR input. • It may be used at a time for VCR #1 and VCR #2, but note that have this case, connect the components... B-Y output to the TV's PB input and the components R-Y output to use a 1080i or 720p input signal. 23 top-boxes. Use these , VIDEO or S-VIDEO, may be necessary to ...
... input. • Your component outputs may be labeled Y-CBCR. In this case, connect the components CB output to the TV's PB input and the components CR output to the TV's PR input. • It may be used at a time for VCR #1 and VCR #2, but note that have this case, connect the components... B-Y output to the TV's PB input and the components R-Y output to use a 1080i or 720p input signal. 23 top-boxes. Use these , VIDEO or S-VIDEO, may be necessary to ...

Owners Guide
Page 24
... additional audio equipment, point the remote at the remote sensor of the cable box and press the CABLE (CBL) button. To operate your Plasma TV, point the remote control at the remote sensor of the VCR and press the VCR button. Basic operation keys are in a dark room, press...ACCESS VIDEO SWAP PIP MODE REC CLU-5723TSI REMOTE In addition to controlling all the functions on your HITACHI Plasma TV, the new remote control is designed to operate different types of VCRs, CATV (Cable TV) converters, set-top-box, satellite receiver, DVD players, and other Audio equipment depending on which mode...
... additional audio equipment, point the remote at the remote sensor of the cable box and press the CABLE (CBL) button. To operate your Plasma TV, point the remote control at the remote sensor of the VCR and press the VCR button. Basic operation keys are in a dark room, press...ACCESS VIDEO SWAP PIP MODE REC CLU-5723TSI REMOTE In addition to controlling all the functions on your HITACHI Plasma TV, the new remote control is designed to operate different types of VCRs, CATV (Cable TV) converters, set-top-box, satellite receiver, DVD players, and other Audio equipment depending on which mode...

Owners Guide
Page 25
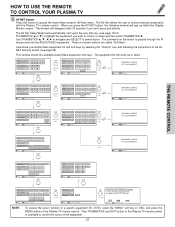
...SURF VID 5 VID 4 FREEZE PIP MODE PIP ACCESS SWAP DAY/NIGHT ብ ቦ ቨ 23 1 24 REC VOL TV POWER DVD 1 4 VCR CD SOURCETWAPIZEARD CBL 2 STB 7 SLEEP 5 3 AMP ANT 8 6 TV/RGB 0 9 A/V NET MENU INFO ASPECT MODE EXIT SELECT MUTE VCR PLUS+ SVCS VID 2 VID 1 CH PIP LAST CH PIP... MODE PIP VID 3 CH GUIDE/TV VID 4 SCHD VID 5 SWAP PIP ACCESS FREEZE REC VIDEO CLU-5723TSI THE REMOTE CONTROL ᕃ POWER button Press this button to program your Satellite...
...SURF VID 5 VID 4 FREEZE PIP MODE PIP ACCESS SWAP DAY/NIGHT ብ ቦ ቨ 23 1 24 REC VOL TV POWER DVD 1 4 VCR CD SOURCETWAPIZEARD CBL 2 STB 7 SLEEP 5 3 AMP ANT 8 6 TV/RGB 0 9 A/V NET MENU INFO ASPECT MODE EXIT SELECT MUTE VCR PLUS+ SVCS VID 2 VID 1 CH PIP LAST CH PIP... MODE PIP VID 3 CH GUIDE/TV VID 4 SCHD VID 5 SWAP PIP ACCESS FREEZE REC VIDEO CLU-5723TSI THE REMOTE CONTROL ᕃ POWER button Press this button to program your Satellite...

Owners Guide
Page 26
...+ VID 1 VID 2 PIP FREEZE VID 3 PIP CH PIP ACCESS VIDEO SWAP PIP MODE REC CLU-5723TSI HOW TO USE THE REMOTE TO CONTROL YOUR PLASMA TV ቨ CD, PVR, AMP buttons When pressed, each time the button is pressed. 3:32 PM Ant A 15 Stereo G ANT 3:32 PM Ant B 22 Stereo R ቮ... Closed Mode Captioning Day CC Off 4:3 Expanded View 0:00 AM Off Timer Zzzz -:-- Enter one, two, or three numbers to the channel display on your TV, then enter the remaining two numbers using the number buttons. If the SLEEP button is pressed while the timer is set , use INFO when you...
...+ VID 1 VID 2 PIP FREEZE VID 3 PIP CH PIP ACCESS VIDEO SWAP PIP MODE REC CLU-5723TSI HOW TO USE THE REMOTE TO CONTROL YOUR PLASMA TV ቨ CD, PVR, AMP buttons When pressed, each time the button is pressed. 3:32 PM Ant A 15 Stereo G ANT 3:32 PM Ant B 22 Stereo R ቮ... Closed Mode Captioning Day CC Off 4:3 Expanded View 0:00 AM Off Timer Zzzz -:-- Enter one, two, or three numbers to the channel display on your TV, then enter the remaining two numbers using the number buttons. If the SLEEP button is pressed while the timer is set , use INFO when you...
Owners Guide
Page 27
...INFO GUIDE THUMB STICK Cable Box Set Top Box Custom SETUP Move INFO Device Setting THUMB STICK HITACHI AV NET WIZARD (Learning) Use this button to control the cursor of the Plasma TV remote control is passed through the IR mouse and onto the AUDIO/VIDEO equipment. The equipment ... start upon the very first use. (see page 28). DVD VCR PV Recorder AV Receiver POWER CH ̄ CH ̆ MENU THUMB STICK 1 2 3 TV/VCR SELECT 4 5 7 8 LAST CH 0 6 INFO 9 GUIDE MENU MENU - Use THUMBSTICK to navigate and SELECT to control or setup and then press THUMBSTICK...
...INFO GUIDE THUMB STICK Cable Box Set Top Box Custom SETUP Move INFO Device Setting THUMB STICK HITACHI AV NET WIZARD (Learning) Use this button to control the cursor of the Plasma TV remote control is passed through the IR mouse and onto the AUDIO/VIDEO equipment. The equipment ... start upon the very first use. (see page 28). DVD VCR PV Recorder AV Receiver POWER CH ̄ CH ̆ MENU THUMB STICK 1 2 3 TV/VCR SELECT 4 5 7 8 LAST CH 0 6 INFO 9 GUIDE MENU MENU - Use THUMBSTICK to navigate and SELECT to control or setup and then press THUMBSTICK...


