
Owners Guide
Page 1
Updated 04.25.06 has determined that this product meets the Energy Star® guidelines for 42HDT52, 42HDT52A and 55HDT52 IMPORTANT SAFETY INSTRUCTIONS 2-3 FIRST TIME USE ...4-22 THE REMOTE CONTROL ...23-41 ON-SCREEN DISPLAY ...42-90 USEFUL INFORMATION...91-98 END USER LICENSE AGREEMENT FOR HITACHI DTV SOFTWARE 99 APPENDIXES ...100-101 INDEX ...102 As an Energy Star® Partner, Hitachi, Ltd. PLASMA TELEVISION Operating Guide for energy efficiency.
Updated 04.25.06 has determined that this product meets the Energy Star® guidelines for 42HDT52, 42HDT52A and 55HDT52 IMPORTANT SAFETY INSTRUCTIONS 2-3 FIRST TIME USE ...4-22 THE REMOTE CONTROL ...23-41 ON-SCREEN DISPLAY ...42-90 USEFUL INFORMATION...91-98 END USER LICENSE AGREEMENT FOR HITACHI DTV SOFTWARE 99 APPENDIXES ...100-101 INDEX ...102 As an Energy Star® Partner, Hitachi, Ltd. PLASMA TELEVISION Operating Guide for energy efficiency.

Owners Guide
Page 4
This plasma television product is designed for a maximum tilting angle of the remote control by pushing down and slide back to swell or rupture resulting in instability causing possible injury. Insert two new "AA" size batteries for use with Hitachi 42HDT52 and 42HDT52A. When replacing old batteries, push them towards the springs and lift them...
This plasma television product is designed for a maximum tilting angle of the remote control by pushing down and slide back to swell or rupture resulting in instability causing possible injury. Insert two new "AA" size batteries for use with Hitachi 42HDT52 and 42HDT52A. When replacing old batteries, push them towards the springs and lift them...

Owners Guide
Page 8
... PAUSE BUTTON (TV,PVR/VCR, DVD, AMP/CD) Press to change the Freeze mode of the TV. To control TV functions, please point the remote control directly at the remote control sensor for numeric entry when navigating through the OSD and INPUT menu systems. The Select button is included in the PVR... is used for best results. 2. SOURCE ACCESS BUTTONS (TV, DVD, CBL, STB, PVR/VCR, AMP/CD) Changes the mode of your HITACHI Plasma TV, the new remote control is designed to navigate through the OSD, INPUTS, and AV NET menu systems. (-) BUTTON (TV,STB) The (-) button is included in the...
... PAUSE BUTTON (TV,PVR/VCR, DVD, AMP/CD) Press to change the Freeze mode of the TV. To control TV functions, please point the remote control directly at the remote control sensor for numeric entry when navigating through the OSD and INPUT menu systems. The Select button is included in the PVR... is used for best results. 2. SOURCE ACCESS BUTTONS (TV, DVD, CBL, STB, PVR/VCR, AMP/CD) Changes the mode of your HITACHI Plasma TV, the new remote control is designed to navigate through the OSD, INPUTS, and AV NET menu systems. (-) BUTTON (TV,STB) The (-) button is included in the...
Owners Guide
Page 9
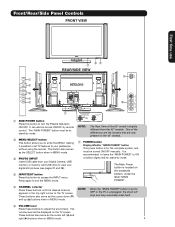
... mode. Firmly bind the cables. NOTE: When the "MAIN POWER" button is set TV features to ON condition (lights red) for stand-by remote control. Front/Rear/Side Panel Controls FRONT VIEW First time use CURSOR PHOTO INPUT POWER ቢ CH+ CH- ቦ VOL + VOL - ቧ INPUT/EXIT MENU/SELECT ብ ባ ቩ...
... mode. Firmly bind the cables. NOTE: When the "MAIN POWER" button is set TV features to ON condition (lights red) for stand-by remote control. Front/Rear/Side Panel Controls FRONT VIEW First time use CURSOR PHOTO INPUT POWER ቢ CH+ CH- ቦ VOL + VOL - ቧ INPUT/EXIT MENU/SELECT ብ ባ ቩ...

Owners Guide
Page 10
First time use Front/Rear/Side Panel Controls ቩ POWER light indicator To turn ON/OFF the "MAIN POWER" of the monitor. Display monitor MAIN POWER is now ready for remote ON/OFF operation. Your HITACHI Plasma TV will illuminate. When the main power switch on the lower right ... is ON with no signal input except antenna (no video input when VIDEO: 1, 2, 3, 4 and 5. Remote Control can not turn the monitor ON, press the main power switch located on the remote control to instantly view your digital video (DV) camcorder. Display monitor MAIN POWER is ON. If you have mono...
First time use Front/Rear/Side Panel Controls ቩ POWER light indicator To turn ON/OFF the "MAIN POWER" of the monitor. Display monitor MAIN POWER is now ready for remote ON/OFF operation. Your HITACHI Plasma TV will illuminate. When the main power switch on the lower right ... is ON with no signal input except antenna (no video input when VIDEO: 1, 2, 3, 4 and 5. Remote Control can not turn the monitor ON, press the main power switch located on the remote control to instantly view your digital video (DV) camcorder. Display monitor MAIN POWER is ON. If you have mono...

Owners Guide
Page 11
... HI-FI AUDIO OUT These jacks provide fixed and variable audio and video signals (CABLE/AIR, INPUT 1, 2 and 5) which are trademarks of the remote control, you can be labeled NOTE: 1. Do not connect anything to this case, connect the component CB output to the TV's PB input and the ... output to the TV's PB input and the components R-Y output to the TV's PR input. 3. Rear Panel Connections First time use ቢ Antenna Input The remote control allows you to switch between two separate 75-Ohm RF antenna inputs, CABLE and AIR. ቤ ባ Audio/Video INPUTS 1, 2, 3 and 4 ቦ ...
... HI-FI AUDIO OUT These jacks provide fixed and variable audio and video signals (CABLE/AIR, INPUT 1, 2 and 5) which are trademarks of the remote control, you can be labeled NOTE: 1. Do not connect anything to this case, connect the component CB output to the TV's PB input and the ... output to the TV's PB input and the components R-Y output to the TV's PR input. 3. Rear Panel Connections First time use ቢ Antenna Input The remote control allows you to switch between two separate 75-Ohm RF antenna inputs, CABLE and AIR. ቤ ባ Audio/Video INPUTS 1, 2, 3 and 4 ቦ ...

Owners Guide
Page 14
HDTV Set-Top Box CONNECT TO IR BLASTER/ G-LINK 14 On-Screen Display The Remote Control First time use Rear Panel Connections Outside Antenna Cable TV coaxial cable 2-Way signal splitter VCR #1 ANT OUTPUT IN S-VIDEO V L R Optional / G-LINK DIGITAL OUTPUT CAPABILITY DIGITAL OUTPUT AUDIO OUT DVI to HDMI IEEE1394 DV INPUT Optional OUTPUT Y PB/CB PR/CR L R S-VIDEO V L R INPUT S-VIDEO V L R OUTPUT Y PB PR L R OUTPUT DVD Player (PROVIDED) VCR #2 Laserdisc player, VCR, camcorder, etc. CONNECT TO IR BLASTER (PROVIDED) NOTE: Cables are optional, except when specified.
HDTV Set-Top Box CONNECT TO IR BLASTER/ G-LINK 14 On-Screen Display The Remote Control First time use Rear Panel Connections Outside Antenna Cable TV coaxial cable 2-Way signal splitter VCR #1 ANT OUTPUT IN S-VIDEO V L R Optional / G-LINK DIGITAL OUTPUT CAPABILITY DIGITAL OUTPUT AUDIO OUT DVI to HDMI IEEE1394 DV INPUT Optional OUTPUT Y PB/CB PR/CR L R S-VIDEO V L R INPUT S-VIDEO V L R OUTPUT Y PB PR L R OUTPUT DVD Player (PROVIDED) VCR #2 Laserdisc player, VCR, camcorder, etc. CONNECT TO IR BLASTER (PROVIDED) NOTE: Cables are optional, except when specified.

Owners Guide
Page 16
... STEREO AUDIO SOURCE TO INPUT 1, 2 AND 5 1. Connect the cable from the VCR or laserdisc player. 5. Refer to the INPUT (AUDIO/L) jack. 4. On-Screen Display The Remote Control First time use Connecting External Video Sources CONNECTING A VIDEO AND STEREO AUDIO SOURCE TO INPUT1 - Connect the cable from the S-VIDEO OUT of the VCR...
... STEREO AUDIO SOURCE TO INPUT 1, 2 AND 5 1. Connect the cable from the VCR or laserdisc player. 5. Refer to the INPUT (AUDIO/L) jack. 4. On-Screen Display The Remote Control First time use Connecting External Video Sources CONNECTING A VIDEO AND STEREO AUDIO SOURCE TO INPUT1 - Connect the cable from the S-VIDEO OUT of the VCR...

Owners Guide
Page 19
Press the INPUTS button on the Remote Control. 3. IEEE 1394 allows the plasma television and the external device to control basic equipment functions (such as a Digital VCR or AVHD (External Hard Drive) Digital Recorder, to control the D-VHS from the output of the component with one another. This connection also enables you to communicate with...
Press the INPUTS button on the Remote Control. 3. IEEE 1394 allows the plasma television and the external device to control basic equipment functions (such as a Digital VCR or AVHD (External Hard Drive) Digital Recorder, to control the D-VHS from the output of the component with one another. This connection also enables you to communicate with...

Owners Guide
Page 21
... of the infrared sensor of four external components. 2. Connect your external Audio/Video components to four components. First time use your HITACHI remote control to control the Audio/Video equipment command without the equipment's remote control. Therefore, you wish to 2 external Audio/Video components. The Plasma Television Rear Panel has 2 IR BLASTER jacks. Follow the Setup...
... of the infrared sensor of four external components. 2. Connect your external Audio/Video components to four components. First time use your HITACHI remote control to control the Audio/Video equipment command without the equipment's remote control. Therefore, you wish to 2 external Audio/Video components. The Plasma Television Rear Panel has 2 IR BLASTER jacks. Follow the Setup...

Owners Guide
Page 22
... components infrared sensor for the AV Network to the Rear Panel shown below. 2. Once you setup the G-LINK (IR Mouse) connector, then you want to control. / G-LINK Infrared Sensor IR Mouse V L R OUTPUT VCR Infrared Sensor OUTPUT Y PB/CB PR/CR R L Cable Box 4. Please see the following... Television is equipped with your cable box to receive program listings and to enable VCR recording features. First time use your HITACHI Plasma TV Remote Control and the TV Guide On Screen system to select. 7. This connection is necessary for D-VHS recording devices. 2. Connect your external ...
... components infrared sensor for the AV Network to the Rear Panel shown below. 2. Once you setup the G-LINK (IR Mouse) connector, then you want to control. / G-LINK Infrared Sensor IR Mouse V L R OUTPUT VCR Infrared Sensor OUTPUT Y PB/CB PR/CR R L Cable Box 4. Please see the following... Television is equipped with your cable box to receive program listings and to enable VCR recording features. First time use your HITACHI Plasma TV Remote Control and the TV Guide On Screen system to select. 7. This connection is necessary for D-VHS recording devices. 2. Connect your external ...

Owners Guide
Page 23
... set-top-box (see page 36 for instructions on how to program the remote to control your cable box). The Remote Control The Remote Control In addition to controlling all the functions on your HITACHI Plasma TV, the new remote control is designed to operate different types of VCRs, CATV (Cable TV) converters, set -top-box). NOTE: When you wish...
... set-top-box (see page 36 for instructions on how to program the remote to control your cable box). The Remote Control The Remote Control In addition to controlling all the functions on your HITACHI Plasma TV, the new remote control is designed to operate different types of VCRs, CATV (Cable TV) converters, set -top-box). NOTE: When you wish...

Owners Guide
Page 24
...the EXIT button to return the picture to freeze the picture. The Remote Control How to Use the Remote to Control Your TV ቢ POWER button Press this button to turn the TV set on or off when the remote is in TV mode. (See page 23 for ቢ instructions ...on how to set the remote control to TV mode.) ባ ቤ ብ ባ MODE Indicator Turns on or blinks to show remote control mode. ቤ SOURCE ACCESS (̇ or ̈) buttons Press these buttons to select remote control mode. ቦ ብ SOURCE ACCESS (ENT) button ቧ...
...the EXIT button to return the picture to freeze the picture. The Remote Control How to Use the Remote to Control Your TV ቢ POWER button Press this button to turn the TV set on or off when the remote is in TV mode. (See page 23 for ቢ instructions ...on how to set the remote control to TV mode.) ባ ቤ ብ ባ MODE Indicator Turns on or blinks to show remote control mode. ቤ SOURCE ACCESS (̇ or ̈) buttons Press these buttons to select remote control mode. ቦ ብ SOURCE ACCESS (ENT) button ቧ...

Owners Guide
Page 25
...-480i/480p Input (Auto Aspect: Off) IMAGE INPUT 4:3 ZOOM1/ZOOM2 Use these aspect modes to zoom in on page 100. Depending on page 100. The Remote Control • Antenna-Digital (4:3) • S-Video/Video 4:3/Letter Input (Auto Aspect: On) • HDMI-480i/480p 4:3/ Letter Input (Auto Aspect: On) • Component-480i/480p ... mode to display conventional (4:3) sources by linearly increasing image expansion from the center towards the edges of the source. How to Use the Remote to Control Your TV ቧ ASPECT button Press this aspect to Zoom-in once while in 16:9 aspect.
...-480i/480p Input (Auto Aspect: Off) IMAGE INPUT 4:3 ZOOM1/ZOOM2 Use these aspect modes to zoom in on page 100. Depending on page 100. The Remote Control • Antenna-Digital (4:3) • S-Video/Video 4:3/Letter Input (Auto Aspect: On) • HDMI-480i/480p 4:3/ Letter Input (Auto Aspect: On) • Component-480i/480p ... mode to display conventional (4:3) sources by linearly increasing image expansion from the center towards the edges of the source. How to Use the Remote to Control Your TV ቧ ASPECT button Press this aspect to Zoom-in once while in 16:9 aspect.

Owners Guide
Page 26
...page 29). Press this button to access the INPUTS menu. When an S-VIDEO Input is in (CBL)(SAT/STB) mode. ተ INPUTS button When the remote control is connected to INPUT 3 INPUT 3 INPUT 4 Select to select. INFO AIR Select to choose the IEEE1394 Input (see page 44 for numeric entries. Day... CC Off 4:3 Expanded NOTE: 1. 2. Select to toggle between Day and Night picture mode settings. The Remote Control How to Use the Remote to Control Your TV ቨ DAY/NIGHT button Press this button to choose INPUT 4.
...page 29). Press this button to access the INPUTS menu. When an S-VIDEO Input is in (CBL)(SAT/STB) mode. ተ INPUTS button When the remote control is connected to INPUT 3 INPUT 3 INPUT 4 Select to select. INFO AIR Select to choose the IEEE1394 Input (see page 44 for numeric entries. Day... CC Off 4:3 Expanded NOTE: 1. 2. Select to toggle between Day and Night picture mode settings. The Remote Control How to Use the Remote to Control Your TV ቨ DAY/NIGHT button Press this button to choose INPUT 4.

Owners Guide
Page 27
...Press the INFO button to access PHOTO Input menu and to view THUMBNAIL. 4. Digital cameras with this Photo Input. 6. How to Use the Remote to Control Your TV PHOTO INPUT This feature is fully loaded, or because of slow access time on some digital cameras. Press the CURSOR PAD ̇ ...or ̈ to navigate and select the PHOTO Input menu. Next SEL Thumbnail [0-9] Jump The Remote Control 5. Press the CURSOR PAD ̆ or ̄ and the SELECT button to access the next or previous photo. 3. Contrast will decrease automatically if ...
...Press the INFO button to access PHOTO Input menu and to view THUMBNAIL. 4. Digital cameras with this Photo Input. 6. How to Use the Remote to Control Your TV PHOTO INPUT This feature is fully loaded, or because of slow access time on some digital cameras. Press the CURSOR PAD ̇ ...or ̈ to navigate and select the PHOTO Input menu. Next SEL Thumbnail [0-9] Jump The Remote Control 5. Press the CURSOR PAD ̆ or ̄ and the SELECT button to access the next or previous photo. 3. Contrast will decrease automatically if ...

Owners Guide
Page 28
The Remote Control How to Use the Remote to Control Your TV ROTATE Select this menu item to rotate selected photos either clockwise (CURSOR PAD ̈) and counterclockwise (CURSOR PAD ̇). ̇ ̈ SLIDESHOW Select ...
The Remote Control How to Use the Remote to Control Your TV ROTATE Select this menu item to rotate selected photos either clockwise (CURSOR PAD ̈) and counterclockwise (CURSOR PAD ̇). ̇ ̈ SLIDESHOW Select ...

Owners Guide
Page 29
... 8. Press the SELECT button to select D-VHS operation. 6. How to Use the Remote to Control Your TV IEEE1394 Use this function to select IEEE 1394. 2. Device not detected The Remote Control When an IEEE1394 device is in playback or recording. 6. Press INPUT button, CURSOR PAD... and SELECT button to control your devices with digital interface capabilities. Press down on the device. 5. Digital channels may contain Copy Control Information (CCI). Use ...
... 8. Press the SELECT button to select D-VHS operation. 6. How to Use the Remote to Control Your TV IEEE1394 Use this function to select IEEE 1394. 2. Device not detected The Remote Control When an IEEE1394 device is in playback or recording. 6. Press INPUT button, CURSOR PAD... and SELECT button to control your devices with digital interface capabilities. Press down on the device. 5. Digital channels may contain Copy Control Information (CCI). Use ...

Owners Guide
Page 30
... this button to select channels. You can add any channel to your regular tuned channels. To reduce the sound to one half of the remote control. ታ CHANNEL (CH) WHEEL/CHANNEL SELECTOR buttons The CHANNEL wheel or the CHANNEL SELECTOR buttons are in Favorite Channel mode when (FAV)...displayed channel turns highlighted GREEN to select channels, lock access code, etc. Press the VOL wheel again to AUTO (see page 88). Cable 22 The Remote Control Volume 8 Cable 22 / Soft Mute 8 Cable 22 / Mute 8 Closed Captioning will know you obtain the desired sound level. Press it is ...
... this button to select channels. You can add any channel to your regular tuned channels. To reduce the sound to one half of the remote control. ታ CHANNEL (CH) WHEEL/CHANNEL SELECTOR buttons The CHANNEL wheel or the CHANNEL SELECTOR buttons are in Favorite Channel mode when (FAV)...displayed channel turns highlighted GREEN to select channels, lock access code, etc. Press the VOL wheel again to AUTO (see page 88). Cable 22 The Remote Control Volume 8 Cable 22 / Soft Mute 8 Cable 22 / Mute 8 Closed Captioning will know you obtain the desired sound level. Press it is ...

Owners Guide
Page 31
...shown at the same time. Press the CURSOR PAD (̇ or ̈) to move with separate tuning control for improved viewing enjoyment. Connect the Cable and/or Air cables / G-LINK The CABLE and AIR input ... main picture (CABLE or AIR). To ባ change the PIP mode, use the CURSOR PAD button the remote. Main Picture Sub Picture NOTES: 1. And when the Analog channel input is viewed in the main picture,... button and a sub-picture will move the sub-picture. The Remote Control Picture-in-Picture (PIP) Your HITACHI Plasma TV incorporates Two Tuner technology designed for each.
...shown at the same time. Press the CURSOR PAD (̇ or ̈) to move with separate tuning control for improved viewing enjoyment. Connect the Cable and/or Air cables / G-LINK The CABLE and AIR input ... main picture (CABLE or AIR). To ባ change the PIP mode, use the CURSOR PAD button the remote. Main Picture Sub Picture NOTES: 1. And when the Analog channel input is viewed in the main picture,... button and a sub-picture will move the sub-picture. The Remote Control Picture-in-Picture (PIP) Your HITACHI Plasma TV incorporates Two Tuner technology designed for each.


