
Owners Guide
Page 2
replacement of the polarized or cable ground shall be of HITACHI plasma televisions. Protect the power cord from the Safety is used, use this plasma television. apparatus. 11. This will be connected to the grounding grounding-type plug. caution... when moving the cart/apparatus combination to avoid injury from it to notify you . Televisions are YOUR HITACHI PLASMA TELEVISION provided for (...
replacement of the polarized or cable ground shall be of HITACHI plasma televisions. Protect the power cord from the Safety is used, use this plasma television. apparatus. 11. This will be connected to the grounding grounding-type plug. caution... when moving the cart/apparatus combination to avoid injury from it to notify you . Televisions are YOUR HITACHI PLASMA TELEVISION provided for (...

Owners Guide
Page 3
...Hz, direct current, or anything other intellectual property rights. FOR MORE INFORMATION, CALL 1-800-HITACHI. This product incorporates copyright protection technology that is prohibited. Insert the power cord into a 120 volt 60 Hz outlet. If the television does not operate properly, ...digital premium cable television programming by your TV screen. Caution Adjust only those controls that are covered in Canada). authorized by Hitachi America, Ltd. Certain advanced and interactive digital cable services such as video games, stock market quotations, computer generated graphics, and...
...Hz, direct current, or anything other intellectual property rights. FOR MORE INFORMATION, CALL 1-800-HITACHI. This product incorporates copyright protection technology that is prohibited. Insert the power cord into a 120 volt 60 Hz outlet. If the television does not operate properly, ...digital premium cable television programming by your TV screen. Caution Adjust only those controls that are covered in Canada). authorized by Hitachi America, Ltd. Certain advanced and interactive digital cable services such as video games, stock market quotations, computer generated graphics, and...

Owners Guide
Page 4
use with Hitachi 42HDT52 and 42HDT52A. HL02065). · Two "AA" size, 1.5V batteries (P# FQ00021). » Power Cord (P# EV01841). ¿ Two IR Mouse cables (P# EY01641). ´ Table Top Stand (P# QJ01831K). ² Cleaning Cloth (P# MS00931). ¶ Power Swivel Cable (P# EW08431). º 2 (2 pcs.) Ferrite Core (P#2169513). ...: / For optional accessories, please ¿ 2 IR Mouse Cables or G-LINK Cables ¶ Power Swivel Cable (42" models only) access our web site at: www.hitachi.us/tv CAUTION: 1. For U.S. First time use only with other apparatus is capable of resulting...
use with Hitachi 42HDT52 and 42HDT52A. HL02065). · Two "AA" size, 1.5V batteries (P# FQ00021). » Power Cord (P# EV01841). ¿ Two IR Mouse cables (P# EY01641). ´ Table Top Stand (P# QJ01831K). ² Cleaning Cloth (P# MS00931). ¶ Power Swivel Cable (P# EW08431). º 2 (2 pcs.) Ferrite Core (P#2169513). ...: / For optional accessories, please ¿ 2 IR Mouse Cables or G-LINK Cables ¶ Power Swivel Cable (42" models only) access our web site at: www.hitachi.us/tv CAUTION: 1. For U.S. First time use only with other apparatus is capable of resulting...
Owners Guide
Page 5
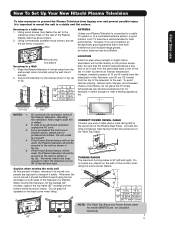
...is free from interference and multiple image ghosts, an indoor antenna may be sure that is recommended for stability. Also, be sufficient. If the Power Swivel feature will be used , the Plasma television should be secured to the wall as shown in an exceptionally good signal area that the ...heavy, whenever it is moved it should be lifted forward using the wall mount bracket. 2. First time use How To Set Up Your New Hitachi Plasma Television To take measures to prevent the Plasma Television from tipping over and prevent possible injury it is 30˚ (left and right). ...
...is free from interference and multiple image ghosts, an indoor antenna may be sure that is recommended for stability. Also, be sufficient. If the Power Swivel feature will be used , the Plasma television should be secured to the wall as shown in an exceptionally good signal area that the ...heavy, whenever it is moved it should be lifted forward using the wall mount bracket. 2. First time use How To Set Up Your New Hitachi Plasma Television To take measures to prevent the Plasma Television from tipping over and prevent possible injury it is 30˚ (left and right). ...

Owners Guide
Page 7
... input. Cables can be purchased from most stores that have phono connectors. Hook-up Cables and Connectors First time use 75-Ohm coaxial shielded wire. Power Swivel Cable (Provided with shielded video and audio cables that sell audio/video products.
... input. Cables can be purchased from most stores that have phono connectors. Hook-up Cables and Connectors First time use 75-Ohm coaxial shielded wire. Power Swivel Cable (Provided with shielded video and audio cables that sell audio/video products.

Owners Guide
Page 8
POWER BUTTON (TV, DVD, CBL, STB, PVR/VCR, AMP/CD) Turns the selected device on your HITACHI Plasma TV, the new remote control is in Set-Top-Box (STB) mode or when the TV uses a digital input. DAY/NIGHT (TV) Toggles picture ...
POWER BUTTON (TV, DVD, CBL, STB, PVR/VCR, AMP/CD) Turns the selected device on your HITACHI Plasma TV, the new remote control is in Set-Top-Box (STB) mode or when the TV uses a digital input. DAY/NIGHT (TV) Toggles picture ...
Owners Guide
Page 9
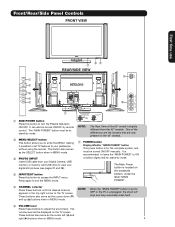
... MENU mode. ቤ PHOTO INPUT Insert USB cable from the 42" models. Front/Rear/Side Panel Controls FRONT VIEW First time use CURSOR PHOTO INPUT POWER ቢ CH+ CH- ቦ VOL + VOL - ቧ INPUT/EXIT MENU/SELECT ብ ባ ቩቪ ቨ REAR/SIDE VIEW ቤ ቫ ... band to ON condition (lights red) for the complete system, and must be displayed on the 42" models. ቨ POWER button Display Monitor "MAIN POWER" button This power button is unplugged, the clock will be at stand-by mode. ባ MENU/SELECT button This button allows you to enter...
... MENU mode. ቤ PHOTO INPUT Insert USB cable from the 42" models. Front/Rear/Side Panel Controls FRONT VIEW First time use CURSOR PHOTO INPUT POWER ቢ CH+ CH- ቦ VOL + VOL - ቧ INPUT/EXIT MENU/SELECT ብ ባ ቩቪ ቨ REAR/SIDE VIEW ቤ ቫ ... band to ON condition (lights red) for the complete system, and must be displayed on the 42" models. ቨ POWER button Display Monitor "MAIN POWER" button This power button is unplugged, the clock will be at stand-by mode. ባ MENU/SELECT button This button allows you to enter...

Owners Guide
Page 10
... be turned OFF (lights orange) if there is set to instantly view your digital video (DV) camcorder. Display monitor MAIN POWER is ON. Your HITACHI Plasma TV will illuminate. When the main power switch on the remote control to make sure the Display Monitor is turned off or in use the CURSOR PAD... and the SELECT button on the display monitor is ON. Check the Power Light to select INPUT 5. Press the INPUTS button ...
... be turned OFF (lights orange) if there is set to instantly view your digital video (DV) camcorder. Display monitor MAIN POWER is ON. Your HITACHI Plasma TV will illuminate. When the main power switch on the remote control to make sure the Display Monitor is turned off or in use the CURSOR PAD... and the SELECT button on the display monitor is ON. Check the Power Light to select INPUT 5. Press the INPUTS button ...

Owners Guide
Page 12
... available before requesting a CableCARD (also known as a Digital VCR (DVHS), Set-Top-Box or Digital Camcorder by your warranty card. HITACHI will notify you will display the following respective screens. ቭ Upgrade Card This card slot is for your external digital devices, such... below). Connect a coaxial cable to exit the second screen. Digital Cable In order to the Power Swivel Table Top Stand. A digital cable subscription is installed ቮ To Power Swivel Connector Connects to start your cable service. Acquiring Data. Insert the CableCARD into the CableCARD ...
... available before requesting a CableCARD (also known as a Digital VCR (DVHS), Set-Top-Box or Digital Camcorder by your warranty card. HITACHI will notify you will display the following respective screens. ቭ Upgrade Card This card slot is for your external digital devices, such... below). Connect a coaxial cable to exit the second screen. Digital Cable In order to the Power Swivel Table Top Stand. A digital cable subscription is installed ቮ To Power Swivel Connector Connects to start your cable service. Acquiring Data. Insert the CableCARD into the CableCARD ...

Owners Guide
Page 21
...output of the Audio/Video components for each of the Rear Panel. 3. Video Audio TV Guide On Screen Channel Manager Locks Timers Setup Power Swivel Move SEL Select Setup Menu Preference Screen Saver Set The Inputs Set AV NET Set Closed Captions Set Monitor Out Upgrades Quick Start... (VCR, Set Top Box, DVD, etc.). First time use your external Audio/Video components to the Rear Panel shown below. 2. Connect your HITACHI remote control to 2 external Audio/Video components. You can connect the Plasma Television with an AV Network feature. Each IR Mouse cable can control ...
...output of the Audio/Video components for each of the Rear Panel. 3. Video Audio TV Guide On Screen Channel Manager Locks Timers Setup Power Swivel Move SEL Select Setup Menu Preference Screen Saver Set The Inputs Set AV NET Set Closed Captions Set Monitor Out Upgrades Quick Start... (VCR, Set Top Box, DVD, etc.). First time use your external Audio/Video components to the Rear Panel shown below. 2. Connect your HITACHI remote control to 2 external Audio/Video components. You can connect the Plasma Television with an AV Network feature. Each IR Mouse cable can control ...

Owners Guide
Page 22
...LINK connection is not necessary for the AV Network to work with a G-LINK feature. One IR Mouse cable can use Connecting External Video Sources Your Hitachi Plasma Television is necessary for the TV Guide On ScreenTM system to work . 3. Press the SELECT or CURSOR PAD ̈ button to highlight TV ...shown below. 2. Use the CURSOR PAD ̄ or channel scroll down to select. 7. Video Audio TV Guide On Screen Channel Manager Locks Timers Setup Power Swivel Move SEL Select NOTE: 1. The IR Mouse must be placed in front of the infrared sensor of the Rear Panel. 3. Place the IR ...
...LINK connection is not necessary for the AV Network to work with a G-LINK feature. One IR Mouse cable can use Connecting External Video Sources Your Hitachi Plasma Television is necessary for the TV Guide On ScreenTM system to work . 3. Press the SELECT or CURSOR PAD ̈ button to highlight TV ...shown below. 2. Use the CURSOR PAD ̄ or channel scroll down to select. 7. Video Audio TV Guide On Screen Channel Manager Locks Timers Setup Power Swivel Move SEL Select NOTE: 1. The IR Mouse must be placed in front of the infrared sensor of the Rear Panel. 3. Place the IR ...

Owners Guide
Page 24
... the picture. Press the EXIT button to return the picture to motion. The Remote Control How to Use the Remote to Control Your TV ቢ POWER button Press this button to turn the TV set on or off when the remote is in TV mode. (See page 23 for ቢ instructions...
... the picture. Press the EXIT button to return the picture to motion. The Remote Control How to Use the Remote to Control Your TV ቢ POWER button Press this button to turn the TV set on or off when the remote is in TV mode. (See page 23 for ቢ instructions...

Owners Guide
Page 27
... button to cycle through the INPUTS selections until the PHOTO INPUT is fully loaded, or because of digital cameras may not work with low battery power may not properly display your Photo Input connections. 27 Press the picture number to jump from your digital camera, USB Drive or memory cards USB...
... button to cycle through the INPUTS selections until the PHOTO INPUT is fully loaded, or because of digital cameras may not work with low battery power may not properly display your Photo Input connections. 27 Press the picture number to jump from your digital camera, USB Drive or memory cards USB...

Owners Guide
Page 29
... operation. 7. When using a CableCARD, this CCI data will be automatically recognized if properly connected. 2. IEEE1394 DVHS1 DEVICE NAME, BRAND NAME POWER TV TV RESET Move STD SEL Select 00:00:00 Counter:-00:03:31 1. Use CURSOR PAD cursors to select D-VHS operation. 6. ... device is connected, it will not disappear until the EXIT button is in playback or recording. 6. Use CURSOR PAD cursors to highlight POWER. 4. Any compatibility problems with digital interface capabilities. TV IN/OUT functions are compatible with this function to control your devices with other ...
... operation. 7. When using a CableCARD, this CCI data will be automatically recognized if properly connected. 2. IEEE1394 DVHS1 DEVICE NAME, BRAND NAME POWER TV TV RESET Move STD SEL Select 00:00:00 Counter:-00:03:31 1. Use CURSOR PAD cursors to select D-VHS operation. 6. ... device is connected, it will not disappear until the EXIT button is in playback or recording. 6. Use CURSOR PAD cursors to highlight POWER. 4. Any compatibility problems with digital interface capabilities. TV IN/OUT functions are compatible with this function to control your devices with other ...

Owners Guide
Page 30
... to tune. You can also delete a channel from WHITE to AUTO (see page 88). However, if it is set to highlighted GREEN. When the TV power is on . To restore the sound, press the VOL wheel one half of the remote control. ታ CHANNEL (CH) WHEEL/CHANNEL SELECTOR buttons The CHANNEL...
... to tune. You can also delete a channel from WHITE to AUTO (see page 88). However, if it is set to highlighted GREEN. When the TV power is on . To restore the sound, press the VOL wheel one half of the remote control. ታ CHANNEL (CH) WHEEL/CHANNEL SELECTOR buttons The CHANNEL...

Owners Guide
Page 34
... codes. The remote control will flash 3 times if the ቢ code was accepted. ባ 5. Aim the remote control at the cable box and press the POWER button. If your cable box code has not been precoded into the remote. 2. Turn ON your Cable box. To switch to the corresponding selection. 4. The...
... codes. The remote control will flash 3 times if the ቢ code was accepted. ባ 5. Aim the remote control at the cable box and press the POWER button. If your cable box code has not been precoded into the remote. 2. Turn ON your Cable box. To switch to the corresponding selection. 4. The...

Owners Guide
Page 35
... programmed until the batteries are for operating the TV. 35 The indicator light will turn off your set -top-box/satellite receiver and press the POWER button. NOTE: 1. In the unlikely event that matches your set - ቢ top-box/satellite receiver as stated above. After replacing the batteries repeat the entire...
... programmed until the batteries are for operating the TV. 35 The indicator light will turn off your set -top-box/satellite receiver and press the POWER button. NOTE: 1. In the unlikely event that matches your set - ቢ top-box/satellite receiver as stated above. After replacing the batteries repeat the entire...

Owners Guide
Page 36
... designed to operate different types of your DVD player. ቢ This remote is entered. Aim the remote control at the DVD player and press the POWER button. In the unlikely event that matches your DVD player. 7. You will turn off your DVD player. ቢ 2. The Remote Control The Remote Control for...
... designed to operate different types of your DVD player. ቢ This remote is entered. Aim the remote control at the DVD player and press the POWER button. In the unlikely event that matches your DVD player. 7. You will turn off your DVD player. ቢ 2. The Remote Control The Remote Control for...

Owners Guide
Page 37
... TV Buttons These buttons are removed from the from the remote control. NOTE: 1. Aim the remote control at the VCR/PVR and press the ባ POWER button. Release the ENT button. The remote control will turn off your VCR/PVR operating guide. 3. The Remote Control The Remote for VCR/PVR Functions...
... TV Buttons These buttons are removed from the from the remote control. NOTE: 1. Aim the remote control at the VCR/PVR and press the ባ POWER button. Release the ENT button. The remote control will turn off your VCR/PVR operating guide. 3. The Remote Control The Remote for VCR/PVR Functions...

Owners Guide
Page 38
.... ባ EXCLUSIVE TV Buttons These buttons are removed from the from the remote control. Aim the remote control at the Audio component and press the POWER button. The remote control will flash 3 times if the code was accepted. 5. The Remote Control The Remote Control for Additional Audio Equipment Operating the precoded...
.... ባ EXCLUSIVE TV Buttons These buttons are removed from the from the remote control. Aim the remote control at the Audio component and press the POWER button. The remote control will flash 3 times if the code was accepted. 5. The Remote Control The Remote Control for Additional Audio Equipment Operating the precoded...


