
Owners Guide
Page 1
PLASMA TELEVISION AVC (Audio Video Control Center) & Plasma Display Monitor Operating Guide for energy efficiency. has determined that this product meets the ENERGY STAR® guidelines for 42HDT51, 55HDT51 IMPORTANT SAFETY INSTRUCTIONS 2-3 FIRST TIME USE ...4-26 THE REMOTE CONTROL 27-49 ON-SCREEN DISPLAY...50-77 USING THE RGB INPUT OF THE PLASMA TV 78-87 CARE OF YOUR HITACHI PLASMA TV & REMOTE CONTROL 88 RECEPTION PROBLEMS ...89 USEFUL INFORMATION/INDEX 90-98 As an ENERGY STAR® Partner, Hitachi, Ltd.
PLASMA TELEVISION AVC (Audio Video Control Center) & Plasma Display Monitor Operating Guide for energy efficiency. has determined that this product meets the ENERGY STAR® guidelines for 42HDT51, 55HDT51 IMPORTANT SAFETY INSTRUCTIONS 2-3 FIRST TIME USE ...4-26 THE REMOTE CONTROL 27-49 ON-SCREEN DISPLAY...50-77 USING THE RGB INPUT OF THE PLASMA TV 78-87 CARE OF YOUR HITACHI PLASMA TV & REMOTE CONTROL 88 RECEPTION PROBLEMS ...89 USEFUL INFORMATION/INDEX 90-98 As an ENERGY STAR® Partner, Hitachi, Ltd.
Owners Guide
Page 2
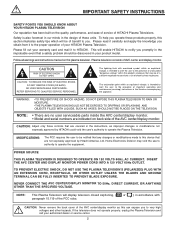
... the television does not operate properly, unplug the Plasma Television and call your HITACHI Plasma Television. Plasma television consists of your authorized dealer or service center. 2 NEVER CONNECT THE AVC CENTER/DISPLAY MONITOR TO 50Hz, DIRECT CURRENT, OR ANYTHING OTHER THAN THE SPECIFIED... VOLTAGE. NOTE: This Plasma Television will enable HITACHI to operate the Plasma Television. CAUTION RISK OF ELECTRIC SHOCK ...
... the television does not operate properly, unplug the Plasma Television and call your HITACHI Plasma Television. Plasma television consists of your authorized dealer or service center. 2 NEVER CONNECT THE AVC CENTER/DISPLAY MONITOR TO 50Hz, DIRECT CURRENT, OR ANYTHING OTHER THAN THE SPECIFIED... VOLTAGE. NOTE: This Plasma Television will enable HITACHI to operate the Plasma Television. CAUTION RISK OF ELECTRIC SHOCK ...

Owners Guide
Page 4
... Top Stand (optional) 3. 4. This plasma television product is not recommended. Power Cord: 42" 55" Plasma Monitor EV01841 EV01841 AVC EV01841 EV01841 4. Cleaning Cloth (P# MS00931). 9. REMOTE CONTROL BATTERY INSTALLATION AND REPLACEMENT 1. Insert two new "AA" size batteries for...CONNECTION CABLE IR MOUSE CABLE FIRST TIME USE 2. Ceiling mounting is designed for a maximum tilting angle of 45 degrees from vertical. Use with Hitachi 55HDT51. Two IR Mouse cables (P# EY01641). 6. 55" Table Top Stand (TTS55) (P# QJ01441K) (Optional). 7. Mounting the panel on ...
... Top Stand (optional) 3. 4. This plasma television product is not recommended. Power Cord: 42" 55" Plasma Monitor EV01841 EV01841 AVC EV01841 EV01841 4. Cleaning Cloth (P# MS00931). 9. REMOTE CONTROL BATTERY INSTALLATION AND REPLACEMENT 1. Insert two new "AA" size batteries for...CONNECTION CABLE IR MOUSE CABLE FIRST TIME USE 2. Ceiling mounting is designed for a maximum tilting angle of 45 degrees from vertical. Use with Hitachi 55HDT51. Two IR Mouse cables (P# EY01641). 6. 55" Table Top Stand (TTS55) (P# QJ01441K) (Optional). 7. Mounting the panel on ...
Owners Guide
Page 5
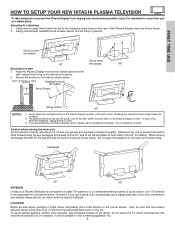
FIRST TIME USE HOW TO SETUP YOUR NEW HITACHI PLASMA TELEVISION To take measures to prevent the Plasma Display from tipping over and prevent possible injury it is moved, two people are located in ... holes might cause fire or defect. 2. The plasma television has two AC cords, one on the AVC center and the other on the picture screen. In case of the Plasma Display monitor or the AVC center. Caution when moving the Display Monitor, lift the handles and the bottom frame as shown below...
FIRST TIME USE HOW TO SETUP YOUR NEW HITACHI PLASMA TELEVISION To take measures to prevent the Plasma Display from tipping over and prevent possible injury it is moved, two people are located in ... holes might cause fire or defect. 2. The plasma television has two AC cords, one on the AVC center and the other on the picture screen. In case of the Plasma Display monitor or the AVC center. Caution when moving the Display Monitor, lift the handles and the bottom frame as shown below...

Owners Guide
Page 7
... out to an audio amplifier with an Optical Audio In jack. Optical Cable This cable is used to connect to the audio input of the AVC. USB Cable This cable is used to 75-Ohm). Before purchasing any cables, be connected to an antenna adapter (300-Ohm to connect your... that sell audio/video products. Monitor Connection Cable (Provided) This cable is used to connect the Display Monitor to the subwoofer output of the AVC Center. Use this cable for the best sound quality. Phono Connector Used on all standard video and audio cables which connect to the Photo Input...
... out to an audio amplifier with an Optical Audio In jack. Optical Cable This cable is used to connect to the audio input of the AVC. USB Cable This cable is used to 75-Ohm). Before purchasing any cables, be connected to an antenna adapter (300-Ohm to connect your... that sell audio/video products. Monitor Connection Cable (Provided) This cable is used to connect the Display Monitor to the subwoofer output of the AVC Center. Use this cable for the best sound quality. Phono Connector Used on all standard video and audio cables which connect to the Photo Input...

Owners Guide
Page 9
..." DISPLAY MONITOR FRONT VIEW 55" DISPLAY MONITOR ቭቩ STANDBY (RED) ON (GREEN) MAIN POWER ቩቧ ቨ STANDBY (RED) ON (GREEN) ቩቧ ቨ (AVC) AUDIO VIDEO CONTROL CENTER POWER STANDBY (RED) ON (GREEN) VOL- Your selection is shown in MENU mode. 9 This button also serves as the cursor left...
..." DISPLAY MONITOR FRONT VIEW 55" DISPLAY MONITOR ቭቩ STANDBY (RED) ON (GREEN) MAIN POWER ቩቧ ቨ STANDBY (RED) ON (GREEN) ቩቧ ቨ (AVC) AUDIO VIDEO CONTROL CENTER POWER STANDBY (RED) ON (GREEN) VOL- Your selection is shown in MENU mode. 9 This button also serves as the cursor left...

Owners Guide
Page 10
... Stand-by ) On Lights Orange Off (Flashing) (Power Saving) Operating When the main power switch is selected. Display monitor MAIN POWER is ON and and AVC Center power is ON, with no signal input except antenna (no video input when VIDEO: 1, 2, 3, 4, 5, or RGB is set OFF. If you wish to listen... JACKS (for VIDEO: 5) Use these audio/video jacks for a quick hook-up from a camcorder or VCR to make sure the Display Monitor is ON. Your HITACHI Plasma TV will illuminate. STANDBY (RED) ON (GREEN) or MAIN POWER STANDBY(RED) ON(GREEN) MAIN POWER FIRST TIME USE 42" 55...
... Stand-by ) On Lights Orange Off (Flashing) (Power Saving) Operating When the main power switch is selected. Display monitor MAIN POWER is ON and and AVC Center power is ON, with no signal input except antenna (no video input when VIDEO: 1, 2, 3, 4, 5, or RGB is set OFF. If you wish to listen... JACKS (for VIDEO: 5) Use these audio/video jacks for a quick hook-up from a camcorder or VCR to make sure the Display Monitor is ON. Your HITACHI Plasma TV will illuminate. STANDBY (RED) ON (GREEN) or MAIN POWER STANDBY(RED) ON(GREEN) MAIN POWER FIRST TIME USE 42" 55...

Owners Guide
Page 11
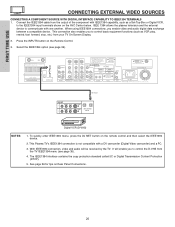
...signal for connecting equipment with this capability, such as a main picture or sub-picture. It may use VIDEO or S-VIDEO inputs to connect to the AVC Box's PR input. 4. To ensure no copyright infringement, the MONITOR OUT output will not have mono sound, insert the audio cable into the left ... may be used for high quality video output. ANT A input can select each video source. In this case, connect the component CB output to the AVC Box's PB input and the component CR output to INPUT 3 and 4, but only one of these inputs may be labeled Y-CBCR. Your component outputs...
...signal for connecting equipment with this capability, such as a main picture or sub-picture. It may use VIDEO or S-VIDEO inputs to connect to the AVC Box's PR input. 4. To ensure no copyright infringement, the MONITOR OUT output will not have mono sound, insert the audio cable into the left ... may be used for high quality video output. ANT A input can select each video source. In this case, connect the component CB output to the AVC Box's PB input and the component CR output to INPUT 3 and 4, but only one of these inputs may be labeled Y-CBCR. Your component outputs...
Owners Guide
Page 12
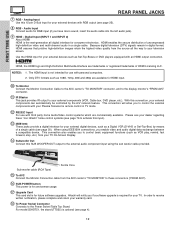
...if a software upgrade is for use with personal computers. 2. Ferrite Core Sub-woofer cable (RCA Type) ቱ To AVC Connect the Monitor Connection cable from your TV. Hitachi will allow you enable video and audio digital data exchange between a compatible device. Analog Input Use this 15-pin D-Sub input... cable into the left audio jack). ቪ HDMI - For model 55HDT51, the stand (TTS55) is the next-generation all the way to these "non Hitachi" home control systems (see page 25). ቩ RGB - Only DTV formats such as a Digital VCR (D-VHS or Set-Top-Box) by the A/V ...
...if a software upgrade is for use with personal computers. 2. Ferrite Core Sub-woofer cable (RCA Type) ቱ To AVC Connect the Monitor Connection cable from your TV. Hitachi will allow you enable video and audio digital data exchange between a compatible device. Analog Input Use this 15-pin D-Sub input... cable into the left audio jack). ቪ HDMI - For model 55HDT51, the stand (TTS55) is the next-generation all the way to these "non Hitachi" home control systems (see page 25). ቩ RGB - Only DTV formats such as a Digital VCR (D-VHS or Set-Top-Box) by the A/V ...

Owners Guide
Page 13
... to gain access to your cable operator and give them the information from the card to exit the second screen. Digital Cable Rear Panel of AVC ICNaSEblRTeTHICSAENRDD If the CableCARD is available before requesting a CableCARD (also known as shown). CableCARD is installed OR CableCARD is not installed After the CableCARD is...
... to gain access to your cable operator and give them the information from the card to exit the second screen. Digital Cable Rear Panel of AVC ICNaSEblRTeTHICSAENRDD If the CableCARD is available before requesting a CableCARD (also known as shown). CableCARD is installed OR CableCARD is not installed After the CableCARD is...

Owners Guide
Page 14
Back of Display Monitor 42" Back of Display Monitor 55" To AC outlet Core To AC outlet Core NOTE: Please use HITACHI specified cable. To AC outlet Please use HITACHI specified cable. If you have a mono VCR, insert the audio cable into the left audio jack of the standard video cable.... 3. If you have a VHS or 8mm camcorder, use the S-INPUT cable in the following examples: Front panel of AVC Front panel of SRS ...
Back of Display Monitor 42" Back of Display Monitor 55" To AC outlet Core To AC outlet Core NOTE: Please use HITACHI specified cable. To AC outlet Please use HITACHI specified cable. If you have a mono VCR, insert the audio cable into the left audio jack of the standard video cable.... 3. If you have a VHS or 8mm camcorder, use the S-INPUT cable in the following examples: Front panel of AVC Front panel of SRS ...

Owners Guide
Page 15
.... However, you use to connect the VCR, camcorder, laserdisc player, DVD player, or HDTV Set Top Box to your Plasma TV is dependent on the AVC Center below. 2. Then press the SELECT button to select the Antenna or Input of VCR AUDIO OUT VIDEO OUT VCR 15 CONNECTING A MONAURAL AUDIO SOURCE...
.... However, you use to connect the VCR, camcorder, laserdisc player, DVD player, or HDTV Set Top Box to your Plasma TV is dependent on the AVC Center below. 2. Then press the SELECT button to select the Antenna or Input of VCR AUDIO OUT VIDEO OUT VCR 15 CONNECTING A MONAURAL AUDIO SOURCE...

Owners Guide
Page 16
... player to the INPUT (AUDIO/R) jack. 3. The picture and sound that a VCR cannot record its own video or line output (INPUT: 4 in example on the AVC Center below. 2. FIRST TIME USE CONNECTING EXTERNAL VIDEO SOURCES CONNECTING A STEREO VCR OR STEREO LASERDISC PLAYER 1. Press the INPUTS button, then select INPUT 3 from the...
... player to the INPUT (AUDIO/R) jack. 3. The picture and sound that a VCR cannot record its own video or line output (INPUT: 4 in example on the AVC Center below. 2. FIRST TIME USE CONNECTING EXTERNAL VIDEO SOURCES CONNECTING A STEREO VCR OR STEREO LASERDISC PLAYER 1. Press the INPUTS button, then select INPUT 3 from the...

Owners Guide
Page 17
... when connecting to the INPUT (S-VIDEO) jack, as shown on line input-output connections. 17 A single VCR can be used for more information on the AVC Center below. 2. Back of the S-VHS VCR or the laserdisc player to rear panel jacks. FIRST TIME USE CONNECTING EXTERNAL VIDEO SOURCES CONNECTING S-VIDEO VCR...
... when connecting to the INPUT (S-VIDEO) jack, as shown on line input-output connections. 17 A single VCR can be used for more information on the AVC Center below. 2. Back of the S-VHS VCR or the laserdisc player to rear panel jacks. FIRST TIME USE CONNECTING EXTERNAL VIDEO SOURCES CONNECTING S-VIDEO VCR...

Owners Guide
Page 18
... rear panel jacks. With DVI output, connect the cable from the INPUTS menu to return to the INPUT (AUDIO/L) jack. 4. The HDMI input on the AVC Center below. 2. Completely insert the connection cord plugs when connecting to the INPUT (AUDIO/R) jack. 3. FIRST TIME USE CONNECTING EXTERNAL VIDEO SOURCES CONNECTING A COMPONENT SOURCE...
... rear panel jacks. With DVI output, connect the cable from the INPUTS menu to return to the INPUT (AUDIO/L) jack. 4. The HDMI input on the AVC Center below. 2. Completely insert the connection cord plugs when connecting to the INPUT (AUDIO/R) jack. 3. FIRST TIME USE CONNECTING EXTERNAL VIDEO SOURCES CONNECTING A COMPONENT SOURCE...

Owners Guide
Page 19
... VIDEO label disappears automatically after approximately four seconds. 7. Select ANT A or B to return to the INPUT (AUDIO/R) jack. 5. See page 26 for tips on the AVC Center below. 2. FIRST TIME USE CONNECTING EXTERNAL VIDEO SOURCES CONNECTING A STEREO LASERDISC/DVD PLAYER OR HDTV SET TOP BOX TO INPUT 1 OR 2 COMPONENT: Y-PBPR. 1. The...
... VIDEO label disappears automatically after approximately four seconds. 7. Select ANT A or B to return to the INPUT (AUDIO/R) jack. 5. See page 26 for tips on the AVC Center below. 2. FIRST TIME USE CONNECTING EXTERNAL VIDEO SOURCES CONNECTING A STEREO LASERDISC/DVD PLAYER OR HDTV SET TOP BOX TO INPUT 1 OR 2 COMPONENT: Y-PBPR. 1. The...
Owners Guide
Page 20
... VCR play, rewind, fast forward, stop, etc.) from your TV On-Screen Display. 2. To quickly enter IEEE1394 menu, press the AV NET button on the AVC Center below. When using IEEE1394 connections, you to the IEEE1394 input terminals shown on the remote control and then select the IEEE1394 device. 2. Connect the...
... VCR play, rewind, fast forward, stop, etc.) from your TV On-Screen Display. 2. To quickly enter IEEE1394 menu, press the AV NET button on the AVC Center below. When using IEEE1394 connections, you to the IEEE1394 input terminals shown on the remote control and then select the IEEE1394 device. 2. Connect the...

Owners Guide
Page 21
... terminal outputs video and audio of the Plasma TV to an external audio amplifier, connect the system as shown below. The "OPTICAL OUT" from the AVC center is controlled by the amplifier, not by the Plasma Television. It does not output component video, HDMI or RGB. CONNECTING EXTERNAL AUDIO/VIDEO DEVICES...
... terminal outputs video and audio of the Plasma TV to an external audio amplifier, connect the system as shown below. The "OPTICAL OUT" from the AVC center is controlled by the amplifier, not by the Plasma Television. It does not output component video, HDMI or RGB. CONNECTING EXTERNAL AUDIO/VIDEO DEVICES...

Owners Guide
Page 22
...Hitachi Plasma TV Remote Control. Press the AV NET button on page 24. 22 The AVC Center has two IR BLASTER outputs which can control up to a total of the external components you can connect the Plasma Television with an AV Network feature. Once this is equipped with up to the AVC...following example of the external components infrared sensor for AV network are on the remote control. FIRST TIME USE CONNECTING AV NETWORK Your Hitachi Plasma Television is setup, it allows your IR Mouse connector to control your equipment using your external Audio/Video components to 2 ...
...Hitachi Plasma TV Remote Control. Press the AV NET button on page 24. 22 The AVC Center has two IR BLASTER outputs which can control up to a total of the external components you can connect the Plasma Television with an AV Network feature. Once this is equipped with up to the AVC...following example of the external components infrared sensor for AV network are on the remote control. FIRST TIME USE CONNECTING AV NETWORK Your Hitachi Plasma Television is setup, it allows your IR Mouse connector to control your equipment using your external Audio/Video components to 2 ...

Owners Guide
Page 26
...), connect it is of S-VIDEO type. • When using a DVI or HDMI input from a Set-Top-Box, it to the left audio jack on the AVC Center. • Refer to the operating guide of your other electronic equipment for additional information on connecting your hook-up cables. • A single VCR can...
...), connect it is of S-VIDEO type. • When using a DVI or HDMI input from a Set-Top-Box, it to the left audio jack on the AVC Center. • Refer to the operating guide of your other electronic equipment for additional information on connecting your hook-up cables. • A single VCR can...


