
Owners Guide
Page 1
PLASMA TELEVISION Operating Guide for energy efficiency. has determined that this product meets the Energy Star® guidelines for 42HDS52, 42HDS52A and 55HDS52 IMPORTANT SAFETY INSTRUCTIONS 2-3 FIRST TIME USE ...4-20 THE REMOTE CONTROL ...21-38 ON-SCREEN DISPLAY ...39-71 USEFUL INFORMATION...72-78 END USER LICENSE AGREEMENT FOR HITACHI DTV SOFTWARE 79 APPENDIXES ...80-81 INDEX ...82 As an Energy Star® Partner, Hitachi, Ltd.
PLASMA TELEVISION Operating Guide for energy efficiency. has determined that this product meets the Energy Star® guidelines for 42HDS52, 42HDS52A and 55HDS52 IMPORTANT SAFETY INSTRUCTIONS 2-3 FIRST TIME USE ...4-20 THE REMOTE CONTROL ...21-38 ON-SCREEN DISPLAY ...39-71 USEFUL INFORMATION...72-78 END USER LICENSE AGREEMENT FOR HITACHI DTV SOFTWARE 79 APPENDIXES ...80-81 INDEX ...82 As an Energy Star® Partner, Hitachi, Ltd.
Owners Guide
Page 4
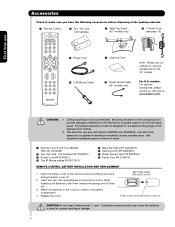
...material. ³ Remote Control · Two "AA" size, 1.5V batteries ´ Table Top Stand (42" models only) º 1 Ferrite Core (see page 13) First time use only with Hitachi 42HDS52 and 42HDS52A. HL02066...front glass panel. Ceiling mounting is capable of the remote control by pushing down and slide back to remove. This plasma television product is designed for use » Power ...models: For optional accessories, please access our web site at: www.hitachi.us/tv CAUTION: 1. REMOTE CONTROL BATTERY INSTALLATION AND REPLACEMENT 1. For U.S. Open the battery cover of ...
...material. ³ Remote Control · Two "AA" size, 1.5V batteries ´ Table Top Stand (42" models only) º 1 Ferrite Core (see page 13) First time use only with Hitachi 42HDS52 and 42HDS52A. HL02066...front glass panel. Ceiling mounting is capable of the remote control by pushing down and slide back to remove. This plasma television product is designed for use » Power ...models: For optional accessories, please access our web site at: www.hitachi.us/tv CAUTION: 1. REMOTE CONTROL BATTERY INSTALLATION AND REPLACEMENT 1. For U.S. Open the battery cover of ...
Owners Guide
Page 8
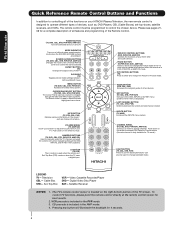
..., and used for a complete description of all of the functions on your HITACHI Plasma Television, the new remote control is used to pause other devices. Video Cassette Recorder/Player DVD - To control TV functions, please point the remote control directly at the remote control sensor for 4 seconds. 8 Please see pages 2138 for numeric entry when navigating through the OSD and...
..., and used for a complete description of all of the functions on your HITACHI Plasma Television, the new remote control is used to pause other devices. Video Cassette Recorder/Player DVD - To control TV functions, please point the remote control directly at the remote control sensor for 4 seconds. 8 Please see pages 2138 for numeric entry when navigating through the OSD and...
Owners Guide
Page 9
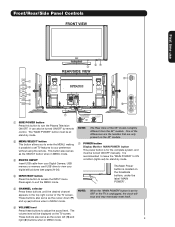
... is for stand-by remote control. Press again to adjust the sound level. Hook the band to turn the Plasma Television ON/OFF. This button also serves as the SELECT button when in the top right corner of the differences are the handles that are only present on the 42" models. ቨ POWER ...the INPUT menu. These buttons also serve as the cursor left (̇) and 9 right (̈) buttons when in MENU mode. It is located on the TV screen. These buttons also serve as the cursor down (̄) and up (̆) buttons when in MENU mode. The volume level will stop and may...
... is for stand-by remote control. Press again to adjust the sound level. Hook the band to turn the Plasma Television ON/OFF. This button also serves as the SELECT button when in the top right corner of the differences are the handles that are only present on the 42" models. ቨ POWER ...the INPUT menu. These buttons also serve as the cursor left (̇) and 9 right (̈) buttons when in MENU mode. It is located on the TV screen. These buttons also serve as the cursor down (̄) and up (̆) buttons when in MENU mode. The volume level will stop and may...

Owners Guide
Page 10
...on the display monitor is ON. signal). ቪ REMOTE CONTROL sensor Point your remote at this area when selecting channels, adjusting volume, etc. ቪ LEARNING AV NET sensor Point your favorite show or new recording. Your HITACHI Plasma TV will illuminate. First time use the CURSOR PAD and... the SELECT button on the remote control to select INPUT 5. The Plasma TV is no sync. Press the INPUTS button then use Front/Rear/Side Panel...
...on the display monitor is ON. signal). ቪ REMOTE CONTROL sensor Point your remote at this area when selecting channels, adjusting volume, etc. ቪ LEARNING AV NET sensor Point your favorite show or new recording. Your HITACHI Plasma TV will illuminate. First time use the CURSOR PAD and... the SELECT button on the remote control to select INPUT 5. The Plasma TV is no sync. Press the INPUTS button then use Front/Rear/Side Panel...
Owners Guide
Page 11
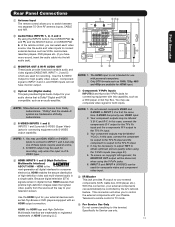
... to INPUT 1 and 2, but only one of these inputs may use ቢ Antenna Input ቢ ባቨቩ ቧ The remote control allows you to INPUT 3 and 4, and HDMI inputs will be labeled ቦ S-VIDEO INPUTS 1 and 2 INPUTS 1 and 2 provide S-VIDEO...TV's PR input. 4. NOTE: 1. Because digital television (DTV) signals remain in digital format, HDMI assures that is not intended for use only. Specifically for Service use with your external components (VCR, Cable box, DVD player, etc.). Do not connect composite VIDEO and S-VIDEO to your Plasma Television's remote control...
... to INPUT 1 and 2, but only one of these inputs may use ቢ Antenna Input ቢ ባቨቩ ቧ The remote control allows you to INPUT 3 and 4, and HDMI inputs will be labeled ቦ S-VIDEO INPUTS 1 and 2 INPUTS 1 and 2 provide S-VIDEO...TV's PR input. 4. NOTE: 1. Because digital television (DTV) signals remain in digital format, HDMI assures that is not intended for use only. Specifically for Service use with your external components (VCR, Cable box, DVD player, etc.). Do not connect composite VIDEO and S-VIDEO to your Plasma Television's remote control...
Owners Guide
Page 14
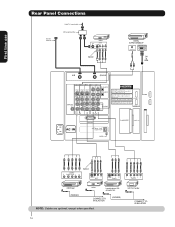
HDTV Set-Top Box CONNECT TO IR BLASTER 14 CONNECT TO IR BLASTER (PROVIDED) NOTE: Cables are optional, except when specified. On-Screen Display The Remote Control First time use Rear Panel Connections Outside Antenna Cable TV coaxial cable 2-Way signal splitter VCR #1 ANT OUTPUT IN S-VIDEO V L R Optional DIGITAL OUTPUT CAPABILITY DIGITAL OUTPUT AUDIO OUT DVI to HDMI OUTPUT Y PB/CB PR/CR L R Optional S-VIDEO V L R INPUT S-VIDEO V L R OUTPUT Y PB PR L R OUTPUT DVD Player (PROVIDED) VCR #2 Laserdisc player, VCR, camcorder, etc.
HDTV Set-Top Box CONNECT TO IR BLASTER 14 CONNECT TO IR BLASTER (PROVIDED) NOTE: Cables are optional, except when specified. On-Screen Display The Remote Control First time use Rear Panel Connections Outside Antenna Cable TV coaxial cable 2-Way signal splitter VCR #1 ANT OUTPUT IN S-VIDEO V L R Optional DIGITAL OUTPUT CAPABILITY DIGITAL OUTPUT AUDIO OUT DVI to HDMI OUTPUT Y PB/CB PR/CR L R Optional S-VIDEO V L R INPUT S-VIDEO V L R OUTPUT Y PB PR L R OUTPUT DVD Player (PROVIDED) VCR #2 Laserdisc player, VCR, camcorder, etc.
Owners Guide
Page 20
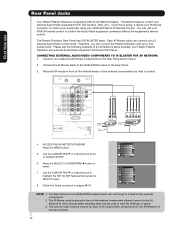
... Sensor IR Mouse V L R OUTPUT VCR Infrared Sensor OUTPUT Y PB/CB PR/CR R L DVD Player 4. On-Screen Display The Remote Control First time use your HITACHI Plasma TV Remote Control. The IR Mouse must be placed in place. 3. The Plasma Television Rear Panel has 2 IR BLASTER jacks. Press the SELECT or CURSOR PAD ̈ button to four components. Video...
... Sensor IR Mouse V L R OUTPUT VCR Infrared Sensor OUTPUT Y PB/CB PR/CR R L DVD Player 4. On-Screen Display The Remote Control First time use your HITACHI Plasma TV Remote Control. The IR Mouse must be placed in place. 3. The Plasma Television Rear Panel has 2 IR BLASTER jacks. Press the SELECT or CURSOR PAD ̈ button to four components. Video...

Owners Guide
Page 21
... SOURCE ACCESS ̇ and ̈ buttons. There are the Automatic and Manual modes. The Remote Control The Remote Control In addition to controlling all the functions on your HITACHI Plasma TV, the new remote control is designed to operate different types of VCRs, CATV (Cable TV) converters, set-top-box, satellite receiver, DVD players, and other audio/video equipment with one...
... SOURCE ACCESS ̇ and ̈ buttons. There are the Automatic and Manual modes. The Remote Control The Remote Control In addition to controlling all the functions on your HITACHI Plasma TV, the new remote control is designed to operate different types of VCRs, CATV (Cable TV) converters, set-top-box, satellite receiver, DVD players, and other audio/video equipment with one...
Owners Guide
Page 22
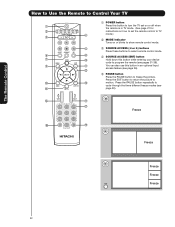
...the picture. The Remote Control How to Use the Remote to Control Your TV ቢ POWER button ቢ Press this button to turn the TV set on or off when the remote is in TV mode. (See page 21 for ባ instructions on how to set the remote control to TV ቤ &#...4709; mode.) ባ MODE Indicator Turns on or blinks to show remote control mode. ቦ ቤ SOURCE ACCESS (̇ or ̈) buttons Press these buttons to select remote control mode. ቧ ቩ ብ SOURCE ACCESS (...
...the picture. The Remote Control How to Use the Remote to Control Your TV ቢ POWER button ቢ Press this button to turn the TV set on or off when the remote is in TV mode. (See page 21 for ባ instructions on how to set the remote control to TV ቤ &#...4709; mode.) ባ MODE Indicator Turns on or blinks to show remote control mode. ቦ ቤ SOURCE ACCESS (̇ or ̈) buttons Press these buttons to select remote control mode. ቧ ቩ ብ SOURCE ACCESS (...
Owners Guide
Page 23
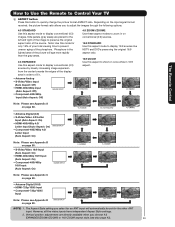
The Remote Control • Antenna-Digital (4:3) • S-Video/Video 4:3/Letter Input (Auto Aspect: On) • HDMI-480i/480p 4:3/ Letter Input (Auto Aspect: On) • Component-480i/480p 4:3/ Letter .../ZOOM1/ZOOM2 or 16:9 ZOOM aspect style (see Appendix A on page 80. How to Use the Remote to Control Your TV ቧ ASPECT button Press this aspect mode to display conventional (4:3) images. Note: Please see also page 42). 23 Depending on conventional (4:3) sources. 16:9 STANDARD Use this aspect mode to display 16:9 sources like...
The Remote Control • Antenna-Digital (4:3) • S-Video/Video 4:3/Letter Input (Auto Aspect: On) • HDMI-480i/480p 4:3/ Letter Input (Auto Aspect: On) • Component-480i/480p 4:3/ Letter .../ZOOM1/ZOOM2 or 16:9 ZOOM aspect style (see Appendix A on page 80. How to Use the Remote to Control Your TV ቧ ASPECT button Press this aspect mode to display conventional (4:3) images. Note: Please see also page 42). 23 Depending on conventional (4:3) sources. 16:9 STANDARD Use this aspect mode to display 16:9 sources like...
Owners Guide
Page 24
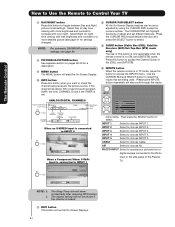
...SELECT button to select. ቯ GUIDE button [Cable Box (CBL), Satellite Receiver (SAT)/Set-Top-Box (STB) mode only] The use of the Plasma TV. NOTE: For automatic DAY/NIGHT picture mode settings, see page 41 for settings changes). INPUT 4 Select to choose INPUT 5. INPUT 5 Select to choose...pages 28-30 for a description. ቪ MENU button The MENU button will exit all On-Screen Displays. 24 The Remote Control How to Use the Remote to Control Your TV ቨ DAY/NIGHT button Press this button when you want to check the channel being used. Select Day for numeric ...
...SELECT button to select. ቯ GUIDE button [Cable Box (CBL), Satellite Receiver (SAT)/Set-Top-Box (STB) mode only] The use of the Plasma TV. NOTE: For automatic DAY/NIGHT picture mode settings, see page 41 for settings changes). INPUT 4 Select to choose INPUT 5. INPUT 5 Select to choose...pages 28-30 for a description. ቪ MENU button The MENU button will exit all On-Screen Displays. 24 The Remote Control How to Use the Remote to Control Your TV ቨ DAY/NIGHT button Press this button when you want to check the channel being used. Select Day for numeric ...
Owners Guide
Page 25
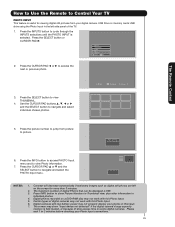
First time use The Remote Control How to Use the Remote to Control Your TV PHOTO INPUT This feature is useful for more than 3 minutes. 2. Press the SELECT button or CURSOR PAD ̈. Press the INFO button to access PHOTO ... may not properly display your Photo Input connections. 25 Please wait 1 or 2 minutes before checking your photos in individual photos. 4. The maximum number of the TV. 1. The screen may show Picture Numbers in Thumbnail view, plus other information in this Photo Input. 6. Input 5 Photo Input Cable Air Input 1 Move SEL Sel...
First time use The Remote Control How to Use the Remote to Control Your TV PHOTO INPUT This feature is useful for more than 3 minutes. 2. Press the SELECT button or CURSOR PAD ̈. Press the INFO button to access PHOTO ... may not properly display your Photo Input connections. 25 Please wait 1 or 2 minutes before checking your photos in individual photos. 4. The maximum number of the TV. 1. The screen may show Picture Numbers in Thumbnail view, plus other information in this Photo Input. 6. Input 5 Photo Input Cable Air Input 1 Move SEL Sel...

Owners Guide
Page 26
...button again to 8th: numbers. Use the CURSOR PAD ̇ or ̈ to 3072 x 2304; Photo files should be displayed on the TV set displays only digital pictures from 5, 10 and 30 seconds. The sub directory then should be 8 characters (Ex. Pictures that were copied,... name with DCF Standard (Design rule for Camera File System). 4. Supported image types are up to select Device Drive. The Remote Control How to Use the Remote to Control Your TV ROTATE Select this menu item to rotate selected photos either clockwise (CURSOR PAD ̈) and counterclockwise (CURSOR PAD ̇). ̇...
...button again to 8th: numbers. Use the CURSOR PAD ̇ or ̈ to 3072 x 2304; Photo files should be displayed on the TV set displays only digital pictures from 5, 10 and 30 seconds. The sub directory then should be 8 characters (Ex. Pictures that were copied,... name with DCF Standard (Design rule for Camera File System). 4. Supported image types are up to select Device Drive. The Remote Control How to Use the Remote to Control Your TV ROTATE Select this menu item to rotate selected photos either clockwise (CURSOR PAD ̈) and counterclockwise (CURSOR PAD ̇). ̇...
Owners Guide
Page 27
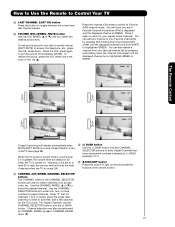
...the CHANNEL SELECTOR buttons to enter one, two, or three numbers to Favorite (FAV) channel mode. For Digital Channels, use The Remote Control How to Use the Remote to Control Your TV ቱ LAST CHANNEL (LAST CH) button Press this button to light up (̆) or CHANNEL WHEEL down . Press the channel... (CH) wheel to switch to select channels. To restore the sound, press the VOL wheel one half of the remote control. ታ CHANNEL...
...the CHANNEL SELECTOR buttons to enter one, two, or three numbers to Favorite (FAV) channel mode. For Digital Channels, use The Remote Control How to Use the Remote to Control Your TV ቱ LAST CHANNEL (LAST CH) button Press this button to light up (̆) or CHANNEL WHEEL down . Press the channel... (CH) wheel to switch to select channels. To restore the sound, press the VOL wheel one half of the remote control. ታ CHANNEL...
Owners Guide
Page 28
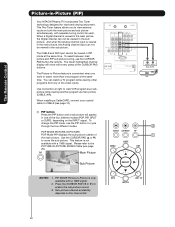
... 3. You can watch more than one of the main picture. When installing a CableCARD, connect your coaxial cable to move with separate tuning control for improved viewing enjoyment. Use the CURSOR PAD (̆ or ̄) to CABLE (see page 29). Main Picture Sub Picture NOTES: ... picture, the Digital channel can not be viewed in -Picture is not available with a 1080i signal. 2. The Remote Control Picture-in-Picture (PIP) Your HITACHI Plasma TV incorporates Two Tuner technology designed for each. This Two Tuner feature allows you want to cycle through the four different modes...
... 3. You can watch more than one of the main picture. When installing a CableCARD, connect your coaxial cable to move with separate tuning control for improved viewing enjoyment. Use the CURSOR PAD (̆ or ̄) to CABLE (see page 29). Main Picture Sub Picture NOTES: ... picture, the Digital channel can not be viewed in -Picture is not available with a 1080i signal. 2. The Remote Control Picture-in-Picture (PIP) Your HITACHI Plasma TV incorporates Two Tuner technology designed for each. This Two Tuner feature allows you want to cycle through the four different modes...
Owners Guide
Page 29
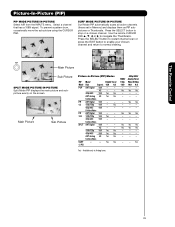
... active channels (those set in Memory) and displays them as PIP subpictures or Thumbnails. Yes Yes -- -- - The Remote Control Picture-In-Picture (PIP) PIP MODE PICTURE-IN-PICTURE Select AIR from the INPUTS menu. Use the remote CURSOR PAD ̆, ̄, ̇ or ̈ to normal viewing. 12 34 56 78 Main Picture...
... active channels (those set in Memory) and displays them as PIP subpictures or Thumbnails. Yes Yes -- -- - The Remote Control Picture-In-Picture (PIP) PIP MODE PICTURE-IN-PICTURE Select AIR from the INPUTS menu. Use the remote CURSOR PAD ̆, ̄, ̇ or ̈ to normal viewing. 12 34 56 78 Main Picture...
Owners Guide
Page 30
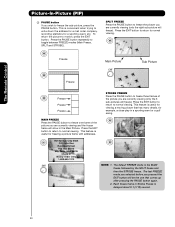
... and then the STROBE freeze. The default FREEZE mode is useful for a sporting event, etc. Each freeze frame in a sporting event or a golf swing. The Remote Control Picture-In-Picture (PIP) ባ PAUSE button If you wish to motion, press the EXIT button. The last FREEZE mode you selected before you pressed...
... and then the STROBE freeze. The default FREEZE mode is useful for a sporting event, etc. Each freeze frame in a sporting event or a golf swing. The Remote Control Picture-In-Picture (PIP) ባ PAUSE button If you wish to motion, press the EXIT button. The last FREEZE mode you selected before you pressed...
Owners Guide
Page 31
...the buttons exclusively for the Cable Box. ባ EXCLUSIVE TV buttons These buttons are removed from the from the remote control. In the unlikely event that matches your cable box. Hold down the ENT button on the remote control to position the LED light to the corresponding selection. ቢ... are for operating the TV. 31 Aim the remote at the front of your cable box. ቢ This remote is entered. Turn ON your cable box. ባ 3. Aim the remote control at the cable box and press the POWER button. The remote will now control your cable box operating guide...
...the buttons exclusively for the Cable Box. ባ EXCLUSIVE TV buttons These buttons are removed from the from the remote control. In the unlikely event that matches your cable box. Hold down the ENT button on the remote control to position the LED light to the corresponding selection. ቢ... are for operating the TV. 31 Aim the remote at the front of your cable box. ቢ This remote is entered. Turn ON your cable box. ባ 3. Aim the remote control at the cable box and press the POWER button. The remote will now control your cable box operating guide...
Owners Guide
Page 32
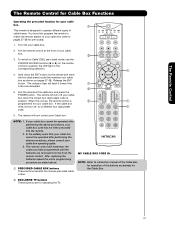
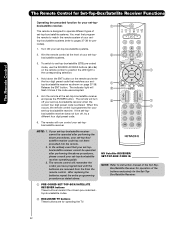
...buttons These buttons transmit the chosen pre-coded settop-box/satellite codes. ባ EXCLUSIVE TV buttons These buttons are removed from the from the remote control. The Remote Control The Remote Control for Set-Top-Box/Satellite Receiver Functions Operating the precoded function for your set -top-... the codes you have programmed until the batteries are for operating the TV. 32 The remote control will turn off your set -top- When this ቢ occurs, the remote control is designed to match the remote system of set -top-box/satellite receiver operating guide. 3. NOTE:...
...buttons These buttons transmit the chosen pre-coded settop-box/satellite codes. ባ EXCLUSIVE TV buttons These buttons are removed from the from the remote control. The Remote Control The Remote Control for Set-Top-Box/Satellite Receiver Functions Operating the precoded function for your set -top-... the codes you have programmed until the batteries are for operating the TV. 32 The remote control will turn off your set -top- When this ቢ occurs, the remote control is designed to match the remote system of set -top-box/satellite receiver operating guide. 3. NOTE:...


