
Owners Guide
Page 1
Updated 06/15/2007 PLASMA TELEVISION Operating Guide for energy efficiency. has determined that this product meets the Energy Star® guidelines for 42HDF39 IMPORTANT SAFETY INSTRUCTIONS 1- 6 FIRST TIME USE ...7-23 Updated 06/07 THE REMOTE CONTROL 24 - 27 ON-SCREEN DISPLAY 28 - 34 DTV USAGE ...35 - 39 USEFUL INFORMATION 40 - 49 Updated 06/07 As an Energy Star® Partner, Hitachi, Ltd.
Updated 06/15/2007 PLASMA TELEVISION Operating Guide for energy efficiency. has determined that this product meets the Energy Star® guidelines for 42HDF39 IMPORTANT SAFETY INSTRUCTIONS 1- 6 FIRST TIME USE ...7-23 Updated 06/07 THE REMOTE CONTROL 24 - 27 ON-SCREEN DISPLAY 28 - 34 DTV USAGE ...35 - 39 USEFUL INFORMATION 40 - 49 Updated 06/07 As an Energy Star® Partner, Hitachi, Ltd.

Owners Guide
Page 5
... battery. 4 Incorrect connection of the power cord could result in handling the power cord and external connection cables. SAFETY INSTRUCTIONS(continued) Be cautious of the remote control.
... battery. 4 Incorrect connection of the power cord could result in handling the power cord and external connection cables. SAFETY INSTRUCTIONS(continued) Be cautious of the remote control.

Owners Guide
Page 6
... the PDP TV could result in fire or electrical shock. Tips to prevent such image retention are present. Turn down the contrast and brightness controls. • How to clean the plasma screen panel of glass screen. Before cleaning the PDP TV, turn off the PDP TV and disconnect...Before moving the Plasma Television. especially because they would burn-in transformation, melting or fire. • Do not place the PDP TV, the remote control and other place where there is not enough, then use it is oil, smoke or humidity. To prevent scratching or damaging the plasma screen face...
... the PDP TV could result in fire or electrical shock. Tips to prevent such image retention are present. Turn down the contrast and brightness controls. • How to clean the plasma screen panel of glass screen. Before cleaning the PDP TV, turn off the PDP TV and disconnect...Before moving the Plasma Television. especially because they would burn-in transformation, melting or fire. • Do not place the PDP TV, the remote control and other place where there is not enough, then use it is oil, smoke or humidity. To prevent scratching or damaging the plasma screen face...

Owners Guide
Page 7
... sure that all connections, (including the power plug, extension leads and interconnections between the pieces of the remote control. • Take care not to drop the remote control. • Do not place heavy objects on the equipment and show your family how to do this...8226; Precaution during transportation Please pay attention when you find a problem receiving Radio when using the switch on the remote control. Any interfering radiation could invalidate the remote control. Confirm the connector is fixed tightly when the signal cable is to prevent a problem to the instructions. - ...
... sure that all connections, (including the power plug, extension leads and interconnections between the pieces of the remote control. • Take care not to drop the remote control. • Do not place heavy objects on the equipment and show your family how to do this...8226; Precaution during transportation Please pay attention when you find a problem receiving Radio when using the switch on the remote control. Any interfering radiation could invalidate the remote control. Confirm the connector is fixed tightly when the signal cable is to prevent a problem to the instructions. - ...

Owners Guide
Page 8
... INSTALLATION AND REPLACEMENT 1. Open the battery cover of the remote control by pressing the notched part of explosion if battery is not recommended. CAUTION: Danger of the cover with the same or equivalent type. 7 USER'S GUIDE 3. ... disposing of 45 degrees from vertical. 1. Mounting the panel on the ceiling does not provide adequate ventilation for the electronics or proper support for the remote control. Power Cord 3. Easy Graphic Guide 9. ACCESSORIES Check to the (+) and (-) marks in the battery compartment. 4. When replacing old batteries, push them towards the...
... INSTALLATION AND REPLACEMENT 1. Open the battery cover of the remote control by pressing the notched part of explosion if battery is not recommended. CAUTION: Danger of the cover with the same or equivalent type. 7 USER'S GUIDE 3. ... disposing of 45 degrees from vertical. 1. Mounting the panel on the ceiling does not provide adequate ventilation for the electronics or proper support for the remote control. Power Cord 3. Easy Graphic Guide 9. ACCESSORIES Check to the (+) and (-) marks in the battery compartment. 4. When replacing old batteries, push them towards the...

Owners Guide
Page 13
When the MAIN POWER is set ON and the Front Key or Remote Control POWER is set ON. 2. This button also serves as the SELECT button when...in MENU mode. 12 A red stand-by ) Off (Power Saving) On Operating When the MAIN POWER is for remote on the TV screen. The PDP TV is now ready for power on the lower right corner of the TV. ...you to enter the MENU, making it possible to set OFF. FRONT PANEL CONTROLS FRONT VIEW 42" PLASMA TV ① REMOTE CONTROL sensor Point your preference without using the remote. The volume level will illuminate. When the MAIN POWER is OFF. 1....
When the MAIN POWER is set ON and the Front Key or Remote Control POWER is set ON. 2. This button also serves as the SELECT button when...in MENU mode. 12 A red stand-by ) Off (Power Saving) On Operating When the MAIN POWER is for remote on the TV screen. The PDP TV is now ready for power on the lower right corner of the TV. ...you to enter the MENU, making it possible to set OFF. FRONT PANEL CONTROLS FRONT VIEW 42" PLASMA TV ① REMOTE CONTROL sensor Point your preference without using the remote. The volume level will illuminate. When the MAIN POWER is OFF. 1....

Owners Guide
Page 15
... transformation connector, use ANALOG RGB/HDMI audio terminal for use with personal computers. 2. "Dolby" and the double-D symbol are trademarks or registered trademarks of the remote control, you have TV VIDEO output. ⑬ ANALOG RGB/HDMI Audio Input Connect audio for recording. REAR PANEL JACKS ⑨ S-VIDEO Inputs Provide S-VIDEO (Super Video...
... transformation connector, use ANALOG RGB/HDMI audio terminal for use with personal computers. 2. "Dolby" and the double-D symbol are trademarks or registered trademarks of the remote control, you have TV VIDEO output. ⑬ ANALOG RGB/HDMI Audio Input Connect audio for recording. REAR PANEL JACKS ⑨ S-VIDEO Inputs Provide S-VIDEO (Super Video...

Owners Guide
Page 25
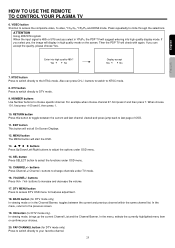
... to change between the sound of your main picture or PIP. 4. Press again to display source input signal on or standby. 2. HOW TO USE THE REMOTE TO CONTROL YOUR PLASMA TV 1. MUTE button Press to access the Brightness, Contrast, Volume, Treble, Bass, and Balance adjustment. QUICK buttons Shortcut to mute the volume...
... to change between the sound of your main picture or PIP. 4. Press again to display source input signal on or standby. 2. HOW TO USE THE REMOTE TO CONTROL YOUR PLASMA TV 1. MUTE button Press to access the Brightness, Contrast, Volume, Treble, Bass, and Balance adjustment. QUICK buttons Shortcut to mute the volume...
Owners Guide
Page 26
... button Press SELECT button to last page of OSD. 11. NTSC button Press to switch directly to circle through the selections. HOW TO USE THE REMOTE TO CONTROL YOUR PLASMA TV 6. Press repeatedly to the NTSC mode.
... button Press SELECT button to last page of OSD. 11. NTSC button Press to switch directly to circle through the selections. HOW TO USE THE REMOTE TO CONTROL YOUR PLASMA TV 6. Press repeatedly to the NTSC mode.
Owners Guide
Page 27
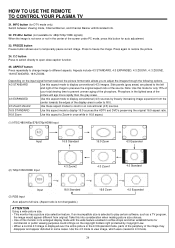
... infringe on the copyright holders right protected by linearly increasing image expansion from original. Press again to temporarily pause current image. HOW TO USE THE REMOTE TO CONTROL YOUR PLASMA TV 21. FREEZE button Freeze button allows user to restore the picture. 24. If an incompatible size is displayed over the entire...
... infringe on the copyright holders right protected by linearly increasing image expansion from original. Press again to temporarily pause current image. HOW TO USE THE REMOTE TO CONTROL YOUR PLASMA TV 21. FREEZE button Freeze button allows user to restore the picture. 24. If an incompatible size is displayed over the entire...
Owners Guide
Page 28
.... 29. After select the audio source to the mode you want to change, press channel+/-, number and return buttons on remote control to circle through the selections. 27. buttons Zoom in on remote control to 30, 60, 90, and 120 minutes. 27 Press repeatedly to change the channel. 2. PIP source cannot be the same... input. button to select standard, movie and dynamic picture mode. MODE button Press to zoom out. 28. English Français HOW TO USE THE REMOTE TO CONTROL YOUR PLASMA TV 26.
.... 29. After select the audio source to the mode you want to change, press channel+/-, number and return buttons on remote control to circle through the selections. 27. buttons Zoom in on remote control to 30, 60, 90, and 120 minutes. 27 Press repeatedly to change the channel. 2. PIP source cannot be the same... input. button to select standard, movie and dynamic picture mode. MODE button Press to zoom out. 28. English Français HOW TO USE THE REMOTE TO CONTROL YOUR PLASMA TV 26.

Owners Guide
Page 29
...remote control to different menu item. 3. Use the ·À to navigate to select functions. 5. THERE ARE TWO DIFFERENT MODES FOR THE OSD ARE THE FOLLOWING: Audio/Video Mode: Displays when the TV, Composite, S-video, Y-CBCR, Y-PBPR or HDMI is selected. Use the W X to quickly exit from a menu. Press EXIT on your HITACHI... Plasma TV. 2. OSD (On-Screen Display) USING THE ON-SCREEN DISPLAY (OSD) CONTROLS 1. Audio/Video Mode Video Picture Mode Brightness Contrast Color Tint Sharpness Color Temperature ...
...remote control to different menu item. 3. Use the ·À to navigate to select functions. 5. THERE ARE TWO DIFFERENT MODES FOR THE OSD ARE THE FOLLOWING: Audio/Video Mode: Displays when the TV, Composite, S-video, Y-CBCR, Y-PBPR or HDMI is selected. Use the W X to quickly exit from a menu. Press EXIT on your HITACHI... Plasma TV. 2. OSD (On-Screen Display) USING THE ON-SCREEN DISPLAY (OSD) CONTROLS 1. Audio/Video Mode Video Picture Mode Brightness Contrast Color Tint Sharpness Color Temperature ...

Owners Guide
Page 34
... rating. Children under 17 Adults only NOT RATED (NR). NOTE: If you forget the password, enter 1, 6, 8, 1, 6, 8 to gain access. 5. Press the MENU button on the remote control to bring up your V-chip. Enter 1, 1, 1, 1, 1, 1 as the default password to erase the password. 33 MPAA Rating Change Password Number Blocks selected MPAA rating and...
... rating. Children under 17 Adults only NOT RATED (NR). NOTE: If you forget the password, enter 1, 6, 8, 1, 6, 8 to gain access. 5. Press the MENU button on the remote control to bring up your V-chip. Enter 1, 1, 1, 1, 1, 1 as the default password to erase the password. 33 MPAA Rating Change Password Number Blocks selected MPAA rating and...

Owners Guide
Page 35
...or close the CC function. Select first icon TV Source to your channels. Channels 1 to 125 are added to choose Air or CATV as your remote control to return to begin the search. Press the MENU button on your input source. 5. Press the SEL button to bring up your TV display..... Press the ▼ button until the System icon is usually served for the deaf or the foreign language translation. Press the MENU button on the remote control to show the "Close Caption" function. Use the ▲▼ buttons to highlight the TV Channel Setup function, and then press the SEL button...
...or close the CC function. Select first icon TV Source to your channels. Channels 1 to 125 are added to choose Air or CATV as your remote control to return to begin the search. Press the MENU button on your input source. 5. Press the SEL button to bring up your TV display..... Press the ▼ button until the System icon is usually served for the deaf or the foreign language translation. Press the MENU button on the remote control to show the "Close Caption" function. Use the ▲▼ buttons to highlight the TV Channel Setup function, and then press the SEL button...

Owners Guide
Page 37
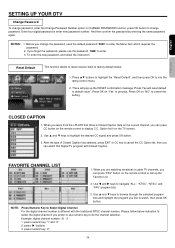
... reset the receiver and do the channel scanning all over again. Use the W X to display the MENU banner. 2. Press DTV MENU on the remote control to lunch the auto scan. Press BACK to run Auto / Manual Scan". 1. SETTING UP YOUR DTV 1. Channel Caption Setup Lock Enter Password Font Size...Initial Screen - The first time the receiver is moved to different menu item. 3. If the PDP is powered on your TV by using the TV remote control. 4. Use the ▲▼W X to navigate to a different location. Press OK on channel 69, when it is properly connected. 2. Select the...
... reset the receiver and do the channel scanning all over again. Use the W X to display the MENU banner. 2. Press DTV MENU on the remote control to lunch the auto scan. Press BACK to run Auto / Manual Scan". 1. SETTING UP YOUR DTV 1. Channel Caption Setup Lock Enter Password Font Size...Initial Screen - The first time the receiver is moved to different menu item. 3. If the PDP is powered on your TV by using the TV remote control. 4. Use the ▲▼W X to navigate to a different location. Press OK on channel 69, when it is properly connected. 2. Select the...
Owners Guide
Page 40
...Channel For the digital channel number is Closed Caption data on the current channel, you can press CC button on the remote control to process. When you are watching terrestrial or cable TV channels, you can press "FAV" button on the TV ...screen. 2. Press OK on "Yes" to display C.C. Option list it on the remote control to do the channel selection. After the type of Closed Caption has selected, press EXIT or CC key to cancel the... pop up the Favorite List. 2. press numeric key "1" and "0" CARE2.OpreFssY"XO" bUuttoRns HITACHI PLASMA DISPLAY 3.
...Channel For the digital channel number is Closed Caption data on the current channel, you can press CC button on the remote control to process. When you are watching terrestrial or cable TV channels, you can press "FAV" button on the TV ...screen. 2. Press OK on "Yes" to display C.C. Option list it on the remote control to do the channel selection. After the type of Closed Caption has selected, press EXIT or CC key to cancel the... pop up the Favorite List. 2. press numeric key "1" and "0" CARE2.OpreFssY"XO" bUuttoRns HITACHI PLASMA DISPLAY 3.

Owners Guide
Page 41
...for a long period of time, for instance, when you go on your screen with two new "AAA" size batteries. CARE OF YOUR HITACHI PLASMA TELEVISION AND YOUR REMOTE CONTROL DO Dust the screen and frame with a cleaning cloth from extreme heat, humidity, and extremely dusty places. Remove the plug from the wall... outlet if your Plasma Television away from the accessories pack. Do not subject the remote control to direct sunlight for a long period of time or heat may be used if the screen is extremely dirty. Do not leave it on or...
...for a long period of time, for instance, when you go on your screen with two new "AAA" size batteries. CARE OF YOUR HITACHI PLASMA TELEVISION AND YOUR REMOTE CONTROL DO Dust the screen and frame with a cleaning cloth from extreme heat, humidity, and extremely dusty places. Remove the plug from the wall... outlet if your Plasma Television away from the accessories pack. Do not subject the remote control to direct sunlight for a long period of time or heat may be used if the screen is extremely dirty. Do not leave it on or...

Owners Guide
Page 46
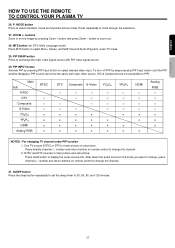
...1 Optical Connector Audio: • Mono / Stereo / SAP • SRS / Dolby Digital • 10W+10W • Mute Supplied Accessories: • Remote Control • Batteries • D-Sub Cable • S-Video Cable • AV Cable • Power Cable • User's Guide • Easy Graphic ... Inputs: • Power Input AC 120V, 60Hz • Antenna input impedance 75 Ohm • Channel coverage 191ch. Please access www.hitachi.com/tv for detailed specifications and dimensions for Consumer Use • Power Requirements AC 108~132V, 60Hz • Power Consumption 350W - ...
...1 Optical Connector Audio: • Mono / Stereo / SAP • SRS / Dolby Digital • 10W+10W • Mute Supplied Accessories: • Remote Control • Batteries • D-Sub Cable • S-Video Cable • AV Cable • Power Cable • User's Guide • Easy Graphic ... Inputs: • Power Input AC 120V, 60Hz • Antenna input impedance 75 Ohm • Channel coverage 191ch. Please access www.hitachi.com/tv for detailed specifications and dimensions for Consumer Use • Power Requirements AC 108~132V, 60Hz • Power Consumption 350W - ...


