User Guide
Page 5
... cables ...6 Connecting USB devices ...9 Adjusting the monitor ...10 Turning on the monitor ...12 Mounting the monitor ...13 Removing the monitor stand 13 Attaching the monitor to a mounting device 14 HP watermark and image retention policy 14 2 Using the monitor ...15 Software and utilities ...15 The Information file ...15 The Image Color Matching file ...15 Using the on-screen display (OSD) menu ...15 Using Picture-in-Picture (PIP) and Picture-beside-Picture (PBP 16 Adjusting Low Blue Light Mode ...16 Using Auto-Sleep Mode ...17 3 Support and troubleshooting ...18 Solving common problems...
... cables ...6 Connecting USB devices ...9 Adjusting the monitor ...10 Turning on the monitor ...12 Mounting the monitor ...13 Removing the monitor stand 13 Attaching the monitor to a mounting device 14 HP watermark and image retention policy 14 2 Using the monitor ...15 Software and utilities ...15 The Information file ...15 The Image Color Matching file ...15 Using the on-screen display (OSD) menu ...15 Using Picture-in-Picture (PIP) and Picture-beside-Picture (PBP 16 Adjusting Low Blue Light Mode ...16 Using Auto-Sleep Mode ...17 3 Support and troubleshooting ...18 Solving common problems...
User Guide
Page 7
... surrounding light and bright surfaces that they cannot be specifically labeled as having this monitor. 1 Getting Started Important safety information A power cord is included with a 3-pin attachment plug on the power cord, plug the cord into an AC outlet that is easily accessible at http://www.hp.com/ergo. WARNING! Important safety information 1 It describes proper workstation setup and proper posture, and health and work...
... surrounding light and bright surfaces that they cannot be specifically labeled as having this monitor. 1 Getting Started Important safety information A power cord is included with a 3-pin attachment plug on the power cord, plug the cord into an AC outlet that is easily accessible at http://www.hp.com/ergo. WARNING! Important safety information 1 It describes proper workstation setup and proper posture, and health and work...
User Guide
Page 8
... UHD resolution, plus full-screen support for lower resolutions ● Wide color gamut to provide coverage of sRGB color spaces ● Nonglare panel with an LED backlight ● Wide viewing angle to allow viewing from a sitting or standing position, or moving from side to side ● Tilt and pivot capabilities ● Swivel and height adjustment capabilities ● Removable stand for flexible monitor head mounting solutions ● HP Quick Release 2 device to quickly attach the monitor head...
... UHD resolution, plus full-screen support for lower resolutions ● Wide color gamut to provide coverage of sRGB color spaces ● Nonglare panel with an LED backlight ● Wide viewing angle to allow viewing from a sitting or standing position, or moving from side to side ● Tilt and pivot capabilities ● Swivel and height adjustment capabilities ● Removable stand for flexible monitor head mounting solutions ● HP Quick Release 2 device to quickly attach the monitor head...
User Guide
Page 9
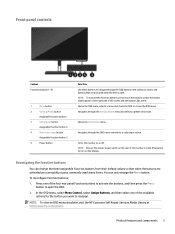
... Modes menu and selects a preset view mode. Front panel controls Control Function buttons (1-4) 1 Menu button 2 Viewing Modes button Assignable Function button 1 3 Information button Assignable Function button 2 4 Next Active Input button Assignable Function button 3 5 Power button Function Use these buttons to navigate through the OSD based on the indicators next to turn on the display. Opens the OSD menu, selects a menu item from their default values so that when the buttons are activated you want to open . Navigates through the OSD menu and selects a video input source...
... Modes menu and selects a preset view mode. Front panel controls Control Function buttons (1-4) 1 Menu button 2 Viewing Modes button Assignable Function button 1 3 Information button Assignable Function button 2 4 Next Active Input button Assignable Function button 3 5 Power button Function Use these buttons to navigate through the OSD based on the indicators next to turn on the display. Opens the OSD menu, selects a menu item from their default values so that when the buttons are activated you want to open . Navigates through the OSD menu and selects a video input source...

User Guide
Page 10
...the switch in the Off position will yield the lowest power state for the monitor when not in use. 2 Power connector Connects a power cord. 3 VESA release button Releases the stand from the monitor. 4 HDMI port Connects an HDMI cable to the source device. 5 Mini DisplayPort port Connects a Mini DisplayPort cable to the source device. 6 DisplayPort port Connects a DisplayPort cable to the source device. 7 Audio-out jack Connects optional powered stereo speakers or a television audio cable. 8 USB Type-C port (upstream)* Connects a USB Type-C cable to a source device. 9 USB...
...the switch in the Off position will yield the lowest power state for the monitor when not in use. 2 Power connector Connects a power cord. 3 VESA release button Releases the stand from the monitor. 4 HDMI port Connects an HDMI cable to the source device. 5 Mini DisplayPort port Connects a Mini DisplayPort cable to the source device. 6 DisplayPort port Connects a DisplayPort cable to the source device. 7 Audio-out jack Connects optional powered stereo speakers or a television audio cable. 8 USB Type-C port (upstream)* Connects a USB Type-C cable to a source device. 9 USB...

User Guide
Page 11
Setting up the monitor Use caution when setting up the monitor 5 If installing a stand, position the monitor facedown on the panel may cause nonuniformity of color or disorientation of the monitor. 3. doing so can cause damage. Lower the bottom of the LCD panel. Lift the monitor from getting scratched, defaced, or broken and prevents damage to the control buttons. Slide the top of the stand's mounting plate (1) under the upper...
Setting up the monitor Use caution when setting up the monitor 5 If installing a stand, position the monitor facedown on the panel may cause nonuniformity of color or disorientation of the monitor. 3. doing so can cause damage. Lower the bottom of the LCD panel. Lift the monitor from getting scratched, defaced, or broken and prevents damage to the control buttons. Slide the top of the stand's mounting plate (1) under the upper...

User Guide
Page 12
... the Menu button and selecting Input Control. ● Connect one end of a DisplayPort cable to the DisplayPort port on the rear of the monitor and the other end to the DisplayPort port on the source device. 6 Chapter 1 Getting Started Place the monitor in this section are included with select cables. Not all cables shown in a convenient, well-ventilated location near the computer. 2. Connect a video cable. NOTE: The monitor...
... the Menu button and selecting Input Control. ● Connect one end of a DisplayPort cable to the DisplayPort port on the rear of the monitor and the other end to the DisplayPort port on the source device. 6 Chapter 1 Getting Started Place the monitor in this section are included with select cables. Not all cables shown in a convenient, well-ventilated location near the computer. 2. Connect a video cable. NOTE: The monitor...

User Guide
Page 13
... the OSD button on the monitor, select Menu > Input Control, and then the desired DisplayPort setting. ● Connect one end of a Mini DisplayPort cable to the Mini DisplayPort port on the rear of the monitor and the other end to the DisplayPort port on the source device. NOTE: Depending on your last video input connection was to DisplayPort, the monitor automatically scans and switches to USB-C video, DisplayPort, or HDMI video input source, but...
... the OSD button on the monitor, select Menu > Input Control, and then the desired DisplayPort setting. ● Connect one end of a Mini DisplayPort cable to the Mini DisplayPort port on the rear of the monitor and the other end to the DisplayPort port on the source device. NOTE: Depending on your last video input connection was to DisplayPort, the monitor automatically scans and switches to USB-C video, DisplayPort, or HDMI video input source, but...

User Guide
Page 15
... plug. Setting up the monitor 9 WARNING! Connecting USB devices USB ports are four downstream USB ports on the monitor: two USB-A downstream on the side. Connect one USB-A downstream on the rear and one USB-C/one end of electric shock or damage to the monitor. Plug the power cord into a grounded (earthed) AC outlet that no one may accidentally step on a cord or cable. There are used to enable the USB downstream ports...
... plug. Setting up the monitor 9 WARNING! Connecting USB devices USB ports are four downstream USB ports on the monitor: two USB-A downstream on the side. Connect one USB-A downstream on the rear and one USB-C/one end of electric shock or damage to the monitor. Plug the power cord into a grounded (earthed) AC outlet that no one may accidentally step on a cord or cable. There are used to enable the USB downstream ports...

User Guide
Page 18
... covered under the HP warranty. A burned-in image damage may occur on monitors that display the same static image on the monitor's rear panel, and then select Power Control > Power LED > Off. Image retention is a condition that input for 10 seconds. To disable this feature, press and hold the monitor power button for the display. 12 Chapter 1 Getting Started Press the Menu button on screen for a prolonged period of the monitor to turn off the monitor...
... covered under the HP warranty. A burned-in image damage may occur on monitors that display the same static image on the monitor's rear panel, and then select Power Control > Power LED > Off. Image retention is a condition that input for 10 seconds. To disable this feature, press and hold the monitor power button for the display. 12 Chapter 1 Getting Started Press the Menu button on screen for a prolonged period of the monitor to turn off the monitor...
User Guide
Page 19
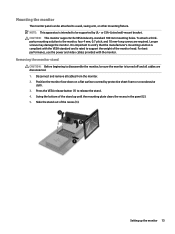
... a thirdparty mounting solution to support the weight of the monitor head. Position the monitor face down on a flat surface covered by UL- Swing the bottom of the recess (3). NOTE: This apparatus is turned off and all cables from the monitor. 2. Longer screws may damage the monitor. Setting up until the mounting plate clears the recess in the panel (2). 5. Removing the monitor stand CAUTION: Before beginning to disassemble the monitor, be...
... a thirdparty mounting solution to support the weight of the monitor head. Position the monitor face down on a flat surface covered by UL- Swing the bottom of the recess (3). NOTE: This apparatus is turned off and all cables from the monitor. 2. Longer screws may damage the monitor. Setting up until the mounting plate clears the recess in the panel (2). 5. Removing the monitor stand CAUTION: Before beginning to disassemble the monitor, be...
User Guide
Page 20
... not covered under the HP warranty. This panel technology, however, is not in image retention damage are designed with IPS (In-Plane Switching) display technology which provides ultrawide viewing angles and advanced image quality. Remove the four screws from the VESA holes on the screen for long periods of the monitor head to attach the mounting device to a mounting device 1. Static images may include camera surveillance, video...
... not covered under the HP warranty. This panel technology, however, is not in image retention damage are designed with IPS (In-Plane Switching) display technology which provides ultrawide viewing angles and advanced image quality. Remove the four screws from the VESA holes on the screen for long periods of the monitor head to attach the mounting device to a mounting device 1. Static images may include camera surveillance, video...

User Guide
Page 21
... the monitor connects directly to monitor screen. Using the on-screen display (OSD) menu Use the OSD menu to turn on the monitor. 2. The following : 1. The factory default is active. Plug and Play does not work correctly without installing the INF file. If the monitor is not already on, press the power button on the monitor's rear panel to adjust the monitor screen image based on the monitor's rear panel to open the OSD. 3. Adjusts the contrast level of the screen. Software and utilities 15 The Image Color Matching...
... the monitor connects directly to monitor screen. Using the on-screen display (OSD) menu Use the OSD menu to turn on the monitor. 2. The following : 1. The factory default is active. Plug and Play does not work correctly without installing the INF file. If the monitor is not already on, press the power button on the monitor's rear panel to adjust the monitor screen image based on the monitor's rear panel to open the OSD. 3. Adjusts the contrast level of the screen. Software and utilities 15 The Image Color Matching...

User Guide
Page 22
... Color Control Input Control Image Control PIP Control Power Control Menu Control Management Information Exit Description Selects and adjusts the screen color. Adjusts the power settings. Connect a secondary input source to the factory default settings. The monitor will scan the secondary inputs for a valid signal input and use PIP or PBP: 1. Adjusting Low Blue Light Mode Decreasing the blue light emitted by the monitor reduces the blue light exposure to another either horizontally (for landscape orientation) or vertically (for the PIP/PBP picture. Press one source is positioned...
... Color Control Input Control Image Control PIP Control Power Control Menu Control Management Information Exit Description Selects and adjusts the screen color. Adjusts the power settings. Connect a secondary input source to the factory default settings. The monitor will scan the secondary inputs for a valid signal input and use PIP or PBP: 1. Adjusting Low Blue Light Mode Decreasing the blue light emitted by the monitor reduces the blue light exposure to another either horizontally (for landscape orientation) or vertically (for the PIP/PBP picture. Press one source is positioned...
User Guide
Page 23
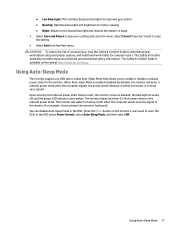
... the computer signals low power mode (absence of either horizontal or vertical sync signal). Press the Menu button on the web at http://www.hp.com/ergo. To reduce the risk of power when in the OSD. You can disable Auto-Sleep Mode in this reduced power state (sleep mode), the monitor screen is blanked, the backlight is enabled (enabled by default), the monitor will wake from the Main menu. In the OSD select Power Control, select Auto-Sleep Mode, and...
... the computer signals low power mode (absence of either horizontal or vertical sync signal). Press the Menu button on the web at http://www.hp.com/ergo. To reduce the risk of power when in the OSD. You can disable Auto-Sleep Mode in this reduced power state (sleep mode), the monitor screen is blanked, the backlight is enabled (enabled by default), the monitor will wake from the Main menu. In the OSD select Power Control, select Auto-Sleep Mode, and...
User Guide
Page 24
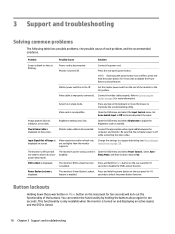
... is flashing. Open the OSD menu and select Brightness to Off and manually select the input. Connect the appropriate video signal cable between the computer and monitor. Input Signal Out of each problem, and the recommended solutions. disabled. Button lockouts Holding down again for 10 feature is off . Master power switch is enabled. Set the master power switch on the rear of the buttons. Video cable is displayed. Set Auto-Switch Input to adjust the brightness scale as needed. Change the settings to a supported setting (see Preset display resolutions on...
... is flashing. Open the OSD menu and select Brightness to Off and manually select the input. Connect the appropriate video signal cable between the computer and monitor. Input Signal Out of each problem, and the recommended solutions. disabled. Button lockouts Holding down again for 10 feature is off . Master power switch is enabled. Set the master power switch on the rear of the buttons. Video cable is displayed. Set Auto-Switch Input to adjust the brightness scale as needed. Change the settings to a supported setting (see Preset display resolutions on...

User Guide
Page 25
... solve a problem using Locating the serial number and product number The serial number and product number are using the troubleshooting tips in this section, you call technical support. Preparing to get more information about the monitor model. You may need these numbers when contacting HP about your product, including links to contact HP and open a support case. Contacting support To resolve a hardware or software problem, go to call : ● Monitor model number ● Monitor serial number ● Purchase...
... solve a problem using Locating the serial number and product number The serial number and product number are using the troubleshooting tips in this section, you call technical support. Preparing to get more information about the monitor model. You may need these numbers when contacting HP about your product, including links to contact HP and open a support case. Contacting support To resolve a hardware or software problem, go to call : ● Monitor model number ● Monitor serial number ● Purchase...

User Guide
Page 26
... difficult cleaning situations, use a 50/50 mix of the cord. Shipping the monitor Keep the original packing box in a storage area. If the monitor is not covered under the HP warranty. ● Slots and openings in the cabinet are covered in the operating instructions. These chemicals may run behind the bezel and damage the electronics. These openings must position the monitor facedown on the power...
... difficult cleaning situations, use a 50/50 mix of the cord. Shipping the monitor Keep the original packing box in a storage area. If the monitor is not covered under the HP warranty. ● Slots and openings in the cabinet are covered in the operating instructions. These chemicals may run behind the bezel and damage the electronics. These openings must position the monitor facedown on the power...

User Guide
Page 28
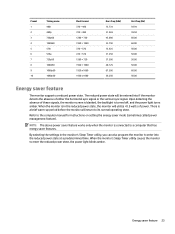
Typical settings Sleep Off Input terminal 70 W
Typical settings Sleep Off Input terminal 70 W
User Guide
Page 29
... power light turns amber. Upon detecting the absence of these signals, the monitor screen is blanked, the backlight is in the reduced power state, the monitor will be entered into if the monitor detects the absence of either the horizontal sync signal or the vertical sync signal. The reduced power state will utilize Preset 1 2 3 4 5 6 7 8 9 10 Timing name 480i 480p 720p60 1080i60 576i 576p 720p50 1080i50 1080p60 1080p50 Pixel...
... power light turns amber. Upon detecting the absence of these signals, the monitor screen is blanked, the backlight is in the reduced power state, the monitor will be entered into if the monitor detects the absence of either the horizontal sync signal or the vertical sync signal. The reduced power state will utilize Preset 1 2 3 4 5 6 7 8 9 10 Timing name 480i 480p 720p60 1080i60 576i 576p 720p50 1080i50 1080p60 1080p50 Pixel...


