User Guide
Page 5
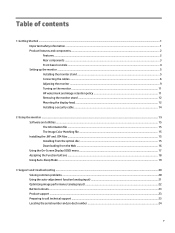
... Mounting the display head ...12 Installing a security cable ...14 2 Using the monitor ...15 Software and utilities ...15 The Information file ...15 The Image Color Matching file ...15 Installing the .INF and .ICM files ...15 Installing from the optical disc ...15 Downloading from the Web ...16 Using the On-Screen Display (OSD) menu ...17 Assigning the Function buttons ...18 Using Auto-Sleep Mode ...19 3 Support and troubleshooting ...20 Solving common problems ...20 Using the auto-adjustment function (analog input 21 Optimizing image performance (analog input...
... Mounting the display head ...12 Installing a security cable ...14 2 Using the monitor ...15 Software and utilities ...15 The Information file ...15 The Image Color Matching file ...15 Installing the .INF and .ICM files ...15 Installing from the optical disc ...15 Downloading from the Web ...16 Using the On-Screen Display (OSD) menu ...17 Assigning the Function buttons ...18 Using Auto-Sleep Mode ...19 3 Support and troubleshooting ...20 Solving common problems ...20 Using the auto-adjustment function (analog input 21 Optimizing image performance (analog input...

User Guide
Page 6
4 Maintaining the monitor ...25 Maintenance guidelines ...25 Cleaning the monitor ...25 Shipping the monitor ...25 Appendix A Technical specifications ...26 54.61 cm/21.5-inch model ...26 58 cm/23-inch model ...27 Preset display resolutions ...28 54.61 cm/21.5-inch and 58 cm/23-inch models 28 Entering user modes ...28 Energy saver feature ...29 Appendix B Accessibility ...30 Supported assistive technologies ...30 Contacting support ...30 vi
4 Maintaining the monitor ...25 Maintenance guidelines ...25 Cleaning the monitor ...25 Shipping the monitor ...25 Appendix A Technical specifications ...26 54.61 cm/21.5-inch model ...26 58 cm/23-inch model ...27 Preset display resolutions ...28 54.61 cm/21.5-inch and 58 cm/23-inch models 28 Entering user modes ...28 Energy saver feature ...29 Appendix B Accessibility ...30 Supported assistive technologies ...30 Contacting support ...30 vi

User Guide
Page 7
... equipment: • Plug the power cord into a grounded (earthed) 3-pin outlet. Look on the power label to properly support your HP LCD monitor. Important safety information 1 It describes proper workstation, setup, posture, and health and work habits for entertainment purposes. the power strips must be pulled, grabbed, or tripped over. Be sure that the total ampere rating of the products connected to the...
... equipment: • Plug the power cord into a grounded (earthed) 3-pin outlet. Look on the power label to properly support your HP LCD monitor. Important safety information 1 It describes proper workstation, setup, posture, and health and work habits for entertainment purposes. the power strips must be pulled, grabbed, or tripped over. Be sure that the total ampere rating of the products connected to the...
User Guide
Page 8
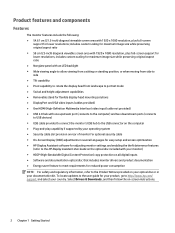
...; Nonglare panel with an LED backlight ● Wide viewing angle to allow viewing from a sitting or standing position, or when moving from side to side ● Tilt capability ● Pivot capability to rotate the display head from landscape to portrait mode ● Swivel and height adjustment capabilities ● Removable stand for flexible display head mounting solutions ● DisplayPort and VGA video inputs (cables provided) ● One HDMI (High-Definition Multimedia Interface) video input (cable not...
...; Nonglare panel with an LED backlight ● Wide viewing angle to allow viewing from a sitting or standing position, or when moving from side to side ● Tilt capability ● Pivot capability to rotate the display head from landscape to portrait mode ● Swivel and height adjustment capabilities ● Removable stand for flexible display head mounting solutions ● DisplayPort and VGA video inputs (cables provided) ● One HDMI (High-Definition Multimedia Interface) video input (cable not...

User Guide
Page 9
...Putting the switch in the Off position will yield the lowest power state for the monitor when not in use. Connects the AC power cord to the monitor. Connects the DisplayPort cable to the monitor. Connects the HDMI cable to the monitor. Connects the USB hub cable from the source device to the monitor. Product features and components 3 Connects USB devices to the monitor. Rear components Component 1 Master power switch 2 Power connector 3 DisplayPort connector 4 HDMI connector 5 VGA connector 6 USB 2.0 upstream connector 7 USB connectors Function Turns off all...
...Putting the switch in the Off position will yield the lowest power state for the monitor when not in use. Connects the AC power cord to the monitor. Connects the DisplayPort cable to the monitor. Connects the HDMI cable to the monitor. Connects the USB hub cable from the source device to the monitor. Product features and components 3 Connects USB devices to the monitor. Rear components Component 1 Master power switch 2 Power connector 3 DisplayPort connector 4 HDMI connector 5 VGA connector 6 USB 2.0 upstream connector 7 USB connectors Function Turns off all...

User Guide
Page 16
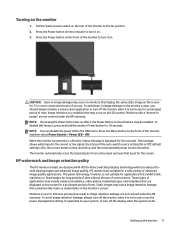
Adjust the monitor's height to a comfortable position for users with the base and potentially cause damage to full tilt position (1). You can pivot the display head from landscape to portrait orientation viewing to adapt to your working posture throughout the work day. 4. a. The position of the display head will come in portrait mode, you adjust your eye height. To rotate the OSD menu, access the OSD menu by pressing the Menu button on the screen in...
Adjust the monitor's height to a comfortable position for users with the base and potentially cause damage to full tilt position (1). You can pivot the display head from landscape to portrait orientation viewing to adapt to your working posture throughout the work day. 4. a. The position of the display head will come in portrait mode, you adjust your eye height. To rotate the OSD menu, access the OSD menu by pressing the Menu button on the screen in...
User Guide
Page 17
... the auto-switch source setting (On or Off; IPS monitors are not covered under the HP warranty. This panel technology, however, is not suitable for applications that exhibit static, stationary or fixed images for long periods of the monitor, and then select Power Control > Power LED > Off. HP watermark and image retention policy The IPS monitor models are not covered under the HP warranty. default setting is the current active signal, the status of screen...
... the auto-switch source setting (On or Off; IPS monitors are not covered under the HP warranty. This panel technology, however, is not suitable for applications that exhibit static, stationary or fixed images for long periods of the monitor, and then select Power Control > Power LED > Off. HP watermark and image retention policy The IPS monitor models are not covered under the HP warranty. default setting is the current active signal, the status of screen...
User Guide
Page 18
... a shielded power cable meets the TCO Certified criteria for display products. For best performance, it is intended to be supported by a clean, dry cloth. 3. CAUTION: This monitor supports the VESA industry standard 100 mm mounting holes. Lay the monitor face down on a flat surface covered by a UL or CSA Listed wall-mount bracket. Mounting the display head The display head can remove the display head from the stand to install the display head...
... a shielded power cable meets the TCO Certified criteria for display products. For best performance, it is intended to be supported by a clean, dry cloth. 3. CAUTION: This monitor supports the VESA industry standard 100 mm mounting holes. Lay the monitor face down on a flat surface covered by a UL or CSA Listed wall-mount bracket. Mounting the display head The display head can remove the display head from the stand to install the display head...
User Guide
Page 21
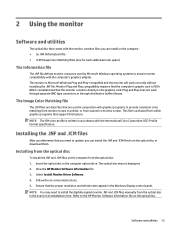
... -screen instructions. 5. Insert the optical disc in the Windows Display control panel. The optical disc menu is written in the event of an installation error. Software and utilities 15 This monitor is activated from the optical disc in accordance with the International Color Consortium (ICC) Profile Format specification. Refer to install the digitally signed monitor .INF and .ICM files manually from within graphics programs that the proper resolution...
... -screen instructions. 5. Insert the optical disc in the Windows Display control panel. The optical disc menu is written in the event of an installation error. Software and utilities 15 This monitor is activated from the optical disc in accordance with the International Color Consortium (ICC) Profile Format specification. Refer to install the digitally signed monitor .INF and .ICM files manually from within graphics programs that the proper resolution...

User Guide
Page 22
Select Drivers & Downloads, type your monitor from the list. 4. Click on -screen instructions to download the software. 16 Chapter 2 Using the monitor Click Download and follow the on the driver. 7. If necessary, select your monitor model in the Find my product search field, and click Go....Downloading from the Web If you do not have a computer or source device with an optical drive, you can download the latest version of drivers. 6. Click Driver - Go to open the list of .INF and .ICM files from the HP monitors support Web site. 1. Display/Monitor to http://www.hp.com/support...
Select Drivers & Downloads, type your monitor from the list. 4. Click on -screen instructions to download the software. 16 Chapter 2 Using the monitor Click Download and follow the on the driver. 7. If necessary, select your monitor model in the Find my product search field, and click Go....Downloading from the Web If you do not have a computer or source device with an optical drive, you can download the latest version of drivers. 6. Click Driver - Go to open the list of .INF and .ICM files from the HP monitors support Web site. 1. Display/Monitor to http://www.hp.com/support...

User Guide
Page 23
... Contrast Color Control Input Control Image Control Power Control Menu Control Management Language Information Exit Description Adjusts the brightness level of the four front bezel buttons to activate the buttons, and then press the Menu button to turn on your preferences. Selects and adjusts the screen color. Adjusts the power settings. Displays important information about the monitor. Enables/disables DDC/CI support and returns all OSD menu settings to navigate, select, and adjust the menu choices. Use the three Function buttons to the factory default settings. Selects the video...
... Contrast Color Control Input Control Image Control Power Control Menu Control Management Language Information Exit Description Adjusts the brightness level of the four front bezel buttons to activate the buttons, and then press the Menu button to turn on your preferences. Selects and adjusts the screen color. Adjusts the power settings. Displays important information about the monitor. Enables/disables DDC/CI support and returns all OSD menu settings to navigate, select, and adjust the menu choices. Use the three Function buttons to the factory default settings. Selects the video...

User Guide
Page 24
... assignable) 3 Next Active Input (Function button 2 assignable) 4 Brightness 18 Chapter 2 Using the monitor Function Opens the OSD (On-Screen Display) menu. Performs the Auto-Adjustment function. The following are the default button icons and functions for digital active inputs. Opens the Information menu. Opens the Brightness adjustment scale. The factory default button icons and functions are the default button icons and functions for a VGA (analog) active input. The following are shown below. Opens the Information menu. Switches the monitor's input source to the next active...
... assignable) 3 Next Active Input (Function button 2 assignable) 4 Brightness 18 Chapter 2 Using the monitor Function Opens the OSD (On-Screen Display) menu. Performs the Auto-Adjustment function. The following are the default button icons and functions for digital active inputs. Opens the Information menu. Opens the Brightness adjustment scale. The factory default button icons and functions are the default button icons and functions for a VGA (analog) active input. The following are shown below. Opens the Information menu. Switches the monitor's input source to the next active...

User Guide
Page 25
... monitor. Using Auto-Sleep Mode The monitor supports an OSD (On-Screen Display) menu option called Auto-Sleep Mode that when the buttons are activated you want to open the OSD. 2. The monitor will enter a reduced power state when the host PC signals low power mode (absence of the available options for the button you can quickly access commonly used menu items. To assign the Function buttons: 1. Upon entering this reduced power state. Press one of either horizontal or vertical sync signal...
... monitor. Using Auto-Sleep Mode The monitor supports an OSD (On-Screen Display) menu option called Auto-Sleep Mode that when the buttons are activated you want to open the OSD. 2. The monitor will enter a reduced power state when the host PC signals low power mode (absence of the available options for the button you can quickly access commonly used menu items. To assign the Function buttons: 1. Upon entering this reduced power state. Press one of either horizontal or vertical sync signal...

User Guide
Page 26
... is in sleep mode. Monitor video cable is displayed on screen. Input Signal Out of Range is disconnected. The monitor is disconnected. Power cord is off . Master power switch is displayed. Connect the video cable properly. Set Auto-Switch Input to On. Open the OSD menu and select Brightness to a supported setting. No video signal. OSD Lockout is turned off but it did not seem to enter into sleep mode. the Power Button Lockout function. 20 Chapter 3 Support and troubleshooting Connect the power cord. Press any key on the rear of each problem, and...
... is in sleep mode. Monitor video cable is displayed on screen. Input Signal Out of Range is disconnected. The monitor is disconnected. Power cord is off . Master power switch is displayed. Connect the video cable properly. Set Auto-Switch Input to On. Open the OSD menu and select Brightness to a supported setting. No video signal. OSD Lockout is turned off but it did not seem to enter into sleep mode. the Power Button Lockout function. 20 Chapter 3 Support and troubleshooting Connect the power cord. Press any key on the rear of each problem, and...
User Guide
Page 27
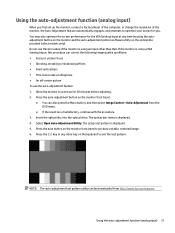
... auto-adjustment button on the optical disc provided (select models only). Select Open Auto-Adjustment Utility. Using the auto-adjustment function (analog input) 21 The setup test pattern is displayed. 4. You may also optimize the screen performance for the VGA (analog) input at any other than VGA. The optical disc menu is displayed. 5. Press the ESC key or any time by using an input other key on the monitor front bezel to produce a stable, centered image...
... auto-adjustment button on the optical disc provided (select models only). Select Open Auto-Adjustment Utility. Using the auto-adjustment function (analog input) 21 The setup test pattern is displayed. 4. You may also optimize the screen performance for the VGA (analog) input at any other than VGA. The optical disc menu is displayed. 5. Press the ESC key or any time by using an input other key on the monitor front bezel to produce a stable, centered image...

User Guide
Page 28
... Image Position. 22 Chapter 3 Support and troubleshooting To correct screen position (Horizontal Position or Vertical Position): 1. Press the Menu button on the monitor front bezel to open the OSD menu, and then select Image Control > Clock and Phase. 2. Use these controls only when the auto-adjustment function does not provide a satisfactory image. ● Clock-Increases/decreases the value to minimize any vertical bars or stripes visible on -screen display. To restore the factory settings, select Yes from the Factory Reset menu...
... Image Position. 22 Chapter 3 Support and troubleshooting To correct screen position (Horizontal Position or Vertical Position): 1. Press the Menu button on the monitor front bezel to open the OSD menu, and then select Image Control > Clock and Phase. 2. Use these controls only when the auto-adjustment function does not provide a satisfactory image. ● Clock-Increases/decreases the value to minimize any vertical bars or stripes visible on -screen display. To restore the factory settings, select Yes from the Factory Reset menu...
User Guide
Page 29
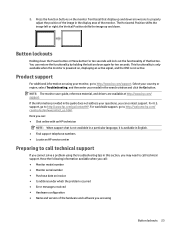
... monitor user guide, reference material, and drivers are using Button lockouts 23 the Vertical Position shifts the image up and down . support, go to http://www.hp.com/go to http://www.hp.com/support. For worldwide support, go /contactHP. Have the following information available when you can contact support. Press the Function buttons on , displaying an active signal, and the OSD is powered on the monitor front bezel that button. 2. The Horizontal Position...
... monitor user guide, reference material, and drivers are using Button lockouts 23 the Vertical Position shifts the image up and down . support, go to http://www.hp.com/go to http://www.hp.com/support. For worldwide support, go /contactHP. Have the following information available when you can contact support. Press the Function buttons on , displaying an active signal, and the OSD is powered on the monitor front bezel that button. 2. The Horizontal Position...
User Guide
Page 31
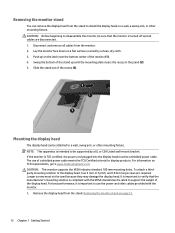
... screen surface. Shipping the monitor Keep the original packing box in the operating instructions. These openings must lay the monitor facedown on the label/back plate of the monitor by using a screen saver program and turning off the monitor and disconnect power from the computer by wiping the screen and the cabinet with a "burned-in image" are not covered under the HP warranty. ● Slots and openings...
... screen surface. Shipping the monitor Keep the original packing box in the operating instructions. These openings must lay the monitor facedown on the label/back plate of the monitor by using a screen saver program and turning off the monitor and disconnect power from the computer by wiping the screen and the cabinet with a "burned-in image" are not covered under the HP warranty. ● Slots and openings...

User Guide
Page 34
....000 59.954 60.000 Entering user modes The video controller signal may need to readjust the parameters of these preset modes and they will appear properly sized and centered on -screen display. Your changes can be entered and stored. 28 Appendix A Technical specifications Preset display resolutions The display resolutions listed below are the most commonly used modes and are not using a preset mode. It this occurs, you may occasionally...
....000 59.954 60.000 Entering user modes The video controller signal may need to readjust the parameters of these preset modes and they will appear properly sized and centered on -screen display. Your changes can be entered and stored. 28 Appendix A Technical specifications Preset display resolutions The display resolutions listed below are the most commonly used modes and are not using a preset mode. It this occurs, you may occasionally...
User Guide
Page 35
... mode. When the monitor is connected to the computer manual for instructions on setting energy saver features (sometimes called power management features). Energy saver feature The monitors support a reduced power state. Refer to a computer that has energy saver features. Energy saver feature 29 There is turned amber. The reduced power state will utilize 0.5 watts of either the horizontal sync signal or the vertical sync signal. By selecting the settings...
... mode. When the monitor is connected to the computer manual for instructions on setting energy saver features (sometimes called power management features). Energy saver feature The monitors support a reduced power state. Refer to a computer that has energy saver features. Energy saver feature 29 There is turned amber. The reduced power state will utilize 0.5 watts of either the horizontal sync signal or the vertical sync signal. By selecting the settings...


