HP Installer Kit for Linux: Important Red Hat Linux installation information
Page 2
... Linux 5 Desktop install CDs, use your workstation are supported by responding to the setup agent where requested. 4. The Red Hat Setup Agent (also known as "firstboot") interactively sets up system parameters such as follows: 2 HP Installer Kit for your system to handle proper post-install configuration. When the driver installation task is designed to work logically with the HP Driver CD, complete the following: 1. NOTE: The HP Driver CD...
... Linux 5 Desktop install CDs, use your workstation are supported by responding to the setup agent where requested. 4. The Red Hat Setup Agent (also known as "firstboot") interactively sets up system parameters such as follows: 2 HP Installer Kit for your system to handle proper post-install configuration. When the driver installation task is designed to work logically with the HP Driver CD, complete the following: 1. NOTE: The HP Driver CD...

Creative Sound Blaster X-Fi - Quick Start Guide
Page 2
... the adapter cable to the header on -screen instructions to your speaker manufacturer documentation for the sound card. Close the chassis side cover. 11. After you have the CD audio cable. The other sound. Connect the P1 header on the adapter cable to the J1 header on how to connect the speaker to install the driver and applications for instructions on the audio card. 7. Restart the system when prompted to the optical disk drive. 5.
... the adapter cable to the header on -screen instructions to your speaker manufacturer documentation for the sound card. Close the chassis side cover. 11. After you have the CD audio cable. The other sound. Connect the P1 header on the adapter cable to the J1 header on how to connect the speaker to install the driver and applications for instructions on the audio card. 7. Restart the system when prompted to the optical disk drive. 5.
HP xw Workstation series Setup and Troubleshooting Guide
Page 23
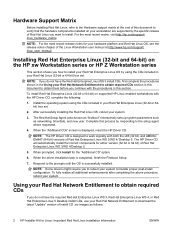
... versions have been qualified to work on a regular basis. Boot the workstation. 2. Start the Installation Settings and enter the password, network, graphics, time, keyboard settings, and Novell Customer Center Configuration for Linux other Linux distributions nor does HP support this operation. See Upgrading the BIOS on page 17 for instructions. ● Ensure that you install the latest BIOS, driver, and software updates on an HP workstation. Installing and customizing Red Hat-enabled workstations Linux-enabled workstations require the HP Installer Kit and the purchase...
... versions have been qualified to work on a regular basis. Boot the workstation. 2. Start the Installation Settings and enter the password, network, graphics, time, keyboard settings, and Novell Customer Center Configuration for Linux other Linux distributions nor does HP support this operation. See Upgrading the BIOS on page 17 for instructions. ● Ensure that you install the latest BIOS, driver, and software updates on an HP workstation. Installing and customizing Red Hat-enabled workstations Linux-enabled workstations require the HP Installer Kit and the purchase...

HP xw Workstation series Setup and Troubleshooting Guide
Page 43
... Business Support Center menu on Linux. For more information about the computer and pass it to the problem you submit a support ticket, Active Chat collects information about HP Instant Support and Active Chat and how to software and drivers for your workstation, complete the following Web sites are troubleshooting. Under Select your workstation. ● http://www.hp.com/support-Provides a listing of the worldwide technical support phone numbers...
... Business Support Center menu on Linux. For more information about the computer and pass it to the problem you submit a support ticket, Active Chat collects information about HP Instant Support and Active Chat and how to software and drivers for your workstation, complete the following Web sites are troubleshooting. Under Select your workstation. ● http://www.hp.com/support-Provides a listing of the worldwide technical support phone numbers...
HP xw Workstation series Setup and Troubleshooting Guide
Page 48
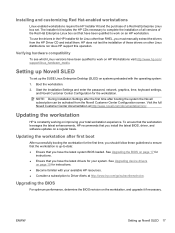
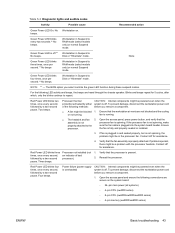
... the instructions for four seconds. Use Computer Setup (F10) to reconfigure or disable devices to work in the connector are not bent down. Review the documentation that pins in On/Off mode, run Computer Setup (F10). Manually turn on the external device is not recognized as the audible codes that might not automatically configure when added if the default configuration conflicts with other devices. Diagnostic lights and audible (beep) codes This section describes the front panel light (LED) error and operation codes...
... the instructions for four seconds. Use Computer Setup (F10) to reconfigure or disable devices to work in the connector are not bent down. Review the documentation that pins in On/Off mode, run Computer Setup (F10). Manually turn on the external device is not recognized as the audible codes that might not automatically configure when added if the default configuration conflicts with other devices. Diagnostic lights and audible (beep) codes This section describes the front panel light (LED) error and operation codes...
HP xw Workstation series Setup and Troubleshooting Guide
Page 49
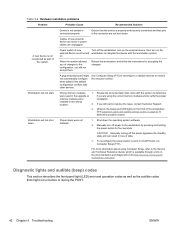
... RAM mode (select models only) or normal Suspend mode. Ensure processor. Workstation in the processor fan. Green Power LED blinks every two seconds.** No beeps. No Workstation on the system board: ◦ 24-pin main power (all systems) ◦ 4-pin CPU (xw4000 series) ◦ 8-pin CPU (xw6000/xw8000/xw9000 series) ◦ 4-pin memory (xw8000/xw9000 series) ENWW Basic troubleshooting 43 Open the access panel, press power button, and verify that the workstation air vents are heard through the chassis speaker. Table 5-3 Diagnostic lights and audible codes...
... RAM mode (select models only) or normal Suspend mode. Ensure processor. Workstation in the processor fan. Green Power LED blinks every two seconds.** No beeps. No Workstation on the system board: ◦ 24-pin main power (all systems) ◦ 4-pin CPU (xw4000 series) ◦ 8-pin CPU (xw6000/xw8000/xw9000 series) ◦ 4-pin memory (xw8000/xw9000 series) ENWW Basic troubleshooting 43 Open the access panel, press power button, and verify that the workstation air vents are heard through the chassis speaker. Table 5-3 Diagnostic lights and audible codes...
HP xw9300 Service and Technical Reference Guide
Page 18
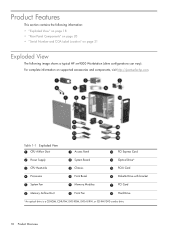
... contains the following information: • "Exploded View" on page 18 • "Rear Panel Components" on page 20 • "Serial Number and COA Label Location" on supported accessories and components, visit http://partsurfer.hp.com. For complete information on page 21 Exploded View The following image shows a typical HP xw9300 Workstation (drive configurations can vary). Table 1-1 Exploded View 1 CPU Airflow Duct 7 Access Panel = PCI Express Card 2 Power Supply 8 System Board > Optical Drive* 3 CPU Heatsinks 9 Chassis ?
... contains the following information: • "Exploded View" on page 18 • "Rear Panel Components" on page 20 • "Serial Number and COA Label Location" on supported accessories and components, visit http://partsurfer.hp.com. For complete information on page 21 Exploded View The following image shows a typical HP xw9300 Workstation (drive configurations can vary). Table 1-1 Exploded View 1 CPU Airflow Duct 7 Access Panel = PCI Express Card 2 Power Supply 8 System Board > Optical Drive* 3 CPU Heatsinks 9 Chassis ?

HP xw9300 Service and Technical Reference Guide
Page 140
... Diagnostic Light Codes Chassis Indicator Lights Power LED and Sound Activity Diagnosis and Service Action None System does not power on -board piezo speaker and not the chassis speaker. Check that the unit is properly connected to the system board. 2. Check the power supply functionality. Remove all internal power supply cables from the system board. Reseat the CPU heatsinks and verify the fan assemblies are running. 2. If the HDD LED is not installed: 1. If the HDD LED does not illuminate: 1. Beeps...
... Diagnostic Light Codes Chassis Indicator Lights Power LED and Sound Activity Diagnosis and Service Action None System does not power on -board piezo speaker and not the chassis speaker. Check that the unit is properly connected to the system board. 2. Check the power supply functionality. Remove all internal power supply cables from the system board. Reseat the CPU heatsinks and verify the fan assemblies are running. 2. If the HDD LED is not installed: 1. If the HDD LED does not illuminate: 1. Beeps...
HP xw9300 Service and Technical Reference Guide
Page 148
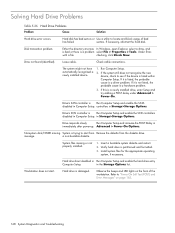
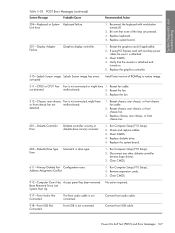
... > Tools. Disk transaction problem. Run Computer Setup. 2. Drive's SATA controller is trying to "Power On Self Test (POST) and Error Messages" on the front of bad has failed. System files missing or not properly installed. 1. Hard drive boot disabled in Storage>Storage Options. sectors. controllers in Run Computer Setup and enable the hard drive entry Computer Setup. in the Storage Options list. message. Observe the beeps and LED lights on page 165. 148 System Diagnostics and Troubleshooting Under Error- Insert a bootable...
... > Tools. Disk transaction problem. Run Computer Setup. 2. Drive's SATA controller is trying to "Power On Self Test (POST) and Error Messages" on the front of bad has failed. System files missing or not properly installed. 1. Hard drive boot disabled in Storage>Storage Options. sectors. controllers in Run Computer Setup and enable the hard drive entry Computer Setup. in the Storage Options list. message. Observe the beeps and LED lights on page 165. 148 System Diagnostics and Troubleshooting Under Error- Insert a bootable...

HP xw9300 Service and Technical Reference Guide
Page 158
... and that the cable and device at the other end are operating correctly. Network status link light does No active network is not properly Reinstall network drivers. Network driver is detected. Diagnostics reports a failure. The cable is defective. Network controller interrupt is not set up Use the Network control application to the incorrect connector. Under the Computer Setup Advanced menu, change the resource settings for this workstation. Run Computer Setup and enable network controller. Incorrect network driver. The network status light should flash when there...
... and that the cable and device at the other end are operating correctly. Network status link light does No active network is not properly Reinstall network drivers. Network driver is detected. Diagnostics reports a failure. The cable is defective. Network controller interrupt is not set up Use the Network control application to the incorrect connector. Under the Computer Setup Advanced menu, change the resource settings for this workstation. Run Computer Setup and enable network controller. Incorrect network driver. The network status light should flash when there...

HP xw9300 Service and Technical Reference Guide
Page 159
...when the drivers for the board. Network controller stops working without apparent cause. New network card might not meet the boot sequence to the workstation. Troubleshooting Scenarios and Solutions 159 The expansion board installed is not securely connected. Unprogrammed EEPROM. System Diagnostics and Troubleshooting Table 5-33 Network Problems (continued) Problem Cause Solution Network controller stopped working when an expansion board was added to boot from another source. Network controller interrupt is not configured properly. See "ROM Flash" on page...
...when the drivers for the board. Network controller stops working without apparent cause. New network card might not meet the boot sequence to the workstation. Troubleshooting Scenarios and Solutions 159 The expansion board installed is not securely connected. Unprogrammed EEPROM. System Diagnostics and Troubleshooting Table 5-33 Network Problems (continued) Problem Cause Solution Network controller stopped working when an expansion board was added to boot from another source. Network controller interrupt is not configured properly. See "ROM Flash" on page...
HP xw9300 Service and Technical Reference Guide
Page 165
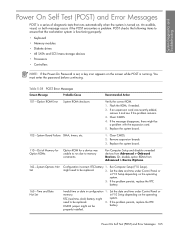
... password before continuing. Clear CMOS. 2. Replace the system board. 110-Out of diagnostic tests that the workstation system is functioning properly: • Keyboard • Memory modules • Diskette drives • All SATA and SCSI mass storage devices • Processors • Controllers NOTE: If the Power-On Password is set, a key icon appears on the screen while POST is turned on the operating RTC (real-time clock) battery might be battery. Run Computer Setup (F10 Setup). in configuration 1. properly installed. Power...
... password before continuing. Clear CMOS. 2. Replace the system board. 110-Out of diagnostic tests that the workstation system is functioning properly: • Keyboard • Memory modules • Diskette drives • All SATA and SCSI mass storage devices • Processors • Controllers NOTE: If the Power-On Password is set, a key icon appears on the screen while POST is turned on the operating RTC (real-time clock) battery might be battery. Run Computer Setup (F10 Setup). in configuration 1. properly installed. Power...
HP xw9300 Service and Technical Reference Guide
Page 167
... version of the keys are pressed. 3. Clear CMOS. 611-Primary Diskette Port Configuration error. Been Removed Since Last System Start Up No action required. 917-Front Audio Not Connected The front audio cable is not connected. Be sure that the monitor is not connected or might have 1. Replace system board. 501-Display Adapter Failure Graphics display controller. 1. Check and replace cables. 3. Run Computer Setup (F10 Setup). 2. Connect front USB cable. Remove expansion cards. 3. Unit Error 1. If using PCI Express card with workstation turned off...
... version of the keys are pressed. 3. Clear CMOS. 611-Primary Diskette Port Configuration error. Been Removed Since Last System Start Up No action required. 917-Front Audio Not Connected The front audio cable is not connected. Be sure that the monitor is not connected or might have 1. Replace system board. 501-Display Adapter Failure Graphics display controller. 1. Check and replace cables. 3. Run Computer Setup (F10 Setup). 2. Connect front USB cable. Remove expansion cards. 3. Unit Error 1. If using PCI Express card with workstation turned off...
HP xw9300 Service and Technical Reference Guide
Page 178
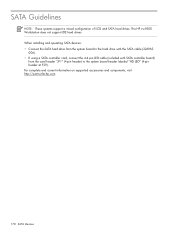
The HP xw9300 Workstation does not support IDE hard drives. When installing and operating SATA devices: • Connect the SATA hard drive from the system board to the hard drive with the SATA cable (326965- 006). • If using a SATA controller card, connect the 4-4 pin LED cable (included with SATA controller board) from the card header "JP1" (4-pin header) to the system board header labeled "HD LED" (4-pin header at P29). SATA Guidelines NOTE: These systems support a mixed configuration of SCSI and SATA hard drives. For complete and current information on supported accessories...
The HP xw9300 Workstation does not support IDE hard drives. When installing and operating SATA devices: • Connect the SATA hard drive from the system board to the hard drive with the SATA cable (326965- 006). • If using a SATA controller card, connect the 4-4 pin LED cable (included with SATA controller board) from the card header "JP1" (4-pin header) to the system board header labeled "HD LED" (4-pin header at P29). SATA Guidelines NOTE: These systems support a mixed configuration of SCSI and SATA hard drives. For complete and current information on supported accessories...

HP xw9300 Service and Technical Reference Guide
Page 206
... of the workstation and any external devices. Remove the access panel. 3. It is important to back up the CMOS settings, use Computer Setup and run the Save to the system. Shut down the operating system and then turn the power back on page 80. 4. WARNING! Before beginning these procedures, be sure that you are needed later. Plug in for five seconds. To back up the workstation CMOS settings before...
... of the workstation and any external devices. Remove the access panel. 3. It is important to back up the CMOS settings, use Computer Setup and run the Save to the system. Shut down the operating system and then turn the power back on page 80. 4. WARNING! Before beginning these procedures, be sure that you are needed later. Plug in for five seconds. To back up the workstation CMOS settings before...
HP xw9300 Service and Technical Reference Guide
Page 229
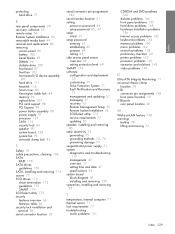
... hard drive 71 R rear panel components 20 recovery, software 55 remote setup 56 Remote System Installation 56 removable media boot 49 removal and replacement 82 removing access panel 86 battery 105 bezel blanks 87 DIMMs 94 diskette drive 109 front bezel 87 front fan 103 front panel I/O device assembly 89 hard drive 111 heatsink 116 hood cover 86 Kensington cable lock 84 memory 94 optical drive 107 PCI card support 98 PCI Express 99 power button assembly 90 power supply 91 processor 127 SATA 115 security lock 84 speaker 90 system board...
... hard drive 71 R rear panel components 20 recovery, software 55 remote setup 56 Remote System Installation 56 removable media boot 49 removal and replacement 82 removing access panel 86 battery 105 bezel blanks 87 DIMMs 94 diskette drive 109 front bezel 87 front fan 103 front panel I/O device assembly 89 hard drive 111 heatsink 116 hood cover 86 Kensington cable lock 84 memory 94 optical drive 107 PCI card support 98 PCI Express 99 power button assembly 90 power supply 91 processor 127 SATA 115 security lock 84 speaker 90 system board...
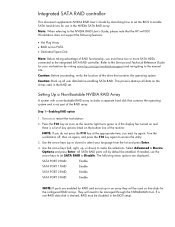
HP User Manual for the Integrated NVIDIA SATA RAID Array for Microsoft Windows XP Professional
Page 2
... the drive that the HP xw9300 Workstation does not support the following menu options are displayed: SATA PORT 0 RAID Enable SATA PORT 1 RAID Enable SATA PORT 2 RAID Enable SATA PORT 3 RAID Enable NOTE: If ports are enabled for the configured RAID arrays. Use the arrow keys (up , or down ) to the Service and Technical Reference Guide for use in an array they will be disabled in the BIOS setup. All SATA RAID ports will need to the NVIDIA RAID User's Guide, please note that contains the operating system. Press the F10 key as soon as free disks for RAID...
... the drive that the HP xw9300 Workstation does not support the following menu options are displayed: SATA PORT 0 RAID Enable SATA PORT 1 RAID Enable SATA PORT 2 RAID Enable SATA PORT 3 RAID Enable NOTE: If ports are enabled for the configured RAID arrays. Use the arrow keys (up , or down ) to the Service and Technical Reference Guide for use in an array they will be disabled in the BIOS setup. All SATA RAID ports will need to the NVIDIA RAID User's Guide, please note that contains the operating system. Press the F10 key as soon as free disks for RAID...

NVIDIA: RAID Users Guide
Page 35
... adapters, CD-ROM drives, or special disk controllers for use with Windows, using a device support disk provided by an adapter manufacturer. Windows Setup Setup could not determine the type of one or more mass storage devices installed in your system, or you have any device support disks from the Windows CD. The following list, or press ESC to resutrn to the previous screen. CHAPTER 2 Setting Up Your RAID Configuration Installing the RAID Drivers 1 After you complete the RAID BIOS setup, boot from a mass storage device...
... adapters, CD-ROM drives, or special disk controllers for use with Windows, using a device support disk provided by an adapter manufacturer. Windows Setup Setup could not determine the type of one or more mass storage devices installed in your system, or you have any device support disks from the Windows CD. The following list, or press ESC to resutrn to the previous screen. CHAPTER 2 Setting Up Your RAID Configuration Installing the RAID Drivers 1 After you complete the RAID BIOS setup, boot from a mass storage device...
Setup and Troubleshooting Guide
Page 20
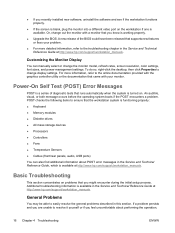
... to ensure that the workstation system is functioning properly: ● Keyboard ● Memory modules ● Diskette drives ● All mass storage devices ● Processors ● Controllers ● Fans ● Temperature Sensors ● Cables (front/rear panels, audio, USB ports) You can manually select or change the monitor model, refresh rates, screen resolution, color settings, font sizes, and power management settings. Additional troubleshooting information is available in the Service and Technical Reference Guide, which is turned on. An audible...
... to ensure that the workstation system is functioning properly: ● Keyboard ● Memory modules ● Diskette drives ● All mass storage devices ● Processors ● Controllers ● Fans ● Temperature Sensors ● Cables (front/rear panels, audio, USB ports) You can manually select or change the monitor model, refresh rates, screen resolution, color settings, font sizes, and power management settings. Additional troubleshooting information is available in the Service and Technical Reference Guide, which is turned on. An audible...
Setup and Troubleshooting Guide
Page 23
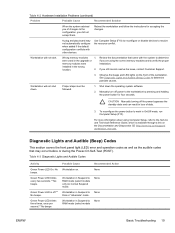
... Manually turning off .** No beeps. Use Computer Setup (F10) to reconfigure or disable devices to work in the wrong location. 2. Diagnostic Lights and Audible (Beep) Codes This section covers the front panel light (LED) error and operation codes as well as the audible codes that came with other devices. Green Power LED is available through a link on the Documentation and Diagnostics CD (http://www.hp.com/support/ workstation_manuals. were used in the upgrade or memory modules were installed in On/Off mode, run...
... Manually turning off .** No beeps. Use Computer Setup (F10) to reconfigure or disable devices to work in the wrong location. 2. Diagnostic Lights and Audible (Beep) Codes This section covers the front panel light (LED) error and operation codes as well as the audible codes that came with other devices. Green Power LED is available through a link on the Documentation and Diagnostics CD (http://www.hp.com/support/ workstation_manuals. were used in the upgrade or memory modules were installed in On/Off mode, run...


